Quantcast
Channel: Crafting ideas from Sizzix UK
Viewing all 2033 articles
Browse latest View live

Shabby Chic metallic card

$
0
0


Hi, everyone! Elena here. Today I want to show you a Shabby Chic card I created using the wonderful Iron Gate Thinlits die and some foil tape.

Supply list:

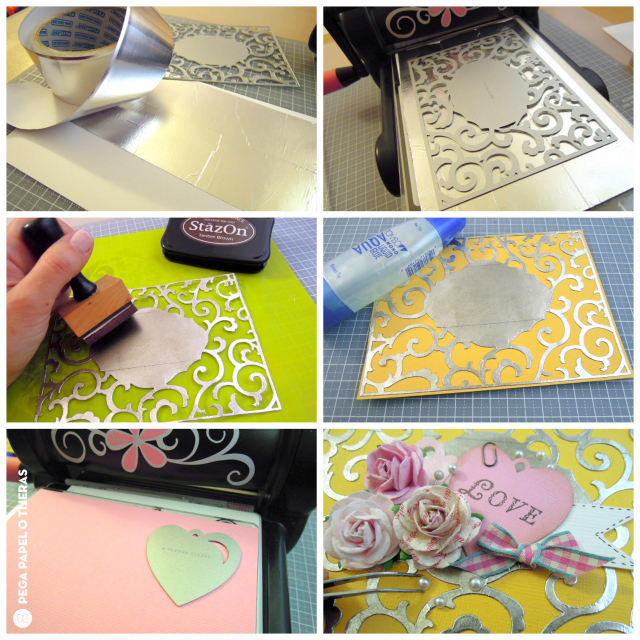
First you have to cover some white cardstock with foil tape. Don't worry about the winkles, they will disappear one you run your cardstock through the Big Shot :)

Then ink your metallic Iron Gate with some Staz'on ink, so it has a more aged appearance and glue it on a yellow card base with some liquid glue.

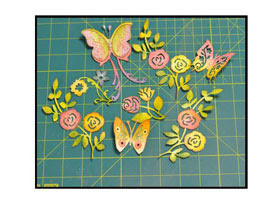
Now is time for embellish, for me this is allways the fun part! Here I have die cut a heart tag to stamp my sentiment on it and I have created a cluster or embellishments in the center of my card. And don't forget to put some flowers and some pearls to achieve a really delicate and whimsical look!


Happy Monday!
............................................
¡Hola a todo el mundo! os escribe Elena. Hoy os quiero enseñar una tarjeta en estilo Shabby Chic que he creado utilizando el maravilloso Thinlits Iron Gate y un poco de cinta metálica.

Materiales:

Primero hay que forrar un poco de cartulina blanca con la cinta metálica. No os preocupéis por las arrugas, porque desaparecerán cuando paséis la cartulina por la Big Shot :)

Después hay que entintar la Iron Gate metálica con tinta Staz'on para que tenga un aspecto más envejecido y pegarla a una base de tarjeta amarilla con pegamento líquido.

Y ahora ya es el momento de poner los adornos, que para mí siempre es la parte más divertida! Aquí he troquelado una etiqueta de corazón para estampar mi título en ella y he creado un cluster de adornos en el centro de la tarjeta. Y no olvidéis poner algunas flores y perlitas para conseguir un look muy delicado y caprichoso! 

¡Feliz lunes!

Card with butterfly and doilies....

$
0
0


Hi everyone...spring is almost here in Norway and soon we can see some butterflies around us.
I love butterflies they are soooo cute :o))
I have made a card with a lovely butterfly from Brenda Walton Sizzix Sizzlits Die - Flights of Fancy


Supply list:
655268 Sizzix Big Shot machine
658334 Sizzix Sizzlits Die - Flights of Fancy
658506 Sizzix Sizzlits Die - Vintage Doily
659005 Sizzix Thinlits Die - Frame, Iron Gate
658333 Sizzix Sizzlits Die - Buckles

Paper: Pion Design - From my Heart II
Stamps: Sizzix and Stampers Anonymous Tim Holtz Collection
Inks: Memento - Rich Cocoa
Other: Seam Binding Ribbon, Buttons, Cheesecloth, Feather  


How to do:
Cut out cardstock and patterned paper ca 30,5 x 15,5 cm, fold the card to 18 x 15,5 cm
Stamp and die cut banner.
Die cut butterfly and stamp some text here and there on the butterfly.
Die cut buckle and make a bow(loop).
Glue orsewa pocketon the outsideof the card. 
Die cut Frame Iron Gate and glue it to the pocket.
Glue the butterfly, feather and seam binding ribbon on the card.


Die cut Vintage Doily and sew it to a tag. Glue the banner to the tag.


Back.


Thanks for stopping by!
See you next Tuesday :o))
Anne Kristine

Hei alle sammen.
Våren er rett rundt hjørnet og sommerfuglene dukke snart opp. Liker så godt sommerfugler de er bare sååå søte der de flyr avsted i det fri  :o))
I dag har jeg laget et kort med den vakre sommerfuglen fra  Brenda Walton Sizzix Sizzlits Die - Flights of Fancy 
 
Produkter:
655268 Sizzix Big Shot machine
658334 Sizzix Sizzlits Die - Flights of Fancy
658506 Sizzix Sizzlits Die - Vintage Doily
659005 Sizzix Thinlits Die - Frame, Iron Gate
658333 Sizzix Sizzlits Die - Buckles

Mønsterark: Pion Design - From my Heart II
Stempler: Sizzix og Stampers Anonymous Tim Holtz Collection
Stempelputer: Memento - Rich Cocoa
Annet: Seam Binding bånd, knapper, osteklut, fjær.

Beskrivelse:
Kutt ut kortet i kartong og mønsterark i str. ca 30,5 x 15,5 cm,
fold det til et kort som måler 18 x 15,5 cm
Stemple og stans ut banner.
Stans ut sommerfuglen og stemple tekst her og der.
Stans ut spennen og lag en sløyfe.
Lim eller sy fast en lomme på utsiden av kortet.
Stans ut Frame Iron Gate og lim det på lommen.
Lim sommerfuglen på kortet med fjær og bånd.
Stans ut Vintage Doily og sy den fast på tag'en. Lim fast banner på tag'en.

Takk for at du stikker innom her og vi ses neste tirsdag :o))
Anne Kristine 


"Tag" card

$
0
0

Hi Sizzix fans
I hope you all had a beautiful week. Today I will show you a tag card
Itemes used:
supply list:
Paper:  kaisercraft-75 cents collection-Shilling-
Off white cardstock
Stamp: My favorite things- Pearls of wisdom-, Stampers anonymous- Simple sayings-Tim Holtz collection-
Ink: Distress ink from Ranger-walnut Stain and black Soot-


How to make:
1. Cut off white cardstock14,5x30 cm, scor 10cm and 20 cm
2. Cut patterned paper 14x9 cm , 6 pieces
4. Die cut using Vintage Dolly and PaperRosette
5.glue the different shapes to the card as I show on photo


Thanks for stopping by, have a nice week, see you next Tuesday
Pia
Hej alle Sizzix fan, jeg håber i har haft en god uge.
I dag vil jeg vise et slags tagkort


Dies jeg har brugt:
Andre materialer:
Papir:kaisercraft-75 cents collection-Shilling-
Off white cardstock
Stempler: My favorite things- Pearls of wisdom-, Stampers anonymous- Simple sayings-Tim Holtz collection-
Sådan gør du:
1. skær off whie karton14,5x30 cm, scor  ved 10cm and 20 cm
2. Skær mønstret papir 14x9 cm , 6 stykker
3. Stands ud ved at bruge frame, fancy, Rectangel, twotimes
4. Stands ud ved at bruge Vintage Dolly and PaperRosette
5.Lim de forskellige dele på kortet som vist på foto
Tak fordi du kiggede forbi, ha' en dejlig uge, vi ses næste tirsdag
Pia


Hair Rim for Girl

$
0
0


Hi all!

Today I would like to show how you can easily and quickly decorate the hair rim or hair band.

Items used: 
Chiffon or Organza
Felt
Needle, thread
Buttons, brads or pearls

Cut 6 big organza circles and 1 felt circle using Circles #4 die.
Then create a flower.

Use spray onto your flowers (if you need).

Add centres onto your flowers and glue or sew them to the rim. I think the rim is very beautiful!

 Have a nice day,

 Daria.


Всем привет!

На улице весна, и мне хочется, чтобы моя дочка была самой нарядной в школе. Я решила украсить ее ободок на волосы, который в общем-то и был симпатичным, но с моими улучшениями заиграл и стал уникальным.

1. С помощью ножа Circles #4 я вырезала 6 кругов из органзы и 1 круг из фетра. Круг из фетра должен быть меньше диаметром, чем круги из органзы.
2. Затем я создала цветы, складывая круги из органзы в лепестки и пришивая их к кругу из фетра.
3. Таким образом я создала 4 цветка разного размера (для меньшего размера цветов, вырежьте круги меньшего диаметра). Я побрызгала эти цветы розовым спреем, чтобы придать им нужный оттенок.
4. Для серединок я использовала пуговицы и жемчужинки. Пуговки я пришила, а жемчужинки приклеила к цветам. Затем готовые цветы я приклеила к ободку, создав цветочную композицию. По-моему получилось очень мило :) А уж дочка моя от обновленного ободка в полном восторге.

Материалы:
Big ShotMachine (655268)
Шифон или оганза
Фетр
Нитки, иголка
Пуговицы, брадс или жемчужинки

Всем хорошего дня,

VIVA ANTIQUA!

$
0
0

Sometimes a die comes along and you know that you will end up using it forever and what's more, never get tired of using it. This makes it's purchase a no-brainer as our American cousins put it. 

Sometimes you fall in love with a whole collection as was the case the first time I saw the brand new Brenda Walton Collection of dies and embossing folders.

 It's so eclectic and varied that upon first glance you would wonder how it was created by the same designer but that's what I love about it. When you start to use the collection you soon discover that everything fits together Perfectly.

It's hard to choose a favourite but the alphabet and number sets are fabulous, the individual letters/numbers are about 52mm tall (just over 2 inches) and they are all quite narrow too


I am a bit of a font geek and I have my favourites which I use according to the type of project I am creating. The great thing about ANTIQUA is that it is so versatile, I can't think of a situation where it wouldn't work which makes it a great investment for any die cutting fanatic. 

I thought I'd make a few quick toppers to illustrate the point. All I used was Core'dinations Card, a bit of silver card, staples, a corner punch and a few adhesive gems, not forgetting my ubiquitous Circle Framelits set. The dies I used are:

  • Sizzix Sizzlits Alphabet Set (12 Dies) - Antiqua Capital Letters (658337)
  • Sizzix Sizzlits Decorative Strip Die - Antiqua Numbers (658338)
  • Sizzix Sizzlits Die - Ampersands & Banner (658332)

If you want to see the whole Brenda Walton Collection Follow this link


Life is a canvas - paint on it!Scrapbooking page by Janna Werner.

$
0
0
Hello everyone, this is Janna. Today I am sharing a scrapbooking page. The title means "Life is a canvas, paint on it" and the journaling is about my desire to use more paint and colors in my work.


Material list:
655268 Sizzix Big Shot machine
655098 Sizzix Accessory - Extended Spacer Platform
657846 Sizzix Texture Fades Embossing Folders - Bubble & Honey Comb
658289 Sizzix Framelits Die Set/Stamps - Banners
and any shape dies, for example
squares, circles, flowers and hearts & stars
cardstock: American Crafts, Stampin´Up
alphas: American Crafts
glitter paper, patterned paper, crepe paper, ink, stamp: Stampin´Up
spray: Studio Calico
twine: Garn und Mehr
other: washi tape, pen, sewing machine, pencil


Instead of using the embossing die with the Big Shot machine, I put the paper into the die and pressed with my fingers. This creates a decent and subitle structure.


As you can see, I also used the negative shapes from the banners, heart and circle. I don´t like to waste beautiful supplies, so these can be used as great style elements as well.


Have a great and crafty day, everyone!
Janna

*****

Hallo ihr Lieben, hier ist Janna. Heute zeige ich euch eine Scrapbooking-Seite, die sich mit meinem Vorhaben, mehr Farbe in meine Arbeit zu integrieren, beschäftigt.

Materialliste:
655268 Sizzix Big Shot machine
655098 Sizzix Accessory - Extended Spacer Platform
657846 Sizzix Texture Fades Embossing Folders - Bubble & Honey Comb
658289 Sizzix Framelits Die Set/Stamps - Banners
alle möglichen Formen, z.B.
squares, circles, flowers und hearts & stars
Cardstock: American Crafts, Stampin´Up
Alphas: American Crafts
Glitter Paper, Patterned Paper, Crepe Paper, Tinte, Stempel: Stampin´Up
Spray: Studio Calico
Twine: Garn und Mehr
Andere: Washi Tape, (Blei-) Stift, Nähmaschine

Anstatt die Embossing-Die mit der Big Shot Maschine zu verwenden, habe ich das Papier in die Die gelegt und mit den Händen draufgedrückt. Das hinterlässt einen subtileren und dezenteren Abdruck.

Wie ihr sehen könnt, habe ich auch die Negati-Stanzform der Banner, des Herzens und des Kreises verwendet. Ich schmeiße wunderschöne Materialien nicht gerne weg, daher ist dies eine gute Lösung für die Reste, außerdem sind sie ein tolles Stilelement.

Habt einen schönen Tag!
Janna

Frame it !

$
0
0


Hi there,

Today let me show you a layout where I used the technique of superimposition of patterned papers from the French brand Color Conspiracy! Volume, texture, masks: this is a very creative and pleasant to make layout!

The Sizzix die steps in at the end of the creation process to put the emphasis on the small picture (6x8cms). I used the Polaroid die once again, definitely one of my favorites at the moment!

The Polaroid frame is cut out of plain grey paper. I outlined its edges with a black pen to make it stand out more.

It is stapled to my picture in an oblique way for more fancy.


Supply list:

Papers: Color Conspiracy
Die-cuts: Color Conspiracy
Wooden embellishments: Studio Calico
Stamps: Craft Origine, 7Gypsies, Stampin'up
Inks: Versafine, Distress, Adirondack
Spray inks: Glimmer Mist Tattered Angels
Masks: Pause Créative, The Crafter's Workshop
Others: Tags, thread

Dies:
655268 Big Shot
658608 Sizzix Framelits Die Set 4PK - Frames, Instant

See you soon,

Karine

Bonjour,

Aujourd'hui une petite page masculine basée sur une superposition de papiers imprimés de la marque française Color Conspiracy ! Du volume, de la texture,des pochoirs, une page très créative et très agréable à réaliser !

Le die Sizzix intervient dans la phase finale pour apporter une dernière touche à ma création et mettre en valeur ma petite photo au format 6x8cm. J'ai encore une fois utilisé ma découpe Polaroid, définitivement une de mes préférée du moment !

Le cadre pola est découpé dans un papier uni gris, j'ai tracé un contour au stylo noir fin afin de le faire ressortir davantage.

Il est agrafé à ma photo de manière incliné pour plus de fantaisie.

Voici la liste du matériel :

Papiers : Color Conspiracy
Die-cuts : Color Conspiracy
Embellissements en bois : Studio Calico
Tampons : Craft Origine, 7Gypsies, Stampin'up
Encres : Versafine, Distress, Adirondack
Encres en spray : Glimmer Mist Tattered Angels
Pochoirs : Pause Créative, The Crafter's Worshop
Divers : Tags, ficelle

Dies:
655268 Big Shot
658608 Sizzix Framelits Die Set 4PK - Frames, Instant


A très vite,

Karine

Trio of triangles

$
0
0


Well hello again, I'm back at the sewing machine after enjoying the wedding of one of my daughters last week ( I have 4 daughters so I'm often doing something with one of them, I'll try to add some photos next week).
 So this week I have a trio of triangles for you - I'm beginning to get impatient about how this quilt is going to look - so we have 3 blocks ( but I promise that it won't keep increasing!)
I have used the 2" and 4 " finished 1/2 square triangles and the 4" finished 1/4 square triangle and cut them with dies 657611,657613 and 657166. I have also used the 4" x 2" finished rectangle, die 657605 in one of the blocks.
Let's start with the simplest of the blocks - the pinwheel - for this I used 2 fabrics

 and die 657613, cutting 4 triangles from each fabric. What I love about using the Big Shot and dies it that I can cut so much in one go - and it is always precise.
Join the dark and light triangles together to make 4 squares -


Join the four squares together to complete the block -
How quick was that!
Now the next one will take a little longer and uses dies 657611 and 657613.
You need 2 different fabrics - the lighter one you need to cut 12 x 2 1/2" (unfinished) triangles, and from the darker fabric you need to cut 4 x 2 1/2"( unfinished) triangles and 4 x 4 1/2" (unfinished ) triangles.


Join 4 dark triangles to 4 light triangles,
 
 and then join 2 light triangles to the dark triangle - shown below
 
 
Join this pieced triangle to a large dark triangle -
 
Make all 4 squares like this and then join the squares to complete the block.
I've called this block Spinning Fish - but I'm sure it really has another name - any suggestions?
 
The final block is Clay's Choice and uses 2" finished triangle - 657611, and 4" x 2" finished rectangle - 657605.
You need 3 fabrics - dark - to cut 4 rectangles and 4 triangles, medium - to cut 4 triangles and light - to cut 8 triangles.
 
Join the light triangles to 4 medium and 4 dark triangles
Join the pieced squares together -
and then join these to the dark rectangles.
Join these pieces together, to make 2 large rectangles
 and then
join these two pieces together to complete the block.
So next week I am going to check that I have a balance of colours in the blocks before I choose the colours and designs that I will use in the last 7 blocks.
I'm pretty sure that I am going to include some more applique - because I enjoyed the flower blocks so much.
But for that's all for this week -hope you've enjoyed it.
As for me - I think I might be helping one of my daughters move house this weekend - so I will be back to sewing again next week for a rest!!


Twofer cards: Positive and Negative Die Cuts

$
0
0

Hi Everyone!
this is Anna. Today's two cards feature the versatility of one Sizzix die using both the "positive" and the "negative" cuts. Make two cards quickly and easily and there's no waste!

Anna Drai - Sizzix - birthday card boy (1)

Anna Drai - Sizzix - birthday card boy (2)

Star Card

Items used:


cardstock: brown kraft, turquoise
patterned paper (blue and yellow)
pressboard
bakers twine (blue and white )
blue button
banner (Pebbles)
distress ink

How to make card:

1- Cut a stripe of kraft cardstock of 22x16 cm. Fold the paper in half to make your card blank. Distress ink the edges.
2- Cut out a “Damask” frame from the turquoise paper (save the negative shape for the second card!!!). Adhere in the center.
3- Use the same Framelits die set for cut two shape in patterned papers. Layer and apply in to the frame.
4- Cut out a star in patterned paper and one in the pressboard and glue together. Adhere in the center of card.
5- Add the banner. Thread a button with twine and adhere to the top.
6- Printed (or stamp) the sentiment. Adhere the sentiment strip to finish.

Anna Drai - Sizzix - birthday card boy (3)

Anna Drai - Sizzix - birthday card boy (4)

Rosette Card

Items used:


cardstock: cream, turquoise
patterned paper (blue and yellow)
orange glitter paper
ice glitter paper
twine
orange button
tulle fabric
strass

How to make card:

1- Cut a stripe of cream cardstock of 22x16 cm. Fold the paper in half to make your card blank.
2- Cut a rectangle of patterned paper of 11x16 cm. Adhere in the center of your card.
3- Take the turquoise “Damask” frame negative shape and adhere in the center. Apply two strass.
4- Cut a stripe of orange glitter paper of 11x3 cm. Create the "fish-tail" cut by inserting the strip at an angle into a Framelits square. Adhere in the center of your card.
5- Cut two strips of tulle fabric and glue on the glitter paper.
6- Use the Sizzix Rosette die to make the rosette with patterned paper and ice glitter paper.
7- Thread a button with twine and adhere to the top.
8- Printed (or stamp) the sentiment. Adhere the sentiment strip to finish.
big shot - Sizzix 657599
Anna Drai - Sizzix - birthday card boy (5)

So I'll say goodbye for this week and show you something else next week. :)

**************************************
Flag_of_Italy Per le amiche italiane! :)

Ciao!
Le due card di oggi dimostrano la versatilità delle fustelle Sizzix: spesso, infatti, è possibile utilizzare entrambe le forme di carta che ne derivano,  sia quella  in "positivo" che quella in "negativo".
In questo modo si riesce a fare due biglietti d'auguri in modo rapido e soprattutto senza spreco!
Vediamo come fare...

Star Card

Materiali:

Sizzix Big shot machine (655268)
Sizzix Framelits Die Set 3PK - Frame, Damask (657599)
Sizzix Bigz Die – Stars (656339)

cartoncino: kraft, turchese
patterned paper (azzurro e giallo)
un pezzetto di cartone pressato
cordoncino
bottone celeste
bandierina (Pebbles)
inchiostro marrone

Procedimento:

1 - Tagliare una striscia di cartoncino kraft 20x15 cm. Piegare il foglio a metà per avere la vostra card vuota. Usare l'inchiostro marrone sui bordi.
2 - Tagliare la cornice "Damask" dalla carta turchese (tenere da parte la forma negativa per la seconda card!!!). Incollare al centro.
3 - Utilizzare lo stesso set di Framelits per tagliare le due forme interne diverse e incollarle dentro la cornice.
4 - Tagliare una stella di carta fantasia e una in cartone, incollare insieme. Incollare al centro della card.
5 - Aggiungere la bandierina o altro abbellimento. Infilare il cordoncino nel bottone e fare il fiocco. Incollare sopra la stella
6 - Stampare o timbrare l'augurio. Incollare la striscia con l'augurio.

Rosette Card

Materiali:


cartoncino: panna, turchese
patterned paper (azzurro e giallo)
carta glitter arancione
carta glitter ghiaccio
spago
bottone arancione
tulle
strass

Procedimento:

1 - Tagliare una striscia di cartoncino di cm 22x16 color crema. Piegare il foglio a metà per avere la vostra card vuota.
2 - Tagliare un rettangolo di carta fantasia di cm 11x16. Incollare al centro della scheda.
3 - Prendere la forma della cornice "Damask" tagliata in negativo e incollare al centro della card. Applicare due strass ai lati.
4 - Tagliare una striscia di carta glitter arancione di cm 11x3. Creare il taglio "a coda di rondine", inserendo la striscia in un angolo di un Framelits quadrato. Incollare la striscia al centro.
5 - Tagliate due strisce di tulle e fissarle sovrapposte sulla carta glitter.
6 - Usare la fustella Rosette per creare la coccarda con la carta fantasia e la carta glitter color ghiaccio per il centro.
7 - Infilare lo spago nel bottone e fare il fiocco. Incollare sopra la coccarda.
8 - Stampare o timbrare l'augurio. Incollare la striscia con l'augurio.

Spero di avervi dato un’idea per avere in poco tempo due biglietti d’auguri belli pronti!
Ci vediamo la prossima settimana!


Fast and easy: Spring pocket envelope

$
0
0

Hi again! Spring is not very willing to come here, to Poland. What can we do then to invite it into our country? How about fast, easy to do and optimistic project?
To complete this green, flowery envelope you don't need more than 30 minutes. All you need to have are some Sizzix dies (including Tim Holtz Sizzix Movers & Shapers L Die - Pocket Envelope), Big Shot machine, some Distress Inks, Embossing folder and embellishments!


Here is the full product list:
- 657843 - Sizzix Movers & Shapers L Die - Pocket Envelope
- 657846 - Sizzix Texture Fades Embossing Folders 2PK - Bubble & Honeycomb Set
- 658290 - Sizzix Framelits Die Set 5PK w/Stamps - Butterflies #4
-  Ranger: Distress Ink: Salty Ocean, Stormy Sky, Pine Needles. Perfect Pearls - Whiten Opal.
- 7 Dots Studio - "Love is in the Air" collection papers
- Prima Marketing: Mechanicals - Roman Numerals, paper roses, buttons, Junkyard Findings
- other: pearl flower, thread. 

First you need to cut out the envelope shape and emboss it using one of the Sizzix Embossing Folders. Next step is gluing everything together and inking the paper envelope with Distress Inks in chosen colors. 


Later we need to do some simple embellishing: I cut out and inked some paper butterflies and prepared a selection of little Prima roses, a button and metal embellishments by Ingvild Bolme. All the composition was build on a bundle of white thread which adds a bit of interesting texture.
Finally I added a bit of twine to close the pocket envelope and a bit of Ranger Perfect Pearls in the desired places and the project was ready!


I hope you will have a great, creative week. See you soon!
Finn

Coupon/Mini Shopping Bag Extravaganza

$
0
0


Hi everyone! I just wanted to share some ideas with you for one of the dies from my From the Heart collection. When designing dies I try to create ones that may be used a bunch a different ways because there's nothing I like better than a good bargain!  I think you will see that the Coupon/Mini Shopping Bag die is very versatile.

This die makes a box that will hold eight Sizzlits. I decided to make some to house my collection. Right now I have them stored in a metal bin but every time I want a certain one I have to look through all of them. With these little boxes I can organize and label them according to the collections or theme!

Die cut the Coupon/Mini Shopping Bag six times from matboard. I cut mine from colored board but of course you can cut it from white and add paper, ink it, or paint it to your taste.
 Add strong double sided tape to all tabs. 
 Make sure to fold each score line to weaken the fibers and 
make it easier to work with before putting your box together.
 Assemble as seen above. When all pieces are lined up, 
press adhesive firmly to the sides of the box. 
To get inside and make sure you have a good bond, 
use a bone folder to press down in the corners. 
I alternated colors for some interest.
Add a label and you are done! Feel free to add some ink or embellishments. I didn't because I will be handling them a lot, taking them on and off the shelf and didn't want extra pieces that might come off. Plus this way they stack flat. You can lay the die on the side or upright and add the label where it suits best.

This week on the Sizzix US blog I showed how to make a Coupon Folder using the same die. I only used one piece of it this time as the cover and binding. It also works great as a mini album that holds all those small cards you collect. as well as photos, gift cards, and business cards.

and here are some other ideas from the Sizzix US DT...

I hope this inspires you to take a second look at the dies you own and use them creatively! See you next time...

How about some tea? by Camilla

$
0
0


Hello crafters!

Today I have made a tea cup. Sizzix has fabulous 3-D dies and in this project I have used two of them; the tea cup and the flower. The papers are from Maja Design.


And a close-up of the 3-D flower.


The dies I used are these:


See you next Sunday!

Camilla

************************************************************

Hej på er!

Idag har jag skapat en tekopp. Sizzix har fantastiska 3D dies och till detta projekt har jag använt två av dem; tekoppen och blomman. Pappren jag använt är från Maja Design.

På bilderna ser du också blomman på nära håll och också diesen som jag har använt.


Vi ses nästa söndag!

Camilla

"I Love You" layout by Gerry

$
0
0


Happy Sunday Sizzix Friends!
I`m here today to share with you a layout.
It`s a clean one where I mostly played
with the Garden Vine Decorative die which
I used to create my own Spring garden :-)
655268 Sizzix Big Shot Machine
658948 Sizzix Thinlits Die - Frame, Fancy Rectangle
658951 Sizzix Thinlits Die - Ornate Hanging Sign
658506 Sizzix Sizzlits Die - Vintage Doily
657523 Sizzix Sizzlits Dies - Card Phrases Set #2
658511 Sizzix Sizzlits Dec. Strip Die - Garden Vine


As an addition to the Fancy Rectangle Frame I added on the left side
a piece of the Ornate Hanging Sign die.


All the flourishes you see on the page were die cut from the Garden Vine die.
It was die-cut 4 times - once using white cardstock and three times using
different colours pattern paper. After that I cut the die itself into
many pieces and matched different flowers together.
As a final touch I added to the centres pearls.
Other Products I used:
Pattern Papers - Webster's Pages
Stamps - Prima Marketing, Tattered Angels, KaiserCraft

I hope you enjoyed my project today!
Have a great Sunday!

Getting ready for St. George

$
0
0


Next week, on April 23, we celebrate Sant Jordi (St. George) in Catalonia. It's a great celebration, which celebrates love and reading and the streets are filled with roses and books. It's actually my favorite holiday and I love taking a stroll around the streets of Barcelona and browse through the book stalls.

For this day I always make a few special bookmarks that have a rose on them to give to my friends as a gift and celebrate this so special day for me.


As I make quite a few of them, I like to do a simple design that can be mass produced and having my Big Shot by hand makes the work very easy!

First I embossed the white cardstock and inked it to give a great depth, then I die cut the rose with red and green cardstock and glued it on the white embossed cardstock. Finally I created a double frame with red and more black cardstock and my bookmark was done! Quick and easy :)

As you can see I like to give them a form of a vertical card to my bookmarks, as they stay better in books and also double as cards to write a message.


Happy Monday!
............................................
La semana que viene, el 23 de abril, celebramos Sant Jordi en Catalunya. Es una gran fiesta, donde se conmemora el amor y la lectura y las calles se llenan de rosas y libros. En realidad es mi fiesta favorita y me encanta salir a pasear por las calles de Barcelona y curiosear por las paradas de libros.

Para ese día siempre hago unos cuantos puntos de lectura especiales que tengan una rosa para regalar y conmemorar este día tan especial para mí.
Como hago bastantes, me gusta hacer un diseño sencillo y que se pueda hacer en serie. ¡Tener mi Big Shot a mano facilita enormemente el trabajo! 

Primero he engofrado la cartulina blanca y entintado el relieve para dar una gran profundidad, después he troquelado la rosa con cartulina roja y verde y la he pegado sobre la cartulina blanca. Finalmente he creado un doble marco con cartulina roja y negra y ya está terminado. Rápido y sencillo :)

Como véis me gusta darles una forma de tarjeta vertical a mis puntos de libro, ya que así es más difícil que se caigan del libro y además hacen una doble función y sirven también de tarjeta.

¡Feliz lunes!

a simple cushion

$
0
0


My sister in law recently asked me to make her a cushion for a Christening gift. It had to be monogrammed and for a little boy. I planned lots of different, more complex, designs but then settled on something that was nice and simple, because unless you're a big fan of patchwork or a quilter yourself I think over complicated designs can be a little too much for a lot of people. Simple squares or simple strips can be just as effective and appreciated more. Besides, there's nothing worse than making something that the new owner really dislikes, is there?

strippy pillow

My 2.5" strip die came out and worked through some of the red, white and blue fabrics in my stash. Quick as a flash I had a simple strippy cushion. That strip die is so useful - once I'd cut out the strips for this I cut some more strips for the binding for a quilt that I also used the strip die to make! It gets so much use, and I never tire of how clever it is - that great big long die makes cutting strips an absolute breeze.

sideways

For the monogrammed 'S' I drew that out onto fusible web, stuck it onto fabric and cut it out with some applique scissors. It wasn't the most fun I've had recently and just made me want the 4" sassy serif alphabet dies even more (especially as I had to label a baby quilt that day using the same freehand technique). The smaller 2" alphabet would be so very useful as well....I think I'll start making my Christmas list (it's not too early to think ahead, is it?)

From The Heart

$
0
0


Hi everyone
Today I will show you a card using different sorts of Sizzix dies.

Dies I have used:
Vintage Doily 658506
Rose Vines & Trellis set 658356
Doily & Doily border 659058
Decorative Border & Heart 658946
Tattered Banners 657179
Heart,Steam & Leaves 657691
Other products I used:
Paper: Riddersholm design- Vintage Pink-
Off white and brown cardstock
Stamp: Stampers Anonymous- Simpl saying-Tim Holtz collection
Ink: Distress ink- vintage Photo- from Ranger
Ribbon, glossy accent and 3D foam
 
How to make:
1.Cut off white cardstock 12x30 cm, fold to create a card base 12x 15 cm
2.Cut brown cardstock 11,3x14,3 cm use as a matte
3.Cut patterned paper 11x14 cm, embos using Rose Vines & Trellis set, glue to the brown matte
4.Glue to the center of card base
5. Die cut Vintage Doily, Doily & Doily border, Decorative Border & Heart and Heart, Steam & Leaves
6. Die cut Tattered Banners, stamp using " From the heart". Glue to the card using 3d foam. decorate using glossy accent and ribbon.

Thanks for stopping by, I hope it gave you some inspiration. See you next Tuesday
Have e great week
Pia 
Hej til alle
I dag vil jeg vise et kort hvor jeg har brugt flere forskellige Sizzix dies
Dies jeg har brugt:
Vintage Doily 658506
Rose Vines & Trellis set 658356
Doily & Doily border 659058
Decorative Border & Heart 658946
Tattered Banners 657179
Heart,Steam & Leaves 657691
Andre produkter jeg har brugt:
Papir: Riddersholm design- Vintage Pink-
Off white og brun karton
Stempler: Stampers Anonymous- Simpl saying-Tim Holtz collection
Sværte: Distress ink- vintage Photo- fra Ranger
Bånd, glossy accent and 3Dpuder

Sådan gør du:
1.Skær off white karton 12x30 cm, fold på midten nu har du en kort base på 12x 15 cm
2 Skær brun karton 11,3x14,3 cm brug det som matte
3 Skær mønstret papir 11x14 cm, embos ved at bruge Rose Vines & Trellis set, lim det til det brune karton
4.Lim det til midten af kortet
5. udstands Vintage Doily, Doily & Doily border, Decorative Border & Heart og Heart, Steam & Leaves
6.UdstandsTattered Banners, stamp ved at bruge " From the heart". Lim til kortet ved at bruge 3D puder. dekorer med glossy accent og bånd.

Tak fordi du kiggede forbi, jeg håber det gav dig lidt inspiration. Vi ses næste tirsdag
Ha' en dejlig uge
Pia

Envelope & tags

$
0
0

Hi Sizzix friends :o)) Hope you all had a great week. Today I have made some tags and envelope.
I hadsome lovelyhours when Imade​​this project. It is always fun to play with new Sizzix Dies.


Supply list:

Papers: Maja Design - Vintage Spring Basics, 
             Manila Tag # 5, Manila Tag #10, Manila Kraft Cardstock.
Stamps: Stampers Anonymous Tim Holtz Collection, Kort & Godt
Inks: Distress Stain - Frayed Burlap, Distress Paint - Antique Linen, Black Soot, Distress ink Pads - Walnut Stain, Frayed Burlap, Faded Jeans, Archival Ink - Jet Black.
Other: Seam Binding Ribbon, Perfect Pearls - Heirloom Gold.

  
Die cut two Arch Frame (big and small), distress these with Distress Stain Frayed Burlap, Perfect Pearls - Heirloom Gold and some water. Distress the edges with Distress ink Pad - Walnut Stain.

Die cut  Mini Stamp from the small Arch Frame. Distress the edges with Distress ink Pad - Walnut Stain.
 
 
Die cut Tapered Fringe and sew it to the cardstock (16 x26 cm) Fold the cardstock to a envelope.
Die cut Postage Stamp Frame and glue it to the envelope as a pocket.
Stamp some text stamps on the Arch Frame and glue it to the envelope with 3D foam.

Distress tags with Distress Stain Frayed Burlap, Perfect Pearls - Heirloom Gold and some water.
Distress the edges with  Distress ink Pad - Walnut Stain and Faded Jeans.
Stamp some text etc..on the tags.

Die cut Mini Finger and Mustache and distress it with Distress Paint - Antique Linen, Black Soot.


Thanks for stopping by!
Anne Kristine

Hei alle Sizzix fan :o)) Håper dere har hatt en fin uke. I dag har jeg laget noen tags og en konvolutt.
Jeg hadde noen herlige kreative timer da jeg laget dette prosjektet. Det er alltid moro å skape med nye Sizzix Dies. 

Produkter:
  
Papir og kartong: Maja Design - Vintage Spring Basics, 
             Manila Tag # 5, Manila Tag #10, Manila Kraft Cardstock.
Stempler: Stampers Anonymous Tim Holtz Collection, Kort & Godt
Stempelputer/maling: Distress Stain - Frayed Burlap, Distress Paint - Antique Linen, Black Soot, Distress ink Pads - Walnut Stain, Frayed Burlap, Faded Jeans, Archival Ink - Jet Black.
Annet: Seam Binding bånd, Perfect Pearls - Heirloom Gold.

Beskrivelse:
Stans ut to Arch Frame (liten og stor), distress disse to med Distress Stain Frayed Burlap, Perfect Pearls - Heirloom Gold og litt vann. Distress kantene med Distress ink Pad - Walnut Stain.

Stans ut Mini Stamp fra Mini Arch Frame. Distress kantene med Distress ink Pad - Walnut Stain.
Stans ut Tapered Fringe og sy eller lim det fast til kartong som måler (16 x26 cm) Fold kartongen til en konvolutt.
Stans ut Postage Stamp Frameog lim det til konvolutten som en lomme.

Stemple tekst på Arch Frame og limes på konvolutten med 3D puter.

Distress tags med Distress Stain Frayed Burlap, Perfect Pearls - Heirloom Gold og vann.
Distress kantene med  Distress ink Pad - Walnut Stain og Faded Jeans.
Stemple tekst etc.. på tags'ene.

Stans ut Mini Finger and Mustache og distress disse med Distress Paint - Antique Linen, Black Soot.

Takk for at du stikker innom!
Anne Kristine 


Birthday Layout

$
0
0


Hi everyone!

This is Daria. And today I would like to show you layout about my birthday and my friends.

Items used:


I cut the numbers using Cargo Stencil Number Set dies and outline the edges to make numbers more visible.  I cut the birds using Birds on a Wire die. These birds like me and my dear friends.
To create layers more varied I used Card Edges #2 die.

Have a nice day
Daria.

Всем привет!

Сегодня я хочу показать страничку о моем последнем дне рождении и о моих подругах. Я использовала цифры из набора Cargo Stencil Number Set, чтобы вырезать свой возраст. Нож Birds on a Wire, чтобы  вырезать птичек на ветке  - они как мы :) И нож с фигурными краями Card Edges #2, чтобы сделать слои более разнообразными.

Материалы:
Big Shot Machine (655268)
Sizzix Movers & Shapers Magnetic Die Set 11PK - Cargo Stencil Number Set (657841)
Sizzix Sizzlits Decorative Strip Die - Birds on a Wire (657791)
Sizzix Sizzlits Decorative Strip Die - Card Edges #2 (657526)

Всем хорошего дня!
Дарья.

Spring in your Step!

$
0
0


..... Don't want to speak too soon but we may have seen the last of the snow which has been clinging stubbornly to the hills around my home for the last 2/3 weeks. My daughter and I went for a walk on Sunday without our coats on so I'm keeping my fingers crossed.

The daffodils which seem to occupy every roadside verge in Wales these days are picking their heads up after their premature snowy burial cruelly stopped them in their tracks and the blossom is starting to appear on the trees which means I'll start sneezing any time soon!

At the beginning of January I made this simple flower garland and at the time Spring seemed like a very distant prospect, but I kept the photo's waiting for the right time and here it is!

The dies used where all from the Botanical Sanctuary and English Garden collections designed by Scrappy Cat for Sizzix and they are all Sizzlit dies. Click on the links above to see the individual collections.

All of the flowers and butterflies were die cut from quality, smooth heavy weight white card. I started by cutting two shapes. Trim around the flower heads of one of the die cuts and put to one side.

Use an assortment of Distress Inks to colour the foliage, I have used the colours Mustard Seed, Crushed Olive and Faded Jeans but feel free to use any die inks that suit the purpose. Build up the colour starting with the lightest first until you have the result you desire.

Use a spritzer Bottle filled with water to spray onto the inked die cut creating a mottled effect. Use your preferred ink shades to colour the flower heads, mist as before and attach to the complete die cut once dry. To Add a little pizazz use a light dusting of Spray and Sparkle glitter varnish.
Choose a selection of your favourite flower and butterfly die cuts and use the same inking techniques on each, try blending the ink, particularly on the butterflies to create interesting two tone effects. Once you have your assembled die cuts attach each one to a plain garland made of twigs.


Birthday Card

$
0
0


Hi everyone,

Today let’s work on a red & beige birthday card that has been made for a Grande Dame of scrapbooking The new Sizzix dies designed by Stéphanie Barnard were of a great help to me with this card 15x15 cms.

Here is the supply list:

Papers: Jenni Bowlin Studio
Thread: Divine Twine
Stamps: Sizzix
Inks: Black & Satin Red Versafine
Embossing powder: American Crafts Red
Versamark
Others: doily

Dies:

657000 Big Shot
658690 Sizzix Framelits Die Set 4PK -Circles, Zig Zag
658696 Sizzix Framelits Die Set 8PK with stamps-Banners2

Start by preparing all the elements you will need to realize your card: The small pennants, the red butterfly and the title.

The pennants are stamped with black & red inks then cut out with the Big Shot. Follow the same process for your title “Happy Birthday”.

A starry circle (die zigzag circle) will be cut out of a beige patterned paper scrap and will be added to the doily.

The butterfly is embossed with red powder.

Now that everything’s ready, all you need to do is assemble the elements. Finish with the title by gluing it with 3D adhesive.


A matching thread has been added for more texture. Here you go, the card is done, ready to be sent!

Have a wonderful day!

Karine

Bonjour tout le monde

Aujourd'hui une petite carte d'anniversaire rouge et beige pour une grande dame du Scrap :) Les nouveaux dies Sizzix designés par Stéphanie Barnard m'ont bien aidé pour réaliser ma carte au format 15x15cm.

Voici la liste du matériel utilisé :

Papiers : Jenni Bowlin Studio
Cordelette : Divine Twine
Tampons : Sizzix
Encre : Versafine noire et satin red
Poudre à embosser : American Crafts Rouge
Versamark
Divers : napperon

Dies utilisés :

657000 Big Shot
658690 Sizzix Framelits Die Set 4PK -Circles, Zig Zag
658696 Sizzix Framelits Die Set 8PK with stamps-Banners2


Commencez par préparer tous les éléments dont vous aurez besoin pour réaliser votre carte. Les petits fanions, le papillon rouge et votre titre.

Les fanions sont tamponnés en noir et rouge puis découpés à la Big Shot. Procédez de même pour le texte "Hppy Birthday".

Un rond étoilé (die cercle Zig-zag) sera également découpé dans une chute de papier imprimé beige et viendra compléter le napperon.

Le papillon est embossé en rouge.

Maintenant que tout est prêt il vous suffit simplement d'assembler tous les éléments. Terminez par le titre monté en 3D.

Une cordelette assortie est rajoutée pour apporter un peu de texture. Et voilà ma carte est terminée, prête à être postée !

Très bonne journée à vous

Karine
Viewing all 2033 articles
Browse latest View live


Latest Images