Quantcast
Channel: Crafting ideas from Sizzix UK
Viewing all 2033 articles
Browse latest View live

Snowflake rosette and borders dies!

$
0
0
So, those Christmas cards... well, if you are organized it would be a would idea to start them now. Here you have an idea using one of my latest dies for Sizzix, Thinlits Die Set 9PK - Winter Borders & Rosette - 659978.


The set consist of 9 dies, three borders, a rosette die, a snowflake, a flower and three circles. To make the rosette you will need two lengths of it, so just die cut it twice.


You can make it larger or smaller, but I like my rosette to have eight points, so I trim two on both. Then I glue the ends.


I die cut two circles to secure it in place. I used cool glue gun, a big blop of glue in the centre. 


I pushed the center to the glue. Then I used the smaller circle on top and pushed down to secure it in place.


One of the borders included in the set is the one I call Candy Cane as creates the diagonal lines of the sweet. This one fits nicely on a A6 card creating the apertures.


Perfect for a red card with a white insert. The second border has dots and stars and this one mesures up 6 inches tall and it does cut all four borders.


Quickly, I assembled this Christmas card with all the elements.
Good luck with your Christmas cards!

Vellum tickets by Lilith

$
0
0
I love scrapbooking but I am a mother to 4 boys and work as a teacher too so time is scarce. I need my creative time even if it is only 20 minutes here and there. I wanted to create a quick layout and sketched a design using theSizzix Framelits Die Set 5PK - Tickets

I cut out different sizes from vellum and placed them over the kraft cardstock, adding darker kraft tags and my photo. To finish off the layout I popped on a couple of buttons and some stickers. A quick layout and I had fun creating.


Supplies

Sizzix Framelits Die Set 5PK - Tickets
Other: Studio Calico The Underground kit, Studio embellishments, Maggie Holmes rub-ons,

Happy Tuesday,

Lilith

Pink Christmas

$
0
0


Hi everyone
Today i will show you a pink Christmas card using the new beautiful dies
Itemes I have used:
Sizzix Thinlits 9 PK Dies Winter Borders & Rosette 659978
Sizzix Thinlits 12PK Dies Ornate Labels 659711
Supply list:
Paper. -Cristmas Story- Craft & You Design
Ink: Archival ink-watering can-
Stamp: QuicKutz -merry christmas-
Acrylic  paint White used on the edges, 3 D foam ,ribbon and Pontura Paint


Thanks for stopping by, wish you a great and creativ week
Pia
Hej alle
I dag vil jeg vise et lyserødt julekort hvor jeg har brugt de skønne nye Sizzix dies.
Sizzix dies jeg har brugt:
Andre materialer:
Papir. -Cristmas Story- Craft & You Design
Ink: Archival ink-watering can-
Stempler: QuicKutz -merry christmas-
Akryl maling-hvid- som jeg har malet alle kanter med  , 3 D foam, bånd og Pontura Paint
Tak fordi du kiggede forbi, jeg ønsker dig en dejlig og kreativ uge
 Pia

Four little Christmas card

$
0
0

Hello to everyone:)  Today I like to show these four little Christmas card I made. They all are size 8 cm × 10 cm, suitable for any purpose:)


Sizzix products:
Sizzix Big Shot Machine 657900
Sizzix Thinlits Die Set 9PK - Christmas Phrase Cards 659973
Sizzix Thinlits Die Set 5PK - Christmas Trims #2 659913

Other products:
Basic Grey papers; Wassail, white cardboard
tape, glue (paper mod podge)

How to do:
Cut the phrases and elements out from cardboard using dies from the sets  Sizzix Thinlits Die Set 9PK - Christmas Phrase Cards 659973 and Sizzix Thinlits Die Set 5PK - Christmas Trims #2 659913.
Cut pieces of patterned papers size 8 cm × 10 cm and glue the cut outs using mod podge. When dried tape the covers on to the cards.
Really easy and quick:)

Wishing, Minna

*   *   *   *

Moi, tällaisia pieniä joulukortteja tein tällä kertaa. Nopeita ja helppoja tehdä, vaikka pakettikorteiksi:)

Sizzix tuotteet:
Sizzix Big Shot Machine 657900
Sizzix Thinlits Die Set 9PK - Christmas Phrase Cards 659973
Sizzix Thinlits Die Set 5PK - Christmas Trims #2 659913

Muut tarvikkeet:
Basic Grey paperit Wassail,   valkoinen kartonki, teippiä, liimaa (mod podge)

Kuinka teet nämä:
Leikkaa fraasit ja kuviot kartongista stansseilla jotka ovat seteistä Sizzix Thinlits Die Set 9PK - Christmas Phrase Cards 659973 ja Sizzix Thinlits Die Set 5PK - Christmas Trims #2 659913. Leikkaa kuviopaperit koko 8 cm × 10 cm ja liimaa leikekuviot papereihin mod podgella. Kun ovat kuivuneet teippaa korttipohjaan.

Terveisin, Minna

Frozen fractals all around!

$
0
0

What on earth is a fractal I hear you cry and you are not alone? If you really want to know the answer, ask any little girl from the age of three upwards. The title of this blog itself is in fact a fractal of a lyric from the song 'Let it go' which comes from the Disney movie 'Frozen' and if you have a young daughter or granddaughter you will no doubt be familiar with both the tune and the lyrics.

My own daughter dressed up as the character Elsa for a Frozen themed lunch at her school last week complete with regulation blond plait so I thought I would use this weeks blog to create a frozen themed card featuring some of the new Tim Holtz collection.

The dies I used are:

You can see the different dies/folders by clicking on the links above.

OK! so it's Disney, it's one of the biggest grossing movies of all time, and my daughter will never speak to me if I get it wrong.... no pressure!

I took a 10.5 x 14 cm rectangle of white card and applied Broken China Distress Ink across the surface. Next, I applied the darker Chipped Sapphire working closer to the corners before going around the edges with Black Soot.

I next applied Perfect Pearls (Biscotti) which comes in a mister bottle. This serves to add a lovely pearl sheen and it also gives the inked surface a lovely mottled look if you spray enough on. After embossing with my snowflakes folder I used a little white gesso applied with my brayer working from the corners inward. I wanted the effect to be quite random and it brings out the embossed detail beautifully.


I die-cut the gorgeous layered snowflake and inked using Broken China and Chipped Sapphire and embossed with its corresponding Texture Fades folder (they come packaged together). Next, Iused my brayer to apply some white gesso in a thin layer.


Once the gesso had dried I used My Fingertips to apply PVA glue to the arms of the snowflake before sprinkling on a little Clear Rock Candy Distress Glitter. Next I die-cut a couple of the smaller snowflakes using the Stacked Snowflakes die (LOVE this die!!!) before embossing both with the same folder. You can use this folder with snowflake die you may already have because they all conform to the same symmetrical six sided shape. I inked, applied the gesso and glitter as before and mounted all three snowflake together using adhesive foam pads to build up a little dimension before mounting toward the top of my embossed rectangle.


I took the final and most famous line from the song 'Let it go' and printed it onto white cardusing several fonts in different shades of the same blue colour. Next, I used scissors to cut them into asymmetric rectangles before lightly inking the edges


I attached the separate words using a combination of glue and foam pads before nervously crossing the room to seek the approval of Nichola and Natalie, our resident 'Frozenologists'
for there stamp of approval which I'm happy to say it received...PHEW!!

Now all I have to do is run it by my daughter (Jorja and Jessica too!!!) like I said, no pressure! 

I hope you like it though?


Winter season ornament

$
0
0


This week I've branched out and used the Thinlits Die - From Our Home to create an ornament that would be great to hang in the windows during Christmas and Winter. You might even make it and put it on one of your Christmas cards and that way the recipient could hang the ornament in their own home.
 
 
I started by die-cutting the Thinlits Die - From Our Home from regular white cardstock and then I mounted vellum on the back side of the motif. Using a pair of sharp scissors, I simply cut along the edge of the little snow scene to make sure cardstock and vellum were perfectly aligned.


In order to add some detail to the project I added some of the small stars on top of the smoke trail and went over those stars as well as the negative spaces where they used to be with clear Wink of Stella.


To give the windows of the house some shine I added multiple layers of Glossy Accent to the inside of alle three windows. This actually gives the windows some bulk as well as the right glassy shine.
 
 
Finally I used some silver thread to be able to hang the ornament: Using a small needled I threaded the silver thread through the vellum part of my ornamet.


Now all that was left was to hang the ornament and enjoy the way it turns into even more of a silhouette cut once it is hung in a window.
 
  
Supply list:
Sizzix Big Shot Starter Kit (Powder Blue & Teal)
Sizzix Accessory - Magnetic Platform for Wafer-Thin Dies
Thinlits Die - From Our Home
Cardstock
Vellum
Wink of Stella
Glossy accent
Silver thread

---o---

I denne uge har jeg udfordret mig selv til at bruge Thinlits Die - From Our Home til at lave et ophæng, som vil passe fint i vinduet til jul og i løbet af vinteren. Man kunne endda sætte det på forsiden af et kort, således at modtageren selv kunne bruge ophænget i deres vinterhjem.

Jeg startede med at udstanse Thinlits Die - From Our Home i almindeligt hvidt karton, hvorefter jeg monterede vellum på bagsiden af motivet. Med en skarp saks klippede jeg langs ophængets kant.

For at give røgsøljlen lidt ekstra detaljer brugte jeg nogle af de små stjerner som dekoration. Jeg løb dem og de negative områder, hvor de havde siddet, over med Wink of Stella for at give dem glimmer.

Jeg brugte Glossy Accents to at give vinduerne i huset et rigtigt glas-look, hvilket gav vinduerne en del mere tyngde samtidig med at det minder om vinduesglas.

Sidste skridt var at sætte sølv tråd i ophænget ved at stikke en tynd nål igennem vellum-delen af ophænget. Og så er det allersidste bare at hænge ophænget op og nyde, hvordan det ligner en silhuette endnu mere, når det er oplyst udefra.
 
Ingredienser: 
Sizzix Big Shot Starter Kit (Powder Blue & Teal)
Sizzix Accessory - Magnetic Platform for Wafer-Thin Dies
Thinlits Die - From Our Home
Cardstock
Vellum
Wink of Stella
Glossy accent
Silver thread

Romantic & creative layout by Karine

$
0
0


Hello!

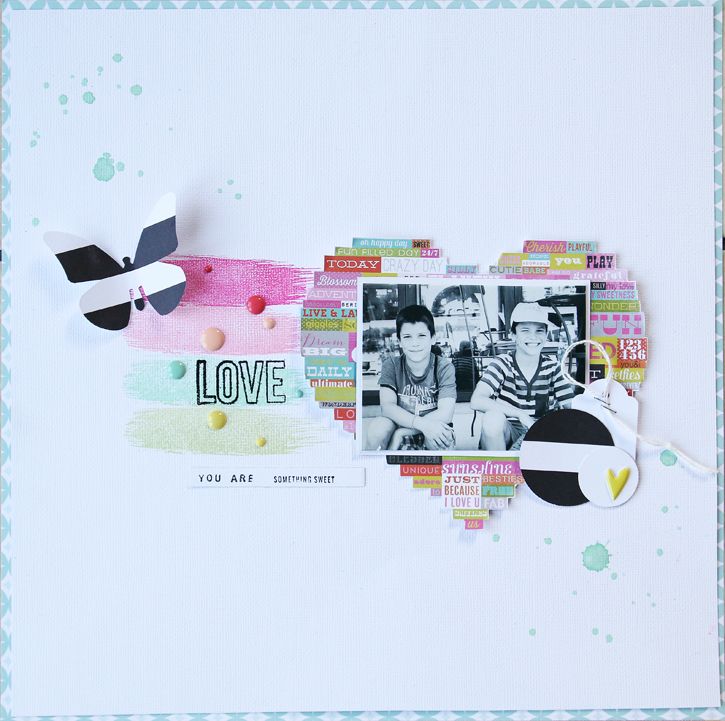
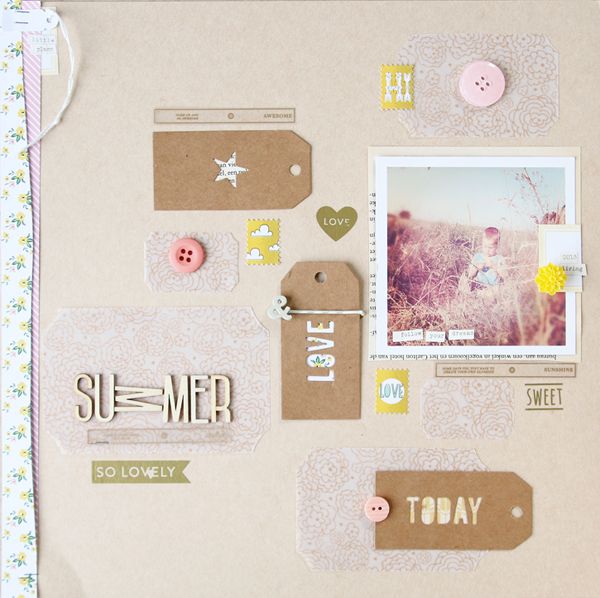
Today let me show you a free style soft page realized with some of my favourite products of the year: the Stabilo Pen68 & Woody pencils! Are you up to pastel colours and romanticism?

Supply list:

Cardstock: American Crafts
Paper: Webster's Pages
Labels: Ephéméria
Stickers: Studio Calico
Stamps: Craft Origine, Florilèges Design, Prima Marketing
Felt-tip pens & pencils: Stabilo Pen68, Woody
Gold embossing powder: Aladine

Photo credit: Les Jolis Moments

Dies:

658300 : Sizzix Big Shot Starter Kit
659436: Sizzix-Garden Greens

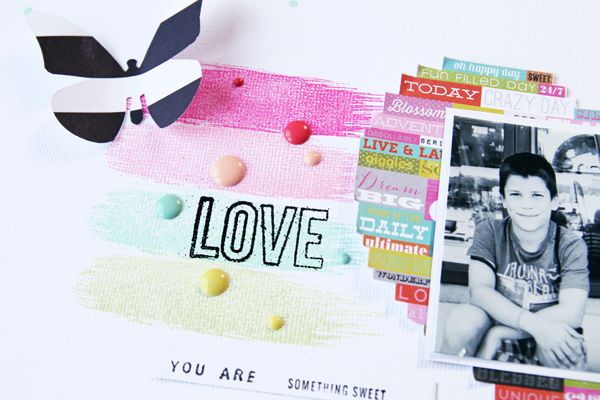
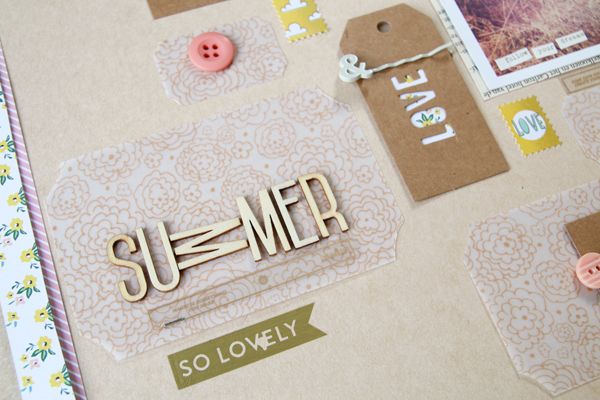
Start by creating a 9-squared grid on your cardstock with a lead pencil. Colour each square with Stabilo Pen68 felt-tip pens: use different colours that fit together.
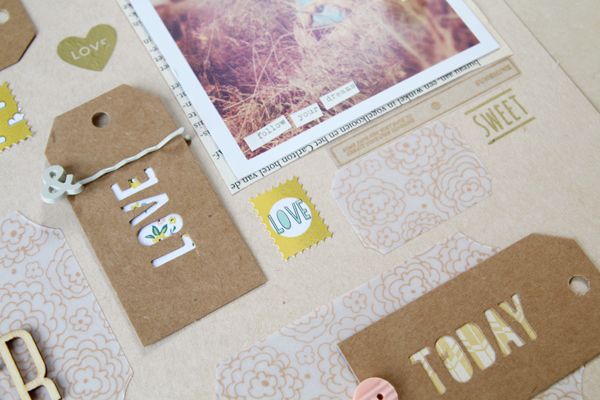
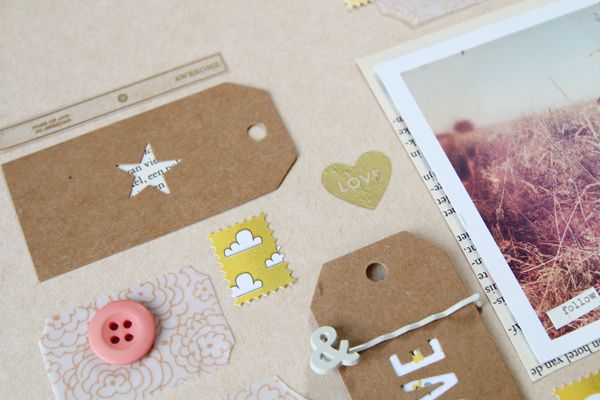
Print some stamp patterns, add mini labels and write some text. Put an emphasis on the edges by outlining them with the Woody pencils. Add a watercolour effect to them for an airy note.

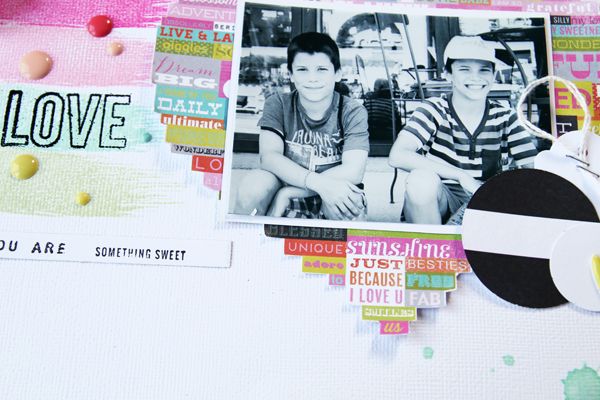
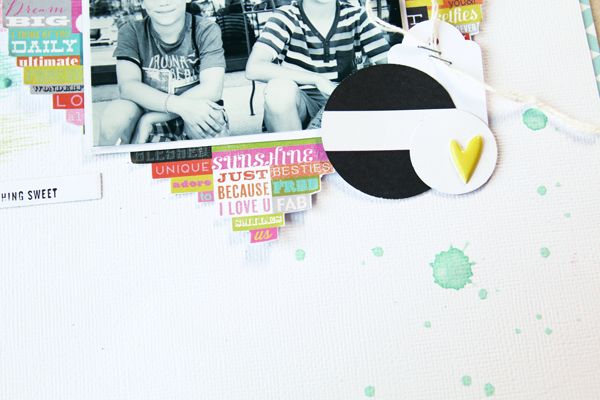
Insert your small picture and finish with some flowers cut out of printed paper.

Cut some foliage patterns from the Garden Greens set out of white paper. Colour them with sea green and blue shades. Once dry, emboss the edges of your leave with gold powder.

Your die cut pattern will add volume and contrast to your creation.
If your leave is crinkling, do not hesitate to put it under weight for an hour or so.


I hope you liked today’s creation. I wish you a very lovely day.

Karine

Bonjour !

Aujourd'hui je vous propose une page patouille toute douce réalisée à l'aide de mes chouchous de cette année les Stabilo Pen68 et Woody ! De la couleur pastel et du romantisme ça vous dit ?

Matériel :

Cardstock : American Crafts
Papier : Webster's Pages
Etiquettes : Ephéméria
Autocollants : Studio Calico
Tampons : Craft Origine, Florilèges Design, Prima Marketing
Feutres : Stabilo Pen68, Woody
Poudreà embosser or : Aladine

Crédit Photo : Les Jolis Moments

Die utilisé :

658300 : Sizzix Big Shot Starter Kit
659436: Sizzix-Garden Greens

Commencez par quadriller votre cardstock blanc en 9 cases égales. Utilisez pour ce faire un crayon en papier. Colorisez chacune des cases avec des feutres Stabilo Pen68 de couleurs différentes et assorties.
Complétez avec des tampons, des mini étiquettes, du texte rédigé à la main. Renforcez les contours en utilisant les crayons Woody, aquarellez pour plus de légèreté.

Ajoutez votre petite photo, complétez avec des fleurs découpées dans un papier imprimé.

Découpez un des feuillages Garden Greens dans un papier blanc, colorisez en vert d'eau et bleu. Une fois sec, embossez les extrémités de votre feuille en or.

Votre forme découpée ajoutera du volume et du contraste à votre création.
Si votre feuille a tendance à gondoler n'hésitez pas à la mettre sous presse une bonne heure.

En espérant que ma création du jour vous aura plu, je vous souhaite une très bonne journée.


Karine

Downton dilema resolved

$
0
0

I'm home again from working at the Knitting and Stitching show at Alexandra Palace, and what a difference a week makes - lights on, heating on, curtains closed. But then candles lit and cosy evenings with lots of lovely fabrics to piece by hand - or machine - maybe Autumn isn't so bad after all.
On my way to the show I called in at the lovely Village Haberdashery shop -http://www.thevillagehaberdashery.co.uk/ , which is a shop I've looked at on line but this was my first chance to visit - it's a small shop but it's full of beautiful fabrics - so I bought just one bundle of fat quarters, which was very restrained. It's  Fly Away by Phyllida Coroneo for Dashwood Studios, and I love the way Kona plains have been added to the bundle - it's a project for the spring - just what project I'm not sure of.


Now back to Downton - I have decided to make the piecing easy and so have started laying out the fabrics and stitching the triangles together - I cut all my16 fat quarters ( Lady Edith and lady Sybil ) into half hexagons using die 658880 http://www.sizzix.co.uk/product/658880/sizzix-bigz-die-5-half-hex  and started to lay out the 'whirligig' design -
then I added the surrounding colours -

then I separated the shapes out to leave me with 6 triangles to stitch -
I then stitched the triangles together - but left the centre 1/4" unstitched -
this is to enable stitching the other piece in (known as a Y seam) to complete the triangle -
Repeat this until you have stitched all 6 triangles -
After this you just keep adding triangles to complete each whirligig - this is how far I have progressed -
When you have stitched all your triangles you can then join them into rows and then join the rows together - I'll show that next week.
Now the question is will I finish the quilt before the end of the series?

I enjoyed working at the show as always - meeting customers,  seeing new fabrics, new projects and I always think that I'll come away without buying anything - this time I was attracted to 'Flexi-frames'
for closing bags - so there will be some bag projects coming up.
 
Whilst working, on The Cotton Patch  stand  (http://www.cottonpatch.co.uk/ ) I decided to see what size quilt I could make out of a layer cake - so using the Big Shot http://www.sizzix.co.uk/product/657900/sizzix-big-shot-machine-only-powder-blue-teal and
Bigz die 659853 http://www.sizzix.co.uk/product/657622/sizzix-bigz-l-die-triangles-isosceles-right-4-1-2-h-assembled
I only cut the full triangle not the half, and managed cut 6 from each 10" square


 so I now have 252 triangles to make into a quilt for the grandchildren - I'm not sure how big this will be but I'll show you next week.
Until then - enjoy the Autumn colours and keep stitching.
Angela

Just for you Card

$
0
0

Happy Friday everyone,

On this wonderful day I would like to share with you my new card. This week I had fun making this card, playing with my Big Shot and using the new beautiful dies: Ornate Labels and Flower Intricate. It was so fast and super easy!

cafe creativo - big shot sizzix - card flower (1)

I used embossing folder to create a textured background on the white card.

cafe creativo - big shot sizzix - card flower (2)

I have die cut the elements of the card out from cardstock and patterned paper, I have adhered them with foam tape to create a little of volume.

cafe creativo - big shot sizzix - card flower (3)
 
Items used:
Sizzix Big Shot Machine (657900)
Sizzix Thinlits Die Set 14PK - Flowers Intricate (659975)
Sizzix Thinlits Die Set 12PK - Ornate Labels (659711)
Sizzix Textured Impressions Embossing Folders 2PK - Houndstooth & Dots Set (659745)
cardstock
patterned paper (We R Memory Keepers)
tracing paper
brad (Prima)
 
Thanks so much for joining me today and I hope you like the card I shared with you.
Hugs

**************************************
Flag_of_Italy
Per le amiche italiane! :)
Buon venerdì a tutti,

In questa splendida giornata vorrei condividere con voi la mia nuova card.

Questa settimana mi sono divertita a fare questo biglietto per mia nipote, giocando con la mia Big Shot e con nuove e bellissime fustelle: Ornate Labels e Flower Intricate. Vi assicuro che l'esecuzione è stato più veloce di quanto possa sembrare.

Ho usato la mascherina da embossing per creare uno sfondo a pois con texture sulla carta bianca. Con questo sfondo ho coperto metà card, per l'altra ho usato una bella carta fantasia.
Ho fustellato poi gli elementi della card da cartoncini e carta patterned e li ho incollati con scotch spessorato per creare un po' di volume. Al fiore, creato con più strati, ho curvato i petali per dare un effetto 3D. Ecco fatto!
 
Questi i materiali usati:
Sizzix Big Shot Machine (657900)
Sizzix Thinlits Die Set 14PK - Flowers Intricate (659975)
Sizzix Thinlits Die Set 12PK - Ornate Labels (659711)
Sizzix Textured Impressions Embossing Folders 2PK - Houndstooth & Dots Set (659745)
cartoncini tinta unita
carte scrapbooking fantasia (We R Memory Keepers)
carta da lucido (per il fiore)
brad (Prima)
 
Grazie mille per esservi uniti a me oggi e spero che vi sia piaciuta le card che ho condiviso con voi.
baci

An autumn table topper finished

$
0
0


Well, here I go again with my finished table topper with that autumn air that I love.
I enjoyed a lot the hand and machine quilting with 8 cotton thread and a nice variegated Mettler for my Bernina.
And here it is !


If you remember, I started this table topper  that I told you here. It was a good opportunity to use my new dies by Sizzix:


After I sew  the squares in a row 6 by 6, I quilted with straight lines and on the leaves by machine, then, some cotton thread around and inside . This give them some texture that I love.


 I added some cotton lace. Love how it can gave a different style. Here you can see how I sew between the the bias and the top.


I love very much these new leaves by Tim Holtz that I have cut in fabric. As  you can imagine I pressed some fusible web on the wrong side before the cutting as it is usual before the appliqué technique.


My backing  fabric is the same that  the bias, from a collection  by Fig Tree that I had some time ago in my stack.


Autumn is living in my home, is it in yours too?
Hope you enjoy your weekend. At last we are having some sunny days again after a cloudy week.


Love
Mercedes 

............................................................****************........................................................


Bueno ,pues aquí estoy otra vez con mi tapete , ya por fín acabado, con un aire otoñal que me encanta.
Disfruté un montón acolchando a mano y a máquina con un hilo de algodón del nº 8 y un matizado de Mettler para mi máquina de coser Bernina.
Y ahí lo podéis ver, en la primera foto, listo  para colocarlo

Si te acuerdas, lo empecé  la semana pasada y te lo conté aquí. Fue una buena oportunidad de usar los nuevos troqueles de Sizzix.


Después de coser los cuadrados en filas de 6 por 6, hice el acolchado con líneas rectas y a máquina sobre las hojas, después usé el hilo de algodón alrededor y dentro de ellas. Esto ha conseguido darle una textura que me encanta.
Añadí  una puntilla en algodón alrededor. Me encanta cómo puede cambiar el estilo  con este detalle. Puedes ver en la foto cómo la cosí entre el biés y el top.
Me gustan mucho las hojas del troquel de Tim Holtz que he cortado en tela. Como puedes imaginarte, primero planché entretela por el revés antes de hace la aplicación.
He elegido la misma tela del biés para  la trasera . Es de una colcección de  Fig Tree que tenía por casa hace tiempo.
El otoño ya está viviendo  casa, ¿ está en la tuya también ?
Espero disfrutes el fin de semana. Por fín estamos teniendo unos días soleados por aquí , después de una semana de lluvias.


A pink and green card by Olga

$
0
0


Hello all!


Here is my new card on any occasion. I used my favourite colours here - pink, yellow and green and my favourite dies - honeycomb, leaves and gears. Recently I also received wonderful dies - phrases and butterflies. They are very beautiful and perfectly match to any project. 


The products I used:


Have a nice day!

Olga

'Hello Owl Friends', and what's so great about the Bigz die,.....

$
0
0


Today I have made a couple of cards using two popular dies and I wanted to let you see what the difference is between the two. As you see the images they produce are pretty similar; with the Bigz die producing a slightly larger owl. 

The biggest difference however, is in the die itself. The Bigz die is something very special that Sizzix make and it is what's called a 'steel rule die'. They are much stronger than the common die on the market and also take a lot more to produce. -But the end result makes it all worth it.


The Thinlits are great if you want to cut cardstock or patterned paper with your dies. If you rarely need to make more than one of each, thay are probably your best choice. However, if you want to get a lot more usage fom your dies you should take a good long look at the Bigz die.

If you want to make lots of owl-cards, (-for party invitations for example), the Bigz will let you cut several layers of cardstock in one go. If you pick different colours cardstock that will leave you with several cuts that you can combine for a different-looking end result. No owl will be the same :-)
The Bigz die will also cut most craft materials you can think of, and others too. You can make an owl (or whatever other die you use)  out of  an old cardboard box, or maybe out of a recycled soda can. The possibilities are endless! 
Since being on the Sizzix UK team I have definitely grown to LOVE the Bigz die!! 
Can you tell?? LOL!


To make my simple cards I inked around each die cut piece before assembling the owls, and then I added some liquid pearl to enbellish them a little more. I finished off the cards with a small stamped sentiment.

This first owl was made with the Thinlits dies.


This one was made with the Bigz die.


Ok so I hope this comparison was at least a little helpful and that you now will be making lots of owl cards of your own for friends 'owl' and new,...LOL!
I know I find it handy to have a few extra cards on hand and these will be given to a couple of little girls who celebrate birthdays soon.
Thanks for looking!

The dies I used:
Sizzix Big Shot Machine Only (Powder Blue & Teal)
Sizzix Thinlits Die Set 9PK - Owl
Sizzix Bigz Die - Owl #4
Sizzix Framelits Die Set 8PK w/Stamps - Hello


-----------------------------------------------------------------------------------------------------------------------------


Hejsan!

I dag har jag gjort två kort med liknande motiv fast med olika dies. Den stora skillnaden är hur användbara Bigz diesen är. Ska du bara göra ett eller att par kort går det ju lika bra med Thinlits diesen. Med Bigs diesen kan du skära igenom de flesta tänkbara hobby materialoch troligen ännu fler. Du kan skära genom många lager av cardstock eller mönsterpapper samtidigt och sedan kombinera dessa för att gäng ugglor (eller något annat) där ingen är den andra lik,. Du kan dessutom skära ut fina motiv från en papplåda som annars var tänkt för återvinningen, eller varför inte metallen i en läskburk. Möjligheterna är många!!
Tror nog ni har genomskådat mig nu :-),... JA jag har verkligen fått upp ögonen för alla fördelar med Bigz diesen sedan jag blev med på designteamet här på Sizzix UK!

Jag inkade runt de utstansade delarna innan jag limmade dom på korten. För att ge mina enkla kort något litet extra använde jag liquid pearl som utsmyckning. Sedan stämplade jag en liten hälsning.

Hoppas ni har någon nytta av min jämförelse och att det nu kommer produceras många fina ugglekort runt om i stugorna!! Jag känner ett par små tjejer som fyller år snart och då är det ju bra att jag redan ordnat med kort....Tack för att ni tittar inom!

Jag har använt:
Sizzix Big Shot Machine Only (Powder Blue & Teal)
Sizzix Thinlits Die Set 9PK - Owl
Sizzix Bigz Die - Owl #4
Sizzix Framelits Die Set 8PK w/Stamps - Hello


Advent Calendar part 3

$
0
0


The last stage in making the advent calendar is assembling all of the component parts.
Before adding the pockets to the pieced background, I made a quilt sandwich with the background, batting and some backing fabric and quilted it with basic diagonal lines. Once the pockets are in place the quilting options are restricted and not doing any beforehand would leave quite large un-quilted areas - as a general rule I like to have a maximum gap of 3in between quilting lines. My pre-pocket quilting was just basic diagonal lines running opposite to the pieced stripes, I had to keep it basic as my walking foot broke as I was fitting it to my machine (aargh) and so all of the sewing was done with a regular presser foot (aargh).


Once the background was quilted the pockets were arranged on it centrally, 1in apart. I arranged my numbers randomly despite my 7 year old son's insistence that they should be in order - but surely half of the fun with an advent calendar is spending 10 minutes hunting for each number in turn, so he was over-ruled.

I pinned the pockets in place and then stitched 2 lines of running stitch along the sides and bottom, closing the opening in the bottom of the pocket as a result. The double line of running stitch was for strength, to ensure the pockets were firmly fixed (my two sons aren't renowned for their delicate touch, especially where chocolate is concerned).

The last job before binding the calendar was to add channels, top and bottom, to the back which would house pieces of (12mm diameter) dowel enabling it to hold its shape as it hangs. Each channel comprised of three sections, to make one complete channel I cut 3 pieces of fabric, two measuring 4in x 2 1/4in and one measuring 12 1/2in x 2 1/4in. Each of the shorter sides on the longer piece were hemmed by folding the ends over twice, a 1/4in each time. The two shorter pieces had the inward facing ends hemmed but the outer ends need to be sealed to fix the dowel inside, one was sewn shut but the other folded in to be closed by hand once the dowel was inside.


All 3 channel pieces were then folded lengthways and then pinned and stitched along the top/bottom of the back of the calendar starting 1in in from either side.
All that was left then was to bind the edges, slide the dowel into the channels and sew the ends closed once it was in.


That's it, done. I love the numbers on it, they're so crisp and consistent having been cut with the Lollipop Shadow Numbers die and the pockets are a good size, allowing more options of what little treats that could fit inside. It will be easy for Santa to slip the note into pocket 24 that tells my boys where he's hidden their new pyjamas for Christmas Eve...

Sizzix at Creativa Madrid 2014

$
0
0
Hi everybody! Elena here

This weekend was very busy for the Sizzix team in Spain. The Feria Creativa Madrid 2014 took place from Thursday to Sunday and me, and other fellow spanish Sizzix bloggers were there!


I was teaching theese two projects in six different workshops, and more than 50 people learned how to use the Big Shot, Bigz dies, framelits and embossing folders!


Paula Pascual, Sizzix Designer and blogger was teaching also there, and Raquel Reyes was doing Big Shot demos for Manos Maravillosas. I had the opportunity to meet Mercedes Jiménez Campuzano for the first time there, she was visiting the craft fair. You can see her patchwork works with Sizzix on the blog every Saturday.

With Mercedes Jiménez Campuzano

With Paula Pascual and Mercedes Jiménez Campuzano

With Raquel Reyes
We had a lot of fun teaching and demoing Sizzix products! Next stop: Creativa Barcelona in November!

Happy Monday!

...............................

Este fin de semana fue muy activo para el equipo Sizzix de España. Se celebró la feria Creativa en Madrid y yo estuve dando estos dos proyectos en seis talleres diferentes. ¡Más de 50 personas aprendieron a usar la Big Shot, los Bigz Dies, Framelits y carpetas de embossing!

Paula Pascual, diseñadora y blogger de Sizzix también estaba allí impartiendo talleres y Raquel Reyes estuvo haciendo demostraciones en el stand de Manos Maravillosas. También tuve la ocasión de conocer a Mercedes Jiménez Campuzano, que nos hizo una visita. Podéis ver sus maravillosos proyectos de patchwork con Sizzix en el blog todos los sábados.

La verdad es que nos lo pasamos genial enseñando y demostrando los productos Sizzix en la feria. Próxima parada: ¡Creativa Barcelona en noviembre!

¡Feliz lunes!

Simple goes far ... by Lilith

$
0
0
When I got my Big Shot it came with a Bigz die (Basic Shapes). I use it all the time. For this layout I started off with some stamping and made a feature of the stamped images by highlighting them with enamel dots. Then I cut out a heart from some Heidi Swapp 6*6 paper which I placed to the side of the stamping. Then I cut out the shapes using the Bigz Die which I used as embellishments. 


SUPPLIES:
Other: Favorite things by Heidi Swapp, Studio Calico Color Theory inks, enamel dots, Mr Huey's Mint Julep,


Clean and simple

$
0
0


Hi everyone
Today I will show you 3 clean and simple cards
Items i have used:
Supply list:
Paper: Craft & You Design.-Frozen Paper-, . Hello Baby- size 10x 10cm
Ink: hero art-Art Print brown-, Bubble Gum-, Archival ink-Watering wan-, distress ink-Peeled Paint-, -forest Moss-, Vintage Photo
3 d foam, Pontura paint -White -and -Pink-


Thanks for stopping by, wish you a great week
Pia
Hej alle
I dag vil jeg vise kort som er i clean and simple stilen
Sizzix dies jeg har brugt:
Andre materialer:
Papir: Craft & You Design.-Frozen Paper-, . Hello Baby-størrelse 10x 10cm
Ink: hero art-Art Print brown-, Bubble Gum-, Archival ink-Watering wan-, distress ink-Peeled Paint-, -forest Moss-, Vintage Photo
3 d foam, pontura paint -White -and -Pink-
Tak fordi du kiggede forbi, ønsker dig en dejlig uge
Pia

Best New Year Wishes

$
0
0

Hello to all:) It`s never too late to start making Christmas and Happy New Year greetings cards, so here is a one of my, a tag.


 Sizzix products:
Sizzix Big Shot Machine 657900
Sizzix Bigz Die - Snowflakes #3 659994
Sizzix Textured Impressions Embossing Folders 2PK - Borders & Flowers Set 659964

Other items:
Pion Design papers Silent Night, vintage image, white cardboard
embossing powders;Silver and Snowflake, watermark stamp pad, embossing heating tool
vintage seam binding ribbon blue

Cut the tag out from the cardboard (size 16,5 cm × 8 cm) and patterned paper at same size, tape them together. Emboss the piece of paper using border folder included the set  Sizzix Textured Impressions Embossing Folders 2PK - Borders & Flowers Set 659964 , tape it on to the tag. Cut the snowflakes out from the cardboard using die Sizzix Bigz Die - Snowflakes #3 659994 and emboss them with powders.
Tape the image and snowflakes , glue the seam binding ribbon bow and finally greeting. That`s all:)

Happy crafting, Minna

*    *    *    *

Moi taas, tein tagin uuden vuoden tervehdyksellä, voi yhtä hyvin laittaa myös jouluisen tervehdyksen:)

Sizzix tarvikkeet:
Sizzix Big Shot Machine 657900
Sizzix Bigz Die - Snowflakes #3 659994
Sizzix Textured Impressions Embossing Folders 2PK - Borders & Flowers Set 659964

Muut tarvikkeet:
Pion Designin paperit; Silent Night, vintage kuva, valkoinen kartonki
embossausjauheet; Silver ja Snowflake, vesileimamuste, kuumailmapuhallin, saumanauhaa

Leikkaa tagi kartongista ja kuviopaperi kokoa 16,5 × 8 cm, kiinnitä ne yhteen. Kohokuvioi pala kuviopaperia kansiolla setistä Sizzix Textured Impressions Embossing Folders 2PK - Borders & Flowers Set 659964  ja kiinnitä kuvioitu paperi tagiin. Leikkaa lumihiutaleet kartongista stanssilla Sizzix Bigz Die - Snowflakes #3 659994  ja embossaa ne jauheilla. Teippaa kuva ja lumihiutaleet, liimaa saumanauharusetti ja lopuksi tervehdys. Siinä kaikki:)

Mukavaa keskiviikkoa, Minna


Noel candy cane

$
0
0


Back to Christmas card again this week and I've gone with one of my favourite colour combinations for Christmas: Kraft, white, red and gold. Love the way those colours come together and instantly remind me of Christmas. This week's card features the new Thinlits Die Set 9PK - Christmas Phrase Cards as well as the new Thinlits Die Set 9PK - Winter Borders & Rosette.
 
 
I kept the card relatively simple and let the card feature a rather large slice of white space.
 
 
On the left most side of the white cardstock, I diecut one of the borders from Thinlits Die Set 9PK - Winter Borders & Rosette. Then I used the same border to cut red cardstock to fill in the empty spaces in the white cardstock and thereby achieving the candy cane look. The second border, also from Thinlits Die Set 9PK - Winter Borders & Rosette, was diecut in a gold paper. I made sure to reserve the stars from the border to use as a detail near the sentiment.
 
 
To create the sentiment for the card I diecut four (and ended up only using three) "noels" using one of the dies from Thinlits Die Set 9PK - Christmas Phrase Cards. Glueing the three diecuts on top of one another will give your diecut dimension as well as stability.
 

Once I had mounted three "noels" on top of one another I added the sentiment to my card. I then strung the baker's twine around the card and tied a bow just above the sentiment. To make sure that the ends of the bow remained arranged in a nice way, I put a little glue under each end. The final touch was to add three of the little gold stars above the sentiment.
 
Supply list:
Sizzix Big Shot Starter Kit (Powder Blue & Teal)
Sizzix Accessory - Magnetic Platform for Wafer-Thin Dies
Thinlits Die Set 9PK - Christmas Phrase Cards
Cardstock
Gold paper
Baker's twine
 
---o---
 
Jeg er tilbage til julekortene i denne uge, og jeg har arbejdet med en af mine favorit farvekombinationer til julekort: kraft, hvid, rød og guld. Jeg elsker den måde, de farver arbejder sammen og umiddelbart minder en om jul. Denne uges kort er lavet med dies fra Thinlits Die Set 9PK - Christmas Phrase Cards og Thinlits Die Set 9PK - Winter Borders & Rosette.
 
Kortet er hold enkelt og med et relativt stort white space område.
 
På den venstre side af det hvide karton udstansede jeg en af strimlerne fra Thinlits Die Set 9PK - Winter Borders & Rosette. Jeg brugte den samme die til at udstanse rødt karton til at fylde i hullerne i det hvide karton, hvorved jeg fik candy cane looket frem. Den anden strimmel, også fra Thinlits Die Set 9PK - Winter Borders & Rosette, udstansede jeg i guldfarvet papir. Jeg sørgede for at gemme de små stjerner, så jeg kunne bruge dem et andet sted på kortet.
 
For at lave teksten på kortet udstansede jeg fire "noel" (jeg endte med kun at bruge tre af dem) med en die fra Thinlits Die Set 9PK - Christmas Phrase Cards. Når man limer flere udstansede motiver ovenpå hinanden, får man et stabilt og dimensionelt motiv uden at bruge 3d-puder.
 
Da jeg havde limet de tre "noel" ovenpå hinanden, limede jeg dem på det kortet. Herefter vandt jeg baker's twine om kortet, og bandt sløjfen lige over teksten. For at være sikker på at sløjfens ender blev siddende på en pæn måde, limede jeg dem fast med en lille klat lim. Det sidste touch var at montere tre af guldstjernerne over højre side af hilsnen.
 
Ingredienser:
Sizzix Big Shot Starter Kit (Powder Blue & Teal)
Sizzix Accessory - Magnetic Platform for Wafer-Thin Dies
Thinlits Die Set 9PK - Christmas Phrase Cards
Karton
Guldfarvet papir
Baker's twine
 

Clean and simple

$
0
0

If you asked anyone I work with to describe me, the word 'simple' may crop up quite a bit although the word 'clean' would be conspicuous by it's absence (I'm a bit messy when I'm working!). Having said that, when it comes to card making Clean & Simple is what I prefer nine times out of ten. 

A few weeks back I made some cards using hexagons which I have taken with me to various shows and demo's recently and they always seem to be popular which I why I want to revisit the idea but with a festive twist.

I will be using a couple of the new Texture Fades embossing folder sets from Tim Holtz namely the Beaded Garland & Snowflake set and the Greeting & Greens set together with the Framelits Hexagons set.

I will also be using a selection of Distress inks to bring the embossing to life.

I started by using a 44 mm wide hexagon to die-cut an aperture in my base card behind which I placed a printed sentiment attached using adhesive foam pads to add a little dimension. I used the same hexagon to die-cut 4 shapes each of which I embossed using my 'Greens' folder.

I inked over the embossed detail using Ripe Persimmon and Spiced Marmalade before adding a little depth to the edges with Fired Brick. Next, I coloured the berries white using a gel pen (Uni-ball Signo by the way, Good white pens are hard to find!) You may need to repeat the white colour up to three times.

 All that was left to do was attach the separate hexagons around the aperture using adhesive foam pads trimming the bottom one to fit the card.


For the second card, I repeated the first three steps moving the aperture to the right and debossing with the 'Snowflakes' pattern.


I used Shabby Shutters, Peacock Feathers and Dusty Concord Distress Inks to add the colour. Once dry, I added tiny 2 mm adhesive gems to the centre of each snowflake and sprayed them with silver 'Spray & Sparkle' to enhance the colours and add a bit off 'Bling'.

I attached the hexagons as before and that, as they say, is that!


This is the sort of card I would be more than happy to send or receive and I'm sure that there are endless colour and embossing combinations that you could play about with to equally good effect.


Black & white by Karine

$
0
0

Hello !

Are you up for neon colours? I’m being very trendy today with a page all in black & white with neon colours touches here and there!

Supply list:
Cardstock: American Crafts
Paper: American Crafts
Stamps: Méli-Mélo, Tim Holtz, Florilèges Design
Labels: Ephéméria
Inks: Aladine, black Versafine
Felt-tip pens: Stabilo Pen68
Masking Tape
Others: Charcoal pencils

Dies:

658300 :  Sizzix Big Shot Starter Kit
659956 :  Sizzix Originals die, Phrase # Hello 2

Start by dividing your lay-out into 6 equal rectangles.

Use the smooth side of your cardstock and print in each 15x10 cm rectangle several stamp patterns such as text, camera and foliage patterns. Use ink that dries rapidly like black Versafine.

Cut your title “Hello” out of black cardstock with the new Originals die, Phrase #Hello 2. This is a die I could use on all my pages!

Now insert some colour here and there with labels and printed stamp patterns. Splash your page with neon pink as a finishing touch.

Your page is now done! It was a piece of cake, wasn’t it?

Have a lovely day,

Karine


Bonjour !

Une page fluo ça vous dit ? Aujourd'hui je surfe sur la tendance avec une page toute en noir & blanc parsémée de quelques touches de fluo !

Matériel :

Cardstock : American Crafts
Papier : American Crafts
Tampons : Méli-Mélo, Tim Holtz, Florilèges Design
Etiquettes : Ephéméria
Encres : Aladine, Versafine noire
Feutres : Stabilo Pen68
Masking Tape
Divers : Fusain

Dies utilisés :

658300 :  Sizzix Big Shot Starter Kit
659956 :  Sizzix Originals die, Phrase # Hello 2

Divisez dans un premier temps votre page en 6 rectangles égaux.

Utilisez le côté lisse de votre cardstock blanc et imprimez plusieurs tampons, tels du texte, appareil photos, feuillages dans chaque rectangle de 15x10cm. Utilisez de l'encre à séchage rapide comme la Versafine noire.

Découpez votre titre "hello" dans du cardstock noir à l'aide du nouveau die Originals die, Phrase # Hello 2. Voici une nouvelle découpe que je risque d'utiliser sur toutes mes pages !

Intégrez maintenant quelques petites touches en couleur à l'aide d'étiquettes, d'impressions tampons.
Eclaboussez votre page en touche finale avec du rose fluo.

Votre page est maintenant terminée ! Un jeu d'enfant n'est ce pas ?

Bonne journée


Karine
Viewing all 2033 articles
Browse latest View live


Latest Images