Hello,
Well I don't know about everyone else but I am getting so excited now for Christmas! I think it is the combination of the Christmas songs playing all day on the radio here and the fact that I have actually started to do my shopping, it gets later and later each year but I think the more prepared you become the more the panic slowly switches to excitement.
This week I have created some fun last minute makes using an assortment of different dies, I have kept the card stock plain just to prove that you don't have to shop for fancy papers if you want to create some last minute Christmas projects. I love reindeers so this is the theme this week, I still chuckle when I remember my son at aged five referring to Rudolph as the 'Red Nosed Radiator', he is nineteen now and won't appreciate me sharing that little gem!
![]()
![]()
![]()
![]()
Well I don't know about everyone else but I am getting so excited now for Christmas! I think it is the combination of the Christmas songs playing all day on the radio here and the fact that I have actually started to do my shopping, it gets later and later each year but I think the more prepared you become the more the panic slowly switches to excitement.
This week I have created some fun last minute makes using an assortment of different dies, I have kept the card stock plain just to prove that you don't have to shop for fancy papers if you want to create some last minute Christmas projects. I love reindeers so this is the theme this week, I still chuckle when I remember my son at aged five referring to Rudolph as the 'Red Nosed Radiator', he is nineteen now and won't appreciate me sharing that little gem!
The dies that I have used are:
Sizzix Framelits Die Set 8PK - Circles #2
Reindeer Noses & Cracker


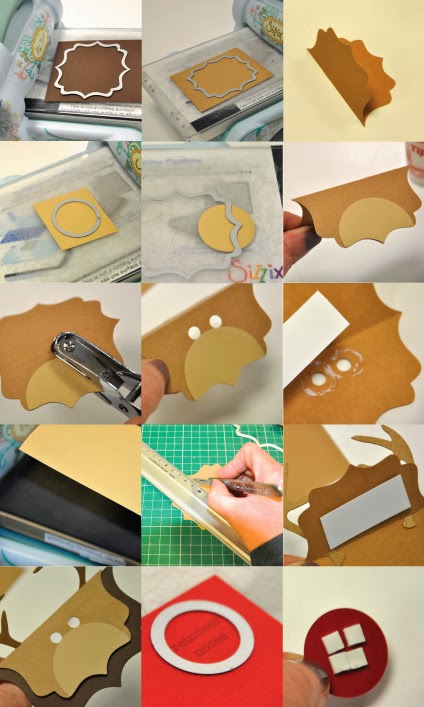
- Die cut a 8cm Fancy Label shape and fold in half.
- Die-cut the smaller Fancy Label shape from buff coloured card and fold in the same way.
- Die-cut a 4cm circle from light beige card.
- Use the edge of the last Labels Fancy that you used to die-cut the circle as indicated.
- Glue this shape into position.
- Use a hole punch to create two eyes.
- Glue a rectangle of white card to the reverse of the reindeer face and cover the eye holes.
- Die-cut two antlers using the Tim Holtz die.
- Make two slits along the fold of the embellished Labels Fancy shape, just big enough for the ends of the antlers to push through.
- Push the antlers through the slits and secure with PVA.
- Stick the embellished reindeer face to the folded brown larger die-cut shape using double sided tape.
- Print the words 'reindeer noses onto red card using brown ink and American Typewriter font in 15pt.
- Die-cut this lettering using the 2.5cm die and then attach to the face using foam pads.
- Fil a 12cm wide cellophane card bag with brown and red sweets and then fold over the top edge and scrunch. Secure with double sided tape and attach to the inside of the folded reindeer head.
- Tie a ribbon into a bow and attach with double-sided tape and add black pearls for the centre of the eyes.