I made some tags for the excellent Dutch magazine HobbyHandig this week and I had forgotten what a fun format it is to work in. The large Movers & Shapers Tag & Bookplates by Tim Holtz is about 8 x16cm and the restricted size seems to stretch your creativity which is no bad thing if you ask me, and let's face it, Tim doesn't seem to struggle does he?
I thought I would play around with a few inks and acrylics on the bookplates which come with this most excellent die. I had so much fun that I may turn this into a mini-series so look out for 'Return of the Tag'.
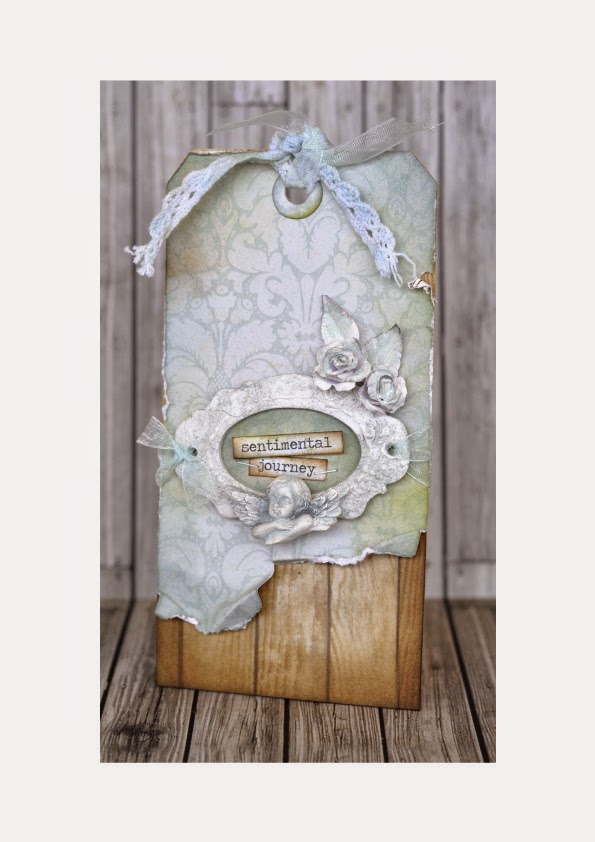
This die is a Bigz L which means it cuts super thick materials like the mount board I have used today. It's a great investment and something you will return to time and again.
I started by die cutting the bookplate from a scrap of old mount board and painting it with gesso which for those of you who don't know is a super thick paint used to prime art canvases, it's also great for creating a variety of textured effects.
Once I had applied a nice thick layer I dabbed it with my brush to add random texture, I'm going for the flaky plaster look. Once the gesso is dry, (you can use a heat tool to speed this up) I painted a thin layer of pale blue acrylic onto the surface before removing most of it with some cotton wool. This will give you a lovely subtle distressed look.

Next, I die cut two sizes of flower and a couple of leaves using the Tattered Garland Decorative Strip Die by Tim Holtz to create a couple of 3D roses. I didn't post the step by step instructions for this as I covered this a few months back (New Blooms part 1, January 8th) using the Tattered Florals flowers, obviously this is done on a much smaller scale.
I then added a layer of the gesso don't worry if it is a bit gloopy, it all adds to the effect. once the gesso was dry I applied the pale blue paint using a dry brush effect. I used the same techniques to distress an angel made from resin which is part of a set from those clever people at Prima Marketing

It's time to cut my tags, I cut one with a subtle damask pattern and one from wood grain paper both from My Mind's Eye collections. I trimmed away part of the base of the damask tag and applied distress inks to the edges of both in a very subtle fashion. Next, I used a paper distressing tool to rough up the edges of the damask tag a little and scrunched up the bottom. I'm going for a tattered, peeling wallpaper look! Finally, I attached the two tags together.

And here is the finished Tag, the bookplate has a piece of inked card behind it with a couple of word stickers from the Chitchat idea-ology pad by Tim Holtz added. I mounted the bookplate with a length of pale blue organza ribbon before attaching the matching cherub and roses. Finally, I threaded some stained lace and organza ribbon through the hole at the top of the tag.
I hope you can tell from the photo but the resemblance to plaster is quite uncanny, Maybe we'll go for rusty metal next week?