Quantcast
Channel: Crafting ideas from Sizzix UK
Viewing all 2033 articles
Browse latest View live

Card: Summer Banner

$
0
0

Hi again Sizzix fans! This is Anna.
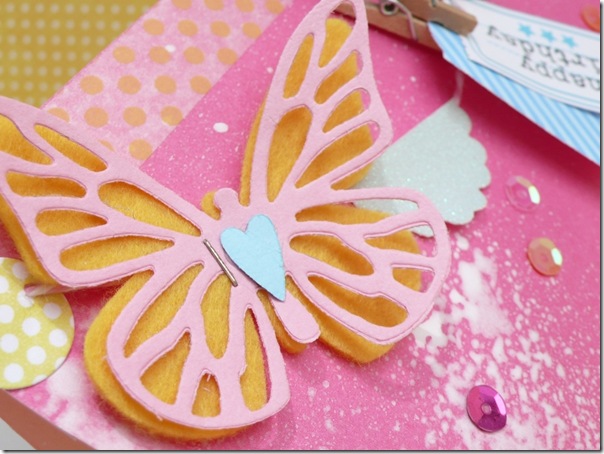
Some paper crafters are addicted to stamps, some to patterned paper, some to the colors mist... but for me it's all about the embellishments. All those shapes, colors and textures are just so fabulous and I love combining them, layering them and with my Big Shot I can make a lots of embellishments!
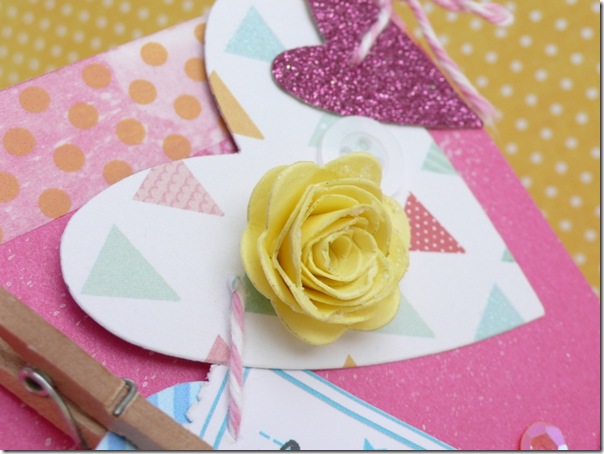
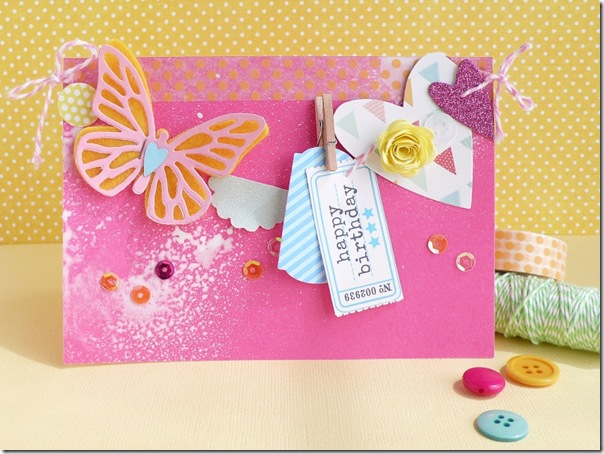
Today I've created a card to share with you where embellishments take center stage. This card is a fun summer colors combo and banners make me think of summer. I used mainly the Big Shot Starter Kit, very easy to make and so lovely! I hope you enjoy!

cafe creativo - Anna Drai - big shot sizzix - card - summer - banner (1)

Items used:

Sizzix Big Shot Starter Kit (658300)
Sizzix Bigz Die - Flowers 3-D (656545)
pink cardstock
scraps of patterned paper
scraps of glitter paper
scraps of felt
washi tape
white acrylic paint
twine
button
sequins
cafe creativo - Anna Drai - big shot sizzix - card - summer - banner (2)

How to make:

1- Fold pink cardstock in half to make card base.
2- Let a few drops of white color.
3- Add a piece of washi tape in the high edge.
4- Die-cut some shapes out with Big Shot Starter Kit of patterned papers, glitter papers, felt... Cut out also a little rose.
5- Make the holes and insert any shape in the twine. Apply the garland in the card.
6- Add some sequins, button, rose and mini clothespin to finish.
I am hoping that these ideas will teach you to create some embellishments using your Big Shot Starter kit!
Have fun with your embellishments! Thanks for stopping by and happy creating!

cafe creativo - Anna Drai - big shot sizzix - card - summer - banner (3)

**************************************
Flag_of_Italy Per le amiche italiane! :)

Ciao!
Ecco un nuovo appuntamento con Anna.
Alcune scrappers sono dipendenti dai timbri, altre hanno la mania per le carte, altre ancora sono fanatiche dei colori spray... ma per me è tutta una questione di abbellimenti.
Forme, colori e texture degli abbellimenti sono così meravigliosi, che non posso farne a meno e con la mia Big Shot ne riesco a creare in numero infinito!
Oggi quindi, condivido qui con voi un biglietto di compleanno, che ho creato per la mia cara amica Manu, dove gli abbellimenti sono l'elemento principale. Ho realizzato questa card con i colori allegri e vibranti dell'estate e i banners, non so perchè, ma mi fanno pensare alla stagione estiva!
Ho usato principalmente il Big Shot Starter Kit, macchina e set di fustelle. E' una card molto facile da fare ed è così simpatica... Spero che vi piaccia!

Materiali:

Sizzix Big Shot Starter Kit (658300)
Sizzix Bigz Die - Flowers 3-D (656545)
cartoncino rosa
ritagli di carte fantasia
ritagli di carte glitter
ritagli di feltro
washi tape
colore acrilico bianco
twine
bottone
paillettes

Procedimento:

1- Piegare il cartoncino rosa a metà per fare base del biglietto 15x10 circa.
2- Spruzzare e far cadere alcune gocce di colore acrilico bianco.
3- Aggiungere un pezzo di washi tape nel bordo in alto.
4- Fustellate alcune forme con la Big Shot da carte fantasia, carta glitter, feltro … tagliare anche una rosellina da arrotolare.
5- Fare i fori ed inserire o incollare ogni forma nel twine. Applicare quindi la ghirlanda isulla card con due fiocchi.
6- Aggiungere alcune paillettes, un bottone, la rosellina e una mini molletta per terminare.

Spero che queste idee vi possano dare altre ispirazioni per creare abbellimenti utilizzando il vostro Big Shot Starter kit.
Grazie per essere passate di qui e buon divertimento con la vostra Big Shot!
Vintage style wedding card

$
0
0

Hi, It's great to see you here again! :)
Summer is traditionally a wedding season, so it is not a surprise I'm attending a wedding this weekend. Of course - this special day needs a special card.. I'm not a fan of clean, elegant ones, so I've made my version of more grungy-shabby card for my cousin and his wife-to-be:) I hope thy will like it!


As you can see there are many layers, but not so much mixed media work this time! I decided to try a bit more "shabby" look - almost no spray, but a lot of fabric, paper, thread... feminine, but not too girly. Vintage, but not too elegant.
The whole project is based on 3 layers of paper - as a base, some canvas and lace strips on the top of them - and finally - dimensional composition in the middle, build with 3 Sizzix cut-outs supported with vintage trinkets, pearl swirls, thread and paper flower.


For this project I used Sizzix dies listed below:
- 658604 - Sizzix Framelits Die Set 8PK - Circles #2
- 659109 - Sizzix Thinlits Die Set 3PK - For the Record 2, Documented 

All the papers and canvas are new, coming releases of my products with Prima Marketing -  Vintage Vanity and Elementals. Metal embellishments are from my last collection - Mechanicals. The project was finished using a bit of Ranger Distress Ink and Liquid Pearls. For sticking the elements and dimension I used products from Scrapbook Adhesives by 3L: 3D Foam Squares and Crafty Power Tape.

Thank you for stopping by! Seed you soon!
Finn

ScoreBoards Gift Box

$
0
0


Hi all- the weather is pretty hot over here in the States so I have been spending some time in my cool basement studio. There are projects in varying stages of completion for CHA which is only two weeks away! Of course I am nowhere near ready yet and have lists all over the house... but it will all get done...

The project I would like to share today is a gift box I made using the Square Box die. This is a ScoreBoards die, which means it was specially designed to cut and score matboard and thicker materials. Sizzix is the only company producing these dies so they are quite unique. Have you tried one? They go together really quickly. Here's a video I made showing how to assemble this box.


You will need:

658058 Sizzix ScoreBoards XL Die - Box, Square
658443 Sizzix Bigz Dies- Flower, Trinity's

pink matboard 6" x 13" (2)
strong double sided adhesive
stencil and paper- Prima
embossing texture paste
Zots
gray ink
dyed seam binding, buttons, lace

  1. Die cut Square Box- you will need to cut the die twice to complete the box.
  2. Place stencil on top of box and spread embossing paste over the box using a credit card. Texturize all sides of the box. Let dry. Add a little gray ink to edges so the paste is not totally white.

  3. Assemble box as shown in video. Punch a small hole on top of the box. Tie on a button or other closure.
  4. Die cut four flowers from Prima paper. Curl flower petals and layer large flowers on top of each other with Zots in between each layer. With a tweezer, start curling the smaller petal strip around the tweezer. Add another strip and repeat, until you have a flower center you like. Secure the end of the strip with tape. 
  5. Adhere flower center to flower base by placing Zots glue dot in the center of the top large flower petal. Set curled flower on top of glue dot.
  6. Tie seam binding to top of box. Place flower and other decor on box. Add gift and give!
FUN TIP: Did you know you can color pearls with Copic markers? I found a beautiful strand of pearls in a thrift store and took it apart to use in my projects. I can tailor a pearl to fit my decor and love how it came out. I got brave and tried the same with the button closure. It was all silver and I colored that in too. :-)
Hope you liked this project! See you next time... 

A "Love" Card by Gerry van Gent

$
0
0


Hello Sizzix friends!

Today I'd love to share with you a card which was created
by using the gorgeous new Pop 'n Cuts Dies designed by Karen Burniston.
I love them and the possibilities to mix and create are endless.

657900 Sizzix Big Shot Machine 
658378 Sizzix Pop 'n Cuts XL Die - Card, Square w/Ornate Edge
658373 Sizzix Pop 'n Cuts Magnetic Insert Die - Label, Funky 3D Pop-up
658367 Sizzix Movers & Shapers Magnetic Die Set - Butterflies
658039 Sizzix Bigz Die - Ornate Plate 
657007 Sizzix Movers & Shapers Accessory - Basic Tray, L
655267 Sizzix Accessory - Cutting Pad, Extended 

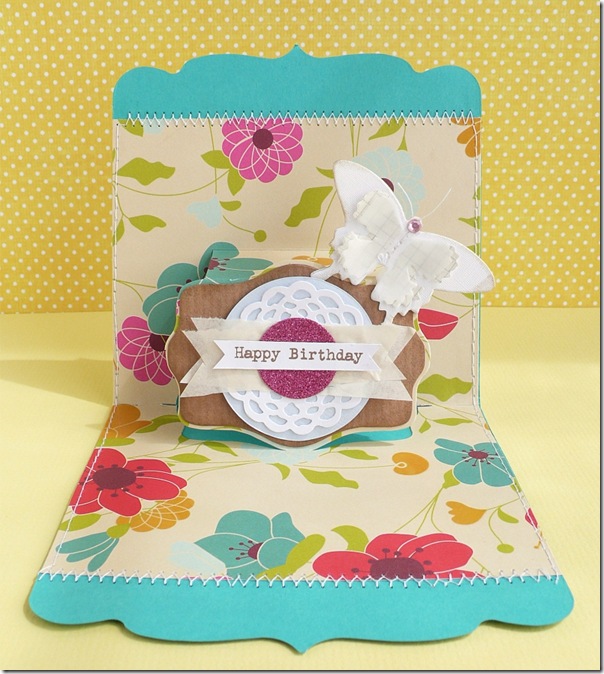
Both butterflies were die-cut a few times and glued on
top of each other so they'll give more dimension.

After die-cutting the Ornate Plate I removed the inside part
of the doily. For my card I used only the scallop circle which
I cut into two parts and adhered it on both sides of the card.

I die-cut The Ornate Edges 4 times as for top & bottom of the card I
used the whole swirls. The other two swirls I cut into two and decorated 
the Pop-up part of the card and the bottom part of the card
N.B. When I used the whole swirls I didn't adhere them on front top/bottom part of the card
but on back side of the card. Then I carefully pulled the swirls to the front.

OTHER PRODUCTS I USED:
Webster's Pages - "Sweet Notes" collection
KaiseCraft - Clear Stamp

*  *  *


I hope you enjoyed my card today!
Have a sunny Sunday!
Gerry

too many ideas, never enough time!

$
0
0


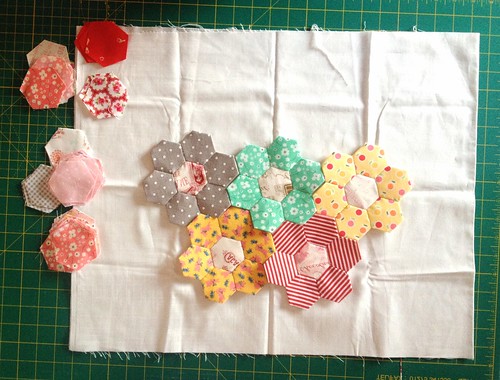
A week or so ago I was sent the new quilting dies but I've not allowed myself to play with them until I have my Christmas quilt project that I started last week and this little hexagon mini project done, dusted and in the post to their respective new homes.

Untitled


One of the new dies is this chevron, which makes fantastic zig zag quilts (it's code number 658664)


You can check out Linda from Sizzix doing a video tutorial on how to construct the zig zag quilt really easily in columns rather than rows, avoiding any tricky Y seams. My head is swimming with the possibilities for this die - I really hope I can get some fabrics cut this week and have a little play around with it to show you next week, we'll have to see how my week pans out and if I manage to get my to-do list organised first though. Maybe I can squeeze in a little cushion or something? Maybe if I just cut the shapes out I can play around with it in between other things?

I have to go - I've got things to finish so I can play! Have a great week - I hope you get to play with some fun stuff too!

Elisse pocket card

$
0
0


Hi everybody! Elena Here.

Today wanted to create a pocket card, but as I was thinking about it, I came with the idea of making the pocket on the outside of the card instead of making it inside the card. I like very much how it came out, you have a nice pocket with tags on the card, but you can still write your message inside.


Supply list:
I  have created a base card of 10x10 cm and have made the pocket with te same pattern paper. Then I have die cut some tags with more pattern paper and cardstock and I have embellish the card with some twine, die cuts from the paper collection, a doily... It si so simple to make, but with those cute tags you don't need anything else. I love them!


Happy Monday!
......................................

Hola a todos! Hoy os enseño una tarjeta que a la hora de hacerla pensé: ¿Y si hago el bolsillo fuera en lugar de dentro? Y dicho y hecho :)

Sobre una base de tarjeta de 10x10 cm he creado un bolsillo en el exterior con el mismo papel decorado, he troquelado unos cuantos tags  y después he adornado la tarjeta con una blonda, cordón, rotulador... la verdad es que no le hace falta mucha cosa, estos tags son tan monos que ellos solos ya decoran la tarjeta. ¡Me encantan!

¡Feliz lunes!

Best wishes....

$
0
0


Hi everyone...hope you all had a great week... today I have a card with a lovely star to show you.
I have usedSizzix Bigz Die - Stars, Celestial on this card.


Supply list:
658300 Sizzix Big Shot Starter Kit (Powder Blue & Teal) 
658345 Sizzix Bigz Die - Stars, Celestial
658506 Sizzix Sizzlits Die - Vintage Doily
658569 Sizzix Movers & Shapers Die - Arch Frame
658555 Sizzix On the Edge Die - Torn Notebook 

Papers: Melissa Frances, cardstock
Stamps: Stampers Anonymous Tim Holtz collection
Other: Seam Binding Ribbon, Button, Angel - Melissa Frances, Paper Doilies. 

Cut out card from cardstock and fold to a card 15x15 cm. Die cut stars with Sizzix Bigz Die - Stars, Celestial . Glue tissue tape on cardstock and die cut the edge with Sizzix On the Edge Die - Torn Notebook  .  Glue or sew the card together as a pocket. Glue patterned paper on both sides of the card. Decorate the front of the card with a star, ribbon, feather and paper dolies. 
Die cut journal card with Sizzix Movers & Shapers Die - Arch Frame . 
Die cut label from Sizzix Big Shot Starter Kit and stamp a text on it. Die cut Sizzix Sizzlits Die - Vintage Doily  and glue it to the journal card together with the label.


Wish you a great day !
Anne Kristine


Heisann....håper dere alle har hatt en fin uke. I dag har jeg laget et kort med stjerner som pynt. Stjernene er stanset ut med  Sizzix Bigz Die - Stars, Celestial 

Materialer som er brukt:
658300 Sizzix Big Shot Starter Kit (Powder Blue & Teal) 
658345 Sizzix Bigz Die - Stars, Celestial
658506 Sizzix Sizzlits Die - Vintage Doily
658569 Sizzix Movers & Shapers Die - Arch Frame
658555 Sizzix On the Edge Die - Torn Notebook 

Papir: Melissa Frances, kartong
Stempler: Stampers Anonymous Tim Holtz collection
Annet: Seam Binding bånd, knapp, engle - Melissa Frances,kakeserviett. 

Skjær ut og fold kartong til str. 15x15 cm.Stans ut stjerner med Sizzix Bigz Die - Stars, Celestial . Lim tissue tape på kartongen og stans ut kanten med  Sizzix On the Edge Die - Torn Notebook  .  Lim eller sy kartongen sammen som en lomme. Lim mønsterark på begge sider av kortet. Dekorer framsiden av kortet med stjerne, fjær, kakeserviett, og bånd. 
Stans ut journal kortet med  Sizzix Movers & Shapers Die - Arch Frame .  Stans ut merkelapp medSizzix Big Shot Starter Kit aog stemple tekst på merkelappen. Stans ut Sizzix Sizzlits Die - Vintage Doily  og lim dette på journal kortet sammen med merkelappen.

Ønsker deg en herlig dag!
Anne Kristine

Summer Fun

$
0
0

Hello Everyone,
I hope you have been as lucky as us Welsh folk and enjoyed a lovely week of sunshine. It is so unusual for us in the UK to have such a long stretch of warm weather and I have really taken advantage, spending lots of time outdoors with family and friends.

I have selected a summer themed project to share with you this week which uses the gorgeous Brenda Walton Flights of Fancy Sizzlits Die


The small die-cut flowers were created using the Sizzix Sizzlits Decorative Strip Die - Summer Florals but any flower would work equally well. 


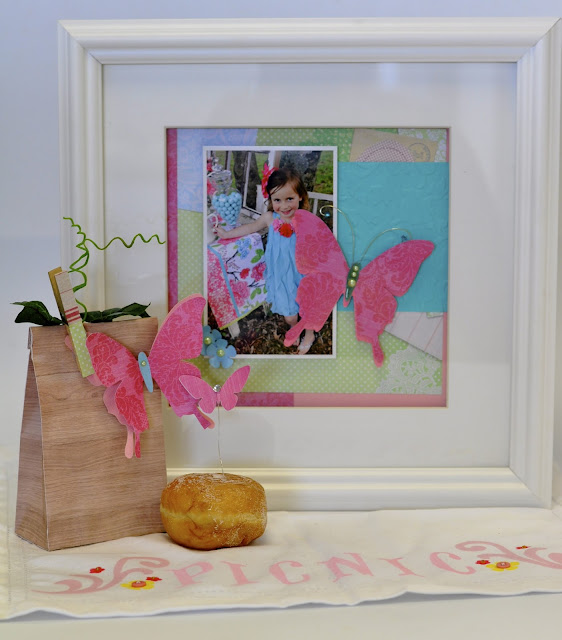
Cover a wooden peg with patterned paper stuck into place with PVA and then use this to hold a goody bag together. This is a bag was created using the Big Shot Pro. I have attached some fake ivy leaves for a woodland effect.


 The napkin was created by making a stencil from die cutting the letters from the Sizzix Sizzlits Alphabet Set Antiqua Capital Letters. Discard each of the letters that you cut and then use the negative that remains to mask of the areas that you don't want the fabric paint to touch. Apply with a dry brush and build up the colour gradually.

Have a lovely week, happy crafting in the sunshine...I have a doughnut to attend to :)


Dare to dream

$
0
0

Hi Everyone
Today i will show you a card using the Pop'n Cute base and the Pop'n Carte Insert

Items used:
Supply List:
Paper: Pinkpaislee-map-_
Ink: Distress ink -Vintage Photo-
Stamp: Simpel Saying-Tim Holtz Collection from Stampers Anonmymous
How to make:
1. Diecut the cardbase using Card,Square w/ Ornate Edge 658378, ink the edges
2. Diecut using Label ,Funky 3D( Pop Up) 658373, glue to the inside of the cardbase
3. Now decorate the card using different sorts of dies and stamps, easy and fun to make a Pop Up card


Hope you enjoyed my project today. Have a great week, see you next Tuesday 12.00 PM
 

Hel Alle
Jeg håber  I har haft en god uge. I dag vil jeg vise et Pop up kort hvor jeg har brugt Pop'n Cute base and the Pop'n Carte Insert
Sizzix dies jeg har brugt:
Andre materialer:
Papir: Pinkpaislee-map-_
Ink: Distress ink -Vintage Photo-
Stempler: Simpel Saying-Tim Holtz Collection from Stampers Anonmymous
Sådan gør du:
1. Udstands kortbasen ved at bruge Card,Square w/ Ornate Edge 658378, ink alle kanter
2. Udstands  Label ,Funky 3D( Pop Up) 658373, lim det til indersiden af kortet
3. Nu kan du  dekorere  kortet med brug af de forskellige udstandsede dies, en hurtig og sjov måde at lave et pop up kort.
Jeg håber du blev inspireret, du må have en god uge, vi ses kl. 13.00 næste tirsdag

Mini..... Card?

$
0
0

Choosing the right combination of dies, papers and embellishments makes my job so much easier. Creativity doesn't thrive in a vacuum, so choosing dies from the Pop 'n Cuts range by Karen Burniston and papers and embellishments from the Far and Away collection by Teresa Collins two fantastically smart and creative designers is half the battle.

Pop 'n Cuts allow you to create effortless 3D pop up cards using your Big Shot machine. The concept revolves around a base die which cuts the card and a number of magnetic drop in dies which create the pop up detail.

I wanted to create a scrapbook layout of my recent teaching trip to Portugal but I had so many images I wanted to use that I didn't quite know where to start. The obvious thing would be to make a mini album but time was pressing, so that's something I will have to come back to at some point. That's when that most elusive mistress inspiration struck!

Here is a quick run down of the dies and papers used:


  • Sizzix Big Shot Starter Kit (658300)
  • Sizzix Pop'n Cuts Base Die - Card, Square w/Ornate Edge 3-D (Pop-Up) by Karen Burniston (658378)
  • Sizzix Pop 'n Cuts Magnetic Insert Dies - Suitcase 3-D (Pop-Up) by Karen Burniston (658377)
  • Sizzix Bigz Dies - Suitcase by Karen Burniston (658366)
  •  Sizzix Sizzlits Decorative Strip Die - Paper Rosette (656931)
  • Far and Away Paper Collection by Teresa Collins
  • Tim Holtz Kraft-Core Cardstock (Nostalgic Collection) by Core'dinations
I started by cutting the base card using the XL base die from map patterned paper before inserting the suitcase 3-D pop up die into the base die.


Next, I die cut the pop-up centre and trimmed off the edges before distressing with inks and scuffing the top and bottom edge with the blade of my scissors. Once I have the look I require I placed the Pop-Up centre into the base card.


I die cut an ornate swirl which is attached to the base die from textured gold card together with a gold circle which I cut in half. I folded the halves and attached them to each corner of the card along with the decorative swirl.. Next, I used some decorative elements from the Far and Away collection, namely two banners and the Balloon motif to decorate the front of the card. as a finishing touch I used my PC and printer to create the 'Porto 2013' motif which I then die cut using the large Framelits circle from the Big Shot Starter Kit., I decorated the centre with a button and mounted it onto the base card along with the assembled banners.


To decorate the centre of the card I cut a strip of orange text paper which I folded and lightly inked the edges before attaching to the base card with eyelets before adding a couple of  paper elements (lightly distressed) from the Far and Away collection before mounting onto the foot of the base card.


The next task was to create a suitcase to hold my photos. i folded a piece of chipboard in half and placed it against the bigz die in such a way that it cut a mirror image. To find out about folding techniques using steel rule dies go to die cutting 101 and look for Folding Techniques on the Sizzix UK website. the one used here was the single fold technique. I used a dress makers pattern wheel to add a faux stitched effect around the edges and added some embossed detail to the front before using distress inks to enhance the detail. Next, i die cut the handle, corners and luggage straps from brown Kraft-core card and distressed with a sanding pad. The buckle was cut from the textured gold card.


I used the paper rosette die to cut a strip of card cut this in half, I concertina folded each half and attached them into the case as shown before die cutting and attaching the tag with a thin strip of the brown Kraft-core. I used my PC to print off my photos and matted each one onto a rectangle of different card from the Far and Away collection. I die cut 5 corresponding circles of card to act as tabs which I attached to the rear of each photo prior to distressing with inks.


I cut a strip of the red/blue diagonal stripped paper and attached another die cut 'Porto 2013' motif decorated with a threaded button to add the finishing touch. The finished project is a perfect compromise between a card and mini album, all I have to do is untie the string around the handles of the suitcase and the memories with come flooding back, Happy Days!


Cover for Art Journal

$
0
0


Hi Everyone!

Daria is here.

I love to paint, I love mixed-media and I love hand made things. That is why I decided to make an art journal by myself. I made the inner sheets from watercolor papers. Сover I made using cotton fabric.

Items used:

To add different shapes on the cover, I cut these shapes using different dies (also from cotton fabric). I sewed them onto the cover using a sewing machine.
Then I used white acrylic paint and different sprays with stencils. After paint dried, I outline the edges of the shapes using PITT Artist Pens.

Art journal is ready. It size is 22*30 cm.


Have a nice day!

Daria.


Всем привет!

Сегодня я хочу показать обложку для моего арт-журнала, который я сделала сама. Я люблю рисовать, люблю делать коллажи, и люблю вещи ручной работы. Поэтому я и захотела себе сделать журнал сама, для своих же рисунков и экспериментов.
Для внутренних листов я взяла бумагу для акварели и сшила ее в блок. Для обложки я взяла тонкий картон, синтепон и разные кусочки хлопка. Я сшила обложку, а затем, чтобы добавить на нее разные формы, навырезала фигурные элементы с помощью Big Shot (так же из ткани). После чего пришила все элементы на обложку.
Затем я использовала разные трафареты с белой акриловой краской и спреями. После того как краска высохла, я обвела все элементы с помощью маркеров PITT Artist Pens.
Теперь осталось только вклеить внутренний блок в обложку и журнал готов. У меня он размером 22*30 см. Не маленький, правда? :)

Материалы:

Хорошего дня!

Дарья.

Exotic Layout

$
0
0


"Welcome to paradise" lay-out

Do you know of these magic places where time stops? With a magnificent view, multicoloured birds, lush vegetation…a taste of heaven! I wished to transcribe all this in today’s lay-out!

Supply list:

Papers: American Crafts, Crate Paper
Alphabets: Glitz Design, American Crafts
Stickers: Jenni Bowlin Studio, Studio Calico
Stamps: Craft Origine, Glitz Design
Ink: Black Versafine
Archival inks: Viridian, Rose Madden, Aquamarine
Spray inks: Glimmer Mist Its Brown, Chalkboard Decadence Tattered Angels
Izink inks: mango, orchid, tulip, bamboo, avocado Aladine
Adirondack inks: Clover, Citrus
Masks: Pause Créative
Masking Tape: Lovely Tape

Die:

658501 Sizzix Sizzlits Die-Flower, Bloom with Leaves 3D


The Sizzix die leaves are perfect for today’s creation. They are cut out of white Bristol paper and shaded with green Adirondack inks (Clover & Citrus) with a cut’n dry foam piece.
The colours blend with subtlety bringing some contrast into the creation. I added some stamped flowers using pink and sea green inks. I completed the whole with a cut-out little bird. The embellishments are grouped together, so as to let the emphasis on the pictures.


Have a nice day!

See you next Thursday!

Karine

Page "Welcome to paradise"

Il y a de ces endroits magiques où le temps s'arrête, une vue splendide, des oiseaux multicolores, une végétation luxuriante, un air de paradis ! Voilà ce que j'ai souhaité retranscrire dans ma page du jour !

Matériel :

Papiers : American Crafts, Crate Paper
Alphabets : Glitz Design, American Crafts
Autocollants : Jenni Bowlin Studio, Studio Calico
Tampons : Craft Origine, Glitz Design
Encre : Versafine noire
Encres Archival : Viridian, Rose Madden, Aquamarine
Encres en spray : Glimmer Mist Its Brown, Chalboard Decadence Tattered Angels
Encres Izink : mango, orchid, tulip, bamboo, avocado Aladine
Encres Adirondack : Clover, Citrus
Pochoirs : Pause Créative
Masking Tape : Lovely Tape

Die utilisé :

658501 Sizzix Sizzlits Die-Flower, Bloom with Leaves 3D

Les feuillages du die Sizzix sont juste parfaits pour ma création du jour. Ils sont découpés dans du papier bristol blanc, puis encrés avec des Adirondack vertes (couleurs Clover et Citrus) à l'aide de mousse cut-n-dry.
Les couleurs se mixent tout en subtilité et contrate. J'ai complété avec des fleurs imprimés en rose et vert d'eau. Un petit oiseau découpé vient compléter l'ensemble. Les embellissements sont regroupés entre eux, laissant la part belle aux photos.

Je vous souhaite une très bonne journée

A jeudi !

Karine

More summerly cards with Janna Werner.

$
0
0
Hello everyone, this is Janna. Today I would like to share more summerly cards. If you haven´t seen my other cards, please click here, here or here. If you are interested in how to create a card with scratch paper, you might enjoy reading this post.


Material list:
657900 Big Shot or
658300 Big Shot Starter Kit
657551 Framelits Circles
657846 Texture Fades Bubble & Honeycomb
658354 Textured Impressions Love & Swirling Vines
658356 Textured Impressions Rose Vines & Trellis
card base: Tchibo
doily, petals, twine, stamp, cardstock, rhinestones, brad: Stampin´Up
ribbon: Maya Road
vellum: American Crafts
cardboard stickers: Pink Paislee
spray: October Afternoon, Heidi Swapp
ink: Tsukineko
other: sewing machine, hot glue gun


The first layer on the card above is a white cardstock that was embossed with the Texture Fades Bubble & Honeycomb die. The vellum on top softens the intensity of the honeycomb pattern.


The second card was inspired by last week´s project - a baby girl mini album. I liked the cover so much that I wanted to transfer it to a card. Instead of attaching a patterned paper behind the cut out circle, I stamped onto the card base and put a piece of vellum on top.


I hope you enjoyed today´s summerly inspiration. See you next week :)
Janna

*****

Hallo ihr Lieben, hier ist Janna. Heute möchte ich euch weitere Sommer-Karten zeigen. Falls ihr meine anderen Karten sehen möchtet, findet ihr diese hier, hier oder hier. Wenn ihr Interesse daran habt, wir man eine Karte aus Schmierpapier herstellt, dann findet ihr hier eine Anleitung.

Materialliste:
657900 Big Shot oder
658300 Big Shot Starter Kit
657551 Framelits Circles
657846 Texture Fades Bubble & Honeycomb
658354 Textured Impressions Love & Swirling Vines
658356 Textured Impressions Rose Vines & Trellis
Kartenrohling: Tchibo
Doily, Blüten, Twine, Stempel, Cardstock, Rhinestones, Brad: Stampin´Up
Band: Maya Road
Vellum: American Crafts
Cardboard-Sticker: Pink Paislee
Spray: October Afternoon, Heidi Swapp
Tinte: Tsukineko
Anderes: Nähmaschine, Heißklebepistole

Die erste Schicht der oberen Karte besteht aus weißem Cardstock, der mit der Texture Fades Bubble & Honeycomb Die embosst wurde. Das aufliegende Vellum mildert das Honeycomb-Muster ab.

Die zweite Karte ist vom Projekt der letzten Woche inspiriert - einem Mini Album. Mir gefiel das Cover so gut, dass ich das Prinzip auch auf einer Karte anwenden wollte. Anstatt den ausgestanzten Kreis mit Patterned Paper zu hinterlegen, habe ich auf den Kartenrohling gestempelt und Vellum aufgeklebt.

Ich hoffe, euch hat die heutige Sommer-Inspiration gefallen. Wir sehen uns nächste Woche :)
Janna


Summer blossoms

$
0
0


Summer is finally here with us - and I am pretty certain of 2 things - we don't know how long it will last and we don't want to do much of anything!!
So this week I have made something very simple and easy to do.
I made simple flowers to embellish a top for a little girl.
I used Bigz Die 658315 and cut 26 circles in pink organza, and 8 in lilac. Fold the circles in half and stitch together,  and then twist the top one 90  degrees. ( see picture below)


 Fold the right hand 1/4 circle underneath and the top left hand circle 1/4 circle down, and stitch ( see picture below)


This when unfolded becomes a simple flower

I made a total of 13 pink and 4 lilac flowers and stitched them around the top of a child's top


And then I thought I'd try embellishing an adult top - I used Bigz die 657602 and cut 24 pink organza circles. I stitched them together in pairs as above, but then I stitched 4 of these together to create a larger flower. I then stitched the 3 flowers in place - of course you could add more, I just wanted to show an idea.
Now I think I can be a little obsessive because I have started to think of lots of other things you can create with the circle dies - the same idea could be used to embellish skirts, bags, hair bands, brooches -  just to mention a few ideas.
What an easy idea to create gifts - an inexpensive t-shirt for a birthday gift, or how about a brooch for teacher at the end of term.
Watch this space I'm sure I'll come up with some more ideas, with samples, over the next few weeks.
Enjoy the summer.
Angela

Sizzix Pop 'n Cuts Birthday Card

$
0
0

Hello Sizzix friends! Hope you all had a great week.
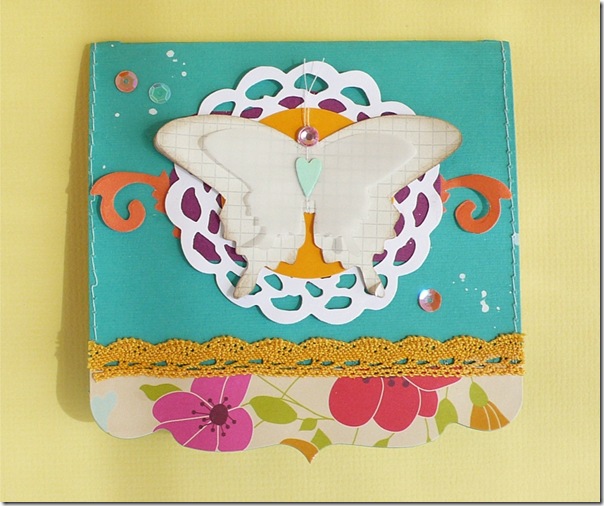
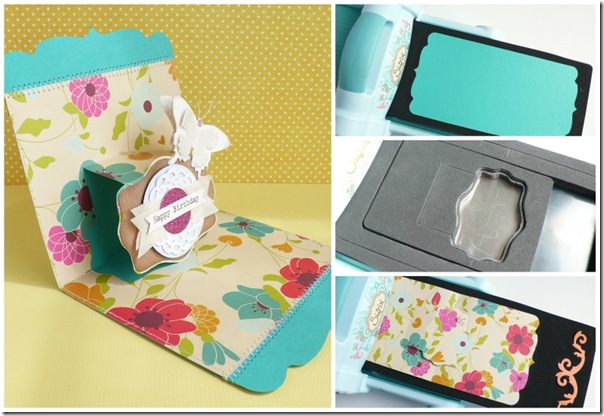
Anna here and I’ve got a fun project today using some of Karen Burniston’s new dies from her Journey collection that was released this month!
cafe creativo - Anna Drai - big shot sizzix - card pop up - Pop 'n Cuts (5)
 
I made this card for my sister in law this week and while quite simple I really love it. The colour combo and the pop up just makes me happy!
 
cafe creativo - Anna Drai - big shot sizzix - card pop up - Pop 'n Cuts (1)

The card front:

cafe creativo - Anna Drai - big shot sizzix - card pop up - Pop 'n Cuts (4)

Items used:

Sizzix Big Shot Starter Kit (658300) machine+dies
Sizzix Accessory - Cutting Pad, Extended, 1 Pair (655267)
Sizzix Pop 'n Cuts Magnetic Insert Die - Frame, Wavy 3-D (Pop-Up) (658371)
Sizzix Pop 'n Cuts XL Die - Card, Square w/Ornate Edge (658378)
Sizzix Framelits Die Set 5PK - Labels, Wavy (658363)
Sizzix Bigz Die - Mariposa by Prima Marketing Inc. (658530)
Sizzix Sizzlits Die - Vintage Doily (658506)
Sizzix Framelits Die Set 8PK - Circles (657551)
 
cardstock: turquoise, white, kraft, orange, yellow, purple
patterned paper
scraps of glitter paper, paper vellum, notepad paper, tissue paper
white acrylic paint
strass, sequins
sewing machine, yarn

How to make:
cafe creativo - Anna Drai - big shot sizzix - card pop up - Pop 'n Cuts (2)

1- Die-cut a Card cover from turquoise cardstock, using the Pop 'n Cuts XL Die - Card, Square w/Ornate Edge die (658378) without an insert.
2- Place the magnetic Pop 'n Cuts Frame, Wavy 3-D (658371) insert inside the base die, align the center fold of the insert with the center of the base die and die-cut the Card out of patterned paper.
3- Fold along crease lines to bring the pop-up image forward as shown.
4- Trim the edges of the inside Card, then adhere Card inside and Card Cover together. Sew as desired.
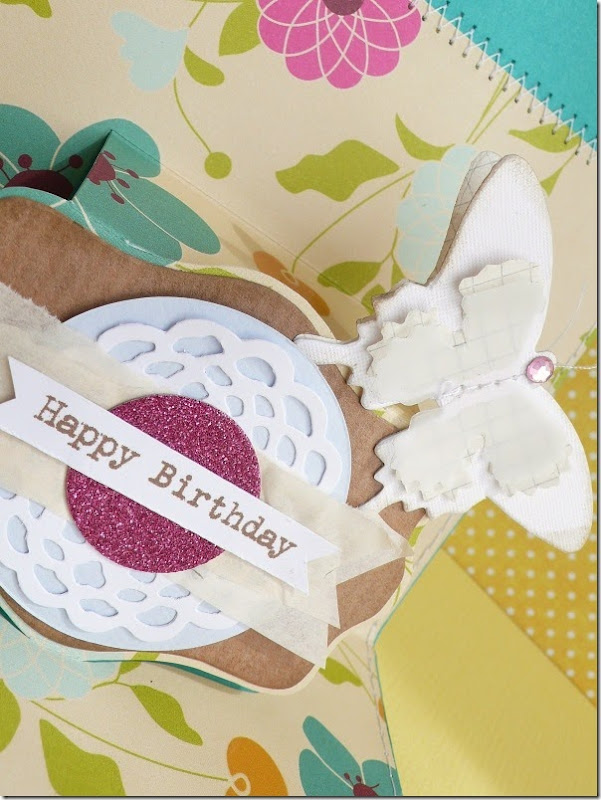
5- Die-cut the Label Framelits from kraft cardstock and adhere to the pop-up.
6- Die-cut a white doily and a glitter circle. Cut two banner from tissue paper and the sentiment. Layer these elements and adhere to the pop-up.
7- Cut out a Mariposa butterfly and apply  as shown.
8- Finish by embellishing the Card front as desired. I used a label, doily and butterfly dies.

cafe creativo - Anna Drai - big shot sizzix - card pop up - Pop 'n Cuts (3)

Thank you so much for visiting! See you soon...

**************************************
Flag_of_Italy Per le amiche italiane! :)
 
Ciao!
Ecco un nuovo appuntamento con Anna. Oggi ho un progetto divertente da condividere con voi, dove ho usato alcune fustelle disegnate da Karen Burniston’s dalla sua Journey collection che è uscita questo mese.
Mi piacciono molto le card pop up, ma ci vuole un po' di tempo per realizzarle, con le fustelle Sizzix è tutto più semplice!
Ho avuto così modo di realizzare questa card 3D per il compleanno di mia cognata.
Devo dire che questa combinazione di colori e l'effetto pop up del biglietto mi mette proprio allegria!
Se volete provarci anche voi ecco le spiegazioni...
 
Materiali:

Sizzix Big Shot Starter Kit (658300) macchina+fustelle
Sizzix Accessory - Cutting Pad, Extended, 1 Pair (655267)
Sizzix Pop 'n Cuts Magnetic Insert Die - Frame, Wavy 3-D (Pop-Up) (658371)
Sizzix Pop 'n Cuts XL Die - Card, Square w/Ornate Edge (658378)
Sizzix Framelits Die Set 5PK - Labels, Wavy (658363)
Sizzix Bigz Die - Mariposa by Prima Marketing Inc. (658530)
Sizzix Sizzlits Die - Vintage Doily (658506)
Sizzix Framelits Die Set 8PK - Circles (657551)

cartoncino: turchese, bianco, kraft, arancione, giallo, viola
carta fantasia a fiori
ritagli di carte glitter, da lucido, notes, velina
colore acrilico bianco
strass, paillettes
macchina da cucire e filo (facoltativo)

Procedimento:
 
1 - Con la Big Shot tagliare la copertina della card da un cartoncino turchese, utilizzando la fustella Pop 'n Cuts XL Die - Card, Square w/Ornate Edge die (658378), senza l'inserto.
2 - Posizionare l'inserto Pop 'n Cuts Frame, Wavy 3-D (658371) all'interno della fustella usata in precedenza, allineare i segni delle pieghe dell'inserto con il centro della fustella base e tagliare così un rettangolo di carta fantasia.
3 - Piega lungo le linee per portare la parte pop-up in avanti, come mostrato in foto.
4 - Tagliare i bordi (superiore ed inferiore) dell'interno card, quindi incollare la parte interna ed esterna insieme. Cucire tutt'intorno, se si desidera.
5 - Tagliare l'etichetta Framelits dal cartoncino kraft e incollare sul pop-up. L'etichetta è coordinata, quindi la sagoma corrisponde alla sagoma del pop up.
6 - Fustellare un centrino bianco e un cerchio glitter. Tagliare due banners di carta velina e l'augurio. Sovrapporre questi elementi uno sull'altro e incollare il tutto al pop-up, con scotch biadesivo spessorato.
7 - Tagliare una farfalla Mariposa, usando diverse carte nelle tonalità neutre e incollarla sopra l'etichetta pop-up.
8 - Per fine abbellire la parte anteriore della card, se si desidera: io ho usato le stesse fustelle di prima tagliando un'etichetta, un centrino e la farfalla più grandi.
 
Grazie per la vostra visita! Ci vediamo venerdì :)

White space and a lot of dimension - low budget scrapping :)

$
0
0

Hi,I hope you had a great week!
Today I want to share one of my new layouts - lighter in style - with just a touch of media on it and a lot, a lot of negative space. Projects like this are perfect for using the leftovers from 12x12'' papers or small paper pads such as 6x6'' or A4. You don't have to use big papers for scrapping, as long as you have a good background to play, right? Tons of embellishments are just an option, too...


As you can see on this layout - you can create balanced, dimensional composition with a touch of gesso, paint, small scraps of paper and just a bit of embellishments - the most important elements here are layered cut-out doilies and a paper rossette, which was decorated with new Mechanicals - metal embellishments from Prima.


The whole secret is in not being afraid of the empty background and composing all the layers of paper, cut -outs and embellishments as close to the photo as possible. It is convinient to have some 3D foam  and double sided tape - it makes the creative process far easier and layers more spectacular ;)


To create a project similar to this you will need 3 different Sizzix dies:
- 658339 - Sizzix Sizzlits Decorative Strip Die - Medallions
- 659068 - Sizzix Thinlits Die - Doily
- 658947 - Sizzix Thinlits Die Set 2PK - Doily & Doily Border 

All the papers, stamps and metal embellishments are new, coming releases of my products with Prima Marketing -  Vintage Vanity A4 Journaling pad, Vintage Vanity Clear Stamps and Mechanicals.  Layout was finished using a bit of Ranger Archival Jet Black Ink, tea stain and spray paint. For stricking the elements and dimension I used products from Scrapbook Adhesives by 3L: 3D Foam Squares and Crafty Power Tape.

I hope you are a bit inspired - have a great, creative weekend!
Finn

Doilies & Glassine Tattered Florals

$
0
0


Hi there! Today I have a fun project to share with you created by Connie Mercer using the Sizzix Bigz Tattered Florals Die along with Darkroom Door Doilies Stamp Set and embellishments.


Instructions:
1. Create a card using kraft card stock folded to 5" x 5".
2. Stamp the Darkroom Door Doilies randomly over the card using black inkpad.
3. Use the Sizzix Tattered Florals Die (656640) to die cut several florals using Tim Holtz Glassine paper. Scrunch them up to give them that vintage worn look. Adhere them to the card using buttons and embroidery thread.
4. Trim image from Darkroom Door Love Letters Filmstrip and adhere in between two florals.
5. Trim word from Darkroom Door Love Letters Wordstrip and adhere to bottom left side of the card.
6. Adhere card to a piece of Graphic 45 patterned paper and add some twine at the top in a bow to complete.


Hope you're having a creative day!

Thanks for stopping by!

Rachel 

A Layout by Gerry van Gent

$
0
0


Happy Sunday Sizzix friends!

Today I have a layout to share with you where I 
used different Sizzix dies.
657900 Sizzix Big Shot Machine
658948 Sizzix Thinlits Frame, Fancy Rectangle
658946 Sizzix Thinlits Decorative Border & Heart
658506 Sizzix Sizzlits Vintage Doily
658367 Sizzix Movers & Shapers Butterflies
657838 Sizzix Movers & Shapers Vintage Fan & Globe Set
657007 Sizzix Bigz L Basic Tray
658527 Sizzix Bigz Die Estate

I used two different pattern papers to die cut the Butterflies and the Heart.
The Estate label was die cut from white cardstock. Then I inked round the edges
and stamped two flourish motives. As a decoration I added a piece of 

Instead the globe I cut out a clock from the pattern paper and
I adhered it on top.

The Fancy Rectangle Frame must be one of my favourites ever... I used 
it so many time and in so many ways - simply love it!

OTHER PRODUCTS I USED:
WEBSTER'S PAGES - "New Year New You" collection

*  *  * 
Dutch Translation

Hallo Sizzix vrienden!

Vandaag wil een layout met jullie delen waarbij
ik Sizzix stansen heb gebruikt.
*  *  * 
657900 Sizzix Big Shot Machine
658948 Sizzix Thinlits Frame, Fancy Rectangle
658946 Sizzix Thinlits Decorative Border & Heart
658506 Sizzix Sizzlits Vintage Doily
658367 Sizzix Movers & Shapers Butterflies
657838 Sizzix Movers & Shapers Vintage Fan & Globe Set
657007 Sizzix Bigz L Basic Tray
658527 Sizzix Bigz Die Estate

*  *  * 

De  Butterflies en het Heart heb ik uit twee verschillende patroon papieren gestanst.
De Estate label is uit witte cardstock gestanst en vervolgens distressed langs
de randen. Daarna heb ik gestempeld met een bloemen motief.
Een stukje uit de Fancy Rectangle Frame heb ik gebruikt als decoratie.

*  *  *

De klok heb ik uit het patroon papier geknipt. Daarna heb ik het 
in plaats van de globe geplakt.

*  *  *

Ik ben helemaal "verliefd" op de Fancy Rectangle Frame - hij is een van 
mijn favorieten aller tijden :-) en ik heb hem op verschillende manieren gebruikt.
Ik vind hem prachtig!

*  *  *

I hope you enjoyed my project today!

triangles triangles everywhere!

$
0
0


Last week I mentioned I had recently got the new quilting dies and was hoping to have a play with the new chevron die this week. Well, as is quite usual for me, I got distracted by plans for a quilt using the chevron die and I've ordered fabrics to make that quilt so I haven't had a chance to play with it just yet as I'm waiting for the fabrics to arrive.

While I'm waiting I thought I'd pull out my Big Shot Pro (literally - it lives under my work table) and start playing with one of the other new dies, the isosceles triangle that finishes at 6 1/2" square (there is a smaller version that fits the big shot too - it ends up at 4 1/2" square)


I've never made a quilt using this block before, the thought of cutting out all of the triangles and then all of the background pieces using templates has put me off, but with the die it's fast and easy - and the 'dog ears' are already cut off so you can match up your points nice and easily too (which is a huge bonus!)

In no time at all I had cut and pieced 30 triangle blocks - literally in about an hour, so all I need to do now is have a think about layout and how big I want to go.  I think it's going to be a really pretty quilt and  so easy to piece together. I've had to set the blocks aside until I have finished some other bits and pieces, but I have the next batch cut and ready to piece next to my sewing machine so I can work on them in between other things. They'd make a really good scrap project too.

I cut from 2 fabrics at a time - one fabric for the triangle's sides (I cut 4 layers - folded so I would have the mirror images needed for the 2 sides of the triangle), and 2 layers of a second for the triangles to give me 2 identical blocks at a time. If you've ever been tempted by triangles like this but, like me, the templates idea put you off - then give this die a whirl. I bet you'd love it too!

finally cut into my Anna Maria Horner Bohemian


Crafting with children and teenagers

$
0
0


One thing about the Big Shot Machine that I love is that it is very easy and safe to use and it is perfect to craft with children.

Last week, since we are on summer holidays, I taught a junior workshop to girls from 11 to 15 years old. We had a lot of fun and, of course the Big Shot Machine was the star of the show :)


Supply list:


We used a lot of basic supplies like cardstock, inks and stamps, and we used some of my favourite framelits shapes to create some tags to insert in the pockets that we created. Here you can see those little and crafty hans in action :)


Happy Monday!
..............................

Una de las cosas que más me gusta de la Big Shot es que es muy fácil y segura de utilizar, lo que la hace ideal para hacer manualidades con niños.

La semana pasada, aprovechando que son vacaciones de verano impartí un taller júnior a niñas que tenían entre 11 y 15 años. Nos divertimos de lo lindo y, claro, la Big Shot fue la estrella del espectáculo :)

Materiales:
Para hacer nuestro álbum utilizamos muchos materiales básicos como cartulinas, sellos y tintas y también algunos de mis Framelits favoritos para hacer las etiquetas que luego pusimos en los bolsillos que fabricamos. Aquí podéis ver algunas fotos de esas pequeñas manos en acción :)

¡Feliz lunes!
Viewing all 2033 articles
Browse latest View live