Quantcast
Channel: Crafting ideas from Sizzix UK
Viewing all 2033 articles
Browse latest View live

Pop-Up Fun!

$
0
0

Hello, this week I would like to share some cards that I have created using Karen Burniston's amazing range of Pop'n'Cuts dies. These ingenious dies really do take card making to another dimension...I love them!

Creating pop-up cards has never been this fun! This collection uses a beautiful array of magnetic insert dies with a base die to design impressive 3-D pop up shapes in just a few quick steps. There are videos with instructions on the Sizzix web-site so I won't bore you with the how-to-do's, I will just show you just what I have done with them and hope that you will be inspired to give them a go!


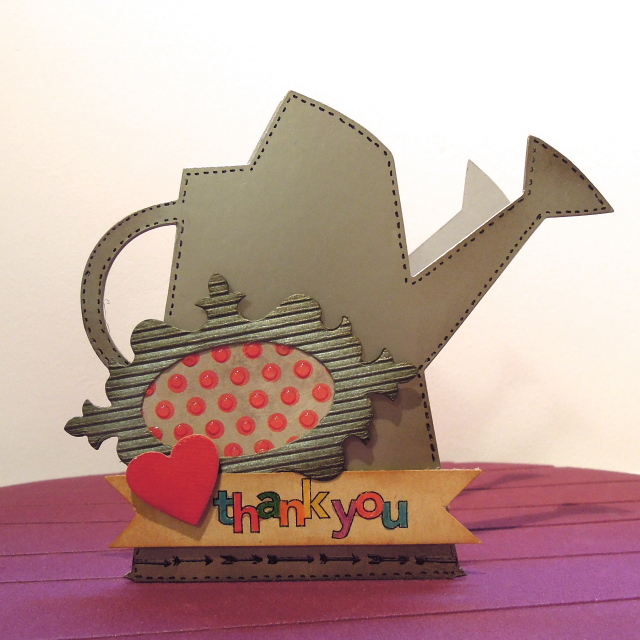
My photograph doesn't show the lovely embossed design that appears in the right bottom corner, it is such a perfect partner to this cute cup cut out.


This has to be my favourite from the collection. I recently made this for my son who left home to pursue  his career as a chef over in Rhodes at the beginning of the summer, I was so nervous when he left but was sure he would have the time of his life so made him this. How wrong could I have been? He was returned to me as it said on the card....within two weeks of leaving having hated every second!


I have created this card in quite masculine colours because I am always thinking of a solution to every crafters puzzle...what to do when faced with making a card for the men in your life! The wide arms of the pop-up chair are quite accommodating and perfect for adding personality to the card. I have added a newspaper which is what I would find on the arm of my Dad's chair but for a female version, change the colours and maybe add a miniature ball of wool with cocktail stick knitting needles?


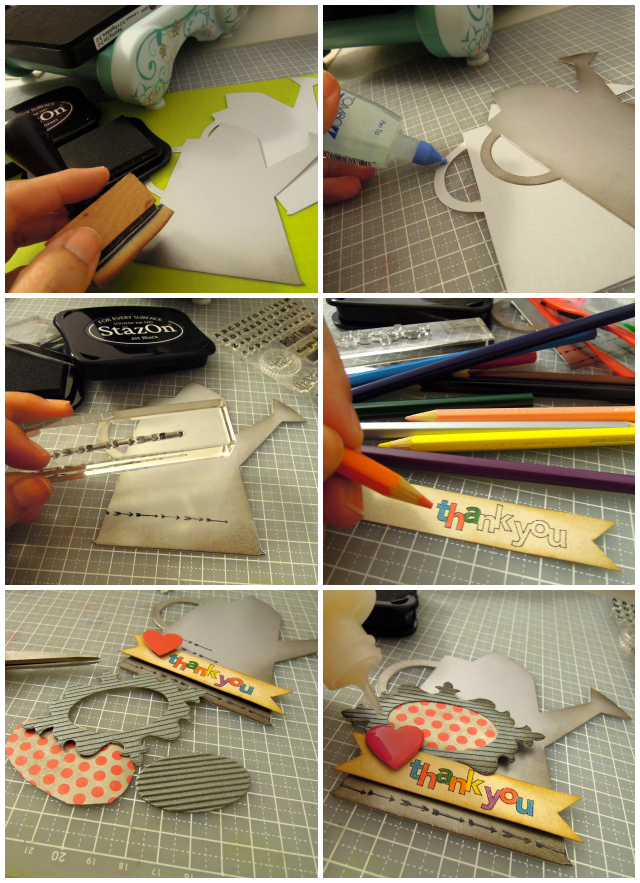
 The rug has been created using Karen Burniston's embossing folder, just emboss your card and then carefully cut around the shape.

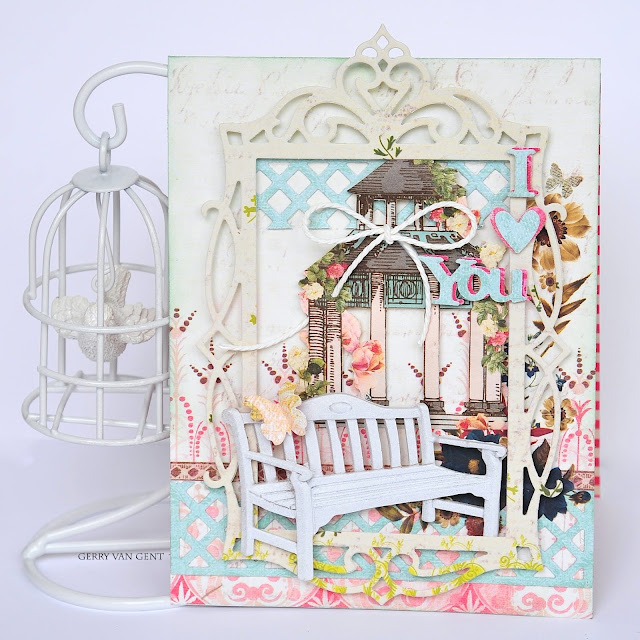
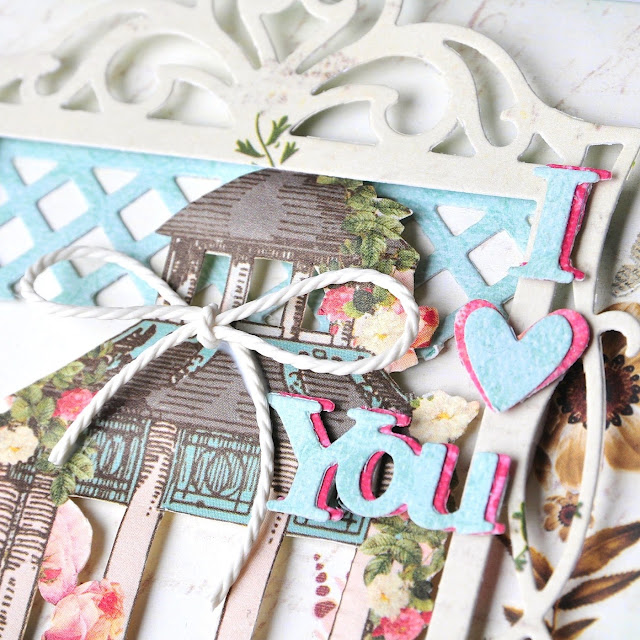
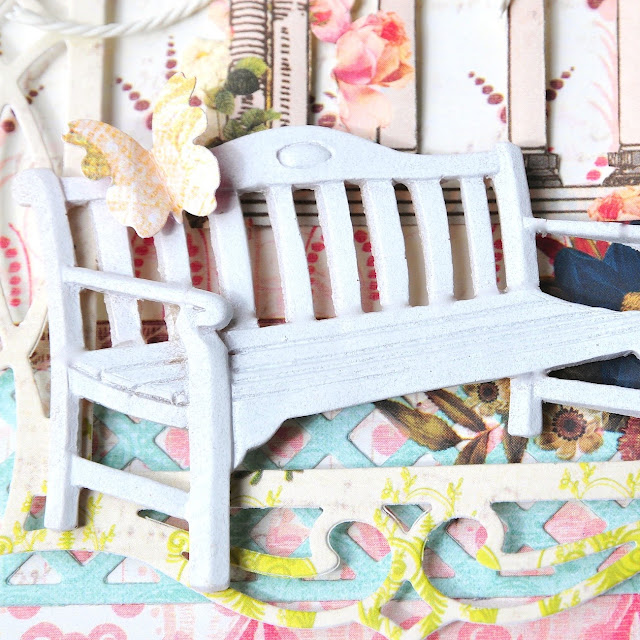
The amazing shape of this card allows you to stick with a really simple design, coordinated papers and a few well placed buttons are all you really need.


Here is a list of the lovely dies that I have used from the Karen Burniston's collection.

Sizzix Pop 'n Cuts Magnetic Insert Die - Chair, 3-D (Pop-Up)


Sizzix Pop 'n Cuts Magnetic Insert Die - Mug & Heart, 3-D (Pop-Up)Sizzix Bigz Die - SuitcaseSizzix Pop 'n Cuts Magnetic Insert Die - Suitcase, 3-D (Pop-Up)Sizzix Textured Impressions Embossing Folders 2PK - Foyer SetSizzix Pop 'n Cuts XL Die - Card, Square w/Ornate EdgeSizzix Pop 'n Cuts Magnetic Insert Die - Label, Funky 3-D (Pop-Up)
Sizzix Textured Impressions Embossing Folders 2PK - Coffee Set

Don't forget to look for the online tutorials which you can find on the Sizzix websites!

Have a great week!


"Grot" layout

$
0
0


Hi All!

Daria is here.

Today I would like to show you a layout and a process.

Items used:
Big Shot Machine (657900)
Sizzix Sizzlits Decorative Strip Die - Vintage Lace (657481)
Sizzix Sizzlits Decorative Strip Die - Washer Border (657826)

To create background for my layout I used different sprays. I added decorative tapes after sprays dried. Also I cut laces using Vintage Lace die and glued them onto the layout. 
I cut border using Washer Border die. I used this border as stencil (with white Gesso).
I used Sprays and Distress Stains to add color to my layout.
Then I added photo and embelishments. 
 

Have a nice day!


Всем привет!

Сегодня я хочу показать вам страничку и немного процесса ее создания.

1. Я побрызгала лист разными спреями. Затем приклеила кусочки декоративного скотча. Чтобы разнообразить фактуру, я вырезала кружева используя нож Vintage Lace. Мне нравится этот нож тем, что он разом вырезает три разных бордюра, и они такие классные ( в моем вкусе).
2. Я вырезала бордюр с использованием ножа Washer Border. Я очень люблю этот узор использовать в качестве трафарета. В этот раз я использовала его с Гессо.
3. Чтобы добавить цвет, и сделать фон более похожим на грот, я использовала разные спреи и Distress Stains.
4. Добавила фото и немного украшений. Страничка готова.

Всем хорошего дня!

Having a Winter Moment!

$
0
0


The Winter Moments to which I refer is actually the name of a Range of Sizzix dies and folders designed by the wonderful (and also pretty talented!) Paula Pascual. Anyone who has taken even a passing interest in my blog will know that it is never too early to make Christmas cards, Boxing day is a good time to start in my opinion!

The Idea came from something I saw in a local shop, an idea which I was able to recall thanks to the wonders of modern technology (camera phone!). 

The finished card in no way resembles the Welsh love spoon which inspired it in the same way that my best ideas rarely come from within the craft industry itself. with the busy lives we all seem to lead these days it's so important to record ideas and inspiration before they are snuffed out by something more or, as is usually the case, less important.

The Sizzix products I used are below, click on each one to link to the website:

I started by die cutting the letters L, V and E from red glitter card, Next I cut three flower shapes from Red and green glitter card. Using a stylus tool and a moulding mat ( the Susan Tierney-Cockburn tool kit is a must in our design room at the moment!) I added dimension to the small and large red flowers by applying a stirring motion in the centre of each before mounting all the flower elements together finishing with an adhesive gem in the centre. I used the flower in place of the letter 'O' to form the word 'LOVE'. Next, I arranged the letters and measured along their length.

At this point I turned to my PC and typed the phrase '....and best wishes this Christmas from the Hughes Family' before printing it in red onto a 16 x 22cm sheet of quality heavyweight white card (I always use Inspire Me Papers) The phrase measures 13cm the same as the word 'LOVE'. Once the base card was folded I carefully attached the word/poinsettia one at a time.


Here are a couple more created using the same principle, the word Christmas was die cut using the Block Talk Die which is one of my current favourites for obvious reasons! If you love the flower/star dies, and let's face it, who wouldn't? they are accompanied by a fabulous set of coordinating stamps, which is staggering value. and the other great thing about them is that you can use them all year round!


Vintage Mini Album

$
0
0

Mini album "So Vintage" by Karine Cazenave-Tapie


Today I’ll show you some bits and pieces of a vintage-style mini album with 100% romantic pictures. This is a class I will teach next October for the Scraptastic event in Belgium.

Supply List:

Album: Jenni Bowlin Studio
Papers & stickers: Glitz Design
Alphabets: Jenni Bowlin Studio
Wood accents: Sodalicious
Stamps: Craft Origine, Florilèges Design, Stamper Anonymous
Inks: Black & grey Versafine
Spray inks: Studio
Ink: Distress Vintage Photo

Dies:

659068 Sizzix Thinlits die-Doily
658300 Sizzix Big Shot Starter Kit
658508 Sizzix Sizzlits-Die Set 3PK-Roses Flower Set

The various accents are cut with the Big Shot out of paper scraps, once the pages are decorated and covered with pattern papers.
Then I shaded (with caution) the butterflies, leaves and doily with a cut’n dry foam piece and my Distress Vintage Photo ink.
Do not hesitate to prepare some accents in advance so that you can decorate your album more easily.
Do not forget that some elements can be glued with 3D adhesives for more volume. If possible, feel free to add your accents directly on your pictures. Avoid tone-on-tone colours and play with contrast.

Here are some snapshots of the album.


I hope you like it!

See you next Thursday for a new creation!

Karine

Mini album "So Vintage" par Karine Cazenave-Tapie

Aujourd'hui je vous présente quelques extraits d'un mini album tendance vintage pour des photos 100% romantiques. Un atelier que je donnerai en octobre prochain lors de l'évènement Scraptastic en Belgique.

Matériel :

Album : Jenni Bowlin Studio
Papiers et autocollants : Glitz Design
Alphabets : Jenni Bowlin Studio
Embellissements en bois : Sodalicious
Tampons : Craft Origine, Florilèges Design, Stamper Anonymous
Encres : Versafine noire, grise
Encre en spray : Studio
Encre : Distress Vintage Photo

Dies utilisés :

659068 Sizzix Thinlits die-Doily
658300 Sizzix Big Shot Starter Kit
658508 Sizzix Sizzlits-Die Set 3PK-Roses Flower Set

Les divers embellissements découpés à la Big Shot dans des chutes de papiers, une fois les pages décorées et recouvertes d'imprimés.
Papillons, feuillages et napperon sont ensuite ombrés délicatement à l'aide d'un morceau de cut-n-dry et d'encre Distress Vintage Photo.
N'hésitez pas à vous faire un petit stock de décorations pour vous permettre d'embellir plus facilement votre album.
Pensez à monter certains éléments en 3D pour leur donner plus de relief, si vos photos le permettent osez ajouter vos décorations directement sur vos clichés. Evitez le ton sur ton et jouez sur le contraste.

Voici quelques extraits de mon album !

J'espère qu'il vous plaira

Je vous donne rendez-vous jeudi prochain pour une nouvelle création !


Karine

Festival of Quilts is here

$
0
0


It's that time of year that I have been looking forward to for months - it's crazy and exhausting but I do just love the Festival of Quilts - my only complaint is that I never have enough time to look round properly as I'm working, but I love the buzz, the colour and the amazing talent that is on display.


So here I am - with the stand all ready and looking rather lovely - even if we do say so ourselves.
We have projects featuring  our new dies - Cuddly Creatures  and Leafy Petals.

The workshop will be using some of the basic geometric dies, and I will be demonstrating with some of the other dies as well. Come along and try for yourselves to see just how great this little machine is - I have been using it for several years now and still get very excited about it.
So come along to Stand C43 in hall 7 to enjoy a free workshop, along with a chat and a sit down!! It's such a great opportunity to try before you buy!

You can also meet the very talented Katy, on the Cotton Patch Stand, where she will be demonstrating the Big Shot and Bigz Dies.

Next week I hope to have some photos of workshops.


Flower & Summer Birthday Card

$
0
0

Hi Everyone! This is Anna.
Today I am going to share a card featuring lots of the lovely Sizzix products!
I wanted to make a birthday card that was simple, pretty, and in keeping with the season. I created this card and the package with bright summer colors: how pretty are these colours!
I’ve been itching to use the flowers from the Sizzix collection by Prima Marketing Inc. I'm really pleased with how this one turned out.

cafe creativo - Anna Drai - big shot sizzix - card - flower - summer (1)

For the flower card: Cut a Gulian flower from felt fuchsia and glue above two Flora flowers. Add a little flower in the center of the yellow flower and apply a strip with the sentiment.

cafe creativo - Anna Drai - big shot sizzix - card - flower - summer (2)

For the package: Apply the doily (cut out with Thinlits) and make a heart embellishment with the dies of  Starter kit, as I had explained here. Glue the heart adding a little colored wool pom pom.

cafe creativo - Anna Drai - big shot sizzix - card - flower - summer (3)

Gotta love those quick cards! Thanks for stopping by today!
Hugs

Items used:

Sizzix Big Shot Starter Kit (658300) machine+dies
Sizzix Bigz XL Die - Card, Scallop #4 (657372)
Sizzix Bigz L Die - Flora by Prima Marketing Inc. (658528)
Sizzix Bigz Die - Gulian by Prima Marketing Inc. (658529)
Sizzix Thinlits Die Set 2PK - Doily & Doily Border #2 (659058)
Sizzix Framelits Die Set 6PK w/Stamps – Banners (658289)
Sizzix Bigz Die - Artist Trading Card (656332)
cardstock
patterned paper
scraps of glitter papers
felt, fabric
gold acrylic paint
little flower
wool pom pom

cafe creativo - Anna Drai - big shot sizzix - card - flower - summer (4)

**************************************
Flag_of_Italy Per le amiche italiane! :)

Felice Estate!
Ecco un nuovo appuntamento con Anna.
Oggi ho intenzione di condividere con voi una card dove ho utilizzato con un sacco di prodotti belli belli.
Volevo fare un biglietto di auguri semplice, carino e in linea con la stagione. Ho creato così questa card e il pacchetto con i colori estivi: quanto sono allegri questi colori!
Ero anche impaziente di utilizzare i fiori della collezione Sizzix disegnata Prima Marketing Inc. Sono davvero contenta del risultato.
Bando alle ciance, ecco come ho fatto:

Materiali:

Sizzix Big Shot Starter Kit (658300) machine+dies
Sizzix Bigz XL Die - Card, Scallop #4 (657372)
Sizzix Bigz L Die - Flora by Prima Marketing Inc. (658528)
Sizzix Bigz Die - Gulian by Prima Marketing Inc. (658529)
Sizzix Thinlits Die Set 2PK - Doily & Doily Border #2 (659058)
Sizzix Framelits Die Set 6PK w/Stamps – Banners (658289)
Sizzix Bigz Die - Artist Trading Card (656332)
cartoncino azzurro, bianco, bianco naturale
carte fantasia
feltro e stoffa
colore acrilico oro
fiorellino in tono
spilla da balia
lana pom pom

Procedimento:

Per la card:
1- Usare la fustella card scallop per fare la base azzurra del biglietto.
2- Tagliare un rettangolo fantasia, un po' più piccolo e incollarlo sul davanti della card.
3- Spennellare i bordi della carta fantasia con acrilico color oro.
4- Tagliare un rettangolo con angoli arrotondati ed incollarlo al centro. Tagliare una bandierina con i framelits e incollare. Tagliare un fiore Gulian dal feltro fucsia e incollarvi sopra due fiori in stoffa tagliati con la fustella Flora.
5- Aggiungere un fiorellino al centro del fiore e terminare con una striscia con l'augurio.

Per il pacchetto:
1- Avvolgere il pacchetto con carte colorate a piacere. Incollare al centro un centrino ritagliato con la fustella del set Thinlits.
2- Incollare in alto un pezzo di carta avanzata dal ritaglio della bandierina della card.
3- Realizzare una abbellimento cuore con le fustelle dello Starter kit, così come vi avevo spiegato qui. Incollare il cuore aggiungendo un filo di lana pom pom colorato.
Spero che queste idee vi possano dare delle ispirazioni per creare nuove card e pacchetti regalo.
Buon divertimento con la vostra Big Shot!

Black and White Stamped Tattered Florals

$
0
0


Hi there! Today I have a fun project to share with you created by Darkroom Door Creative Team member Godelieve Tijskens using the Sizzix Bigz Tattered Florals Die along with Darkroom Door stamps!


Instructions:
1. Cut flower shapes using Sizzix Tattered Florals Die 656640 and white cardstock.
2. Use Darkroom Door 'Checkered DDBS013' and 'Dots DDBS004' Background Stamps to stamp a pattern onto the flowers using a black ink pad.
3. Doodle around the edges of the flower shapes to make a border on the flowers. 
4. Stamp flower stems onto the white folded card using Darkroom Door String Sentiments stamp set DDRS066. Attach the flower petals to the top of the stem, layering with black flower centres. Doodle some white dots with a pen.
5. Stamp smaller flowers from Darkroom Door String Sentiments stamp set DDRS066 and doodle a stem. 
6. Doodle a border around the edge of the card and add some small black dots to finish!


Products used:
Sizzix: Tim Holtz Alterations Die Tattered Florals
Darkroom Door stamps:  String Sentiments, Checkered Background, Dots Background
Ranger Archival ink - Jet Black
White Pen Signo
Black pen Sakura Micron

Don't you just love this idea? 

Hope you all have a creative weekend! Thanks for stopping by!

Rachel

"I Love You" card by Gerry van Gent

$
0
0

Hello Sizzix friends!
For my Sunday post today I created a card where I
combined Sizzix dies with a gorgeous shabby chic resin
rub-ons and pattern papers. 

657900 Sizzix Big Shot Machine
658948 Sizzix Thinlits Frame, Fancy Rectangle 
659069 Sizzix Thinlits Butterfly, Flowers & Lattice
657523 Sizzix Sizzlits Card Phrases Set #2
*  *  *
The lattice was die-cut once and cut into two. A piece of it I used to
decorate the top of the frame and the other part was used on the bottom as a border.

*  *  *  
OTHER PRODUCTS I USED:
Pattern Papers - Webster's Pages, Prima Marketing
Shabby Chic Resin - Prima Marketing, Ingvild Bolme
Rub-ons - Prima Marketing
*  *  * 

Thank you for visiting!
Gerry

The Festival of Quilts 2013

$
0
0


Wow - I think that just about sums up how I spent the past few days at the Festival of Quilts demonstrating the Big Shot on The Cotton Patch stand. The response to the Big Shot was fantastic, and we sold quite literally a mountain of machines and dies!

Festival of quilts 2013

The festival of quilts is the largest quilt show of its kind in Europe, and is really the one big event that brings all of us together within the UK. I look forward to going every year, to see the quilts, to shop and to meet up with friends. This year I was helping out one of the longest standing (and the biggest) patchwork and quilting shops in the UK, The Cotton Patch.

I met some fantastic customers this Festival and it was an absolute pleasure to be able to recognise faces from last year who had been on the Sizzix workshop with me and Angela last year,  had bought Big Shots then and were stocking up on new dies to try new ideas.


Festival of quilts 2013

It's a wonderful festival - completely exhausting, a little overwhelming when you are working and faced with so many hundreds and thousands of visitors at first, but I wouldn't swap it for the world. It's such a pleasure.

I also have exciting news for you if you're a fan of the hexagon dies - there are 2 new larger sizes coming soon, so watch this space and I'll tell you all about them as soon as they're here.

Right now, I'm going to unpack my bags and get back to work. Festival has inspired me to make some new projects - I'll be back next week with a tutorial for you using the 2 dies that we seemed to sell the most of. The half square triangle and co-ordinating square. But first, I think I'll have a little sit down and a well earned cup of tea!

If you were one of the many visitors I had the pleasure of meeting this weekend - welcome to the Sizzix family! I hope you have as many hours of fun with your new big shot as I do!

Watering Can Card

$
0
0


Today I have made a card using the Watering Can Scoreboard XL Die. This die makes an awesome box, but I wanted to try something different and also I was looking for a very modern look for it.

Supply list:
  • Silver cardstock
  • Silver corrugated cardstock
  • Paper scraps
  • Satz'on Ink
  • Color pencils
  • Stamps
  • Glossy Accents
  • Liquid glue
  • Foam squares
  • Black permanent marker

It is very simple to make a card using this Die, just die cut twice the shape of the can, glue both pieces on the handle and your card base is ready. Now it is time to embellish :)
I have used some Staz'on ink on the metallic cardstock to give some dimension and to stamp some arrows. I have stamped my sentiment on a piece of craft cardstock and colored it with simple color pencils. Finally, I have created an embellishment using the Fancy Oval Die set, and put on the card with some foam squares. As my final touch I have varnished some elements with Glossy Accents.


Happy Monday!
................................
Hoy he hecho una tarjeta utilizando el Watering Can Scoreboard XL Die. Este troquel hace una caja estupenda, pero quería probar algo diferente y que tuviera un aire más moderno.

materiales:
  • Cartulina plateada
  • Cartón corrugado plateado
  • Restos de papeles
  • Satz'on Ink
  • Lápices de colores
  • Sellos
  • Glossy Accents
  • Pegamento líquido
  • Foam adhesivo
  • Rotulador permanente negro
Hacer esta tarjeta es muy sencillo. Solo tienes que troquelar dos veces la forma de la regadora y pegarlas por la parte de las asas. Una vez tienes la base es cuestión de adornar :)
He utilizado tinta Staz'on para dar un poco de dimensión a la cartulina y para estampar algunas flechas. Después he estampado el título en un trozo de cartulina craft y lo he pintado con lápices de colores. Por último he creado un adorno con el  Fancy Oval Die set y lo he pegado a la tarjeta con foam adhesivo. Como último toque he barnizado algunos elementos con Glossy Accents.

¡Feliz lunes!

Pop - Up Card with hidden tags

$
0
0


Hi Sizzix friends.... today I a Pop - Up Card with some hidden tags to show you. I have used the 657836 Sizzix Bigz Die - Vintage Typewriter on the inside of the card..............


Supply list:

657900 Sizzix Big Shot Machine Only (Powder Blue & Teal)
658378 Sizzix Pop 'n Cuts XL Die - Card, Square w/Ornate Edge
658373 Sizzix Pop 'n Cuts Magnetic Insert Die - Label, Funky 3-D (Pop-Up)
657836 Sizzix Bigz Die - Vintage Typewriter
658367 Sizzix Movers & Shapers Magnetic Die Set 2PK - Butterflies
658526 Sizzix Bigz Die - Elisse

Papers from Pion Design - Vintage Garden, Chipboard
Stamps from Stampers Anonymous Tim Holtz Collection


The typewriter is distressed  with Distress Paint - Black Soot and Brushed Pewter.
Sew or glue a pocket on the card to the tags.


 ..............and the cute butterfly from this die  658367 Sizzix Movers & Shapers Magnetic Die Set 2PK - Butterflies on the outside of the card.


 Manila tag # 5 is distressed with Distress ink Pad - Old Paper, Frayed Burlap, Tumbled Glass and Walnut Stain before I die cut butterflies with


Thanks for stopping by, wish you a great day!
Anne Kristine

Hei alle sammen... i dag har jeg laget et Pop - Up kort med skjulte tags. 
På innsiden av kortet har jeg brukt 657836 Sizzix Bigz Die - Vintage Typewriter......
...og på utsiden av kortet har jeg brukt  658367 Sizzix Movers & Shapers Magnetic Die Set 2PK - Butterflies

Produkter: 
657900 Sizzix Big Shot Machine Only (Powder Blue & Teal)
658378 Sizzix Pop 'n Cuts XL Die - Card, Square w/Ornate Edge
658373 Sizzix Pop 'n Cuts Magnetic Insert Die - Label, Funky 3-D (Pop-Up)
657836 Sizzix Bigz Die - Vintage Typewriter
658367 Sizzix Movers & Shapers Magnetic Die Set 2PK - Butterflies
658526 Sizzix Bigz Die - Elisse

Papir fra Pion Design - Vintage Garden, Chipboard
Stempler fra Stampers Anonymous Tim Holtz Collection

Skrivemaskinen er distresset med Distress Paint - Black Soot og Brushed Pewter.
Sy eller lim en lomme på kortet til tags.

Manila tag # 5 er distresset med Distress ink Pad - Old Paper, Frayed Burlap, Tumbled Glass og Walnut Stain før jeg kuttet ut sommerfuglene med  658367 Sizzix Movers & Shapers Magnetic Die Set 2PK - Butterflies

Takk for at du stikker innom her og ønsker deg en herlig dag!
Anne Kristine


Easel Card

$
0
0


Hello everyone
Today I will show you an easel card using different sorts of the beautiful Sizzix dies
 Items I have used:
Big Starter Kit (658300)
Sizzix bigz Flower, Black Eyed Susan ( 658422)
Sizzix Bigz Estate ( 658527)
Framelits Banners (658289)
Decorative Strip Vintage Lace ( 657481)
Supply list:
Paper: Inkido Beautiful Memories serien-Pink Blossom-, green and off white cardstock
Ink:Distress ink from Ranger-Vintage Photo and Frayed Burlap
Stamps: Inkido, Vilda stamp and stampers anonymous Tim Holtz Collection CMS 156 worn text
Brads and flowers
How to make:
Cut off white cardstock 15x30 cm scor 15 and 22,5 cm, cut one more 15x15 cm it's the front of the card
Cut 2 pieces of patterned paper 14,5x 14,5 cm, glue to the inside and to the front of the card
Die cut the different sorts of dies , ink the edged using distress ink -Vintage Photo-
Stamp on the patterned paper using ink - Frayed Burlap
Decorate the card using lace, flowers and brads


Thanks for stopping by and I hope it gave you some inspiration. See you next Tuesdag.
Wish you a great week
Hej igen
I dag vil jeg vise et staffelikort hvor jeg har brugt flere forskellige af de skønne Sizzix dies
Dies jeg har brugt:
Big Starter Kit (658300)
Sizzix bigz Flower, Black Eyed Susan ( 658422)
Sizzix Bigz Estate ( 658527)
Framelits Banners (658289)
Decorative Strip Vintage Lace ( 657481)
Andre materialer:
Papir: Inkido Beautiful memories serie-Pink Blossom-, green og off White cardstock
Ink:Distress ink fra Ranger-Vintage Photo og Frayed Burlap
Stamps: Inkido, Vilda stamp og stampers anonymous Tim Holtz Collection CMS 156 worn text
Brads og blomster
Sådan gør du:
Skær  off white karton 15x30 cm scor  ved 15cm og  22,5 cm, skær et stykke på15x15 cm dette er forsiden af kortet
Skær 2 stykker mønstret papir 14,5x 14,5 cm, lim det ene til indersiden af kortet og det andet til det der er forsiden på kortet
Udstands de forskellige Sizzix dies, svært alle kanter med Vintage Photo
Stempel på det mønstrede papir med Frayed Burlap og på tagen
Dekorer kortet med blonder, blomster og brads.
Tak fordi du kiggede forbi, jeg håber du fik lidt inspiration. Vi ses næste tirsdag
Ønsker dig en fantastisk uge
Pia

Hippy Chic

$
0
0

Hello, well the sun has stopped shining here in Wales but I have decided to share some summer projects with you that my daughter loves. At twenty two, my wild child loves to go to music festivals and loves the 'Indie' look so when I came up with some ideas to adapt some very ordinary items to make them more bohemian she was thrilled. 

The Bigz die that I have used is from the Indie Craft Festival collection which consists of a variety of Bigz, Sizzlits, Framelits with matching Textured Impressions Embossing Folders. I really love the collection and as the motifs were festival inspired it was perfect choice for the type of projects I was hoping to create.


The beauty of the Bigz die is that its steel rule capabilities allow it to cut out so much more than paper and card so I took full advantage of this to create this shrink plastic bracelet. Shrink plastic is such an under rated material and to be honest, I hadn't used it for years and was surprised to discover that there was a printable version, obviously this is great for shrinking down photographs but for this project I decided to scan in a piece of patterned paper and printed on to this.

Once the design was printed onto the shrink plastic, I die-cut the flower shape using the 

Sizzix Bigz Die - Flowers & Leaves


and then used the heat gun to shrink the flower shape. I LOVE the effect! 

It was easy to select the beads and thread everything together, I used a length of elastic and knotted the ends to secure, it would be such a nice project to make with children actually as they are always fascinated by shrink plastic, (just like me!)


And now the same die, different materials! 


Here I die-cut fabric scraps backed with iron-on adhesive, once the flower shapes were cut out I simply removed the backing and ironed into position, I am not the most amazing when it comes to sewing but i think the simple running stitch works well with the naivety of the flower shapes, (just as well really!) Buttons add a little dimension to the cushion but you could use beads to create the same simple effect.


The buzz word at the moment seems to be up cycling and with the current economic climate here in the UK I can understand why! One of my daughters friends has recently opened a vintage shop and I was amazed to see just how busy she is with everyone not just looking for a bargain but more importantly seeking something 'different'. There seems to be a rejection of the high street shops at the moment due to a need for low cost originality. This retro leather bag was embellished with die-cut leather and felt flowers stuck in place with the trusty glue gun. 


I really hope that you have enjoyed my projects, have a great week!

Butterflies

$
0
0

Hi Everyone!

Today I would like to show you a card.

Items used:
Big Shot Machine (657900)
Sizzix On the Edge Die - Butterflight (657495)
Sizzix Thinlits Die - Frame, Fancy Rectangle (658948)

I cut Butteflies borders using Butterflight die two times (from striped paper and white cardstock). I cut out butterflies from white border and glued them onto the striped butterflies border.
I cut frame using Frame, Fancy Rectangle die to make my card more elegance.
I coloured stamp with Copics Markers. I added crystals and liquid pearls onto the card.

Have a nice day!


Всем привет!

Сегодня я хочу показать открытку. 

Я вырезала бабочковые бордюры из полосатой бумажки и белого кардстока (с помощью ножа Butterflight). Из белого бордюра я вырезала отдельно бабочек и наклеила их на полосатый бордюр, чтобы придать бабочкам больше объема и полета.

Из голубой бумаги я вырезала рамку с помощью ножа Frame, Fancy Rectangle.  Она такая ажурная, что, как мне кажется, придает открытке больше элегантности.

Сама картинка - это штамп, который я раскрасила маркерами Copic.

Материалы:
Big Shot Machine (657900)
Sizzix On the Edge Die - Butterflight (657495)
Sizzix Thinlits Die - Frame, Fancy Rectangle (658948)

Всем хорошего дня!


Thank You card

$
0
0


Hello!

I don’t really have time to scrapbook this summer however I’m filling my stock of THANK YOU cards!

Here are two new very colourful cards:

Supply list:

Cardstock: American Crafts
Mask: Heidi Swapp
Embellishments: My Mind's Eye
Stickers: Pebbles
Inks: Dylusions, Glimmer Mist
Inks: Prima Vintage pink, Versafine noire
Stamps: Glitz Design, Hero Arts
Others: cloth

Dies:

658300 Sizzix Big Shot Starter Kit
658290 Sizzix Framelits Die Set 5 PKwith stamps Butterflies #4

Start by cutting two rectangles size 10x16cm & 15x12cm out of white cardstock. Fold in half.

Add an orange rectangle on each card to add colour and dynamism.

The “thank you” card is reworked with a paper that has scooped-out butterflies. Then apply a mask and spray turquoise blue ink. Add embellishments.

The “hello” card is reworked with the same mask and calendar stamps. I stapled a butterfly cut out of cloth; it is used as an accent.
Add a title and 3D embellishments.


See you Thursday!

Karine

Bonjour !

Cet été pas vraiment le temps de scrapper mais par contre je refais mon stock de cartes de remerciement !

Voici deux nouvelles cartes colorées à souhait.

Matériel utilisé :

Cardstock : American Crafts
Pochoir : Heidi Swapp
Embellissements : My Mind's Eye
Autocollants : Pebbles
Encres : Dylusions, Glimmer Mist
Encres : Prima Vintage pink, Versafine noire
Tampons : Glitz Design, Hero Arts
Divers : tissu

Dies utilisés :

658300 Sizzix Big Shot Starter Kit
658290 Sizzix Framelits Die Set 5 PKwith stamps Butterflies #4

Commencez par découper dans du cardstock blanc deux rectangles de 10x16cm et 15x12cm. Pliez en deux.

Ajoutez un rectangle de cardstock orange sur chaque carte pour ajouter de la couleur et du dynamisme.

La carte "Thank you" est retraillée avec un papier contenant des papillons évidés, positionnez ensuite un pochoir et vaporisez en turquoise. Complétez avec des embellissements.

La carte "Hello" est retravailée avec le même pochoir et des tampons calendrier. Un die papillon découpé dans du tissu est agrafé en guise d'embellissement.
Complétez avec un titre et des décorations en volume.

A jeudi !


Karine

Festival 2013 was fun.

$
0
0


Hello everyone - last week seems a long time ago - we were just into the first day of the show, and now everything is packed away and we are all tired but inspired with so many ideas for new projects that we have no idea where to start.
As Katy has already said, in her blog this week, we had a lot of fun, meeting some of you for the first time, and welcoming others of you back again.
Here I am just starting the workshop and this is the end of one of the workshops with some people sewing by hand and some using the machines that were on loan from Elna, which we greatly appreciated.
This shows quite a quiet time  - at times we were completely surrounded by people watching the workshops, and for any of you who didn't manage to grab a seat I hope to see you at Alexandra Palace, Knitting and Stitching show, where I will be demonstrating the Big Shot and Bigz dies alongside Cotton Patch.
I was amazed at some of the work on display at the show - some were truly inspiring, and I have come back with so many ideas and the promise to myself that I am going to practice my quilting before next Festival.

In the meantime I have a little project that I have been working on - Butterfly bunting -


I have fused to fabrics Right sides together and then cut them out using Bigz Die 658629 and the Big Shot.
I only cut 3 of these double layers at a time and attached them to the ribbon with a few stitches and here below is Eve, my grand-daughter displaying them for me, before we hang them in her bedroom.

I think I will make some more and zig-zag stitch around the edges and maybe add some beads, but for this week - that's all I have the energy for.
I'm sure there will be more ideas for bunting in the next few weeks, and over the coming months there will be projects inspired from the Festival.
I hope you've all had as much fun as I have over the last week.
Angela

What a sell-out!

$
0
0


I return to you fresh from another great show at Create and Craft. The response to our Sizzix shows has been fantastic and there is another one in the pipeline for the end of the month (details to follow).

The fastest selling item on the show was the Framelits w/Stamps Set - Flowers, Star by Paula Pascual (658621) as I confidently predicted (Nice to get it right for once!!!).

We saw this set used to great effect in last weeks blog, but such was the response from the Create & Craft viewers I thought I would show you a few more things made with what is rapidly becoming one of my favourite sets. Why do I love it so much? Simple, it's so versatile you can use both the stamps and dies independently or both together to create some wonderful effects.

When people who design craft projects for a living design the dies too, then versatility and functionality are top of the agenda that's what makes Paula's work so timeless and classy. It is almost impossible to make a bad card....Trust me, I've tried


Summer Travel Scrapbook: Sicily

$
0
0

Hi Everyone! This is Anna.
It's summertime and life is feeling' pretty easy, so shouldn't the scrapbooking be easy too?
I love creating travel layouts. Chronicling the travels on scrapbook pages allows you to relive the trip even when you’re back home. It takes me back to the places I have been, the colors, the smells, the people are coming up while I create.
Here are my travel layout. This was a special vacation we took to Sicily, Italy.

cafe creativo - sizzix big shot - Travel - Sicily (1)

To make this layout, I took my cue from the photo. Used a lot of dies on this layout. Everything about this page reminds me of the sights we saw and the fun we had that day.

cafe creativo - sizzix big shot - Travel - Sicily (2)

cafe creativo - sizzix big shot - Travel - Sicily (3)

Hope you like this layout! See you next Friday!
Happy Summer!

Items used:
Sizzix Big Shot Starter Kit (658300) machine+dies
Sizzix Thinlits Die Set 4PK - Love Birds & Hearts (659006)
Sizzix Thinlits Die Set 2PK - Doily & Doily Border #2 (659058)
Sizzix Framelits Die Set 5PK - Labels, Wavy (658363)
Sizzix Bigz Die - Tiny Tabs & Tags (657188)
Sizzix Movers & Shapers Die - Tag & Tie (657859)
Sizzix Framelits Die Set 6PK w/Stamps – Banners (658289)
Sizzix Sizzlits Decorative Strip Alphabet Die - Chip Block (656917)

1 photo (cm 10x15)
cardstock: blue American Crafts, kraft (reuse packaging)
patterned papers: American Crafts, Studio Calico, 4 heures 37
glitter embellishment: American Crafts
notebook paper
handamade paper
sheet music
white alphabet
acrylic paint
washi tape
mini tag
scrap of gold fabric
strass

**************************************
Flag_of_Italy Per le amiche italiane! :)

Ciao ragazze! E' venerdì, quindi ci risiamo con un nuovo appuntamento scrap con Anna :)
Passato bene il Ferragosto? D'estate la vita scorre lenta e tranquilla... finalmente si può oziare un po' e magari dedicarci di più allo scrap!
Infatti questa settimana sono riuscita a fare una paginetta estiva, su un viaggio in Sicilia di un paio d'anni fa. Adoro fare i LO sui viaggi, perchè mentre creo, ritornano alla mente i ricordi, i bei posti visitati, i profumi, i colori, la gente...
Sono partita dalle sfumature blu del mare e del cielo della foto, così con l'aiuto dell'acrilico bianco ho sfumato il mio cartoncino azzurro partendo dal basso. Poi ho messo in evidenza la foto sovrapponendola a qualche carta... Qualche spruzzata di colore arancione, quindi sono passata agli abbellimenti ritagliati con la Big Shot: centrino cuore, tag, farfalla in negativo, mini tag, etichette, bandierina, un altro centrino, l'alfabeto.
Spero che il mio layout vi sia piaciuto. Tornate a trovarmi venerdì prossimo!
Felice Estate! :)

Materiali:
Sizzix Big Shot Starter Kit (658300) machine+dies
Sizzix Thinlits Die Set 4PK - Love Birds & Hearts (659006)
Sizzix Thinlits Die Set 2PK - Doily & Doily Border #2 (659058)
Sizzix Framelits Die Set 5PK - Labels, Wavy (658363)
Sizzix Bigz Die - Tiny Tabs & Tags (657188)
Sizzix Movers & Shapers Die - Tag & Tie (657859)
Sizzix Framelits Die Set 6PK w/Stamps – Banners (658289)
Sizzix Sizzlits Decorative Strip Alphabet Die - Chip Block (656917)

1 foto (cm 10x15)
cartoncino: azzurro American Crafts, kraft (riciclando un packaging)
patterned papers: American Crafts, Studio Calico, 4 heures 37
abbellimento glitter: American Crafts
pagina di quaderno
carta artigianale
pagina di spartito
alfabeto bianco
colori acrilici
washi tape
mini tag
ritaglio di stoffa dorata
strass

3D Flower in Canning Jar

$
0
0


Hello everyone- I have a fun summer project for you today.

I used the Canning Jars ScoreBoard die from the Picket Fence collection to cut plastic from die packaging. Then I did something weird to it, just to see if it would work- and it did! (See step #5)


Supplies:

658453  Sizzix ScoreBoards XL Die - Canning Jars, 3-D by Eileen Hull
657122  Sizzix ScoreBoards XL Die - Album, Photo by Eileen Hull
657118  Sizzix Bigz Die - Flowers, 3D #2 by Eileen Hull
657119  Sizzix Bigz Die - Leaves by Eileen Hull
658445  Sizzix Bigz Die - Phrase, Bloom & Plant Markers
658458  Sizzix Textured Impressions Embossing Folders 4PK - Jar Labels Set by Eileen Hull
657900  Sizzix Big Shot machine

plastic die packaging, Turquoise and Silver Staz-On ink, green rickrack, yellow tissue paper, chipboard, spray adhesive, burlap, white and aqua spray paint, green wool felt, heat gun, matboard scrap

  1. Cover a piece of chipboard about 5" x 7" with burlap. Adhere burlap with spray adhesive.
  2. Run burlap covered chipboard through Big Shot using 4" x 6" rectangle from Album die. 
  3. Spray paint 4" x 6" piece with 2-3 coats of white spray paint. Let each layer dry, then add another coat. Concentrate white on the bottom and blue at the top.
  4. Die cut a small Canning Jar from packaging. Run jar through machine using Quilted Jar folder. With Turquoise Staz-On, ink the raised areas of the embossed jar.With Silver Staz-On, color the lid of the jar by swiping color across the jar with a sponge. 
  5. Lay plastic die cut jar over a jar or can (I used a soup can) and apply heat using heat gun. The plastic will melt to the shape that is below and when it cools, the plastic will keep the shape of what it was on top of. This will cause the embossing to flatten but the color will stay! Now you have a nice rounded realistic shape to your canning jar.
     
  6. Die cut 10-12 Flowers, 3D from yellow tissue paper. Follow instructions on package to assemble medium size flower. Use a pipe cleaner to keep layers together. Fluff flower.
  7. Die cut leaves from wool felt (I actually cut up an old jacket that I had in my closet for years!)
  8. Die cut "Bloom" from a piece of scrap matboard.
  9. Adhere jar to chipboard piece using Zip Dry Paper Glue. Position green rickrack for stem and glue in place. Add leaves, flower and "bloom". 
  10. Use Crop-a-dile to punch two holes. Thread three stands of hemp through and knot for hanger.
Hope you enjoy what's left of the summer!

scrappy squares cushion

$
0
0


Last week I promised you a tutorial using half square triangle and square dies. Unfortunately some family things sidetracked me and that tutorial will happen next week instead. Sorry about that!

Instead I'm going to show you what happens to the scrap squares I cut using my 2.5" square die.
Mostly I seem to make pretty piles of these squares every time I have scraps leftover from a project. My scraps are always cut into smaller squares - either 4.5" or 2.5" depending on the size of the scraps.

144 of these little squares makes a great sized cushion...this is basted (using basting spray which if you've never tried you really should give it a whirl, it's fantastic. Especially for smaller quilts and cushions)

144 x 2" squares = 1 perfect sized pillow top

You can make the sewing together easier by making 4 blocks - each block 6 rows of 6 squares (36 squares) and sewing the 4 blocks together. Sewing 12 rows of 12 squares can get you a little tangled!


144 x 2" squares = 1 perfect sized pillow top

This will give you a cushion top of 24.5" before quilting - perfectly sized for propping yourself up in bed to read or for a floor cushion for a small child.

I need to quilt this now and finish it off with an envelope opening (because that's by far the quickest way to finish off a cushion). It might be a little early to think about Christmas, but these would make great gifts and the only fabric you would need to buy is for the envelope opening - so they're nice and cheap too!

You could also monogram them with appliqued initials of a favourite saying (like this that my teenage daughter is always using)

Stuff the teenager says

I printed off letters for this one using Word on my computer and traced them onto fusible web, but the sassy serif alphabet dies would make this job far easier (those dies are firmly on my christmas wish list - I would use them so much!)


Viewing all 2033 articles
Browse latest View live