This is a layout on my coffee addiction inspired by the new Sizzix embossing folders!
I used them as soon as I received them!
Supply list:
Papers: Basic Grey, Lilybee Design, Color Conspiracy
Glitter paper: American Crafts
Cardstock: American Crafts
Alphabets: American Crafts, Jillibean Soup
Frames: Crate Paper
Wood embellishments: Studio Calico
Masking Tape: Lovely Tape
Sticker Basic Grey
Chipboards: Studio Calico
Stamps: Hero Arts, Glitz Design, 7Gypsies
Ink: Chalk Prima
Others: Ribbon
Dies:
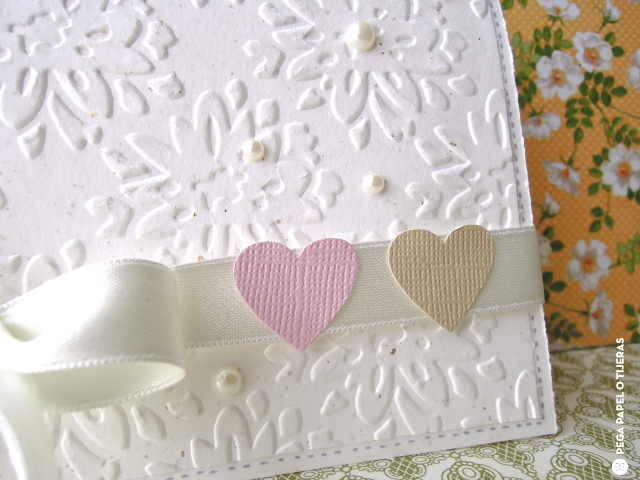
657212 Sizzix Movers and Shapers magnetic die 2PK-mini hearts set
658380 Sizzix Textured Impressions Embossing-Folders 2PK- Coffee Set
658002 Sizzix Sizzlits Decorative Strip Die- Lace and circles
Start by choosing pastel coloured pattern papers and a background with soft patterns (here it is my pretty hearts paper).
Use the coffee embossing folder with a white cardstock: a perfect match for my theme!
I also stamped a cup pattern (Hero Arts) and cut it up.
Cut a lace border with your Big Shot, small hearts out of golden paper, choose some wooden hearts, two Pola frames and some little bubble chipboards.
Gather and glue all these elements around your picture.
Glue the golden hearts with 3D adhesives to make them stand out more.
Add your title using three different fonts.

Add some masking tape strips and your lay-out is done!


Page "Coffee, Love, Addict"
Une page sur mon addiction pour le café largement inspirée par les nouvelles plaques à embosser Sizzix !
A peine reçu, aussitot scrappées !
Matériel :
Papiers : Basic Grey, Lilybee Design, Color Conspiracy
Papier paillettes : American Crafts
Cardstock : American Crafts
Alphabets : American Crafts, Jillibean Soup
Cadres : Crate Paper
Embellissements en bois : Studio Calico
Masking Tape :Lovely Tape
Autocollant : Basic Grey
Chipboards : Studio Calico
Tampons : Hero Arts, Glitz Design, 7Gypsies
Encre : Chalk Prima
Divers : Ruban
Dies utilisés :
657212 Sizzix Movers and Shapers magnetic die 2PK-mini hearts set
658380 Sizzix Textured Impressions Embossing-Folders 2PK- Coffee Set
658002 Sizzix Sizzlits Decorative Strip Die- Lace and circles
Commencez par choisir des imprimés dans les tons pastels et un fond de page aux motifs discrets ici mon joli papier à coeurs.
Embossez sur du cardstock blanc la plaque "café", juste idéale pour ma thématique !
Dans la même idée, tamponnez et découpez un tampon tasse de la marque Hero Arts.
Découpez une frise dentellée à l'aide de votre Big Shot, des petits coeurs dans du papier doré, sélectionnez des coeurs en bois, deux cadres pola, des petites bulles chipboards.
Assemblez tous ces éléments autour de votre photo.
Afin qu'ils ressortent bien, montez les coeurs dorés en 3D à l'aide d'adhésifs.
Complétez avec votre titre en jouant sur trois typo différentes.
Ajoutez quelques bandes de masking tape et votre page est terminée !
Karine

")
")
")
")


")
")
")