Quantcast
Channel: Crafting ideas from Sizzix UK
Viewing all 2033 articles
Browse latest View live

Snowman Gift Tag

$
0
0

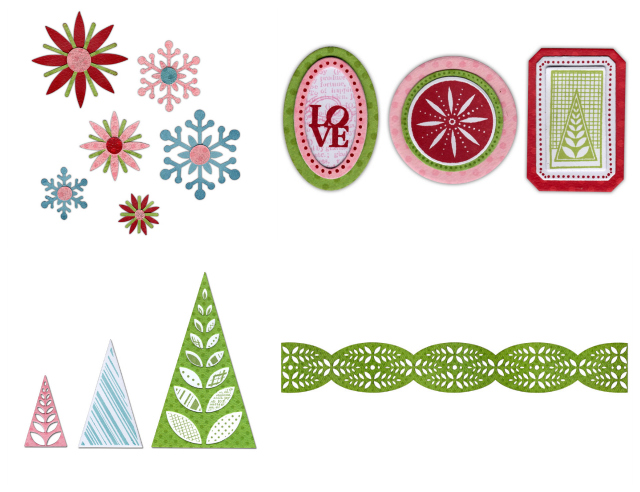
Hi everybody! September is already here and as everybody is in the "back to school" mood, I'm already thinking about Christmas. Have you already seen Paula Pascual's amazing collection Winter Moments? This is an Europe Exclusive range and I love every single one of these dies!!

All dies in this collection are very versatile and there are so many creative possibilities. Today I'm showing you how to make a Snowman Gif Tag. Enjoy the video!


Supply list:


Happy Monday!

........................................

¡Hola a todos! Septiembre ya está aquí y mientras todo el mundo está en modo "vuelta al cole" yo ya estoy empezando a pensar en Navidad. ¿Habéis visto ya la estupenda colección "Winter Moments" de Paula Pascual? Esta colección es exclusiva para Europa y a mí me encantan todos y cada uno de los troqueles. La verdad es que son muy versátiles y hoy os voy a enseñar cómo podéis hacer un muñeco de nieve con ellos. ¡Disfrutad del vídeo! 

Materiales:
¡Feliz lunes!

Card with tags and stars....

$
0
0


Hi everybody....today I have made a card for you with Brenda Waltons Gift Tags -Sizzix Bigz Die - Gift Tags ...beautiful design on these Gift Tags ♥
The stars I found on this Sizzix Die - Sizzix Bigz Die - Stars, Celestial 


Supply list:
657900 Sizzix Big Shot Machine Only (Powder Blue & Teal)
658730 Sizzix Bigz Die - Gift Tags
658345 Sizzix Bigz Die - Stars, Celestial 
656627 Sizzix On the Edge Die - Scallops
657826 Sizzix Sizzlits Decorative Strip Die - Washer Border

Papers: Authentique, Manila tag #12
Stamps: Stampers Anonymous Tim Holtz collection
Inks: Distress ink Pad - Walnut Stain, Broken China, Archival Ink - Jet Black, 
Other: Tim Holtz Stencil, Seam Binding Ribbon, Button, Feather.


Fold Patterned paper to a card and die cut the edge with  Sizzix On the Edge Die - Scallops
Die cut 3 stars with Sizzix Bigz Die - Stars, Celestial and distress the edges with Distress ink Pad - Walnut Stain. Sew or glue the stars to the card. 
Die cut 2 Gift Tag with  Sizzix Bigz Die - Gift Tags
Die cut border with Sizzix Sizzlits Decorative Strip Die - Washer Border and glue it together with Gift Tag , ribbon and feather. Sew a button on the star and glue it to the card.


Distress Manila tag # 12 with Distress ink Pad - Walnut Stain and Broken China. Distress the tag with Tim Holtz Stencil....add some text and glue a Gift Tag (for journaling)  to the main tag.
Wish you a great day and thanks for stopping by.
Anne Kristine

♥♥♥♥♥

Hei alle sammen ...i dag har jeg laget et kort med Brenda Waltons Gift Tags -Sizzix Bigz Die - Gift Tags ...nydelig design på disse tags'ene ♥
Stjernene fant jeg på denne Sizzix die - Sizzix Bigz Die - Stars, Celestial 

Materialer:
657900 Sizzix Big Shot Machine Only (Powder Blue & Teal)
658730 Sizzix Bigz Die - Gift Tags
658345 Sizzix Bigz Die - Stars, Celestial 
656627 Sizzix On the Edge Die - Scallops
657826 Sizzix Sizzlits Decorative Strip Die - Washer Border

Papir: Authentique, Manila tag #12
Stempler: Stampers Anonymous Tim Holtz collection
Inks: Distress ink Pad - Walnut Stain, Broken China, Archival Ink - Jet Black, 
Annet: Tim Holtz Stensil, Seam Binding bånd, knapp, fjær.

Fold mønsterark til et kort og stans ut kanten med  Sizzix On the Edge Die - Scallops
Stans ut 3 stjerner med Sizzix Bigz Die - Stars, Celestial  og distress kantene med Distress ink Pad - Walnut Stain. Sy eller lim stjernene til kortet.
Stans ut 2 tags med Sizzix Bigz Die - Gift Tags
Stans ut borden med  Sizzix Sizzlits Decorative Strip Die - Washer Border og lim det sammen med tag, bånd og fjær. Sy en knapp i midten av stjernen og lim det til båndet.
Distress Manila tag # 12 med Distress ink Pad - Walnut Stain og Broken China. Distress tag'en med Tim Holtz Stencil....stemple tekst på tag'en og lim Gift Tag (for journaling)  til den store tag'en.

Ha en fin dag og takk for at du stikker innom her.
Anne Kristine


Happy birthday

$
0
0


Hi Everyone
Now  it's Tuesday again. Today i will show you a birthday card using a lots of the beautiful Sizzix dies

Items used:
Sizzix Bigz Flower-black eyed Susan ( 658422)
Sizzix Bigz Gullian ( 658529)
Sizzix bigz Alphabeth set Serif Essentials Numbers 2 dies ( 656616)
Frame fancy rectangle ( 658948)
Sizzix thinlits Leaves garden by Susan Garden ( 658413)
Sixxiz thinlits dies set  Border, Label,medallion,Key ( 658953)
Supply list:
Paper: Inkido-Beautiful Memories-, off White cardstock
Stamp: Stampers Anonymous- simple saying- Tim Holtz Collection
Ink: Distress ink - Vintage Photo- 
Flower, Pountura paint - white- and ribbon
How to make:
1. Make a cardbase 14,5x14,5 cm using off white cardstock
2. Cut out patterned paper 14x14 cm and glue to the center of the card base
3.Cut out off white cardstock 13,5x13,5 cm and one in patterned paper 12x 12 cm, glue to the center of the card base
4.Die cut the different sorts of Sizzix dies and decorate the card


I hope it gave  you some inspiration, wish you a great week
See you next Tuesday
Pia
Hej igen
Så er det allerede tirsdag igen. I dag vil jeg vise et fødselsdags kort hvor jeg har brugt mange af de skønne Sizzix dies
Dies jeg har brugt:
Sizzix Bigz Flower-black eyed Susan ( 658422)
Sizzix Bigz Gullian ( 658529)
Sizzix bigz Alphabeth set Serif Essentials Numbers 2 dies ( 656616)
Frame fancy rectangle ( 658948)
Sizzix thinlits Leaves garden by Susan Garden ( 658413)
Sixxiz thinlits dies set  Border, Label,medallion,Key ( 658953)
Andre materialer:
Papir: Inkido-Beautiful Memories-, off White karton
Stempler: Stampers Anonymous- simple saying- Tim Holtz Collection
Ink: Distress ink - Vintage Photo- 
Blomst, Pountura paint - white- og forskellige bånd
1. lav en kort base14,5x14,5 cm ved at bruge off white karton
2. skær i mønstret papirpaper 14x14 cm og lim til midten af kort basen
3.Skær ud  off white karton 13,5x13,5 cm og et stykke mønstret papir12x 12 cm, lim til midten af kortet
4.Udstands de forskellige Sizzix dies og dekorer kortet
Jeg håber dette gav dig lidt inspiration. Ønsker dig en dejlig uge
Vi ses næste tirsdag
Pia

The Colour Purple

$
0
0

Hello,

I am imagining there will be a lot of people dusting there craft tools off now that the children have gone back to school, I love making quick projects but it is lovely not to have any interuptions and have a whole day of crafting at home with lots of chocolate biscuits to maintain my energy levels!

Naturally when the children return to school everyone starts the countdown to Christmas and I am determined to get organised this year! Although I will buy gifts for friends and family I plan to make little additional items to go along with the main gift, something simple and personal to each person, or family. Over the next few weeks I will share my creations with you and maybe other Christmas ideas that I have along the way, from decorations to simple card makes that can be created in bulk using the Big Shot machine.

This week has gone so fast however and I have just had time to photograph a little project that I created for Pete to take with him to Create and Craft this weekend. I have used one of the new Sizzix Brenda Walton dies from her favourite things collection which I love so much. I rarely use purple in projects but when combined with silver I think the end result works well...let me know what you think.


This project is actually a box frame, but due to the reflection on the glass I took the 'artwork' out of the frame to photograph. This could easily be used as a card layout however and in festive colours would be a simple Christmas card layout.


A little curling of the petal edges creates such a difference and gives the project dimension.


Along with the metallic card foliage, adding gems really lifts this project. I love gems, and they are so inexpensive that you can afford to add a little bling to all of your projects!


Notebook

$
0
0


Hi Everyone!

Daria is here. And today I would like to show you a notebook which I made using Sizzix dies.

Items used:
Big Shot Machine (657900)
Sizzix Sizzlits Die - Frame, Renaissance (657736)
Sizzix Framelits Die Set 6PK - Banners, Fancy (658601)
Sizzix Sizzlits Decorative Strip Alphabet Die - Inside Out (657827)

I used beautiful Renaissance Frame and Banners dies to make a base more layered. Also I used canvas, gesso and different mists to make the cover of my notebook more interesting.


I used Inside Out alphabet die to make the title.


Have a nice day!

Daria.


Всем привет!

Сегодня я с блокнотиком. Его формат А6, он не большой, но очень милый. Я сделала его с использованием холста, гессо, спреев. И конечно использовала чудесные ножи от Sizzix, чтобы сделать фон более интересным, а так же чтобы создать надпись на блокнотике.

Материалы:
Big Shot Machine (657900)
Sizzix Sizzlits Die - Frame, Renaissance (657736)
Sizzix Framelits Die Set 6PK - Banners, Fancy (658601)
Sizzix Sizzlits Decorative Strip Alphabet Die - Inside Out (657827)

Дарья.

Butterfly Card !

$
0
0


Hello!

Today let me show you how to do a card which is simple & feminine with volume and texture.

Supply list:

Papers: Crate Paper
Label: Crate Paper
Stamp: Craft Origine
Ink: Black Versafine
Others: tracing paper, sewing thread

Dies:

658518 Sizzix Textured Impressions Embossing Folder 2PK- Pom-poms and Roses Set
658334 Sizzix Sizzlits Die-Flights Of Fancy

With the “Flights of Fancy” die, cut out an XXL pretty butterfly. This die introduces you to softness and femininity, don’t you think?

I wanted to play with soft colours, pink and transparence. The butterfly is at first cut out of a Crate Paper paper scrap, then out of tracing paper. The two butterflies are then stapled together.

Then I used a “flowers” embossing folder with light pink paper. The papers are superimposed and stapled. Add a touch of texture with mustard sewing thread.

Add a “tab” sticker and a stamp “Home Made”.

The whole will be glued on a geometric pattern paper size 12x17cm.


See you next Thursday!

Karine

Bonjour !

Aujourd'hui je vous propose une carte toute simple, très féminine toute en volume et texture.

Matériel :

Papiers : Crate Paper
Etiquette : Crate Paper
Tampon : Craft Origine
Encre : Versafine noire
Divers : calque, fil couture

Dies utilisés :

658518 Sizzix Textured Impressions Embossing Folder 2PK- Pom-poms and Roses Set
658334 Sizzix Sizzlits Die-Flights Of Fancy

Découpez un joli papillon format XXL dans le die "Flights of Fancy", une découpe qui invite à la douceur la féminité, vous ne trouvez pas ?

J'ai eu envie de couleur tendre, de rose et de transparence. Le papillon est découpé une première fois dans une chute de papier Crate Paper, puis une seconde fois dans du calque. Les deux formes sont ensuite agrafées.

J'ai également embossé dans du papier rose clair une plaque fleurs. Les papiers sont ensuite superposés et agrafés. Ajoutez une touche de texture avec du fil couture couleur moutarde.

Complétez avec un stickers onglet et un tampon "Home Made".

L'ensemble sera collé sur un papier imprimé à motifs géométriques découpé au format 12x17cm.

A jeudi prochain !


Karine

Oodles of Triangles

$
0
0


Before I begin on triangles - I am happy to announce the arrival of my grand daughter, Oona Rose, on Monday evening at 10.50pm. Of course I think she's beautiful, not wrinkled and sleeps peacefully in Grandma's arms - now I really must complete that quilt for her!
So back to Triangles - I never thought they would become such a favourite of mine - but then I never used to have a Big Shot machine and the Bigz dies to cut them!
At the weekend I was in Helsinki teaching workshops for Sinelli

 - a really lovely shop, a little outside Helsinki, full of almost everything you could wish for as a crafter! It was a good job I was working most of the time, otherwise I'm sure my suitcase would have been overweight and I would be starting several new hobbies ( I did  manage to buy some lovely Christmas fabrics and a few other fabrics).
So back to the point - there was an exhibition of quilts by Ritva Ljungquist - a lovely Finnish lady, who allowed me to photograph some of her quilts to share on this blog.
 I just love the variety of patterns that she has created from using just triangles
 
 
I've added a close up so that you can clearly see that the blocks are made just usings triangles - so get out your Big Shot machine and Bigz dies - 657613 and 657611 ( 4" and 2" finished 1/2 square triangles)
and start cutting - you can use some of those delicious small bits from your scrap bag - selecting a mixture of light and dark, or you can splash out on new fabric for a colour themed quilt.
I suggest you cut a selection of different fabrics and then lay them out to make sure that you have a balance of dark and light and then start sewing.
I'll just add another few photos to whet your appetite -

I hope that inspires you to start cutting and sewing lots of lovely triangles.
I loved my brief visit to Finland, meeting quilters, working for Sinelli and the beautiful views I saw of Helsinki. I think it may have to be a holiday destination soon!
Now I'm off to sew some of those Cuddly Creatures onto the quilt for my grand daughter.
Enjoy your week.
Angela
 

Altered Canvas Bag

$
0
0

Happy Friday everyone! This is Anna.
How are you doing? It's September already, can you believe it?

This week I have taken a break from the usual scrapbooking, and chosen to make this bag for me!
I found this brown canvas bag for just €3 in my local market. I just wish I had picked up more than one now! This is a large bag that can hold all your stuff.
For this project I painted a piece of canvas bag with gold acrylic paint. Next I’ve used three felt and fabric flowers cut out on my Big Shot using Sizzix dies.
 
cafe creativo - sizzix big shot - flowers bag (1)
 
cafe creativo - sizzix big shot - flowers bag (2)
 
So Fun!!! I love so much make this bag that I would like to create another, in other colors trend.
So... What do you do if you have a canvas bag lying around your house? Alter it with some Sizzix dies, of course!
 
cafe creativo - sizzix big shot - flowers bag (3)
 
Have fun and do let me know if you attempt to make one of this :)
 
Items used:
 
canvas bag
fabric and felt
gold acrylic paint
buttons
hot glue

**************************************
Flag_of_Italy Per le amiche italiane! :)

Ciao! Sono Anna con un nuovo progetto Sizzix per voi.
Questa settimana ho preso una pausa dal “solito” scrapbooking ed ho scelto di fare questa borsa per me! Solo per me!
Ho trovato questa borsa di tela marrone per soli 3 € in un mercato locale. Vorrei solo averne comprate altre! Questa è una borsa abbastanza capiente, che può contenere tutte le tue cose che noi donne ci portiamo in giro ;)
Per questo progetto ho spennellato una parte della borsa con vernice acrilica color oro. Una volta asciutto, ho incollato tre fiori di feltro e stoffa tagliati con la mia Big Shot utilizzando le fustelle Sizzix, tra cui anche la bellissima Peonia (fustella n°658423). Ho rifinito con qualche bottone.
 
E' stato così divertente! Mi è piaciuto molto fare questa borsa che vorrei crearne un'altra, magari in altri colori di tendenza.
Quindi... Cosa fare se avete una borsa di tela in giro per la vostra casa? “Alterarla” con alcune fustelle Sizzix, naturalmente!
Buon divertimento e fatemi sapere se ci avete provato :)
Ciao! a presto!
 
Materiali:
 
borsa di tela
stoffe e feltro
colore acrilico oro
bottoni
colla a caldo


Art Journal obsession - more journaling with Thinlits!

$
0
0

Hi, it's me again!
Last week I posted a page from my ongoing project - "Odyssey" vintage book which I keep filling with pages inspired by my old family photos. Well, the problem is I got so inspired after last time that I simply couldn't stop! so today I've got another journal page - this time dedicated to my beloved grandpa - Edward - who passed away way too early in 1993.


This time I also focused on Echo Park Paper skeleton flower die (aren't these shapes just amazing?) - Sizzix Thinlits Die Set 4PK - Springtime (659117) - and vintage papers and tickets from my home collection. I had so much fun creating it. Here you can see  more details!


Again- all the colours come from homemade tea stain, Vintaj Patina and sprays (Luminarte Primary Elements with water), there is a bit of gesso and some 3D Foams by Scrapbook Adhesives used as embellishments too ;) As finishing touches I used some metal elements such as paper clips, an iron plate I found on the street, piece of wire I got from one of my students, buttons and staples. The checked fabric is one of the Canvas Resist Sheets (my Elementals by Prima) and stamps are a choice of background patterns from my Prima Vintage Vanity collection.

See you soon - have a great week!
Finn

Shopping Bag Mini-Album

$
0
0


I bought a Gelli Plate the other day and went a little crazy making papers. So I decided to make a tiny mini-album using a piece from my Coupon/Mini Shopping Bag die and add the Gelli papers inside. It goes together super fast, which leaves you more time for the fun part- embellishing!


Here are some of the papers I made. I used my embossing folders on the Gelli plate to give pattern and dimension. I also have all of the pieces I trimmed off and am saving them for accents on future projects.

You will need:

658055  Coupon/Mini Shopping Bag ScoreBoards die by Eileen Hull
658053  Flower Layers with Heart Petals by Eileen Hull
657119  Leaves  by Eileen Hull
658458  Jar Labels set by Eileen Hull
657900  Big Shot

painted paper strips 4 1/4" x 8 1/2", twine for book binding 12" each, inks, gold paint pen, brad, seam binding ribbon
Here is one of the sayings I wrote in the book:


I highlighted the edges of the album and pages with gold paint pen. I just think that adds such a rich and subtle texture to the pages. To assemble the book, I tied signatures into the spine and knotted on the outside. You could also add different dimensional elements to the pages and just use fewer pages if it got too big. In the book I did there are 7 signatures of two pages each and that seems to be about right.

I would appreciate if you could like my Facebook page. I will be holding a giveaway for some dies in the next week and that's where it is taking place, plus I post lots of other fun craft ideas and tips. Thanks so much for stopping by.

A "Dear Santa" Gift Box by Gerry van Gent

$
0
0

Happy Sunday Sizzix friends!
Today I'd love to share with you a gift box I created
for a small present that I'll give during Christmas holidays.
The box size is approximately 16cm x 7cm. 
657900 Sizzix Big Shot machine
658735 Sizzix Sizzlits Decorative Strip Die Winter Florals
658621 Sizzix Framelits Die Set w/Stamps Flowers, Star
658622 Sizzix Framelits Die Set w/Stamps Snowflakes #2
658615 Sizzix Decorative Strip Die Leafy Border

I due cut once the Winter Florals decorative strip from white cardstock
and cut in two parts. Then I "wrapped" the box with the two pieces and
adhered them partly. Some of the stars from the strip die I used 
to decorate the box. 

I continued the "wrapping" on the left side of the gift box and 
I added a small label from the pattern paper "It`s Christmas".
The right side of the boxes was left "clean" so the box will be open
easily without being damaged.

The Flowers, Star was die-cut from different pattern papers and
glued on top of one another. I added a small die-cut snowflake
and added a tiny gem in the middle of the flower as a final touch.


OTHER PRODUCTS I USED:
Webster's Pages - "It`s Christmas" collection 
Webster's Pages - trinkets

I hope you enjoyed my project today! 
Have a creative Sizzix Sunday!

planning for Christmas gifts

$
0
0


With the weather changing here in the UK and Autumn most definitely here, it's time to think ahead to Christmas and ideas for simple gifts.

Last year I made zipped pouches and filled them with soaps and face cloths for inexpensive and personal gifts for members of my family.

I made simple patchwork blocks and framed them with larger pieces of fabric, added lining and a zip and in no time I had wash bags.

christmas gift making

This block - the shoo fly is simple to make using the Sizzix big shot. Use the 2.5" square and co-ordiating half square triangle die, cut a total of 4 triangles from background fabric, and  4 squares from background fabric, plus 1 square and 4 triangles from a second fabric.


2 flannel pouches cut out and waiting for zip delivery so they can be sewn together. (Flannel from @quiltmehappy )

Piece the blocks together, sewing the background triangles to the second fabric triangles and pressing the seams open, and then construct the rows as below, pressing each seam open.


You can find hundreds of tutorials for constructing zipped pouches online, but a favourite of mine is the Noodlehead open wide pouch. It has clear and easy to understand directions and makes really perfect pouches.

Next week I'll show you how to make a pot holder using the big shot, which could also be used as a coaster. We'll have Christmas gifts made in no time!


Tim Holtz halloween

$
0
0

It seems that the imagination of Mr Tim Holtz knows no bounds which is great news for the rest of us on planet Sizzix. my favourite collections are Tim's Halloween and Christmas collections which always seem to transcend the norm and avoid the obvious or at least give it a new spin. 

Tim's collections almost dare you to try something new, transporting your creative imagination away from the flat page or card and into other previously undiscovered realms.

I decorated a couple of frames (below) for a recent event which we attended using a selection of the dies from Tim's new collection and I had an absolute blast experimenting with inks and different distressing techniques. I also got to use the new Christmas dies which I will be showing you at the beginning of October, I think they will be worth waiting for too!


Below are some close ups of some of the elements I used. I particularly like the mirror which is decorated with a stamped skull using a very subtle, washed out look. The ink pot and quill are a welcome edition to the Sizzix cannon, those of you with long memories may recall a similar Sizzix die from about ten years ago which was always very popular. The Spooktacular alphabet is, as are all Tim's alphabet very well balanced and fun to use.

I can't believe how well the ironwork Gate  cuts, it's so clean and great fun for distressing, I went for the rusty look!

The Bigz wall clock die is a new favourite of mine, it comes in various parts and I embossed it with one of Tim's new folders before going crazy with inks and Perfect Pearl powders.

Two of the stand out dies of this collection for me are the decorative strips Bats & Crossbones and Cobwebs. Cobwebs like the gate is very complex in design but cuts so crisply and is a great edition not only to your Halloween projects but anything for boys too (we love that kind of thing!).

Finally, let's not forget the Apothecary bottles which I embossed using the Ink Splats folder and attacked with my Distress Inks. Later on this week I will show you a wicked clock card with a very masculine feel which has a description of the techniques used to create it so stay tuned!!!


Click on the individual dies to follow the links. The dies used are:


Tattered Leaves monochromatic card

$
0
0

Hi everybody! Today I want to Show you a very simple and monochromatic card made using very few supplies but has great result and, as fall is just around the corner, I'm using one of my all time favorites Sizzix Bigz Dies: Tim Holtz's Tattered leaves.


Supply list:
To make this card just stamp the background plaid stamp on the card base with distress ink and adhere the ribbon and the twine on the bottom of the card. Then die cut some leaves using the same cardstock and ink the edges. Finally, glue them on the card and bend the leaves to create some movement and volume. It was easy,wasn't it?

Happy Monday!
..........................

¡Hola a todo el mundo! Hoy os quiero enseñar una tarjeta muy simple y monocromática hecha utilizando muy pocos materiales pero que tiene un resultado estupendo y, como el otoño está a la vuelta de la esquina, voy a utilizar uno de mis troqueles favoritos: Tattered Florals de Tim Holtz.


Supply list:
Para realizar la tarjeta tan solo estampa el sello de fondo con tinta distress y pega la cinta y el cordón en la parte baja de la tarjeta. Después troquela algunas hojas con la misma cartulina y entina los bordes. Por último, pega las hojas a la tarjeta y dóblalas un poco para conseguir volumen y movimiento. Fácil, ¿verdad?

¡Feliz lunes!

Christmas Card with Snowflake

$
0
0


Hi everyone....hope you all had a great week...today I have a Christmas Card with a beautiful Snowflake to show you. I have used Sizzix Bigz Die - Snowflake Ornament 
on tthe front of this card... the Snowflake is so beaufitul ...love it ♥ 


Supply list:
657900 Sizzix Big Shot Machine Only (Powder Blue & Teal)
658740 Sizzix Bigz Die - Snowflake Ornament 
658734 Sizzix Sizzlits Decorative Strip Die - Bower Birds
658730 Sizzix Bigz Die - Gift Tags
658622Sizzix Framelits Die Set 8PK w/Stamps - Snowflakes #2 

Papers: Pion Design - Wintertime in Swedish Lapland, Bazzill
Inks: Distress ink Pad - Walnut Stain
Stamps: Penny Black
Other: Seam Binding Ribbon, Wild Orchid Crafts - Bead Berry Spray, Cheesecloth, Strukturpaste and Distress Glitter - Clear Rock Candy

How to do:
Die cut the Snowflake in patterned paper. Cut out patterned paper and glue or sew it to the front. 
Glue the Snowflake only in the middle of the card. Glue the panel to the main card.  


Die cut beautiful border in patterned paper.


Sew or glue it to the inside of the card as a pocket. Put journal card insiden.


Glue patterned paper to chipboard and die cut Gift Tags with Sizzix Bigz Die - Gift Tags
Distress the edges with sandpaper.
Stamp some text on the Gift Tag and glue it to the inside of the card. 


At last add some Strukturpaste and Distress Glitter - Clear Rock Candy on the ribbon and Berry Spray. 


Wish you a great day!
Anne Kristine

♥♥♥♥♥

Hei alle sammen ...håper dere har hatt en fin uke...idag har jeg et julekort med en vakker snøstjerne å vise dere. Denne snøstjernen er bare så vakker ...trenger ikke så mye annet pynt.

Materialer:

657900 Sizzix Big Shot Machine Only (Powder Blue & Teal)
658740 Sizzix Bigz Die - Snowflake Ornament 
658734 Sizzix Sizzlits Decorative Strip Die - Bower Birds
658730 Sizzix Bigz Die - Gift Tags
658622Sizzix Framelits Die Set 8PK w/Stamps - Snowflakes #2 

Papir: Pion Design - Wintertime in Swedish Lapland, Bazzill
Inks: Distress ink Pad - Walnut Stain
Stempler: Penny Black
Annet: Seam Binding bånd, Wild Orchid Crafts - Bead Berry Spray, osteklut, Strukturpaste og Distress Glitter - Clear Rock Candy

Beskrivelse :
Stans ut snøstjernen i mønsterark. Skjær ut et panel med mønsterark og sy eller lim panelet til fremsiden. Lim snøstjernen kun i midten av kortet.
Lim panelet til selve kortet.  
Stans ut den vakre bården og lim eller sy den fast på innsiden av kortet som en lomme til å putte journal kort i .
Lim mønsterark på chipboard og stans ut pakkelapper med  Sizzix Bigz Die - Gift Tags 
Distress kantene med sandpapir. Stemple tekst på pakkelappen og lim den på innsiden av kortet.
Til sist påfør Strukturpaste og Distress Glitter  - Clear Rock Candy på bånd og bær.

Ha en flott dag!
Anne Kristine

Life is good.......

$
0
0

Hi everyone
Today i will show you a card using Big shot starter kit and some other beautiful Sizzix dies.
Items i have used:
Big shot starter kit (658300)
Sizzix bigz die Butterfies & labels by Karen Burniston (658364)
Sizzix Bigz die Tattered Poinsettia ( 658261)
Decorative strip- Vintage lace- ( 657481)
Supply list:
Paper: Prima Collection. Sunrise- Sunset 960018-960056 by Finnabair , cardstock green and grey
Ink: Distress ink -Vintage Photo-,-Spiced Marmelade-.
Stamp: Prima clear stamp, Stampers Anonymous -Simple Saying CMS 155- Tim Holtz Collection
Pontura paint-red-, 3D foam and ribbon
How to make:
1. Cut out a cardstock 21x15 fold to make a card base 15x10,5 cm
2. Cut out patterned paper 14,5x 10 cm, glue to the center of the card base
3. Die cut the different sorts of Sizzix dies, glue first the vintage lace to the card base , then the label using 3D foam
4. Place the leaves under the label and decorate using the different sorts of die cuts, ribbon and stamps
 Here I have used prima clear stamp on the butterfly
I hope it gave you some inspiration, wish you a nice week
See you next Tuesday 12.00
Hej alle
I dag vil jeg vise et kort hvor jeg blandt andet har brugt dies fra Sizzix starter kit
Dies jeg har brugt: 
Big shot starter kit (658300)
Sizzix bigz die Butterfies & labels by Karen Burniston (658364)
Sizzix Bigz die Tattered Poinsettia ( 658261)
Decorative strip- Vintage lace- ( 657481)
Andre materialer:
Papir: Prima Collection. Sunrise- Sunset 960018-960056 by Finnabair , karton grøn og grå
Ink: Distress ink -Vintage Photo-,-Spiced marmelade-.
Stempler: Prima clear stamp, Stampers Anonymous -Simple Saying CMS 155- Tim Holtz Collection
Pontura paint-red-, 3D foam og bånd
Sådan gør du:
1. Skær karton 21x15 fold så kortet måler 15x10,5 cm
2. skær i mønstret papir 14,5x 10 cm, lim til midten af kortet
3. Udstands de forskellige Sizzix dies, lim først vintage lace på kortet , derefter label ved at bruge 3D foam
4. Placer  bladene under  label og dekorer ved at bruge de forskellige die cut , bånd og stempler
Jeg håber dette gav dig lidt inspiration, vi ses næste tirsdag kl 13
Ønsker dig en god uge

Art Journal

$
0
0


Hi Everyone!

Daria is here.

Today I would like to show you a new art journal. I made it for one of my scrap-friends. I hope she will love this art journal and will create a lot of gorgeous mixed media projects.

Items used:
Big Shot Machine (657900)
Sizzix Movers & Shapers Magnetic Die Set 2PK - Mini Butterflies Set (657209)
Sizzix Bigz Die - Flower #2 (657711)

I made the inner sheets from watercolor papers. Сover I made using cotton fabric. To add different shapes on the cover, I cut these shapes using dies (also from cotton fabric). I sewed them onto the cover using a sewing machine. Then I used white acrylic paint and different sprays with stencils. After paint dried, I outline the edges of the shapes using PITT Artist Pens.


This is back side of art journal.

Have a nice day!

Daria.


Всем привет!

Сегодня я хочу показать новый арт-журнал, который я сделала в подарок одной из своих скрап-подруг. Его размер А5. 
Арт-журнал сделан с нуля, внутренние листы у него из бумаги для черчения, мягкая обложка. Разные интересные формы для обложки я вырезала с помощью ножей Sizzix. Так же я использовала краску, трафареты и спреи для придания законченного вида обложке.

Материалы:
Big Shot Machine (657900)
Sizzix Movers & Shapers Magnetic Die Set 2PK - Mini Butterflies Set (657209)
Sizzix Bigz Die - Flower #2 (657711)

Всем хорошего дня!

Дарья.

Bon Voyage

$
0
0


Hello,
I thought you may like to see the card I made this morning for Lydia who is sadly leaving the Customer Service Team this week. I havent known Lydia for long but everyone here at Sizzix will be sorry to see her go. She is off to spend some time volunteering in India which is so exciting, I’m sure she’ll have such a fantastic experience.

As you can see I have created the card using Karen Burniston dies.


The papers are from a collection called Far & Away by Teresa Collins which were perfect for the occasion.


The envelope is a little bit of a cheat really, because it doesn't have to go through the post I made a really simple envelope alternative with a piece of folded card slightly wider than the card and twice the depth I added a patterned folded band to the top and then attached a chipboard button and tied with string. The sides of the envelope are actually left open!


I have attached a band of manilla coloured card to the inside front and back of the card, this is not only for decorative value with the cream edge more defined, but also because it enables the card to stand up in this format.

The little labels were cut from the papers and creased slightly before sticking into position to add interest. The suitcase was layered with a metallic handle glued into place and then the whole thing was attached using foam pads. I am really happy with the result..I just hope Lydia is :)

Like Clockwork!

$
0
0


I had so much fun working with the new Tim Holtz Halloween dies that I thought I would go a little crazy this week and have fun with dies old and new for no better reason than I wanted to have a bit more fun! Now if that's a crime then you can lock me up and throw away the key.


The card is an over the top celebration of die cutting and inking techniques in perfect harmony (I hope!) It's hard to believe that everything that you see started off as smooth white card!

Below is a list of the dies and folders I used all of which are designed by Tim Holtz from collections old and new, just click on the dies and follow the link for more information.


You will also need a selection of Ranger Distress Inks and Perfect Pearls powders and some smooth heavy weight card.

Take a piece of smooth white card measuring 200 x 135mm and trim both ends using the On the Edge die so that the centre section measures no more that 100mm so that the embossing folder fits over the top. Die cut all the parts to create the clock including two of the main body before trimming the centre from one of them using the crease lines to guide you.

Choose a range of Distress inks which will, when combined give a rusty patina to the die cuts I used Broken China, Crushed Olive, Wild Honey, Mustard Seed and Dusty Concord and I used Vintage Photo and Soot Black towards the end of the process. Press some of the ink pads face down onto and ink blending mat in a random fashion and add a fine mist with a spritzer before placing the die cuts face down into the ink, when you are happy with the results use a heat tool to speed up the drying process.

Deboss the main background and main clock using the gears folder and use your ink applicators to bring out the detail by gently applying the ink a little at a time until you attain the desired effect. Repeat with all of the other die cuts finishing with the darker colours. While still wet brush with metallic perfect pearls in places to add a sheen. Next, mount all the elements together onto the background using a glue gun and adhesive 3D foam pads to add depth.


Create a base card from the smooth white card stock measuring 210 x 135mm and emboss the top and bottom of the front cover using the diamond plate folder. Gently apply ink to bring out the embossed texture, for this I used Weathered Wood to give the grey finish and Wild Honey and Mustard Seed to mimic the effects of rust. Next, I diluted some ink in water and used a paint brush to drip it down the front of the card to give a more realistic weathered metal feel. Finally, I brushed over the diamond plate pattern with a fine dusting of Pearl powder to give a pleasing metallic sheen.


New Card !

$
0
0


Hello!

Let’s go on with the cards by using a very natural colour combo that I particularly like.

Supply list:

Paper: Bazzill
Cardstock: American Crafts
Stickers: Studio Calico
Wood star: Studio Calico
Stamp: Craft Origine
Ink: Versafine Smokey Grey
Masking Tape: Lovely Tape

Dies:

658518 Sizzix Textured Impressions Embossing Folder 2PK-Pom-poms and Roses Set
658332 Sizzix Sizzlits Die-Ampersands & banner

My aim was to create a very soft and airy card to be sent to a friend.

The card has a standard size of 10x15cm, with a geometric patterned paper as an addition.
Then I embossed a white paper piece with the “roses” embossing folder to give a feminine touch to my creation.

I really fancy the Brenda Walton "Ampersands & Banner" dies! The banner is cut out of kraft paper. The title is printed with a stamp and will be superimposed thanks to 3D adhesive.

I simply completed my card by adding little stars (wood & stickers).


See you next Thursday!

Karine

Bonjour,

Nous continuons toujours dans les cartes cette fois-ci un combo très naturel que j'affectionne particulièrement.

Matériel :

Papier : Bazzill
Cardstock : American Crafts
Autocollants : Studio Calico
Etoiles en bois : Studio Calico
Tampon : Craft Origine
Encre : Versafine Smokey Grey
Masking Tape : Lovely Tape

Dies utilisés :

658518 Sizzix Textured Impressions Embossing Folder 2PK-Pom-poms and Roses Set
658332 Sizzix Sizzlits Die-Ampersands & banner

Je souhaitais créer une carte toute douce et aérienne pour simplement offrir à une amie.

Une carte au format standard 10x15cm, réhaussée par un papier imprimé aux motifs géométriques. J'ai ensuite embossé un papier blanc avec la plaque à motifs "roses" pour donner un côté féminin à ma création.

Un gros coup de coeur pour les dies de Brenda Walton "Ampersands & Banner" ! La bannière est ici découpée dans du kraft, le titre réalisé au tampon sera superposé à l'aide de mousse en 3D.

Ma carte est simplement complétée par des petites étoiles autocollantes et en bois.

A jeudi !


Karine
Viewing all 2033 articles
Browse latest View live