Quantcast
Channel: Crafting ideas from Sizzix UK
Viewing all 2033 articles
Browse latest View live

Christmas Blog Hop - day 1!


Welcome Home Card

$
0
0
There is a very famous TV advertisement in Spain that says "Come Home for Christmas" And everyone knows that song :) 

Today I have made a card inspired by this advertisement, but you can use it in any time someone comes home from a long trip, long stay in hospital or a year abroad.


Supply list:
I love this little house from Karen Burniston, and these dies are amazing, you can cut, and use them as stencils, as I did in this card. Isn't it great?

Here you can see some details. i made the tree with a simple scallop circle from the Wrappers die set from Paula Pascual. 


Do you have someone who "comer home for Christmas"?

Happy Monday!
.......................

¿Os acordáis del famosísimo anuncio de El Almendro? ¿Ese que decía "Vuelve a casa por Navidad"? Pues esta vez me he inspirado en ese anuncio para hacer esta tarjeta de bienvenida, que se puede utilizar después de que alguien haya estado un largo tiempo en el hospital, tras una beca Erasmus... En fin, lo que se os ocurra :)

A mí me encanta esta casita de Karen Burniston. Los troqueles, a parte de para coortar se pueden utilizar como plantillas y estarcir con ellas. Y el arbolito está hecho con un simple troquel de galleta. 

Y vosotros... ¿Tenéis a alguien que "vuelva a casa por Navidad"?

¡Feliz lunes!

Gift Box

$
0
0


Hi everybody... hope you all had a great week.... today I have a Gift Box to show you, and again a Christmas project. But I think you can use this idea for any occasion.
On this box I have used Sizzix Bigz Pro Die - Box w/Lid #3
You have to use Sizzix Big Shot Pro Machine  with this Sizzix Die.


Supply list:
656250 Sizzix Big Shot Pro Machine Only (Periwinkle) w/Standard Accessories
657675 Sizzix Bigz Pro Die - Box w/Lid #3
658776 Sizzix Movers & Shapers Magnetic Die Set 2PK - Mini Toy Soldier & Ice Skate
658770 Sizzix Sizzlits Decorative Strip Die - Holly, Beaded & Snowflake Garland
658373 Sizzix Pop 'n Cuts Magnetic Insert Die - Label, Funky 3-D (Pop-Up)

657492 Sizzix Bigz Die - Tattered Pinecone
657468 Sizzix Bigz Die - Holly Branch

Papers: Tim Holtz Paper Stash Merriment, chipboard, Bazzill
Stamps: Stampers Anonymous Tim Holtz Collection.
Inks: Distress ink Pad - Walnut Stain, Distress Paint - Picked Fence, Brushed Pewter, Distress Stain - Fired Brick, Barn Door.
Other: Melissa Frances - Mica Flakes, Seam Binding ribbon, button

How to do:
Die cut the box in patterned paper with Sizzix Bigz Pro Die - Box w/Lid #3
Glue it together. Die cut ice skates in chipboard with Sizzix Movers & Shapers Magnetic Die Set 2PK - Mini Toy Soldier & Ice Skate . Paint these with Distress Paint - Picked Fence, Brushed Pewter.
Die cut branches with  Sizzix Bigz Die - Tattered Pinecone and Sizzix Bigz Die - Holly Branch. Distress the edges with Distress ink Pad - Walnut Stain.
Color seam binding ribbon with Distress Stain - Fired Brick, Barn Door and water.
Glue Mica flaces on the top of the box.
Decorate the top of the box with branches, ice skates and a bow.

Inside the box:
Cut out a panel 21,5 x 9 cm and die cut in patterned paper with Sizzix Pop 'n Cuts Magnetic Insert Die - Label, Funky 3-D (Pop-Up)
Glue the panel inside the box. Die cut garland with  Sizzix Sizzlits Decorative Strip Die - Holly, Beaded & Snowflake Garland .
Glue garland inside of the box.


Place a small gift or gift card insiden the box.
 

Thanks for stopping by and I wish you all a great day!
Anne Kristine

♥♥♥♥♥♥

Hei alle sammen...håper dere har hatt en fin uke... idag har jeg en gave eske å vise dere hvor jeg har brukt  Sizzix Bigz Pro Die - Box w/Lid #3Denne dies er stor og du trenger Sizzix Big Shot Pro Machine   for å stanse ut esken.

Materialer:
656250 Sizzix Big Shot Pro Machine Only (Periwinkle) w/Standard Accessories
657675 Sizzix Bigz Pro Die - Box w/Lid #3
658776 Sizzix Movers & Shapers Magnetic Die Set 2PK - Mini Toy Soldier & Ice Skate
658770 Sizzix Sizzlits Decorative Strip Die - Holly, Beaded & Snowflake Garland
658373 Sizzix Pop 'n Cuts Magnetic Insert Die - Label, Funky 3-D (Pop-Up)
657492 Sizzix Bigz Die - Tattered Pinecone
657468 Sizzix Bigz Die - Holly Branch

Papir: Tim Holtz Paper Stash Merriment, chipboard, Bazzill
Stempler: Stampers Anonymous Tim Holtz Collection.
Inks: Distress ink Pad - Walnut Stain, Distress Paint - Picked Fence, Brushed Pewter, Distress Stain - Fired Brick, Barn Door.
Annet: Melissa Frances - Mica Flakes, Seam Binding bånd, knapp

Beskrivelse:
Stans ut esken i mønsterark med Sizzix Bigz Pro Die - Box w/Lid #3
Limes i sammen. Stans ut skøyter i chipboard med Sizzix Movers & Shapers Magnetic Die Set 2PK - Mini Toy Soldier & Ice Skate . Males med Distress Paint - Picked Fence, Brushed Pewter.
Stans ut grener og blader med Sizzix Bigz Die - Tattered Pinecone og Sizzix Bigz Die - Holly Branch. Distress kantene med Distress ink Pad - Walnut Stain.
Farg seam binding bånd med Distress Stain - Fired Brick, Barn Door og vann.
Lim Mica flakes på toppen av esken.
Dekorer toppen av esken med grener, blader, skøyter og en sløyfe.
Innsiden av esken:
Skjær ut et panel 21,5 x 9 cm og stans ut i mønsterark med Sizzix Pop 'n Cuts Magnetic Insert Die - Label, Funky 3-D (Pop-Up)
Lim panelet på innsiden av esken. Stans ut garlander med  Sizzix Sizzlits Decorative Strip Die - Holly, Beaded & Snowflake Garland .
Limes på innsiden av esken.
Plasser en liten gave eller et gavekort inni esken.

Ønsker dere alle en fin dag og takk for at du stikker innom her.
Anne Kristine

Christmas card

$
0
0


Hi everyone
I hope you all had a great and creative week. Today I have a Christmas card to show you using the
 Sizzix Pop 'n Cuts XL Die Set - Card, Horizontal A2 w/Circle Label, 3-D (Pop-Up.
Items used:
Snow Florries On the Edge (656920) and Mini Snowflakes set Movers & shapers ( 657474)I use an older Tim Holtz  design but instead you could use
Supply list:
Paper: My Minds Eye-All is Bright-, Vivi Gade design, cardstock
Stamp: KaiserCraft clear stamps.Christmas Sentiments., Woodware-clear magic singles-
Ink: Distress ink -vintage Photo-
Glitter snow,ribbon,paper lace doilies, button and gelatin used as window glass
Die cut The Sizzix Bigz Die - Window & Window Box in  recycled cardstock and White cardstock glue together, glue gelatine to the die cut window , it is the glass, glue the cut out image to the window
 
Die cut Pop'n Cuts card with

Decorate using the different sorts og Sissix die cut and make snow using glitter snow
Thanks for stopping by
Wish you a great week
Pia
Hej alle
Jeg håber i alle har haft en dejlig og kreativ uge. I dag vil jeg vise et julekort hvor jeg har brugt
Dies jeg har brugt::
Snow Florries On the Edge (656920) og Mini Snowflakes set Movers & shapers ( 657474) Jeg har brugt nogle ældre Tim Holtz dies men i stedet kan du bruge disse
Supply list:
Papir: My Minds Eye-All is Bright-, Vivi Gade design, cardstock
Stempler: KaiserCraft clear stamps.Christmas Sentiments., Woodware-clear magic singles-
Ink: Distress ink -vintage Photo-
Glitter snow,bånd ,papir lace doilies, knap, gelatine/husblads brugt som vinduesglas
Tak fordi du kiggede forbi
Ønsker dig en dejlig uge
Pia

Winter Wonders

$
0
0

Brrrhhh! I have just looked out of the window and it is actually SNOWING here in North Wales, although I do love the snow I like it to fall the day before Christmas and then disappear on New Years day, is that such a big ask?

So...sticking with the wintery theme I would like to share with you some projects that I have been creating recently with the starter kit dies, I have said it many times before but these dies are such a great collection and so versatile.


Admittedly I have gone a little off-piste (see what I did there?) with my colour selection which was inspired by a photograph that I saw in a home decor magazine. I really love the subtlety of the wintery shades of grey and brown with highlights of lilac.


When are circles more than circles? When you pair them up to make a cheeky little snowman of course!
Essentially the dies in the Starter Kit could be mistaken for being summer motifs but these two Christmas cards illustrate that this doesn't have to be the case. I have used little touches of ink on the edges of some of the shapes such as the flowers and the snowman's scarf which is simply scrunched up strips of stripy paper with fringes cut with scissors.

I am not the biggest ink fan (I am a little nervous of working with anything that makes my hands dirty to be honest) but in moderation I think it really ties a design together. The ink I have used is Tim Holtz Pumice Stone Distress Ink by Ranger.

Well at least with this cold snap we all have an excuse to stay in doors and keep warm and what better activity to do than crafting! Have a lovely week, I will post more winter themed starter kit projects next week, until then....happy crafting!

Sweet Boy

$
0
0


Hi All!

Daria is here. And today I would like to show a layout about one sweet boy. I love colors I used and I love these Sizzix dies which help me to create a layout.

Items:
Big Shot Machine (657900)
Sizzix Sizzlits Decorative Strip Die - Washer Border (657826)
Sizzix Framelits Die Set 9PK - Tags #2 (658611)
Sizzix Thinlits Die Set 6PK - For the Record (659108)
Sizzix Framelits Die Set 4PK - Frames, Instant (658608)


Have a nice day!

Daria.

Всем привет!

Сегодня я хочу показать вам страничку про одного маленького и очень симпатичного мальчика. Цветовую гамму я подбирала под фотографии, и мне нравится, что страничка получилась такой желтой, теплой, солнечной.

Материалы Sizzix:
Big Shot Machine (657900)

Всем хорошего дня!

Christmas Blog Hop - Day 4!

$
0
0


Monday 22nd November - Katy Jones
Tuesday 23rd November - Hadley Gordon
Wednesday 24th November - Carolyn Forster
Thursday 25th November - me!
Friday 26th November - Kerry Green


Hello - welcome to day 4 of our Christmas blog hop.
I've been thinking about what to do for this blog for weeks and had so many ideas - but the winner is a table runner and place mats - which co-ordinate with my Azure coloured dinner service.
This is such a lovely quick make - using the Big Shot and Bigz dies - 657608 (3" finished square),
657612 (3" finished 1/2 square triangle), 657633 ( 1 1/2" finished strips for the bindings).
I was about to go out to my local patchwork shop to buy some new Christmas fabrics, that I'd seen the previous week, when I thought I'd just look in my stash - and I found these gems by Nancy Haslvorsen

 ( I doubt that you'll be able to find them now but there are some fantastic modern Christmas fabrics in stores now).
For the table runner
- you will need the following fabrics - fabric 1 is on the left, 2 in the middle and 3 on the right.
Fabric 1 - 60cms for squares, triangles and binding.
Fabric 2  and 3 - 40cms so each for squares  Backing 15" x 68"
Wadding 15" x 68" x 2
For each place mat you will need -
Fabric 1 - 30cms
Fabric 2 and 3 -20cms of each
Backing - 15" x 24"
Wadding -15" x 24" x 2.
I started by cutting all the fabrics for the table runner and place mats ( I'm making 12 mats so I had quite a few to do!
For the table runner  I cut -
Fabric 1 - 15 squares using die 657608, 24 triangles with die 657612, and binding strips with Bigz XL die 657633 - 4 strips ( you will need extended cutting plates for this die)
Fabric 2 - 28 squares
Fabric 3 - 26 squares.

Make the rows for the table runner using the photo as a guide - ( bottom of the picture is  row 1)
Make 2 each of rows 1,2 and 3.
Make 9 of row 4.
Join the rows together.
Layer the back, double wadding ( for heat protection ) and the pieced top, pin and quilt - I quilted in the ditch around fabric 1 squares and triangles. Join the binding strips together, and press in half along the length and attach to the table runner, trim the backing and wadding and then stitch the folded edge of the binding to the back.
For the place mat use the photo below as a guide - you will need to make 2 each of rows 1 and 2 - and the middle row is row 5 - and you only need 1.

Complete in the same way as the table runner.
Now all you need is to make a few more place mats and then add Christmas dinner!
This set is subtle and I think I'll be able to use it all year round - but you can make it as bright and Christmassy as you like. You can also shorten or extend the runner by adding more or fewer of row 4.
So at least now I feel like I've started my preparation for Christmas - only presents to buy and food to plan - nearly there really.
I hope you're enjoying this week of blogs as much as we are.
Happy sewing.
Angela


prize info

Click here to enter!


All is calm!

$
0
0


We are preparing for our busiest time of the year, namely our two big trade shows Creative World/Frankfurt in January and Stitches/Birmingham in February so everyone at Sizzix central is super-busy which lends the title of this blog a slightly ironic twist!

November sees the release of the new range of flower dies from the uber talented Susan Tierney-Cockburn, I am also working on next years releases as we speak. It's a real challenge to pit your wits against mother nature (the ultimate designer) and try to make the flowers look just like the real thing.

This week I have used the new Poinsettia die from Susan's range which is a Thinlits set. To get the best out of Susan's collections you should check out the Tool Kit which is never too far from my grasp, it is a brilliant addition to any paper crafters arsenal. If you want to find out more about the Basic Techniques or the poinsettia Die Specific Instructions then click on the blue links.

I wanted to keep away from the classic red/green poinsettia, as much as I love it, so I decided to go with white petals and mint leaves. I die cut a selection of each, in total you would need at least 8 leaves and 16 petals. next I used the leaf tool to add a crease line down the centre of each leaf before moulding with the large ball stylus to shape the leaves and add natural looking creases. Finally, I pinched the base of each leaf between thumb and forefinger.
I took the mint green die cut calyx shape and added creases  before pinching and stirred the centre with the ball stylus. Next, I added the leaves one at a time overlapping them at random.


I shaped the white petals the as with the leaves. I applied a little PVA glue in a fine line along the edge of each leaf and dipped them in some Ice Diamond by Pinflair, you could also use micro beads or glitter, it's all down to personal preference at the end of the day! I created a base from a white calyx as before and attached the petals to create the larger of the two flowers using a mix of the larger petal sizes.


Next, attach the assembled flower into the assembled leaves and create the smaller/inner flower using an assortment of smaller petals before attaching a large adhesive pearl into the centre. 


Once completed it can be attached to a card, gift box, tag, candle, Christmas tree, hair slide etc. You can even create several to make a spectacular garland. However you choose to use the Poinsettia die set I know you'll have fun.


Romantic Mini Book

$
0
0


Hello!

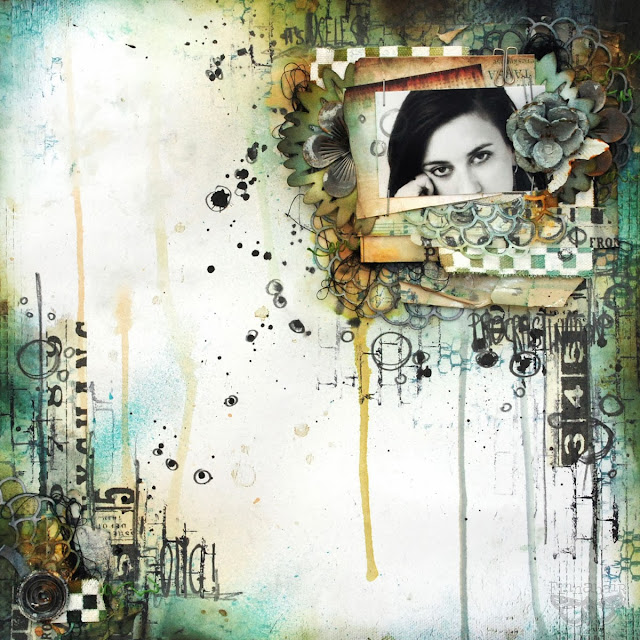
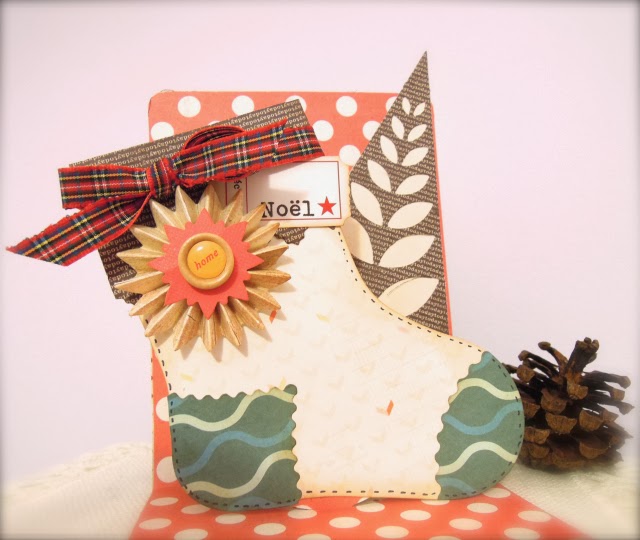
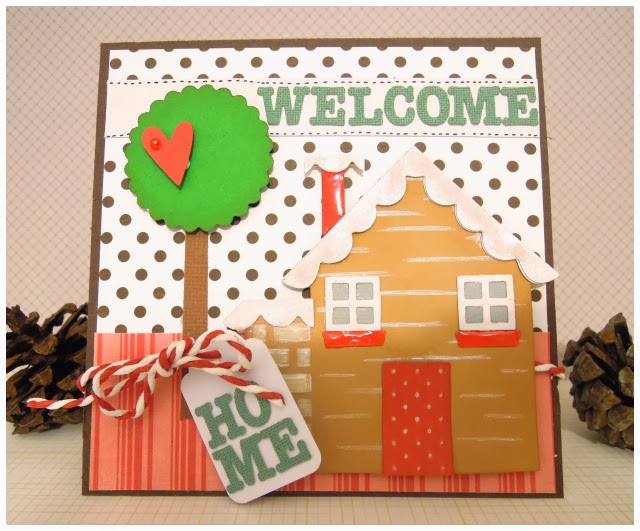
Let’s go on with mini books! This time, this is an altered book with a soft and romantic atmosphere.
I had fun working girly pastel colours.

Supply list:

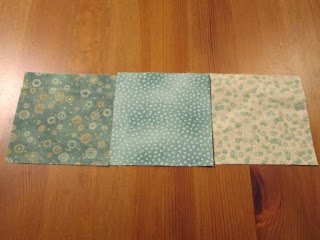
Papers: Crate Paper, Glitz Design, Studio Calico
Alphabets: Jenni Bowlin Studio
Rub-ons, stickers: Jenni Bowlin Studio
Die-cuts: Studio Calico
Wood Embellishments: Studio Calico
Stamps: Florilèges Design, Glitz Design
Gold embossing powder: Aladine
Ink: Versafine, Distress Vintage Photo, Adirondack Sunshine Yellow, Watermelon
Izink: Aladine Orchid
Stickers: 7Gypsies
Others: Tulle, Bristol

Dies:

658777 Sizzix Texture Trades Embossing Folder 3PK-Outlines Label Set
658518 Sizzix Textured Impressions Embossing Folder 2PK-Pom-poms & Roses Set

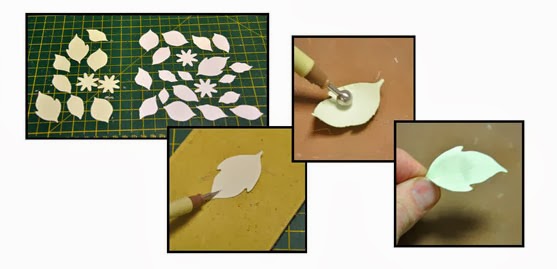
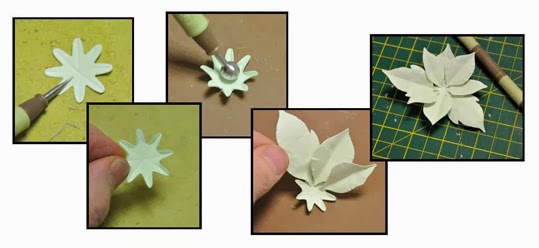
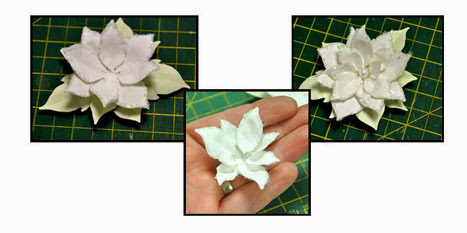
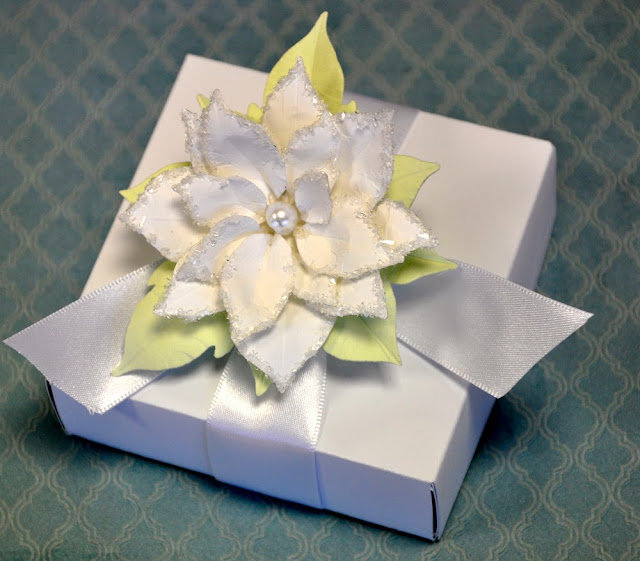
In this mini book I used two different types of embossing folders: a rose-patterned folder that I love and a labels’ folder. There are sold in sets of three and this set is just fantastic! You’ll only need to use your Big Shot for embossing paper then to cut them out with a pair of scissors.

Both folders are used with smooth white Bristol paper.

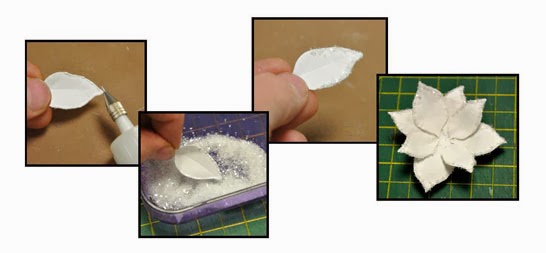
Once cut, the label is coloured with Izink pigment ink (Orchid colour). Avoid colouring it all to add nuance to your die cut.

The embossed roses-patterned paper is coloured with 2 shades of Adirondack inks. Make some small circular moves starting from the outside and moving towards the inside. Wood embellishments are glued afterwards.


See you next Thursday with a card!

Have a nice day!

Karine

Bonjour !

On continue dans les mini albums avec cette fois-ci un livre altéré à l'univers doux et romantique.
Je me suis ici amusée à travailler des couleurs très girly et pastels...

Matériel :

Papiers : Crate Paper, Glitz Design, Studio Calico
Alphabets : Jenni Bowlin Studio
Rub-ons, stickers : Jenni Bowlin Studio
Die-cuts : Studio Calico
Embellissements en bois : Studio Calico
Tampons : Florilèges Design, Glitz Design
Poudre à embosser or : Aladine
Encre : Versafine, Distress Vintage Photo, Adirondack Sunshine Yellow, Watermelon
Izink : Aladine Orchid
Stickers : 7Gypsies
Divers : tulle, bristol

Dies utilisés :

658777 Sizzix Texture Trades Embossing Folder 3PK-Outlines Label Set
658518 Sizzix Textured Impressions Embossing Folder 2PK-Pom-poms & Roses Set

J'ai utilisé dans ce mini deux types de plaque à embosser : une plaque à motifs rose que j'adore et des étiquettes. Celles-ci vendues par lot de 3 sont juste géniales ! Il vous suffit de mes embosser à l'aide de votre Big Shot puis de les découper à l'aide d'une paire de ciseaux.

Mes deux plaques sont embossées dans du papier blanc lisse ( Britol).

L'étiquette une fois découpée est colorée grâce à des pigments Izink couleur Orchid. Evitez de la teinter complètement pour nuancer votre découpe.

La plaque à motifs roses est quant à elle colorée à l'aide de deux couleurs d'Adirondack. Effectuez de petits mouvements circulaires en allant de l'extérieur vers l'intérieur. Des embellissements en bois sont ensuite collées en guise de décoration.

Rdv jeudi prochain pour cette fois-ci une carte !

Bonne journée

Karine

Felt Christmas Tree - 3D

$
0
0

Hi Everyone! This is Anna.
This week I have been playing with Sizzix Bigz Die - Christmas Trees, 3-D: I created this 3D Christmas tree made from white/creamy felt and decorated with beads.
Making tabletop Christmas trees of felt is good way to go if you want to get more cozy objects of holiday decor than those that made of cardboard or paper.
Check out this felt Christmas tree: is so much fun and easy to create!
 
cafe creativo - Anna Drai - sizzix big shot - christmas tree (1)
 
cafe creativo - Anna Drai - sizzix big shot - christmas tree (2)
 
cafe creativo - Anna Drai - sizzix big shot - christmas tree (4)
 
Items used:
felt
scrap of fabric
wood spool
wooden skewer
beads, sequins, strass, glitters
hot glue
sewing machine, yarn
 
cafe creativo - Anna Drai - sizzix big shot - christmas tree (6)
 
How to make:
Die-cut three identical felt pieces using the Sizzix Bigz Die - Christmas Trees, 3-D (658754).
Sew two piece together in one side. Sew the third piece that will attach the final two panels.
Now that your tree is together, attach on beads, strass, sequins to look like ornaments. Add as many or few embellishments as you like. Add a glitter star to the top of the tree.
 
cafe creativo - Anna Drai - sizzix big shot - christmas tree (3)
 
Make wood stand: glue a piece of wooden skewer into wood spool. Once you're done, just thread the tree onto the wooden skewer.
And now experiment with your favorite colors!

Well, I hope you enjoyed it! Thanks for stopping by and have a wonderful weekend!
 
cafe creativo - Anna Drai - sizzix big shot - christmas tree (5)
 
**************************************
Flag_of_Italy Per le amiche italiane! :)
Ciao a tutti! Ecco un nuovo appuntamento con Anna.
Se si vuole ottenere un'atmosfera più accogliente per Natale si può usare il feltro, invece che la carta per realizzare le decorazioni natalizie. Questa settimana ho potuto giocare ancora con una fustella molto versatile: Sizzix Bigz Die - Christmas Trees, 3-D (658754). La fustella è una Bigz quindi taglia benissimo anche il feltro spesso, non potevo non approfittarne! Ho creato questo alberello di Natale 3D fatto con feltro bianco/panna e decorato con perline e strass.
Quindi se siete a caccia di idee o regalini in feltro, date un'occhiata a questo alberello: è davvero divertente e facile da creare!
 
Materiali usati:
feltro
ritagli di stoffa
rocchetto di legno
spiedino di legno
perle e perline varie, paillettes, strass, glitter
colla a caldo
macchina per cucire, filo
 
Procedimento:
Fustellate tre alberelli identici di feltro con la Sizzix Bigz Die - Christmas Trees, 3-D (658754).
Cucire due pezzi insieme lungo un lato. Cucire il terzo pezzo che unirà anche gli altri due alberi. Avrete così un albero con tre facce.
Ora che la struttura del vostro albero è a buon punto, attaccare le perline come fossero palline dell'albero di Natale. Aggiungere molti o pochi abbellimenti, secondo i gusti. Aggiungere una stella glitter, anche questa con tre facce, tagliata con la fustella e da sistemare sulla punta dell'albero.
Fare il piedistallo di legno: incollare un pezzo di spiedino di legno nel rocchetto, spessorando con un po' di stoffa. Ora basta infilare l'albero sullo spiedino. Volendo si può incollare il rocchetto su un altra base di legno per dare stabilità. Decorare anche il rocchetto.
Ed ora sperimentate con i vostri colori preferiti!

Spero che vi sia piaciuto! Grazie per essere passate di qui :)
Ci vediamo venerdì prossimo con un nuovo progetto!

Procrastination - friend or foe?

$
0
0

Hi,it's me again!
I'm sure some of you have the same problem as me: - problem with focusing on thinkgs that "need to be done"... And I guess layout below is just about moments like that. It just madeitself one late evening, when I should be thinking about something else... Van you see all these layers and textures? What can be better?
And colors? This color set is going to be popular on my desk for next couple of weeks!


Sizzix Dies used in this project:
- 658502 - Sizzix Sizzlits Die - Flower, Daisy
- 659117 - Sizzix Thinlits Die Set 4PK - Springtime

As you can see I went totally crazy with layers, inks, stamping, splashing... It was great fun and I was happy to try finally my new set of Archival Inks (Wendy Vecchi) and play with colors that were already on the background paper (7 Dots Studio - 9th Wave). There are also my Prima Mechanicals - but a altered and rusty this time. I had them on my desk for too long!


These little cut-outs totally rocked my world - I can layer them in tons, absolutely everywhere - on cards, tags, layouts, canvases - you just name it. I love how versatile and eye catching they are and no matter what the colour palette is - they will always match!
Perfect choice for me:)
See you soon!
Finn

Window Box Card and Frame

$
0
0


I have a couple of projects to share today. I used the Window Box ScoreBoards die make a card and frame.

Although ScoreBoards dies are designed to cut and score matboard, you can also use them to cut paper. I trimmed the window down a bit to fit on the A-2 card. The base of the card is made using aqua shimmer paper then a window was cut from heavy off white paper and placed on top of pretty patterned paper. The sentiment is stamped under the window. For fun I added some pompom trip for a window valance and tied twine in the fold of the card.

The flower is a piece from the same die and is cute from some coordinating paper. A button is added as the flower center.


You will need:

658452  Sizzix ScoreBoards XL Die - Window Box
657115  Sizzix Bigz Die - Flower, 3-D Fringed
657718  Sizzix Sizzlits Die Set 3PK - Birds & Butterflies Set
656491  Sizzix Little Sizzles - 6" x 13" Mat Board Pack, 6 Cream Sheets


Before cutting the die, I trimmed the matboard to make a foldover panel. to I used my Gelli Plate to build up layers of color on the matboard frame. After the paint dried, I lettered "Hope springs eternal" at the bottom of the frame and filled it in with Copic markers and white pen. I love how the white pen peps up the letters and create dimension and pop. 

Butterflies were cut from dictionary pages and inked around the edges, then adhered to the frame. I made a flower from about ten layers of sewing pattern tissue, then added some chalk ink to the edges of the flower petals and fluffed it up. A flower stem supports the flower. 

The second project never seemed to end- I kept adding layers and pieces! I am still not sure I like it- but it was a fun exercise to do. And to me, that is one of the best thing about creating something.

Thanks for stopping by! Hope you can take the time to create something fun this weekend...

A Tag by Gerry van Gent

$
0
0

Happy Sunday Sizzix friends!
Today I am sharing with you a tag I created featuring two of
the recent Sizzix releases and of course mixing them with old dies.

657900 Sizzix Big Shot machine
656938 Sizzix Movers & Shaper L Die Tag & Bookplate
659133 Sizzix Thinlits Die Moroccan Card Front
659372 Sizzix Framelits Die Set w/Stamps Framed Silhouettes 
658551 Sizzix Sizzlits Deco. Strip Die Mini Filmstrip & Mini Tickets
658252 Sizzix Sizzlits Decorative Strip Die Cobblestones
*   *   *

For this gorgeous ornate frame I used the Framed Silhouettes.
My first step was to stamp the frame by using Embossing Powder.
Framed Silhouettes

Then I die cut it with the matching frame die. 
Framed Silhouettes
I added the woman's portrait ("Everyday Vintage") and coloured in her dress.

I layered here two of the decorative strips - Cobblestones and Mini Filmstrip.

OTHER PRODUCTS I USED:
Prima Marketing "Everyday Vintage" collection
Prima Marketing Mini sachet flowers
Prima Marketing/Ingvild Bolme Tiny Junkyard Findings Clock parts
Lindy's Stamp Gang
Rangers - Embossing powder, Distress markers
White twine

*   *   *
Dutch Translation

Fijne zondag Sizzix vrienden.
Vandaag wil ik graag met jullie een tag laten zien die ik
met twee nieuwe Sizzix stansen heb gemaakt.
657900 Sizzix Big Shot machine
656938 Sizzix Movers & Shaper L Die Tag & Bookplate
659133 Sizzix Thinlits Die Moroccan Card Front
659372 Sizzix Framelits Die Set w/Stamps Framed Silhouettes 
658551 Sizzix Sizzlits Deco. Strip Die Mini Filmstrip & Mini Tickets
658252 Sizzix Sizzlits Decorative Strip Die Cobblestones
*   *   *
Deze mooie lijst heb ik met behulp van Framed Silhouettes gecreëerd.
Eerst heb ik met Embossing poeder de lijst gestempeld. 
*   *   *
Daarna heb ik de gestempelde lijst gestanst met bijbehorend stansje.
*   *   *
Ik heb de vrouw ("Everyday Vintage") toegevoegd aan de lijst en 
haar jurk ingekleurd.
*   *   *
Ik heb twee laagjes gecreëerd m.b.v. de twee decorative strip stansen - 
*   *   *
I hope you enjoyed my project today!
Have a creative Sunday with our awesome products!

Christmas blog hop round up

$
0
0


Last week was our Christmas blog hop, and we had a week of really lovely patchwork and quilted projects. If you missed any of them I've got some pictures to remind you and you can head straight to their tutorials.
There was so much inspiration, and projects to suit every taste.


You can still find plenty of Christmas fabrics in stores (button up and stitch and Fabric HQ both have a good selection of modern Christmas fabrics still in stock), so it's not too late to stock up and make some great Christmassy projects (can you believe Christmas is just one month away now?!)

And here are the projects;
Table runner and placemats from Angela.... (click on each person's name to go direct to their tutorial)


A Christmas tree cushion from Hadley (this is my favourite from the week, I love it!)...


A simple mug rug (or coaster) from Carolyn...


A fun banner from Kerry...


A Christmas stocking from me....


There's still time to enter the giveaway! It closes this coming Friday at 10am (November 29th), and all of the details can be found by clicking here.


Surprise!

$
0
0
I love surprises, and this card is a perfect example for this. I looks like a simple card made of pattern paper. Very nice but very simple.


But when you open it....
Surprise!


There is this Christmassy pop up. Isn't it beautiful? And this is also very easy to make, you only need a Pop'n cuts base and then some other dies to create your scene. I have user Brenda Walton's Stocking and Paula Pascual's leafy tree. Then I have embellish it with some ribbon, a ticket and a button and voilà! This amazing card is made in almost no time :)


Supply list:
And you... Do you like surprises?

Happy Monday!
.......................

A mí me encantan las sorpresas y esta tarjeta es un perfecto ejemplo de las que me gustan. Es una tarjeta muy bonita, hacha con un papel decorado precioso pero muy simple, hasta que la abres y... ¡Sorpresa!

Dentro está esta escena navideña en tres dimensiones, como un Pop Up. Hacerla es muy fácil, solo necesitas una de las bases Pop'n Cuts y algunos troqueles para adornar. Yo he utilizado este calcetín de Brenda Walton y un arbolito de Paula Pascual. 

Finalmente lo acabammos de adornar con una cinta y un botón y listo, una tarjeta sorprendente hecha en muy poco tiempo.
 Y a vosotros... ¿Os gustan las sorpresas?

¡Feliz lunes!

Country Cottage

$
0
0

Hi everyone...hope you all had a great and creative week....today I have made a Country Cottage in Vintage style for you. It was really fun to make this tiny house....and you know...I love Vintage style.


Supply list:
657900 Sizzix Big Shot machine
658743 Sizzix Bigz XL Die - Country Cottage, 3-D

Papers: Maja Design, chipboard, old bookpaper
Inks: Distress ink Pad - Walnut Stain, Archival Ink - Jet Black
Other: Marabu - Structure Paste, Distress Glitter - Clear Rock Candy, Gesso, Glue n'seal 
Pearls, Seam Binding ribbon, tinsel, paper doilies

How to do:
Glue some old bookpaper to patterned paper her and there. Gentle paint some Gesso over. Let it dry.
Die cut the house with Sizzix Bigz XL Die - Country Cottage, 3-D
Do the same with the roof.
Die cut the ground in chipboard and paint it with Gesso.
Decorate the windows with paper doilies. Glue the house together.
Glue the house to the ground and let it dry.
Add some Structure Paste and Distress Glitter here and there. Paint Gesso here and there for snow effect. 


A little tipisto stamptexton textile...


Die cut partsof the house in patterned paper and you use it as a smal gift tag.


Thanks for stopping by and I wish you a great day!
Anne Kristine

♥♥♥♥♥♥
Hei alle sammen....håper du har hatt en fin og kreative uke....i dag har jeg laget et mini hus i vintage stil. Som dere vet elsker jeg denne stilen og det var virkelig moro å lage dette huset. 

Materialer:
657900 Sizzix Big Shot machine
658743 Sizzix Bigz XL Die - Country Cottage, 3-D

Papir: Maja Design, chipboard, gamle boksider.
Inks: Distress ink Pad - Walnut Stain, Archival Ink - Jet Black
Annet: Marabu - Structure Paste, Distress Glitter - Clear Rock Candy, Gesso, Glue n'seal 
perler, Seam Binding bånd, tinsel, kakeserviett

Beskrivelse:
Lim gamle boksider på mønsterark her og der. Mal forsiktig over med Gesso og la det tørke.
Stans ut huset med Sizzix Bigz XL Die - Country Cottage, 3-D
Gjør det samme med taket.
Stans ut grunden i chipboard og mal dette med Gesso
Dekorer vinduene med kakeserivett og lim sammen huset.
Lim huset fast til grunden og la det tørke.
Påfør Struktur Paste og Distress Glitter her og der. Mal med Gesso her og der for å skape snø effekt.
Pakkelapp:
Stans ut noe av huset som fint kan brukes til pakkelapp.

Takk for at du stikker innom her og ønsker deg en herlig dag.
Anne Kristine 

Winter card

$
0
0


Hi everyone.
Hope you all had a great week, today I will show you 2 Winter cards using the same dies


Items used:
Sizzix Texture Fades Embossing Folders 2PK - Snowflake Pattern & Plaid Set (658779)
Sizzix Thinlits Die Set 2PK - Decorative Border & Heart (658946)
Sizzix Framelits Die Set 9PK w/Stamps - Charms, Winter (658620)
Supply list:
Ink: Archival ink-Coffe-, hero arts-White-
Cardstock 2x 20x14cm make a cardbase 10x14 cm and 2x 9,8x13,8 cm to use in embossing folder
Ribbon and pontura paint White
 
 
Thanks for stopping by
Wish you a great and creative week
Pia
Hej alle
Jeg håber i alle har haft en dejlig uge , i dag vil jeg vise 2 kort hvor jeg har brugt Sizzix Texture Fades Embossing Folders 2PK - Snowflake Pattern & Plaid Set
Dies jeg har brugt:
Sizzix Texture Fades Embossing Folders 2PK - Snowflake Pattern & Plaid Set (658779)
Sizzix Thinlits Die Set 2PK - Decorative Border & Heart (658946)
Sizzix Framelits Die Set 9PK w/Stamps - Charms, Winter (658620)
Andre materialer:
Ink: Archival ink-Coffe-, hero arts-White-
Karton 2x 20x14cm lav en kortbase på10x14 cm og 2x 9,8x13,8 cm bruges i embossing folders
Bånd og pontura paint White
Tak fordi du kiggede forbi
Ønsker dig en dejlig og kreativ uge
Pia


Quick Home Decor Makes

$
0
0

This week has been so-o-o-o cold here in Wales...no snow but with the dreaded frozen windscreens to contend with in the mornings Summer really does feel like a distant memory!

Last week I shared some frosty card projects with you that I created with the Big Shot Starter Kit, well along with the cards I also created some home decor items in the same colour scheme, it just goes to show, as I keep saying, these dies are so versatile!


These frames are ingenious as it makes the contents appear to be floating because they are sandwiched between the two pieces of glass, I have attached the paper flower to the outside of the glass because it is three dimensional. The large chevron brad gives the whole project a contemporary feel.


 You can create this effect with any straight sided wooden plant pot, simply use the side of the pot as your template and draw around this onto patterned paper before cutting out, inking and sticking into position with double-sided tape. There is no real rhyme or reason to what has been attached in all honesty, I simply cut some scraps of paper into rectangles and played around with their positioning until they looked right! Text was created using a PC and printer and then cut out with the Framelit label in the kit. The delicate butterfly was offset slightly and decorated with tiny pearl gems.


Nothing could be simpler than these folded paper hearts, select papers that are muted to create the same effect and carefully edge each shape with a light application of distress ink for an aged effect.

I really hope you like these simple ideas for home decoration, simple, inexpensive and in my opinion stylish enough to be given as Christmas gifts...well it is only four weeks away now! How are your preparations going, I would love to here about your Christmas crafting preparations :)


Family

$
0
0


Hi All!

Today I would like to show a layout which I made for one of my friends. This layout talks about the good times spent in the country with the big family.


I made a lot of layers using small pieces of papers and of course cut outs which I created using Big Shot Machine and different dies.

Items:
Big Shot Machine (657900)


Have a nice day!


Всем привет!

Сегодня я хочу показать страничку, которую сделала для моих друзей. Эта страничка рассказывает о хорошо проведенном времени на даче, всей огромной дружной семьей.
В этой страничке я создала множество слоев с помощью разных кусочков бумажек, а так же с помощью вырубок, которые я сделала с помощью Big Shot.

Материалы:

Хорошего дня!

Festive Font Fun!

$
0
0

This week I wanted to create some really simple Christmas cards which were inspired by a Father's day card that I saw Somewhere or other and I 'kind of' adapted the idea for this weeks blog. Isn't it amazing how we take in inspiration and ideas which pop up when least expected?

I know that once December arrives we will be bombarded with Christmas tunes which is just fine by me, I can't wait to get my Christmas classics on the CD player. Would I feel differently if I worked in a shop or supermarket listening to the same CD on repeat 8 hours a day....YES! I love 'em and I thought I would steal a few choice lyrical phrases today.


I wanted to use my favourite BLOCK TALK alphabet by Tim Holtz which has all the uppercase letters and numbers on a single Bigz XL die, that's right, a single die! It's a die that you will go back to time and time again because the letters are tall and thin which means that you can fit some pretty big words on a card/tag/ layout,

I started by attaching an  A4 Double sided tape sheet (from the clever people at Stix2) to the back of a sheet of stiff white card this is a great way to add and adhesive layer to your die cuts but I want the adhesive on the front and not the rear this time. I trimmed rectangles to size to fit over the individual letters that I needed (tape sheet side against the die) and ran it all through my trusty Big Shot. Next, I placed the letters on my cutting mat against the place with the measurements and noted that the word 'MERRY' measures approximately 4 x 8cm.


At this point I turned to my PC and created a document in Publisher I drew a rectangle measuring 148.5 x 105mm (A6) as a guide for the front of my card. I also drew a rectangle measuring 40 x 80mm which represents the word 'MERRY' I then created a couple of text boxes with rest of the text and manipulated them to fit in the large rectangle. Once I had everything in place I flipped it through 90 degrees and set it in the top left hand corner before deleting the large rectangle. I sent the document to print placing an A5 sheet of stiff white card in the feed tray.


Once the card was printed I scored and folded down the centre. Next, I cut strips of double sided 3D foam pads and attached them to the rear of each die cut letter prior to mounting them onto the base card, I drew a faint guide line to help with accurate placement.


When the letters where in place I set about carefully removing the backing to the adhesive sheet on the front of each letter using the point of a craft knife. Finally I sprinkled my chosen glitter onto the face of each letter before shaking off the excess. You are probably wondering why I didn't just cut glitter card? Well, I have lots of gorgeous glitter in cool and unusual colours and I don't have the glitter card to match so it's another way that die cutting becomes a great problem solving tool.


As you can see I finished the card with a white bow and adhesive gem.


I couldn't stop at one card though.....


Viewing all 2033 articles
Browse latest View live