Quantcast
Channel: Crafting ideas from Sizzix UK
Viewing all 2033 articles
Browse latest View live

In Rememberance

$
0
0

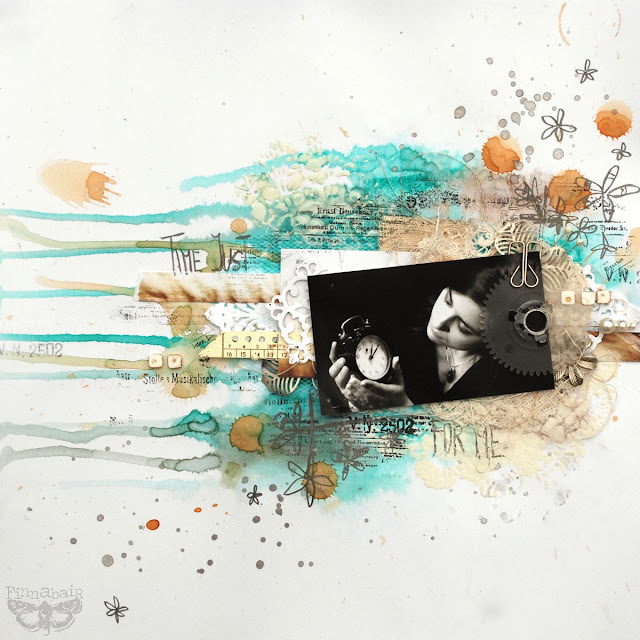
First of all I want to extend my thanks to all the staff and Customers of Rayher in the beautiful city of Ljubljana. I had a great three days and wish I could have spent more time exploring the beautiful countryside. I was lucky enough on my first day to have lunch on the edge of Lake Bled which is absolutely stunning, check out the link! We ran four separate workshops each day and on the first evening we had late night shopping at which I demonstrated all things Sizzix, they even served Sizzix cocktails (non-alcoholic I might add!)

 This Sunday I will take my place at the local cenotaph alongside many friends who have served in the forces down the years. The Poppy is such an evocative symbol and lends itself perfectly to innumerable craft applications, it works as well for appliqué as it does for paper crafting and there are many shades and varieties to choose from too.

I thought I would create a couple of simple cards this week using poppies, one using the fabulous Thinlits Poppy set by Susan Tieney-Cockburn and the other using some imitation silk from an old cushion cover.

As well as the Thinlits set I also used my Trusty Susan's Garden Tool Kit and decorative papers from the My Mind's Eye Collectable Range.

I started By Die cutting two sets of petals from red card, the leaves and central stamen from green card and 3 more stamen and the calyx from black card ( to find out more about the tools and techniques click on the links above to find tool kit tips and die specific instructions as well as some general tips)


Next, I inked the centre of each petal as well as the edges to add a little definition, if you prefer you can use pastels. I shaped each petal with the ball end stylus and 'stirred' the centre of the calyx on which the petals sit before attaching them one at a time with PVA glue.


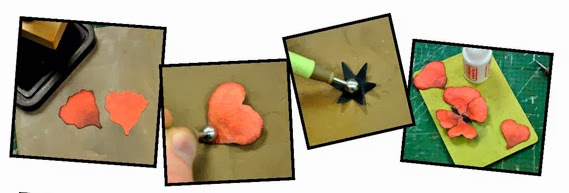
I coloured all the leaves with a blue ink pad finishing the tips with black. Next, I stirred and shaped the green calyx on the foam mat and snipped down the centre of each spoke of the black stamen with a pair of scissors before cupping and stirring on the foam mat.


After separating the spokes with my finger tips I attached all three black stamen to the flowers centre followed by the green stamen and attached the leaves to the rear of the petals.


I hand cut the black pennant and created the text using my PC before printing onto the face of a standard sized card.


The second card was created using a Bigz Circle die of which there are many. I think it's an essential piece of my die stash, maybe the essential piece.

 I die cut 3 green and 3 red circles from a man made silk/satin fabric, in the end I didn't use the medium sized circles but they will come in handy soon I have no doubt! I folded the smaller red circle in half and grasping it in my tweezers I ran the crease over the flame of a candle to make it permanent.I then repeated the last step working around the flower before sealing the edges of the circle over the candle flame.


I sealed the edge of the larger circle in the same way before placing them together.I placed one of the green circles back against the die, but slightly offset to create a leaf shape. Once I had the four leaves I again folded then up the centre and creased them over the candle flame as before. Finally, I attached the circles together using a jewelled brad and mounted the leaves onto the rear.


This is the finished card, I created the text on my PC and added a length of folded ribbon with the ends trimmed as shown.


All I want for Christmas?

$
0
0


Just before I move onto a Christmas idea I want to show off my stash of hexagons.
As I mentioned before I have been travelling - to Cambodia to visit my youngest daughter and her husband - which entailed 2 flights, one of which was 13 1/2 hours long. So I needed several things to do to pass the time - and my hexagons were so useful - you can use a thread cutter rather than scissors and a small sewing needle appears to be allowed - so I managed to tack a lot of hexagons and stitch a fair number together. I'm still not sure how big this project is going to be - but I'll keep you up to date with my progress.
So now onto - All I want for Christmas? - as many of you, who have seen me demonstrating the Big Shot and Bigz dies at shows, will know one of my favourite dies is 657611 - the 2" finished half square triangle - which I can use to cut 32 triangles at time.
So how amazing would it be to cut 112 triangles in one go - which is exactly what you can do with the Bigz XL die - 658322 ( you will also need the Bigz XL 25" cutting pads) - there are 14 triangles on this die and cutting 8 layers creates 112 - how amazing is that.
If I didn't already have this treasure I would love to have it as a present.
I'm sure I can add to the list over the next few weeks - and also maybe come up with a couple of quick makes to give as gifts.
Meanwhile I'm going to carry on with my hexagons while enjoying a glass of wine.
Enjoy the cosy evenings.
Angela.
 

Christmas card and tag - Unusual colours

$
0
0

Hi Everyone! This is Anna.
The two installment of countdown to Christmas is here! I hope you enjoyed last week. As a reminder, the plan is to share a new Christmas project made with Sizzix dies each week.
Here are the card and tag I created using some items from Winter Moments collection. Unusual colours for Christmas cards but I really like the result!

cafe creativo - Anna Drai - sizzix big shot - card tag christmas (1)

I love how they look together and I love this snowflakes! Aren't they great? Ok I think they are great! The die gives you more different snowflakes! They are super detailed and look awesome layered up like this. A little strass in the center is perfect.

cafe creativo - sizzix big shot - card tag christmas (2)

cafe creativo - sizzix big shot - card tag christmas (3)

cafe creativo - sizzix big shot - card tag christmas (4)

Tip: use this design with different patterned papers to completely change the look of this card.

I hope you enjoyed my project today. Have a great week end, see you next Friday!
 
Items used:
cardstock: white, light pink, pink, kraft
patterned paper: Prima - Paper Wishes and Dreams – 11:11 – 970024, Prima - Paper Wishful Thinking - Dreams Blossom - 970352
polka dot fabric
white fabric
snowflake charm
button
strass
glue, hot glue, foam board tape

**************************************
Flag_of_Italy Per le amiche italiane! :)
Ciao! Ecco un nuovo appuntamento con Anna.

Ecco la seconda parte del countdown per il Natale. Spero vi sia piaciuto quello della scorsa settimana. Ecco la card e la tag che ho creato con alcuni prodotti della collezione Winter Moments ed altre fustelle.Colori insoliti per il Natale, ma volevo provare qualcosa di diverso e il risultato non mi dispiace.

Per realizzare la card ho embossato i fiocchi di neve sul cartoncino rosa, ho ritagliato un angolo del fiocco di neve più grande per infilarci un rettangolo di carta fantasia e la scritta con l'augurio. Ho completato con un altro rettangolo a pois e una striscia fucsia nel centro. Ho creato un fiore bianco di stoffa tagliando diverse forme di fiori poi sovrapposte e l'ho abbellito con un bottone e un charm. Infine ho aggiunto strass qua e là.

Per la tag ho incollato due strisce differenti (di carta fantasia e stoffa a pois) al centro della tag base. Ho quindi sovrapposto un cerchio Charm di carta kraft. Ho sovrapposto alcune forme di fiocchi di neve, incollandole con scotch spessorato, per dare volume e tridimensionalità. Ho terminato con uno strass al centro.

Spero vi sia piaciuto il mio progetto oggi. Buon fine settimana, ci vediamo venerdì prossimo!
 
Materiali:
cartoncino: bianco, rosa chiaro, rosa, kraft
patterned paper: Prima - Paper Wishes and Dreams – 11:11 – 970024, Prima - Paper Wishful Thinking - Dreams Blossom – 970352
tessuto rosa a pois
tessuto bianco
charm fiocco di neve
bottone
strass
colla, colla a caldo, scotch spessorato

Mustache card !

$
0
0


Hello!

Today let’s do a masculine birthday card (this one’s for my DH). I had fun playing with the “mustache” die from Tim Holtz as well as with an embossing folder.

Supply list:

Papers: Glitz Design
Cardstock: American Crafts
Stickers: Glitz Design
Chipboards: Jenni Bowlin Studio
Others: 3D foam

Dies:

658778 Sizzix textured fades embosssing Folder 2PK-Birch trees and candy stripes set
658562 Sizzix movers and shapers magnetic dies set 2 PK-Mini mustache and pointed finger

I felt like creating a card for my Honey’s birthday next Friday. Not easy to create when it’s for a man, isn’t it?

The Tim Holtz “moustache” was the obvious choice then! So I went for a “tie” die, a cork “moustache die and here we go!

To bring more volume some elements are glued with 3D foam. I added a small strip of kraft paper that is embossed with one of the latest embossing folders: a geometric diagonal pattern which fits perfectly with my theme.


I hope you will get inspired by my realisation!

Have a nice day,

Karine

Bonjour !

Aujourd'hui une carte d'anniversaire masculine pour l'anniversaire de mon conjoint. Je me suis amusée avec le dies moustache de Tim Holtz ainsi qu'une plaque à embosser.

Matériel :

Papiers : Glitz Design
Cardstock : American Crafts
Autocollants : Glitz Design
Chipboards : Jenni Bowlin Studio
Divers : Mousse 3D

Dies :

658778 Sizzix textured fades embosssing Folder 2PK-Birch trees and candy stripes set
658562 Sizzix movers and shapers magnetic dies set 2 PK-Mini mustache and pointed finger

J'avais envie de créer une petite carte pour l'anniversaire de mon chéri ce vendredi. Pas facile de créer pour un homme n'est ce pas ?

La moustache Tim Holtz est alors apparue comme une évidence ! Un die-cut cravate, une découpe moustache en liège le tour est joué !

Pour apporter davantage de relief les divers éléments sont montés en 3D. J'ai rajouté une petite bande de papier kraft embossée avec une des dernières plaques à embosser. Un motif diagonal et géométrique qui colle parfaitement au sujet.

J'espère que ma carte vous aura inspiré !

Bonne journée

Karine


Colors and layers - pure fun!

$
0
0

Hi,I hope you had a great week :)
I had - not often you have a chance to visit Sizzix headquarters  meet your friends from the blog and have a peek into the heart of the company, right? How lucky I am! I love my job and this opportunity to travel and experience so much.
Talking about experience - today I have something I made inspired by my recent visit to Avoca Woolen Mills in County Wicklow, Ireland. This place is full of breathtaking colors, patterns, textures... just have a look!


You can read more about this place and my project idea in one of the posts on my blog - here. You will see there I got inspired by yarn, blanket pattern and color scheme - and echos of this fascination you can see on my layout below:

The color palette is based on4 colors of Distress Inks: Broken China, Brushed Corduroy, Shabby Shutters and Picked Raspberry and the composition is a multi-layered, artsy project based on using white cardstcock, Prima Elementals Canvas Resist Sheet and lace leftovers from my table! The easiest ideas are usually the best!


You can see a lot of Sizzix cut-outs here too - it's a selection of my favorite Thinlits, Sizzlits and Bigz Dies: 
- 658720 - Sizzix Bigz Die - Ornate Frame
- 658502 - Sizzix Sizzlits Die - Flower, Daisy
- 659117 - Sizzix Thinlits Die Set 4PK - Springtime


All these elements together create eye-catching, fresh looking composition  - great both on layout and greeting card.   You simply can't go wrong! Finishing the layout with stamping and a bit of pencil doodling was fast and enjoyable. And...can you see this hot pink yarn? Mindblowing!

I wish you all a great creative week - see you soon!
Finn

Birdhouse Ornament

$
0
0


Brrr....the weather is finally getting chilly. Before you know it, Christmas will be here!  I like to make a few handcrafted ornaments every year for my tree. Here's one for this season.

I used my ScoreBoard Birdhouse die to make this project from matboard. Crafting with thick material like this (up to 1/16") makes the projects you make so sturdy and able to hold up for years. I figure if I am going to the trouble of making something, I want it to last a while. Sizzix is the only company that makes dies specially designed to cut and score thick board like this. Have you tried a ScoreBoard die yet? Did you know you can also emboss matboard? Check out the fabulous metal roof!


Sizzix Supplies:
658451  Birdhouse, 3D
657114  Flower, Layers #9
658455  Basketweave and Honeycomb set
656491  Matboard pack- cream

Other Supplies:
Adhesive backed metal tape (I found this in a home improvement store in the US), text paper, bamboo skewer, metal embellishment, wooden bird from Prima, black permanent marker, Copic markers, crystal glitter, spray adhesive, glitter
  1. Coat a piece of matboard with spray adhesive and cover with dictionary paper. Lay the paper on the matboard so the direction of the text matches up with the front of the birdhouse.
  2. Remove adhesive backing from tape and place over matboard where the roof will be cut (rectangle with scalloped edges). TIP- Here's how I lay this out: place my paper and tape right side down on the die and lay the matboard piece on top, then cut) Check die for reference.
  3. Die cut birdhouse, bottom and roof. Add text and doodles with markers and color in.
  4. Coat Birdhouse and bottom with spray adhesive, then sprinkle on a layer of glitter, smoothing over with your fingers to make sure all areas are covered.
  5. Emboss roof with Basketweave embossing folder. Isn't this cool?


  6. Use markers to color wooden bird. 
  7. Cut a piece of bamboo skewer to 1 1/2" and color with ink. Punch a hole below the open circle on the birdhouse and insert the skewer.

     
  8. Die cut 6-8 layers of the smallest flower on the die. Punch a hole in the center and secure all layers with a brad. Scrunch and ink petals. Cut leaves and glue under flower.
  9. Place embellishments on birdhouse and secure with glue.
  10. Punch a hole in the middle of the birdhouse roof and insert a wire hanger. Twist the wire around a pencil for a fun effect, then bend into a hanger shape.


  11. Add glue or strong double stick tape to the two tabs on top of the birdhouse and press roof into place.
  12. Hang on your Christmas tree!

Thanks for stopping by- see you next time... 

"Congratulations" Card by Gerry van Gent

$
0
0

Happy Sunday Sizzix friends!
Gerry here today to share with you a greeting card
I created for my blog post today.


657900 Sizzix Big Shot Machine
658373 Sizzix Pop 'n Cuts Magnetic Insert Die Label, Funky 3D
658356 Sizzix Textured Impressions Embossing Folder Rose Vines & Trellis Set
657007 Sizzix Movers & Shapers Accessory Base Tray, L
656938 Sizzix Movers & Shapers L Die Tag & Bookplates
659069 Sizzix Thinlits Die Set Butterfly, Flowers & Lattice

*   *   *
Card Size: 13.5 cm x 13.5 cm
I used sand paper to distress the embossed parts of my background paper
so it will pop up. 

The title was the the last touch I added to my card.
I didn`t have the size and font I liked to use as a title
so I used a computer font and printed the word "Congratulations",
distressed it with ink and adhered it on the card.

I used Karen Burniston's Funky 3D Label as a base of the bookplate.

My card has dimension as I use different layers and....generous amount of foam squares :-)

OTHER PRODUCTS I USED:
Maja Design "Walking in the Forest" collection
Webster's Pages Silhouette resin
Prima Marketing fabric flower
*   *   *
Thank you for visiting us today!

a little Christmas crafting

$
0
0


It's now only 44 days until Christmas, but don't panic - that is still plenty of time to get yourself prepared.
I'm busy beavering away with some Christmas crafts and next week from Monday 18th there'll be a Christmas blog hop here on the Sizzix blog, so you're bound to pick up some great ideas for the coming holiday.

Can you guess what I've been making this week?


Sandra's boot sock

More on that soon!

There's a great offer on at the moment on the Sizzix website - up to 75% off dies. There's quite a few bigz dies included in the offer, most are more suited to papercraft but some are perfect for using with felt and fabric for applique 

Dies such as the raccoon


the crown


a Christmas tree


and flower layers


There are loads more dies in the offer, but hurry - stock is limited!


Big Shot Video Tutorials

$
0
0
Hi everybody!

These days I have been asked a lot about how the Big Shot and Sizzix dies work. I get these questions a lot in my blog, Facebook and workshops so today I want to tell you that there are a lot of video tutorials on the Sizzix website, and they are great! You can have a look at the videos here.

And today I want to share with you the cover of the mini album that I'm teaching in Barcelona in November. I have used the Reindeer die as my main embellishment. I love this die!


Happy Monday!
................................

¡Hola a todos!

Últimamente estoy recibiendo muchas preguntas acerca de cómo funciona la Big Shot y sus troqueles. Recibo estas preguntas en mi blog, Facebook y en los talleres que imparto, así que hoy os quiero recordar que hay unos cuantos vídeo-tutoriales de la Big Shot en español en la web de Sizzix, y que están muy bien :) Seguro que encontráis el que estáis buscando. Los podéis ver en esta página y pinchar en la pestaña "Vídeos en español" como podéis ver en la imagen a continuación:


O si lo preferís los podéis ver en esta lista de reproducción.

Espero que encontréis toda la información que necesitéis, pero si tenéis más dudas dejádmelas en los comentarios y las utilizaré para hacer un vídeo resolviendo todas ellas.

¡Feliz lunes!


Frosty Snowman

$
0
0


Hi Sizzix friends...hope you all had a great week...today I have a card with a lovely Frosty Snowman to show you. I really love these Framelits Dies Set with Stamps.


Supply list:


Paper: White Bazzill, Distress Watercolor cardstock
Inks: Archival Ink - Jet Black, Distress Markers - Stormy Sky, Vintage Photo, Spiced Marmelade, Festive Berries
Other: Marabu - Strukturpaste 804, Distress Glitter - Clear Rock Candy, Glossy Accents, Seam Binding Ribbon, button, Idea-ology - Chitchat Seasonal, 3D foam, Cheesecloth, water brush


How to do :
Stamp snowman on watercolor cardstock. Color the snowman with Distress Markers and water brush.
Die cut the snowman with Sizzix Framelits Die Set 6PK w/Stamps - Snowman Blueprint
Glue the snowman together with 3D foam. Glue some Distress Glitter on the scarf.
Make some snow effect with Struktur paste and Distress Glitter. Let it dry.
Stamp trees on watercolor cardstock with Distress ink Pad - Stormy Sky and spray some water over. Die cut trees with Sizzix Framelits Die Set 7PK w/Stamps - Holiday Joy
Stamps some trees on the background (watercolor cardstock) and spray some water over.
Make some snow effect with Struktur paste and Distress Glitter. Let it dry.
Glue cheesecloth to the main card and glue the panel on the top.
Decorate the card with snowman and a bow.
Thanks for stopping by and I wish you a great day!
Anne Kristine
♥♥♥♥♥♥
Hei alle sammen ...håper du har hatt en fin uke... i dag har jeg et kort med en herlig snømann å vise dere. Settene med Framelits og stempler er så fine til slike prosjekter... du slipper å klippe ut bittesmå detaljer.
Materialer:


Papir: Hvit Bazzill, Distress Watercolor kartong
Inks: Archival Ink - Jet Black, Distress Markers - Stormy Sky, Vintage Photo, Spiced Marmelade, Festive Berries
Annet: Marabu - Strukturpaste 804, Distress Glitter - Clear Rock Candy, Glossy Accents, Seam Binding bånd, knapp, Idea-ology - Chitchat Seasonal, 3D puter, osteklut, vannpensel

Beskrivelse:
Stemple snømann på akvarell paper. Fargelegg snømannen med Distress Markers og vannpensel.
Stans ut snømannen med Sizzix Framelits Die Set 6PK w/Stamps - Snowman Blueprint
Lim sammen snømannen med 3D puter. Lim Distress Glitter på skjerfet.
Lag snø effekt med Struktur paste og Distress Glitter.La det tørke..
Stemple trær på akvarell kartong med Distress ink Pad - Stormy Sky og spray litt vann over. Stans ut trær med Sizzix Framelits Die Set 7PK w/Stamps - Holiday Joy
Stemple trær på bakgrunnen (akvarell kartong) og spray litt vann over.
LAg snø effekt med Struktur paste and Distress Glitter. La det tørke.
Lim fast osteklut på utsiden av selve kortet og lim panel over.
Dekorer kortet med snømann og sløyfe.
Ønsker dere alle en fin dag!
Anne Kristine 


Ballroom Slippers

$
0
0


Happy Tuesday everyone
I hope you all had a great week. Today I will show you ballroom slippers made with Sizzix Bigz L die Ballroom Slippers and how I made a box for shoes
Supply list:
Paper: Little yellow bicycle-Love letters-, Papir Design-Herman & Emilie, cardstock pink and of white.
Stamp: KaiserCraft clear stamp -You-
Ink: Hero Art- Art print brown-
Lace, Pountura paint.-pink-,half pearls and leaves
How to do:
1. Die cut the shoes with Sizzix bigz L -Ballroom slippers , do the same again so you have 2 shoes
2.Glue the different diecuts together
3. Decorate using decorative strip rosettes, 2 small  to decorate the shoes and one big rosette to decorate the top of the box
4. Decorate using lace round the shoes
5.Cut out a cardstock 20x24 cm, score 5 cm round
6. Cut out a cardstock 16x20 , score 2,5 cm round , it is the top , decorate using patterned paper, lace, leaves, big rosette and stamp text
Thanks for stopping by and hope it gave you some inspiration, see you next Tuesday
Wish you a great week
Pia
Hej alle
I dag  vil jeg vise et par festsko hvor jeg har lavet en skoæske til. Skoene er lavet med den lækre Sizzix Bigz L die Ballroom Slippers
Supply list:
Papir: Little yellow bicycle-Love letters-, Papir Design-Herman & Emilie, karton pink og of white.
Stempler: KaiserCraft clear stamp -You-
Ink: Hero Art- Art print brown-
Blonde, Pountura paint.-pink-,halv perler  og blade
Sådan gør du:
1. Udstans skoene ved at bruge Sizzix bigz L -Ballroom slippers , gør det samme engang til så du får to sko
2.Lim de forskellige udstansede dele sammen
3. Dekorer ved at bruge Mini Rosetten ,, de 2 små bruges til skoene og den store til at pynte på æsken
4.Dekorer sko og æsken med blonder rundt
5.Skær ud karton 20x24 cm, scor 5 cm rundt
6. Skær ud karton 16x20 , scor 2,5 cm rundt , dette er toppen af æsken, dekorer med mønstret papir, blonde, blade, rosetten og tekst 
Jeg håber dette gav dig lidt inspiration, vi ses næste tirsdag
Ønsker dig en god uge
Pia


Hexagonal Birthday

$
0
0

This week I am sharing with you a really simple Birthday card idea using hexagons, this shape seems to be popping up everywhere at the moment and the different sized hexagons in the Framelits set are great for the smallest cards or large 12x12" scrapbook formats.

The card is for my niece's 22nd Birthday, she loves cycling so I based the colour scheme around a gorgeous retro cycle brad.

The dies that I used are...

The flower is from the Big Shot Starter Kit but any small die-cut flower would work equally well.
I have embossed some of the hexagons using...


Draw around the third largest hexagon in the set of Framelits and then tape the hexagon a size larger over this drawing and cut out.


Die-cut the smaller hexagon from a rectangle of yellow card the same size as your card blank.


Stick the yellow card rectangle to the card front using PVA. Emboss a grey rectangle of card and then stick this into position along side the hexagon aperture.


 Stick other die-cut rectangles to the card front and then trim away the excess. Print the sentiment using a PC & Printer and then die-cut this with the smaller rectangle.


Stick acetate to the inside of your card, covering the aperture and securing with double-sided tape. Use the same tape to stick the printed hexagon to the front as shown.


Complete the card with additional strips of card, small embossed rectangle and a die-cut flower decorated with a brad and stuck down with a small foam pad.

I would never normally chose this colour scheme but I'm really pleased with the result...all down to one cute brad! Have a great week :)

Felt Hair Ties

$
0
0


Hi All!

Daria is here today.

Do you love felt? I love! I love to create interesting embelishments using this gorgeous product.

I love my daughter! And I love that she has beautiful clothes and hair. And I created a Felt Hair Ties for her. And she loves them very much!!!

Items:
Sizzix Bigz Die - Flower Layers & Leaves (657690)

I cut flowers using Flower Layers & Leaves die. I sew them together and add buttons.

Also you may add stiching and beads to your flowers and they will become more interesting.

You may use such flowers as embelishments on your pages or cards. But I created hair ties for my daughter.

Have a nice day!


Всем привет! 

Сегодня я снова с резиночками для волос, на этот раз из фетра. Но что поделать. Я обожаю свою дочь и люблю, чтобы она красиво выглядела. А еще мне нравится, когда у нее есть что-то, чего нет ни у кого, например, украшения для волос. 

Я вырезала цветочки из фетра с помощью ножа Flower Layers & Leaves, сшила их вместе и добавила пуговички.  Чтобы цветы были более интересные, можно на них добавить вышивку и бисер, что я и сделала на голубых цветочках. 
Из таких цветов получатся прекрасные украшения для страничек и открыток. Но я порадовала дочку и сделала резинки.

Всем хорошего дня!

Chasing Rainbows!

$
0
0


I want to share a lovely story with you all, which happened last week while I was reading my 3 year old daughter (Pictured below in Daddy's glasses) a bed time story. As I was reading the book and ploughing through my full repertoire of facial contortions and silly voices she pointed straight at me and said 'Daddy, a rainbow!'. 


There is a moon shaped light on the wall behind me and I thought that she was talking about the light shining through what is left of my hair.

She continued to repeat 'a rainbow, a rainbow!' until she reached forward and lovingly traced each line in my forehead with her finger.

What a wonderful way to describe wrinkles, I hope they got there from smiling and not frowning!

So..... This week I decided to take rainbows as my theme, Sadly we don't currently make a rainbow die so I reached for my old friend the circle Framelits and I used two sets which provide me with every size I could ever need The sets are Circles and Circles #2.

I picked out 6 circle dies which, for the instructions, we shall number with 6 being the largest and 1 being the smallest.

I chose my rainbow colours from quality heavyweight card stock (Inspire Me Papers are super quality) and cut each one in turn I also used circle #3 to cut a hole in the centre of the red, orange, yellow and green circles. The blue circle is cut using die #2, with die #1 used to cut the hole in the centre. Next, I matted them together using PVA glue before cutting the concentric circles in half using craft knife and steal ruler (Don't discard the other half!)


To make the little clouds I used the smallest Framelits die in the Scalloped Ovals set and cut two from white card, before trimming away the bottom third of each die-cut with scissors and re-attaching it with 3D foam pads to appear like overlapping clouds. Next I attached the clouds to the base of the rainbow using the pads.


Finally I made a 'Rainbow quote search' on my computer before settling for the words of wonderful Maya Angelou. I printed the quote onto a white card blank using my PC and attached my rainbow...Easy-peasy!


As I was getting ready to post my blog I noticed the other half of the rainbow sitting all by itself on the edge of my cutting mat. There can be no sadder sight than a discarded rainbow, that is, if it wasn't for the fact that it sat upside-down creating a beautiful rainbow smile.......


Mini book cover

$
0
0


Hello,

It’s been a while since I haven’t shown you a mini book! Here is the cover of one of my latest mini album, one that I taught last week-end for the Scrapediem cropping party in Lognes.

Supply list:

Papers: Crate Paper, Glitz Design, Studio Calico
Alphabets: Jenni Bowlin Studio
Rub-ons, stickers: Jenni Bowlin Studio
Die-cuts: Studio Calico
Stamps: Florilèges Design
Inks: Versafine, Distress Vintage Photo
Stickers: 7Gypsies
Others: tulle

Die:

658798 Sizzix Textured Impressions Embossing Folders 2PK-Trellis & Swirls Set

This is a mini book with light and delicate tones and lots of texture. That was the program of last week-end’s workshop.

I created a little window size 6x8cm out of a thick cardboard piece. I inserted an embossed white Bristol piece inside. This embossed piece is coloured with Distress Vintage Photo ink and a piece of cut’n dry.
The ink is applied in a light manner so that to obtain a very light beige colour.

Then my cover is decorated with rub-ons and various embellishments such as brads, stickers and die-cuts.


See you next Thursday!

Karine

Bonjour,

Cela fait bien longtemps que je ne vous avez pas présenté un mini album ! Voici la couverture d'un de mes dernier album présenté le week end dernier en atelier pour la crop Scrapediem à Lognes.

Matériel :

Papiers : Crate Paper, Glitz Design, Studio Calico
Alphabets : Jenni Bowlin Studio
Rub-ons, stickers : Jenni Bowlin Studio
Die-cuts : Studio Calico
Tampons : Florilèges Design
Encre : Versafine, Distress Vintage Photo
Stickers : 7Gypsies
Divers : tulle

Die :

658798 Sizzix Textured Impressions Embossing Folders 2PK-Trellis & Swirls Set

Un mini dans des tons très doux et délicats avec une multitude de textures. Voilà le programme de mon dernier atelier ce week end.

J'ai crée une petite fenêtre en évidant un morceau de cartonnette au format 6x8cm permettant d'accueillir un morceau de bristol blanc embossé. Celui-ci est ensuite coloré à l'aide d'une encre Distress Vintage Photo et d'un morceau de cut'n dry.
L'encre est appliquée de façon légère pour obtenir un ton beige très clair.

Ma couverture est ensuite décorée avec des rub-ons et divers embellissements tels des attaches parisiennes, des stickers et des die-cuts.

A jeudi !

Karine

A quick quilt for Christmas

$
0
0


So I was sorting out my sewing room - again - I'm sure I don't really leave it so very messy - but the reward for all my effort was to uncover a fat quarter bundle of Tula Pink's Prince Charming fabric.
  It has been waiting to be used since I bought it at Festival of Quilts last year ( yes I know 18 months ago!!) I then found some peach coloured fabric to co-ordinate and my quick quilt plan was born -

Using my Big Shot, and Bigz die 65762, I cut lots of 5" unfinished squares from the Prince Charming fat quarters -I'm not sure yet whether to use the peach as sashing between the squares or to cut it into squares as well. So this evening I am going to lay it out on the floor to see which I prefer - and then I'm going to piece it and either tie the corners or sew buttons on - instead of traditional quilting - which will also save time. I intend to time how long this quilt takes me to make - so that I can encourage you all that it's not too late to make gifts for Christmas!
That's all for this week - next week will be a quilting blog hop - with 5 of us publishing a blog one day of the week - how exciting - I can't wait to see what the others will do - which also means that news of this quilt will be delayed - so you can see completion in 2 weeks time.
Enjoy your weekend.
Angela


Christmas Stocking Garland

$
0
0

Hi Everyone! This is Anna.
This week I was inspired to create a stocking garland when I spied this Sizzix die stocking from while… too cute! The die even included the ruffly cuffs for the top of the stockings and more embellishments – love it!!!
You can Recycle fabric scraps. I used a scrap piece of fleece blanket and grey sweatpants :D

cafe creativo - Anna Drai - sizzix big shot - stocking christmas (1)
 
cafe creativo - Anna Drai - sizzix big shot - stocking christmas (2)
 
cafe creativo - Anna Drai - sizzix big shot - stocking christmas (3)
 
cafe creativo - Anna Drai - sizzix big shot - stocking christmas (4)
 
Items used:
glitter paper (DCWV - The Christmas & Winter Combo Glitter Cardstock Matstack)
white fleece fabric
grey sweat fabric
scrap of flowers patterned fabric
lace
red ribbon
twine white and red
red and white buttons
harness bell
sequins
hot glue
sewing machine, yarn
 
How to make:
Cut different parts of the Stocking Gift Holder by Brenda Walton from different materials: cut out two piece of front from white fleece fabric, cut out the topper of stocking from grey sweat fabric, cut out a star from red glitter paper. Use Framelits to cut out a snowflake.
Set to assembling the stocking. Sew the front of stocking above the back. Sew/assembly the topper.
Now comes the fun part… decorating the stockings!
Apply ribbon, lace, snowflake, buttons, sequins... When you are done decorating the stockings, leave enough ribbon on each end to create a loop for hanging.
When you are happy with the placement of all the stockings, tie a loop for hanging onto each end and Voilá! … you’re done!
 
You’ve created a stocking garland that will be a treasured keepsake for many years to come. This will also make a beautiful Advent Calendar or holiday gift for that special someone on your list!
Thanks for stopping by and have a wonderful weekend!
 
cafe creativo - Anna Drai - sizzix big shot - stocking christmas (5)

**************************************
Flag_of_Italy Per le amiche italiane! :)

Ciao! Ecco un nuovo appuntamento con Anna.
Questa settimana ho creato una ghirlanda natalizia, ispirata da questa bella e versatile fustella Sizzix Bigz XL Die - Stocking Gift Holder (658744) troppo carina e versatile!!!
La fustella comprende anche il bordo decorato per la parte superiore della calza. Nella stessa fustella c'è anche una decorazione a forma di coccarda e ci sono anche punta e tallone, che per questo progetto non ho usato, perchè non erano adatti alla ghirlanda semplice e veloce, che avevo in mente di fare. Ho ritagliato solo come abbellimento la parte a stella della coccarda, che è molto decorativa, soprattutto se si usa carta glitter.
Credo comunque che prossimamente con questa fustella farò una prova anche con la carta, ma il fatto è che una Bigz e non ho resistito a tagliare subito stoffa e feltro! In questo caso ho usato un pezzo di morbido pile (un avanzo di coperta!) e un ritaglio di felpa grigia, anch'essa di recupero. Quindi possiamo ben dire che è un progetto di riciclo creativo ;)

Ecco come ho fatto a realizzare la ghirlanda di calzine da appendere a Natale:
 
Materiali:
carta Glitter (DCWV - The Christmas & Winter Combo Glitter Cardstock Matstack)
tessuto in pile bianco (di recupero)
tessuto grigio di felpa (di recupero)
avanzo di tessuto a fiorellini
pizzo
nastro rosso
spago bianco e rosso
bottoni rosso e bianco
campanellino
filo di paillettes
colla a caldo
macchina per cucire, filo
 
Procedimento:
Tagliare le diverse parti della calza da diversi materiali: tagliare due pezzi del davanti da pile bianco, tagliare la parte superiore della calza da tessuto felpato grigio, tagliare una "stella" di carta glitter rossa. Utilizzare i Framelits per tagliare un fiocco di neve glitter.
Cucire lungo i bordi le due parti di calza, una sopra l'altra. Cucire o incollare il bordo grigio.
Ora arriva la parte divertente... decorare le calzine! Applicare nastri, pizzi, fiocchi di neve, bottoni, paillettes... il tutto a piacimento. Quando avrete finito di decorare le calze, incollare un cordoncino su ogni estremità. Posizionare tutte le calze sullo spago, fare un fiocco e voilà... la ghirlanda è pronta per essere appesa!

Io l'ho realizzata con sole tre calze, ma voi potete abbondare!!! Si può inoltre infilare cioccolatini, torroncini o caramelle al loro interno, come regalino per i bambini, soprattutto se ne realizzate 25 per il calendario dell'Avvento.

Grazie per essere passati di qui!
Felice fine settimana!

Perfect detail - Thinlits

$
0
0

Hi, it's great to see you here!
I'm having a time in my creative life when I'd like to use  a very limited color palette, focus more on the texture and free space than color. When it comes to texture - what can be better than layers of beautifully cut and ripped paper? Great, matching detail here and there makes a huge difference and it is great if you can decide what shape you want to use - and repeat this pattern many times too! This is one of the reasons why I like using Sizzix dies - I'm not limited with number of elements I want to use!
On the layout below I used just one cut-out element - but it is matching perfectly with the stencil, crochet doily and all the layers I put on the background. Simply perfect!


Here is the set I used for this project:
659010 - Thinlits die set - Christmas

You can see more on the close-ups:


All I needed here was a bit of watercolor - Distress Ink - some chalk paint and stamping - with my Vintage Vanity stamps from Prima. Finishing touches were done with soft pencil.

I wish you all a great, creative week!
best wishes
Finn

A little birdie told me...

$
0
0


Hi everyone! It's Rachel here with a card to share using the Sizzix Bow Strings Textured Impressions Embossing Folder 656975 and Darkroom Door stamps!


Here's how I made the card:

1. Emboss white cardstock using the Sizzix Bow Strings Embossing Folder.
2. Lightly sponge Archival Sepia ink over the top to highlight the texture.
3. Adhere to amber coloured card.
4. Stamp the birds branches from the Darkroom Door Love Birds DDRS057 stamp set onto white cardstock using Archival Sepia ink. Trim and adhere to the card.
5. Stamp the birds from the Darkroom Door Carved Birds Vol 2 stamp set DDRS118 onto white cardstock using Archival Saffron and Vermillion ink pads. Trim and adhere to the branches on the card.
6. Stamp the sentiment from the Darkroom Door Love Birds DDRS057 stamp set onto white cardstock using Archival Sepia ink. Mount onto amber cardstock and tear along the bottom just to give it a fluffy look :) Adhere to the card to complete!

I love this embossing folder - it almost looks like a willow tree!

Hope you've enjoyed today's inspiration!

Thanks for looking! Have a great weekend!

Rachel

A "Merry Christmas" Card by Gerry van Gent

$
0
0


Happy Sunday Sizzix friends!
Today I prepared for you a Christmas Card using some
gorgeous new & old Sizzix dies.
657900 Sizzix Big Shot machine
659127 Sizzix Thinlits Dies Frame Layers & Flower #2
657906 Sizzix Framelits Dies Frame, Snowflake
659131 Sizzix Thinlits Dies Labels, Long
658622 Sizzix Framelits Dies w/ Stamps Snowflakes #2
*  *  * 

Card Size: 12.5 cm x 14cm
To make the circle I used two different dies.
From the  Frame Layers & Flower #2 die I used the inside circle
of the doily which is the solid, main circle.
 Then I used the Frame, Snowflake die as this one I used
as a frame. I distressed with ink and adhered on top of the
solid circle.

The round shaped dates you see are fussy cut from the
pattern paper and then glued on top of the die-cut snowflakes.

I love this new set with long labels - it`s so intricate and 
beautiful.
Labels, Long
For my card I combined two of those labels.
The smallest label is used as a base of the title.
From the largest label only the top ornate part
was used to decorate the smallest label on the card.

OTHER PRODUCTS:
Webster's Pages - "A Christmas Story" collection
Webster's Pages - a paper clip bow

*  *  * 
And ... I want to share another card I created recently for 
Maja Design blog using two of my favourites new dies...

658780 Sizzix Bigz Die Window & Window box
658221 Sizzix Originals Medium Die Curly Gate

OTHER PRODUCTS:
Maja Design "Vintage Frost Basics" collection
*  *  * 
I hope you enjoyed my cards today!
Have a creative Sunday!
Viewing all 2033 articles
Browse latest View live