Quantcast
Channel: Crafting ideas from Sizzix UK
Viewing all 2033 articles
Browse latest View live

Gold & mini book cover

$
0
0


Hello!

Here is a new mini-book cover 100% gold for all those who like shine & sparkles!

Supply list:

Mini album: Sodalicious
Alphabets: Glitz Design
Ribbon: American Crafts
Metallic corners: Ephéméria
Stamps: Tim Holtz, Florilèges Design
Ink: Versafine Smokey Gray
Spray ink: Mister Huey's black
Others: Sequins, gold acrylic paint, school eyelets, Masking Tape

Dies:

658332 Sizzix Sizzlits Die- Ampersands & banner
659379 Sizzix Framelits Die Set 6PK with stamps-Tree blueprint
658508 Sizzix Sizzlits die set 3PK-Roses flower set

I started to apply a thin layer of gesso on my cover. Once it is dry, I glued my “&” pattern (cut out of white cardstock).

On top of it, I inserted a label printed with grey ink: I love this Tim Holtz stamp! The label is cut then inserted on my cover.

I used foliage patterns cut out of white cardstock with my Big Shot as embellishments. There are shaded with Distress Vintage Photo ink before being glued to my cover.

Next week, I will show you some of the inner pages


I wish you all a Merry Christmas!

See you next week,

Karine

Bonjour !

Une nouvelle couverture de mini album 100% Gold pour toutes celles qui aiment tout ce qui brille !

Matériel :

Mini album : Sodalicious
Alphabets : Glitz Design
Ruban : American Crafts
Coins métal : Ephéméria
Tampons : Tim Holtz, Florilèges Design
Encre : Versafine Smokey Gray
Encre en spray : Mister Huey's black
Divers : Sequins, acrylique or, oeillets scolaires, Masking Tape

Dies utilisés :

658332 Sizzix Sizzlits Die- Ampersands & banner
659379 Sizzix Framelits Die Set 6PK with stamps-Tree blueprint
658508 Sizzix Sizzlits die set 3PK-Roses flower set

Pour travailler mon fond de couverture j'ai commencé par appliquer une fine couche de Gesso. Une fois la peinture sèche j'ai collé mon & découpé dans du cardstock blanc.

Par dessus une étiquette tamponnée en gris, j'adore ce tampon Tim Holtz ! Celle-ci est découpé puis intégrée à ma couverture.

En guise de décoration, des feuillages découpés à la Big Shot également dans du cardstock blanc. Ils seront ombrés à l'encre Distress Vintage Photo avant d'être collés à la page de couverture.

La semaine prochaine je vous montrerai quelques pages intérieures de mon mini :)

Je vous souhaite à toutes un très bon Noël !

A la semaine prochaine

Karine

Christmas all sewn up!

$
0
0


It's the final countdown - and still so much to do, but it is amazing how a looming deadline can focus the brain, and the sewing machine.
Do you remember back in the summer I started a quilt for my new grand-daughter - well I am pleased to announce that I only have the binding to hand stitch and embroider the eyes on the animals -

Originally I was going to make the leaves, that hide parts of the animals, into flaps that could be lifted to reveal the whole creature - but then thought that the amount of play this will get it might be better to just fix the leaves in place. I stitched all the animals in place, then fused the leaves in place. I layered the backing and wadding with the front and the zig-zag quilted around the leaves - a fast and I think effective method of completing the quilt.

I had a lot of fun with this quilt - and wouldn't have made it without the use of my Big Shot and Cuddly Creatures dies -
Lion - http://www.sizzix.co.uk/product/658640/sizzix-bigz-l-die-lion,
Giraffe - http://www.sizzix.co.uk/product/658640/sizzix-bigz-l-die-lion
Elephant - http://www.sizzix.co.uk/product/658638/sizzix-bigz-l-die-elephant
Crocodile - http://www.sizzix.co.uk/product/658634/sizzix-bigz-die-crocodile
I'm not sure which is my favourite - it might be the giraffe - especially with the addition of long eyelashes - but the elephant follows closely - which reminds me I still have to master the elephant bunting for Abi - her birthday is at the end of January.
My other achievement is to have finished all my place mats -
so I am feeling quite pleased with myself - after all there are still 6 more sleeps until Christmas morning!I like Katy's question on her blog - what would be on your wish list for a new die? I think I'll have to ponder that - because I know we have at least one die due to be launched next year that I think is going to be another of my favourites - so you'll have to keep reading the blogs to find out what it is!!!
Now all I have to do is clean the house - put up and decorate the Christmas tree - we weren't well at the weekend so it still hasn't been done - so it's Saturday morning or else the grandchildren will be 'helping' on Sunday.
If you're panicking that you won't manage to complete your gifts by Christmas you could always take a photo and make a card saying that its on it's way!
I hope you all enjoy Christmas, and have some fun.
Angela


It's a Cracker.....

$
0
0


Excuse the unforgivable Christmas pun in the title but it literally is a cracker! This is a super-quick, unscheduled blog, no messing about!

Today we had Christmas Lunch here at Sizzix Central complete with Crackers, I took some of the cracker scraps from the table.


Die cut some bits and pieces with the beautiful Sizzlits Poinsettia die from Brenda Walton and the embossing folder from the new Big Shot starter kit.


A snip-snip here and there, bit of glue, Simple!


Retro Santa Xmas Card

$
0
0
Hi Everyone! This is Anna.
I know you are so busy! I know you’re shopping, decorating, wrapping, baking and going to Christmas parties. After all... it’s the busiest time of the year!
But just in case you had a few extra minutes... look my last Sizzix project! :)
This week I wanted to show you a card I made using Sizzix Framelits Die Set 5PK w/Stamps - Retro Christmas (659377), are perfect for a Christmas card. With this kit you can make great cards simply and easily!
For this card I decided to use also the Pop 'n Cuts dies, to make a Christmas "surprise" and I go with a retro theme.
 
cafe creativo - Anna Drai - sizzix big shot - christmas card pop up (1)
 
cafe creativo - Anna Drai - sizzix big shot - christmas card pop up (2)
 
cafe creativo - Anna Drai - sizzix big shot - christmas card pop up (3)
 
Items used:
 
cardstock: white
patterned paper (Basic Grey - Forest)
glitter paper (DCWV - The Christmas & Winter Combo Glitter Cardstock Matstack)
embellishments (Ikea)
embossing powder (Stamp-n-stuff - Penny Copper)
embossing ink pad(Versamark)
gold acrylic paint
washi tape
strass
thread
heat dryer
glue
 
cafe creativo - Anna Drai - sizzix big shot - christmas card pop up (4)
 
Place the magnetic Pop 'n Cuts Frame inside the base die and die-cut from cardstock. Fold along the crease lines as shown to bring the pop-up forward.
Place a piece of patterned paper over the top half of the Card and die-cut, trim away the pop-up and attach to the Card.
Cut three white stripes to look like snow, layer on top of each
other and adhere.
Cut a front of Card and use embossing folders to create a textured background. Crease and place over fold on back of Card to cover opening.
Stamp and die cut the Santa and the sentiment in Versamark ink and use copper powder over the top. Glue the Santa above pop-up and the sentiment as shown.
Embellish Card with die cut stars, stickers and strass. Finish by embellishing the Card front as desired.
 
I hope you enjoyed these cards and the tips I shared with you.

Best wishes and Merry Christmas to everyone!!!
Hugs

**************************************
Flag_of_Italy Per le amiche italiane! :)

Ciao a tutti! Ecco un nuovo appuntamento con Anna.
So che siete molto impegnate in questo periodo tra shopping, decorazioni, impacchettamenti, cene, recite di Natale ecc. Dopo tutto... è il momento più movimentato dell'anno!
Ma se avete un minuto... vi faccio vedere la mia ultima card natalizia :)
L'ho fatta usando un bellissimo set di Framelits provvisti anche di timbri, Sizzix Framelits Die Set 5PK w/Stamps - Retro Christmas (659377). Con questo kit è possibile fare meravigliosi biglietti semplici e veloci, ve lo consiglio!
Qui, però ho voluto fare qualcosa di particolare, una piccola sorpresa natalizia, realizzando una card pop up, con un look semplice, ma retro' dato dal bel timbro del set. Il biglietto può essere anche un mezzo carino per offrire una "gift card", nascosta tra i "cumuli di neve" o sul retro... ecco così un'idea per un regalo last minute ;)
Vi assicuro che è molto veloce e semplice da fare...

Materiali:
 
cartoncino bianco
carta fantasia natalizia (Basic Grey – Forest)
carta glitter (DCWV - The Christmas & Winter Combo Glitter Cardstock Matstack)
stickers (Ikea)
polvere per embossing (Stamp-n-stuff - Penny Copper)
inchiostro per embossing (Versamark)
vernice oro acrilica
nastro adesivo decorativo
strass
filo
pistola termica
colla
 
Collocare la Pop 'n Cuts Frame, all'interno della fustella base e tagliare il cartoncino. Piegare lungo le linee guida, per portare in avanti il pop-up.
Posizionare un pezzo di carta fantasia sopra la metà superiore della card e fustellare, tagliare via il pop-up e incollare.
Tagliare tre strisce bianche di altezze diverse, larghe quanto la card e dare loro la forma ondulata; sovrapporre una sull'altra per farle assomigliare ad un terreno coperto da neve. sporcare i bordi con inchostro se si vuole. Incollare sul pop up.
Tagliare il fronte della card e utilizzare la mascherina embossing per creare uno sfondo testurizzato. Piegare e posizionare sul retro della card.
Timbrare e fustellare il Babbo Natale e l'augurio (che fanno parte del set), utilizzando l'inchiostro Versamark e la polvere color rame con la pistola termica.
Incollare Babbo Natale sopra la neve e l'augurio, così come mostrato.
Abbellire il biglietto con stickers, stelline fustellate e strass. Terminare abbellendo la parte anteriore della card, se si desidera, con etichetta dorata e fiocco di neve.
Ecco fatto!
 
Come sempre spero possa esservi di ispirazione per un'idea dell'ultimo minuto ;)

Vi auguro di trascorrere un meraviglioso e allegro Natale!!!
baci
a presto!

Artist Trading Blocks

$
0
0


I hope you all are ready for the holidays!

Just a quick post here to let you know of an exciting new trend here in the US- Artist Trading Block or ATB's! Similar to Artist Trading Cards, but better, because now you can craft in 3D! Instead of two sides there are six to decorate. The largest one is 3 1/4" so the size is manageable- if you make a mistake, no problem- go on to the next side and put the mistake at the bottom of the block- no worries!  Everyone can be an artist on the ATB's.


The blocks are made with ScoreBoards dies- this means they are specially designed to cut and score thick materials like matboard and chipboard . With matboard, your block will be rigid and not tear or wrinkle like paper would when you apply layers of embellishments. There are five different sizes of blocks ranging from 3.25" down to 1.5". Imagine the possibilities!  The dies will be released in February and are part of my Cherished collection, an adorable selection of dies for the wee ones. As you can see, these blocks just aren't for babies! Craft in 3D and customize the blocks to fit the occasion or person that the blocks celebrate.

Here is a Tribute to Tie-Dye- a tower that I made from the blocks using all different techniques and supplies. I will share full instructions next week on the Artist Trading Block blog so please stop by.

Gather supplies and die cut the blocks using Sizzix ScoreBoards 658983 Block/Bank/Cube and 656491 Cream Matboard.


Paint the blocks with regular acrylic paint using a stencil brush, then blended the colors together, adding layer on top of layer. Start with light layers- you can always get darker. 


 I used white Wendy Vecchi Embossing Paste and StencilGirl stencils for the next step. Place the stencil on the block and position medallion where desired. Use post-it notes or paper to mask off surrounding areas. Take a small amount of the embossing paste and spread it over the stencil so it covers the area of the stencil, then lift up carefully. Try not to smudge the paste until it has dried.


I will share instructions for the other blocks next week on our The Artists on the Block blog. Check out some of the amazing projects our community has been sharing! We will have fabulous samples set up in the Sizzix booth at CHA so if you will be there please come by and say hi! Would you like to be featured as an Artist on the Block? Please like us on Facebook and follow on Twitter to see the latest new inspiration.

Happy Holidays and thanks so much for your support of my dies. See you in 2014!

Eileen

A Girly Layout by Gerry van Gent

$
0
0

Hello Sizzix friends and 
Happy Sunday!
Today I would love to share with you a layout using
different Sizzix dies and an embossing folder. This is also
one of the  layouts I was teaching during  my workshops in 2013.

Leanne

657900 Sizzix Big Shot machine
658240 Sizzix Sizzlits Decorative Strip Die Brick Wall
657670 Sizzix Textured Impressions Embossing Folders 
- Roses & Frame Set
658946 Sizzix Thinlits Die Decorative Border & Hearts
659069 Sizzix Thinlits Die Butterfly, Flowers & Lattice
658506 Sizzix Sizzlits Die Vintage Doily
*   *   *

The Decorative heart border was cut in many pieces and
spread over the layout to give more texture.
PC2

The photo was placed in an embossed frame.
The inside rectangle was simply removed from the
embossed frame and instead a photo was adhered.
*     *     *
Both vintage doilies were used to layer the flowers.
PC3

The lattice and the brick wall dies were used both 
to decorate the background. For this purpose I once again
cut the dies into different sizes and adhered them
mainly by using modelling paste.
PC1

Other Products I used:
Prima Marketing - papers, flowers and stamps
Prima Marketing & Ingvild Bolme - distressing tool & craft knife
*   *   *

Wishing you Happy Holidays with your loved ones!
Gerry

Merry Christmas!

$
0
0

Wherever you are, whatever you are doing, have a very Merry Christmas and a Happy, Healthy 2014.

Thank you for visiting my blog every week (or however often you visit!) and I hope to 'see' you plenty next year too!

Katy x

Merry Christmas!

$
0
0
With this card I want to wish you a merry Christmas and a happy New Year! Have a safe and happy Holidays :)


Supply list:

Love,
Elena
........................

Con esta tarjeta os quiero felicitar las fiestas. Que paséis una muy feliz y segura Navidad y un próspero año nuevo.

Con cariño,

Elena


Christmas Wreath - Merry Christmas from Finn!

$
0
0

Hi, I hope you are ready for celebrating Christmas!
As always I'm not ready! I have no idea how it is possible but there is always some last minute shopping, decorating, some very urgent projects that need to be finished...this year I was running like crazy to get some proper Christmas decorations for our new home: tree, lights, candles - and of course I needed something for my front door - a wreath!
Honestly saying - prices of ready-to-go wreaths were highly discouraging... and the quality of them would be also a matter to discuss! So I decided to buy plain, natural (and discounted!) wreath and decorate it myself!

I started with a simple set: scissors, hot glue gun, pine cones, some red berries and otdor lights...but very soon my mighty Sizzix Big Shot came in and cutting has started!


(yeah, you can see my not-the-best-photo taken by my husband - work in progress!)

I decided to use burlap, few of my 12x12 Resist Canvas Sheets from Prima and brand new Tim Holtz Sizzix Bigz XL Die - Jumbo Tattered Florals (659441) - just perfect for my needs!


Flowers are really big and super easy to cut - Bigz Dies will go through layers of fabric, thin metal, wood, felt, chipboard - just name it! I cut out my elements from different sheets of Resist Canvas to get more interesting effect - and after spraying them with colorful mists and gluing them with hot glue gun I finished each flower with a selection of my Prima Mechanicals. 


This way I got a perfect Christmas decoration for my front door - with a bit of personal touch! Simple, not expensive, fast. What can be better?

If you like this project - and newTim Holtz Jumbo Tattered Florals Bigz XL Die (659441) I have a good news for you! Here you can see a great video showing how you can use BigZ Dies and these particular grungy flowers - and what is even better - this product will be available is your local stores in January 2014!

Happy Christmas to you all!
Finn

Merry Christmas to you all!

$
0
0


Hi everyone... today I have some Stocking Gift Holders to show you with pictures of my grandchildren. I want to hang them on our Christmas tree with a tiny gift inside.


Supply list:
657900 Sizzix Big Shot machine
658744 Sizzix Bigz XL Die - Stocking Gift Holder

Other: Wool felt, old book paper, lace, Seam Binding ribbon, button

How to do:
Die cut stocking in wool felt and sew or glue lace on the top of the stocking. Sew or glue picture and old book paper to the stocking. Sew the stocking together. Add a bow with a button in the middle.


Wish you all a Merry Christmas
Anne Kristine

♥♥♥♥♥♥

Hei alle sammen ...i dag har jeg laget noen julestrømper med bilder av våre barnebarn. De skal henge på juletreet med en liten gave oppi. 

Materialer:
657900 Sizzix Big Shot machine
658744 Sizzix Bigz XL Die - Stocking Gift Holder

Annet: Ull filt, gammel bokside, blonder, Seam Binding bånd, knapp

Beskrivelse:
Stans ut julestrømpene i ull filt. Sy eller lim blonder på toppen av strømpen. Sy eller lim fast bilde med gammel bokside på strømpen. sy sammen strømpen og sett fast en sløyfe med en knapp i midten.
 
Ønsker dere alle en riktig GOD JUL!
Anne Kristine

Merry Christmas/ Candy glass

$
0
0

Hi everyone
I hope you all are ready for the holiday's. Today it will be a Quick post from me. In the evening we celebrate Christmas, dance around the Christmas tree and sing all the beautiful Christmas songs.
Today I will show you a candy glass you can use as a little gift.
Items used:
Sizzix Framelits Die set 7PK w/stamps-Holiday Joy
Sizzix Framelits Die Set 5PK w/Stamps - Retro Christmas
Supply list:
Paper: Wintertime Swedish Lapland Pion Design
Ink: Hero Art- Art print Brown
White acrylic paint and moddeling pasta  to the top of the glass
Stamp and die cut the diffenrent sorts of Sizzix dies, decorate the glass


 Thanks for stopping by
Wish you all A Merry Christmas
Pia

Hel alle
Jeg håber du er ved at være klar med alle juleforberedelserne til i aften.
I dag er det er hurtig post fra mig, et slikglas som du kan bruge som en lille gave.
Dies jeg har brugt::
Sizzix Framelits Die set 7PK w/stamps-Holiday Joy
Sizzix Framelits Die Set 5PK w/Stamps - Retro Christmas
Andre materialer:
Papir: Wintertime Swedish Lapland Pion Design
Ink: Hero Art- Art print Brown
Hvid acrylic paint ogmoddeling pasta til toppen af glasset
stempel og udstans de forskellige Sizzix dies, pynt glasset
 Tak fordi du kiggede forbi
Ønsker dig en dejlig juleaften og juledage
Pia

Merry Christmas!

$
0
0

Well here we are...it's Christmas Eve!!
I have one last Christmas project to share with you for last minute card inspiration! It's a very quick post today understandably with everyone having so much to do for the big day.


 I have used the Brenda Walton Holiday Greenery Sizzlit die to create this card which is one of my favourite. I always appreciate a die which crams in as many elements as possible and this one certainly does with five flower shapes, four leaf shapes and berries too! I think this die would be useful beyond Christmas too by just removing the Holly leaf shapes from the equation an amending the colours to suit the occasion.


I decided to add a little texture to the card by crumpling the die-cut flower shapes in my hand before layering. I love the effect, especially when compared to the glossy sheen of the metallic silver card elements. The green glitter card also gives a subtle festive hint without being too obvious.

The phrase was created with my PC & printer and then die-cut using two of the shapes from the Labels, Fancy Framelit Set which is one of those sets that I return to time and time again.

So that is it....I am now off to do a little more shopping and then it is a cosy night eating mince pies washed down with a small glass of sherry or two!

Have a very merry Christmas :)

Perfect Moment

$
0
0

Hi All!

First of all, I wish you all a Merry Christmas! I hope that you are enjoying fun and festivities with family and friends.

Today I would like to show a layout about my perfect moment – summer, great weather, my family near me and good mood. What can be better?


Items:
Big Shot Machine (657900)
Sizzix Thinlits Die Set 2PK - Doily & Doily Border #2 (659058)
Sizzix Movers & Shapers Magnetic Die Set 2PK - Mini Butterflies Set (657209)

The Washer Border I cut in many pieces and spread over the layout. Also I used the Washer Border as stencil with white acrylic paint.
I used doily to layer the flowers and to make my layout more openwork.


I cut butterfly using Mini Butterflies Set. I used white embossing powder and stamp to make resist-effect on the butterfly.


Have a nice day!


Всем привет!

Всех кто отмечает сегодня Рождество, я хочу поздравить и пожелать всего только самого хорошего! Надеюсь вы сегодня со своей семьей и друзьями, радуетесь и празднуете.

А я хочу показать страничку об одном идеальном моменте - лето, отличный отель, хорошая погода, рядом семья и у меня хорошее настроение. Что может быть лучше?

Для создания этой странички я использовала бордюр - Washer Border - который я порезала на небольшие полоски, и использовала для создания фона. Так же этот бордюр я использовала в качестве трафарета с белой акриловой краской.
Бабочку я вырезала с помощью набора Mini Butterflies. На этой бабочке я сделала узор с помощью штампа и белой пудры для эмбоссинга. После чего побрызгала на нее спреем и узор проявился.
Ну и для большей ажурности я вырубила салфеточку с помощью набора ножей Doily & Doily Border #2.

Материалы Sizzix:
Big Shot Machine (657900)
Sizzix Thinlits Die Set 2PK - Doily & Doily Border #2 (659058)
Sizzix Movers & Shapers Magnetic Die Set 2PK - Mini Butterflies Set (657209)

Всем хорошего дня!


Christmas Leftovers (Part 3)

$
0
0

First of all, Merry Christmas! I will be up to my neck in Turkey with all the trimmings by the time this blog appears as I am Lord and master in the kitchen on Christmas day (and every other day come to think of it!)

I always love to hear tales of how early we crafter's make our Christmas cards so I thought I'd start on today for next year, how's that for early?

Here is the last in my series of freestyle collage cards, I must warn you it's a very addictive style of working and one I can see myself revisiting over and over again in the new year.

The die I chose to use was designed by the fabulous Brenda Walton and is a Sizzlit die called Holiday Icons which contains four classic shapes including the dove and star which I have used here. I also used a Thinlits doily from  the Love Story set

I die cut the dove and star from white card before using my finger tip to apply some pale blue paint to the dove and delicately inking the edge with 'Old Paper' Distress ink, once dry I applied Glossy accents. I applied PVA to the star and sprinkled with glitter before leaving both die cuts to dry.


Next, I die cut part of the doily before inking and distressing the edges with a fine sanding block and applied it to the base card alongside a couple of scraps of paper and the 'Merry definition' which I created on my PC before printing onto graph paper, trimming to size and inking the edges. I also added a silver eyelet and applied a stamped image using the 'Old Paper' distress ink to give a very delicate and subtle effect.


All that was left to do was attach the various elements Including the plastic 'star' button and key brad along with a smattering of adhesive pearls and gems. I do hope you have enjoyed this little series of cards as much as I have enjoyed making them?

Finally I want to wish a very Happy Birthday to my fellow Christmas Day babies; please stand up Design genius Paula Pascual, Steve Potter carpenter extraodinaire who creates all our trade show stands and Silva Brodar, my good friend from Slovenia ( if you are ever lucky enough to find yourself in Ljubljana, pop into the Rayher store, you wont be disappointed)


Boxing Day reward!

$
0
0


I hope you've all had a very happy Christmas.
I'm enjoying a quiet breather today - before we all get together again, tomorrow, for more family fun -
so all the washing up is done - the wrapping paper re-cycled and peace and quiet has descended!
What better time to pick up my hexagons and stitch a few more motifs -


I've hardly done any since my holiday - but thinking about it these are very well travelled hexagons - they've been to Helsinki in Finland, Barcelona in Spain,
and to Siem Reap in Cambodia - even visiting the site of the Tomb Raider film, the stilt villages and Anchor What.

I wonder where else they will travel before the quilt is finished - I guess it depends on how big the quilt grows!
I also wonder what other projects will be started ( and hopefully finished) in 2014 - I know for sure that I'm looking forward to lots of fun - and I hope to meet more of you at the shows during the year.

Have a Happy New Year - and don't make too many resolutions - just one or two that you can achieve - mine is just to sort out and move my sewing room to a bigger bedroom - ( I'm not sure that 'just' is the right word though) which I hope to achieve by the end of February- then I can be more organised and have more time sewing - rather than playing hunt the fabric!!
Keep sewing.
Angela


Mini album

$
0
0

Hello!

I hope you’re fine and that you spent a nice Christmas time!
As promised, here are some pages of my mini-book with the foliage die that I like so much!

Supply list:

Mini album: Sodalicious
Alphabets: Glitz Design
Ribbon: American Crafts
Metallic corners: Ephéméria
Stamps: Tim Holtz, Florilèges Design
Ink: Versafine Smokey Gray
Spray ink: Mister Huey's black
Others: Sequins, Gold acrylic paint, school eyelets, Masking Tape

Die:

658508 Sizzix Sizzlits Die Set 3PK-Roses flower set

As seen last week, I used the foliage die on the cover as an embellishment.

It is used as a common thread in my album. The leaves are cut out of white Bristol paper (not pattern papers) so that they can be shaded or printed onto depending on the pages.
Furthermore, white brings contrast to my lay-outs.

This is a pattern that matches with lots of themes like outdoorsy strolls, holidays or a series of photo portraits like in my album.


Have a lovely day,

See you next week,

Karine

Bonjour !

J'espère que vous allez bien et que vous avez passé un bon Noël !
Comme promis voici quelques pages de mon mini avec le dies feuillages dont je raffole !

Matériel :

Mini album : Sodalicious
Alphabets : Glitz Design
Ruban : American Crafts
Coins métal : Ephéméria
Tampons : Tim Holtz, Florilèges Design
Encre : Versafine Smokey Gray
Encre en spray : Mister Huey's black
Divers : Sequins, acrylique or, oeillets scolaires, Masking Tape

Die utilisé :

658508 Sizzix Sizzlits Die Set 3PK-Roses flower set

Nous l'avons vu la semaine dernière j'ai utilisé le die feuillage sur la page de couverture en guise de décoration.

Nous le retrouvons tout au long de mon album tel un fil conducteur. Les feuilles sont toujours découpées dans du Bristol blanc et non des papiers imprimés pour pouvoir les ombrer ou les tamponner selon les pages.
De plus le blanc apporte du contraste à mes mises en page.

Un motif qui s'accorde avec énormément de thématiques telles les balades en plein air, les vacances ou encore comme ici une série de portraits.

Bonne journée à vous

A la semaine prochaine.


Karine

Celebrate with Anna Draicchio: New Years Eve Party

$
0
0

Hi Everyone! Anna here to share with you inspiration for a stylish way to celebrate the New Year.
For celebrations big and small, It's easy and affordable decorate the room and table with Sizzix dies! Take a peek at these projects. It's time to get ready for a little New Year's Eve fun...
I played with different Sizzix dies and I used some new dies from Laced With Love collection and Where Women Cook colection. Love love love!!!
I chose a Turquoise and Gold color combination, but you can use any colors ;)
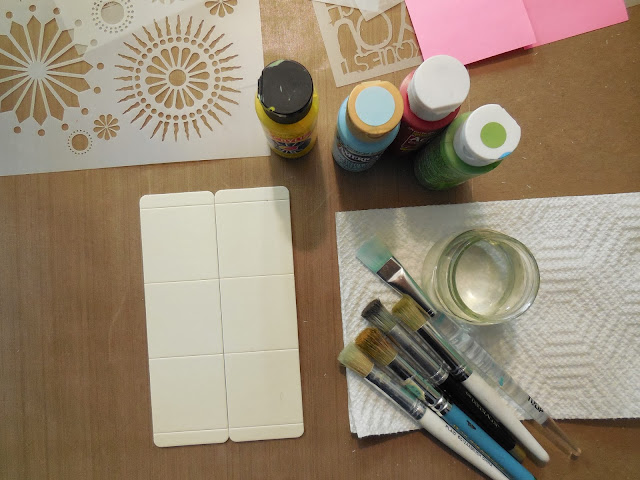
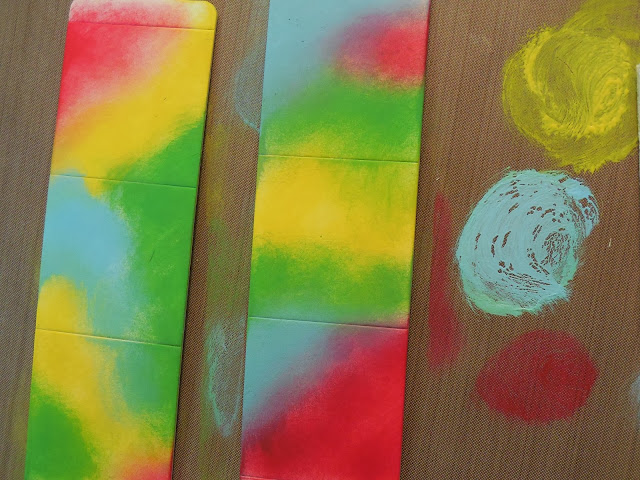
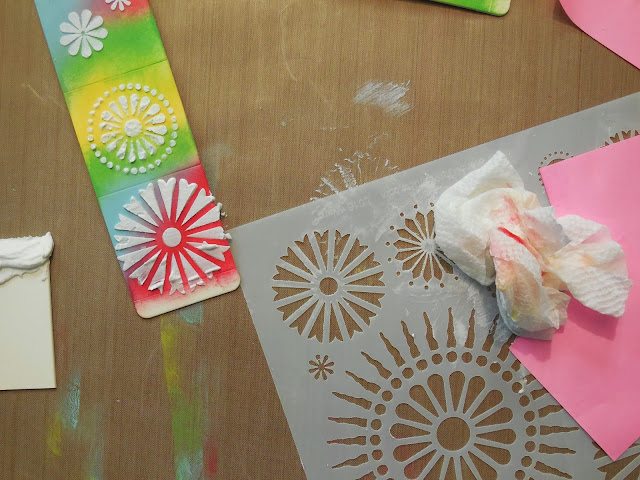
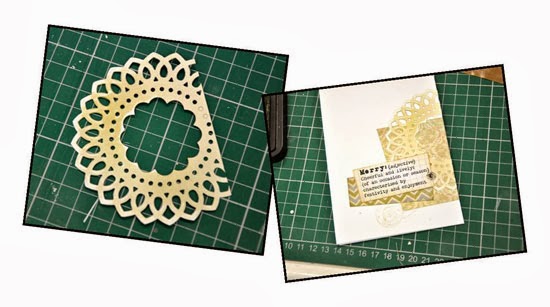
Getting started with a card. Handmade cards are always a pleasure to receive. Remind your friends and family to dream big in the year to come with a card made with love. Here are a quick idea for you...
 
Sizzix Big Shot - New Years Eve Party (7)
 
Sizzix Big Shot - New Years Eve Party (8)
 
I painted a turquoise cardstock, attached a pretty doily and... more gold and glitter stars!
 
Card, Items used:
Sizzix Big Shot Machine Only (Powder Blue & Teal) (657900)
Sizzix Bigz Die - Doily, Classical Lace (658922)
Sizzix Bigz Die - Stacked Stars (658771)
cardstock: white, light yellow, turquoise
glitter paper
thick chipboard
stripe of ivory fabric
gold acrylic paint
aqua acrylic paint
glitters
sequins
sewing machine
thread
glue
 
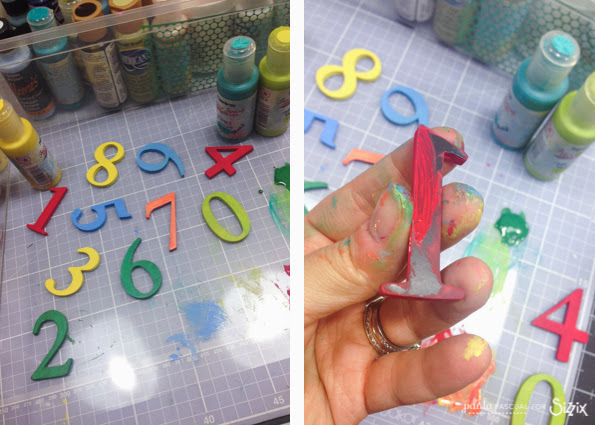
The second project is super quick and easy to make: a festive paper garland! It adds the perfect handmade touch during the party. The instructions are the same of this old project.
 
Sizzix Big Shot - New Years Eve Party (1)
Sizzix Big Shot - New Years Eve Party (2)
 
Paper Garland, Items used:
Sizzix Big Shot Machine Only (Powder Blue & Teal) (657900)
Sizzix Accessory - Cutting Pad, Extended, 1 Pair (655267)
Sizzix Bigz XL Alphabet Die - Vintage Market (658772)
Sizzix Thinlits Die Set 3PK - Lace, Layering Decorator (658914)
Sizzix Bigz Die - Stacked Stars (658771)
cardstock: ivory, light yellow, turquoise
thick chipboard
gold acrylic paint
sewing machine
thread
glue
 
This Tea light houses is an idea for a table decoration and are not only pretty for New Year Eve but also great for any occasion. I used three houses cut out with Thinlits and covered with gold acrylic paint.
 
Sizzix Big Shot - New Years Eve Party (3)
 
Sizzix Big Shot - New Years Eve Party (4)
 
Tea light houses , Items used:
Sizzix Big Shot Machine Only (Powder Blue & Teal) (657900)
Sizzix Accessory - Cutting Pad, Extended, 1 Pair (655267)
Sizzix Bigz XL Alphabet Die - Vintage Market (658772)
Sizzix Thinlits Die Set 8PK – House (658785)
cardstock: ivory, light yellow, turquoise
thick chipboard
gold acrylic paint
glue
 
Finally I created several place cards with new Bigz die Silverware Tags, adore! This is very easy and fun place cards for the dinner table.
 
Sizzix Big Shot - New Years Eve Party (5)
 
Sizzix Big Shot - New Years Eve Party (6)
 
Place cards , Items used:
Sizzix Big Shot Machine Only (Powder Blue & Teal) (657900)
Sizzix Bigz Die w/Bonus Textured Impressions - Silverware Tags (659187)
cardstock: ivory, light yellow
patterned papers
glue
 
Thanks for stopping by, I hope you enjoyed these last-minute ideas for adding a few paper crafted touches to your New Year Eve Party.
I wish you all a good beginning to what will, hopefully, be a prosperous 2014.
See you all in the New Year!
 
**************************************

Flag_of_Italy Per le amiche italiane! :)

Ciao! Ecco l'ultimo appuntamento del 2013 con Anna. Sono qui per condividere con voi qualche idea per festeggiare il Nuovo Anno con un po' di creatività. Per le celebrazioni grandi o piccole che siano, è facile decorare la casa e la tavola con le fustelle Sizzix, come ho fatto io! 
Ho giocato con differenti fustelle Sizzix ed ho anche usato alcuni nuovi prodotti delle collezioni Laced With Love e Where Women Cook.
Ho scelto una combinazione di colori turchese e oro, ma voi potete usare tutti i colori che preferite.
Date uno sguardo a questi progetti... perchè è ormai tempo di prepararsi per una divertente notte di Capodanno...

Iniziamo con un biglietto (o invito). Le card fatte a mano sono sempre un piacere da ricevere. Ricordate quindi ai vostri amici e familiari di fare grandi sogni per l'anno che verrà con una card fatta con amore. Nelle foto in alto vedete una rapida idea, che ho realizzato io per i miei amici. Ho spennellato un cartoncino turchese, attaccato la metà di un delizioso centrino e aggiunto tante stelle dorate o brillantinose! Qualche paillettes per rendere la card ancor più scintillante... ecco fatto!

Card per Capodanno, materiali usati:
Sizzix Big Shot Machine Only (Powder Blue & Teal) (657900)
Sizzix Bigz Die - Doily, Classical Lace (658922)
Sizzix Bigz Die - Stacked Stars (658771)
cartoncino: bianco, giallo chiaro, turchese
carta glitter
cartone pressato
striscia di stoffa avorio
colore acrilico oro
colore acrilico verde acqua perlato
glitters
paillette
macchina da cucire
filo
colla
 
Il secondo progetto è super veloce e facile da fare: una ghirlanda di carta festosa! E' il progetto perfetto per una festa e darà il giusto tocco personale fatto-a-mano. Le istruzioni sono le stesse del mio vecchio progetto che trovate qui. Che aspettate a farla? ;)

Ghirlanda per Capodanno, materiali usati:
Sizzix Big Shot Machine Only (Powder Blue & Teal) (657900)
Sizzix Accessory - Cutting Pad, Extended, 1 Pair (655267)
Sizzix Bigz XL Alphabet Die - Vintage Market (658772)
Sizzix Thinlits Die Set 3PK - Lace, Layering Decorator (658914)
Sizzix Bigz Die - Stacked Stars (658771)
cartoncino: avorio, giallo chiaro, turchese
cartone pressato
colore acrilico oro
macchina da cucire
filo
colla

Il porta lumini che vi mostro nelle foto sopra è un'idea per decorare un angolo della casa o la tavola, non solo per il Veglione di Capodanno, ma ideale per ogni occasione. Ho usato tre casette ritagliate con la bella fustella del set Thinlits, che ho poi verniciato molto semplicemente con il color oro. Un 2014 ritagliato con il bell'alfabeto Vintage Market (ideale per tagliare cartone e feltro perchè è una Bigz XL)  completa il progetto per Capodanno.

Porta-lumini Casette, materiali usati:
Sizzix Big Shot Machine Only (Powder Blue & Teal) (657900)
Sizzix Accessory - Cutting Pad, Extended, 1 Pair (655267)
Sizzix Bigz XL Alphabet Die - Vintage Market (658772)
Sizzix Thinlits Die Set 8PK – House (658785)
cartoncino: avorio, giallo chiaro, turchese
cartone pressato
colore acrilico oro
colla
 
Infine ho creato in un attimo i segnaposti con la nuova fustella Bigz Silverware Tags. La fustella contiene anche la mascherina per embossare e creare così le venature in rilievo delle posate, fantastica! Ecco così dei facili e divertenti segnaposti per la tavola di Capodanno.

Segnaposti posata, materiali usati:
Sizzix Big Shot Machine Only (Powder Blue & Teal) (657900)
Sizzix Bigz Die w/Bonus Textured Impressions - Silverware Tags (659187)
cartoncino: avorio, giallo chiaro
carte fantasia
colla
 
Grazie per essere passati di qui, spero vi siano piaciute queste idee last-minute per dare un tocco di creatività al Veglione di Capodanno.

Auguro a tutti voi un buon inizio di quello che sarà, si spera, un prospero 2014.
Ci vediamo nell'anno nuovo!

Fridge Magnets

$
0
0


I hope you all had a wonderful Christmas. Some of us (looking at you mr super talented Pete Hughes - happy belated birthday!) also celebrate our birthdays on Christmas Day, so it is even more special. I have spent these days with the family and I must admit they have been rather eventful in a good way, except for a tooth issue. A tale for another day!

Anyway, today I am sharing one project I have done as a Christmas present for my nephew Laith, who is 18 months old. I wanted him to have number magnets on his fridge Nd instead of buying them I made them myself using the Numbers Bigz die from the serif essentials collection.


I first die cut them three times using mount board (the stuff to frame pictures, but any really thick card will do too). Then I used strong magnetic sheet.


I glue all three die cuts of the same number together and peel off the back and attached to the mount board numbers.

Then I proceed to paint them using good acrylic paints like Paperarsty Fresco.


Once dry I clean the excess acrylic paint on the magnetic back, coat them with a clear non toxic child friendly varnish, and voila, they were done!


PS Laith loves them!


Back to journaling - praising the leftovers!

$
0
0

Hi, did you have a good, peaceful Christmas time?
I had - celebrating Christmas at home, in new place - this time in more quiet way than it was years before. But you know? I liked it too - I had a moment to work on one or two special projects, to think about my plans for the coming days, to try something new...
Before Christmas I was making project like crazy - I had to be on time with so many cards, layouts and journals that it was a great pleasure for me to do something just for myself as a break and a bit of "mind stretching"! I was lucky to have great inspiration - my friend's Round Robin - and here is the result of my "free time creating".


I have a special "leftover basket" in my studio now - I put there all the bits and pieces of Sizzix cut-outs I didn't use in my projects - and when I need some elements, some quick inspiration - I can always get some from there! Can you see how in quick and easy way I could build, interesting, layered background using some flower and doily elements from my small collection?


Here is the list of dies I used for this project - but it would work with any similar ones :)
- 658947 - Sizzix Thinlits Die Set 2PK - Doily & Doily Border
659127 - Sizzix Thinlits Die Set 4PK - Frame Layers & Flower #2
- 658506 - Sizzix Sizzlits Die - Vintage Doily
- 658502 - Sizzix Sizzlits Die - Flower, Daisy
- 658720 - Sizzix Bigz Die - Ornate Frame 

I really think this basket was a great idea - it is a shame to throw away pieces you don't need in  that moment...they can be perfect for your future projects, right?
Sending you lots of love
Finn

A Happy Canvas Layout by Gerry van Gent

$
0
0

Hello Sizzix Friends and Happy Sunday!
I hope you all had a beautiful and cosy Christmas
and you all spent precious moments with your loved ones.

I am here today to share with you a canvas layout which has nothing
to do with Christmas or Winter :-)
It`s simply a happy, colourful canvas .... where I am featuring
 a few gorgeous Sizzix dies.
Hubby
657900 Sizzix Big Shot Machine
658948 Sizzix Thinlits Die Frame, Fancy Rectangle
658951 Sizzix Thinlits Die Ornate Hanging Sign
658946 Sizzix Thinlits Dies Decorative Border and Heart
658240 Sizzix Sizzlits Decorative Strip Die Brick Wall
*   *   *

The Fancy Rectangle Frame was die cut twice using
pattern paper and white cardstock. I used the white
cardstock die-cut frame as a shadow.
WP c2

As for the Brick Wall strip die - it was used all over 
the canvas in small pieces.

*   *   *
Once I die cut the Decorative Border I cut it exactly in two parts.
For the canvas I used only half of the border, adhered it on 
top left part of the canvas and decorated with lace.
WP c1

The Ornate Hanging Sign was die cut from white cardstock.
For my project I used only the ornate part of the sign.
I added a final touch to it i.e. a small resin flower.
WP c3

OTHER PRODUCTS I USED:
Webster's Pages - pattern papers, lace, stamps, resin and alphas

*   *   *

This is my last blog post for 2013 and I hope you enjoyed it!

WISHING YOU ALL 
A HEALTHY, HAPPY & CREATIVE 2014!

See you ...next year :-)!
Viewing all 2033 articles
Browse latest View live