Quantcast
Channel: Crafting ideas from Sizzix UK
Viewing all 2033 articles
Browse latest View live

Travel Layout

$
0
0


Hello,

Today let’s get a ride on the most mythical road in the world: the Road 66! Having travelled on this road last year, I couldn’t resist the urge to use the Tim Holtz set dedicated to this monument!

Supply list:

Cardstock: American Crafts
Papers: Studio Tekturek
Alphabets: American Crafts
Stickers: Studio Calico, Ephéméria
Stamps: Craft Origine, Paper Artsy
Inks: Adirondack, Viva Colour, Chalk Prima
Watercolour pens: Stabilo Pen68
Others: Masking Tape, wood embellishments

Die:

658579: Sizzix Texture Fades Embossing Folders 4PK-Travel Signs Set

Start by embossing twice some white or light-coloured paper with your embossing folder. If you travel in the US or do a road trip on Road 66, this Tim Holtz set is just the obvious choice!

Once embossed, use a spray ink, diluted paint, watercolour paint or inks like Adirondack to colour entirely your paper. I selected three colours: green, orange and yellow. Let it dry in the open.

Then build your page starting by choosing a neutral background. Multiply the pattern papers and masking tape strips.

Work on your background with stamps, make splashes with a watercolour pen, add your title with alphabets and here you are!

I hope my layout will make you feel like plunging into your last holidays pictures!


Have a lovely day,

Karine

Bonjour,

Aujourd'hui je vous emmène avec moi sur la route la plus mythique au monde, la route 66 ! Ayant effectué ce voyage l'an dernier je ne pouvais résister à l'envie d'utiliser la plaque Tim Holtz dédié à ce monument !

Matériel :

Cardstock : American Crafts
Papiers : Studio Tekturek
Alphabets : American Crafts
Stickers : Studio Calico, Ephéméria
Tampons : Craft Origine, Paper Artsy
Encres : Adirondack, Viva Colour, Chalk Prima
Feutres aquarellables : Stabilo Pen68
Divers : Masking Tape, embellissements bois

Die utilisé :

658579: Sizzix Texture Fades Embossing Folders 4PK-Travel Signs Set

Commencez par embosser deux fois votre plaque à embosser dans un papier blanc ou clair. Avec un voyage aux USA et un road trip sur la Route 66, cette plaque Tim Holtz était juste évidente !

Une fois embossée, utilisez une encre en spray, de la peinture diluée,de l'aquarelle ou encore des encres telles les Adirondack pour teinter entièrement votre papier. J'ai opté pour 3 couleurs : vert, orange et jaune. Laissez sécher à l'air libre.

Composez ensuite votre page en choisissant un fond neutre mais en multipliant les imprimés et les bandes de masking tape.

Travaillez votre fond avec des tampons, éclaboussez avec un feutre aquarellable, ajoutez votre titre à l'aide d'alphabets et le tour est joué !

J'espère que ma page vous donnera envie de vous plonger dans vos dernières vacances !

Bonne journée à vous

Karine

Oh Sew Sweet.....

$
0
0


Now I can reveal that it was my grand daughter Eve's 5th birthday on Tuesday and the fabrics were part of her birthday present -

and here she is checking out the fabrics - I also added a selection of cotton threads for her to use - we now just need to make a date to make the cushion - photos to follow.

 On Wednesday I had a lovely drive from the office to visit the Oh Sew Sweet Shop in Mapplewell, nr Barnsley.
I had a beautiful drive across with sun shining across the moor, and then a delightful  afternoon at the shop.
I was there to demonstrate the Big Shot and Bigz dies and met some lovely of Lorrayne's lovely customers -

I really enjoy introducing customers to the benefits of using the machine and dies - speed, precision cutting being 2 of them.
Here is Lorrayne - busy cutting fabrics for me at the end of the day - because of course it would be rude to visit a shop and not buy any fabric wouldn't it -

and here is a glimpse of some of her lovely fabrics -
The shop is a delight, and with the added bonus of a sweet counter by the door - where you can buy your old favourites!
I managed to justify a small selection of fabric -

 to make quillows for grandchildren - I know I have plenty of fabric at home, but these I will have 5 quillows made, one for each grandchild, ready for Easter - watch this space to see if I manage it!
Well that's all for now - I'm going to plan the blocks for these fabrics and then go and raid my stash for fabrics for the other 3 quillows.
Have fun sewing.
Angela

Birthday card: Doily and Garden Greens

$
0
0

Hi Everyone! This is Anna.
Hope you all had a great week. I'm back with some more inspiration for you... and I hope you will like it :)
I've got another little card to share with you today.
 
cafe creativo - Anna Draicchio - sizzix big shot - card - doily (1)
 
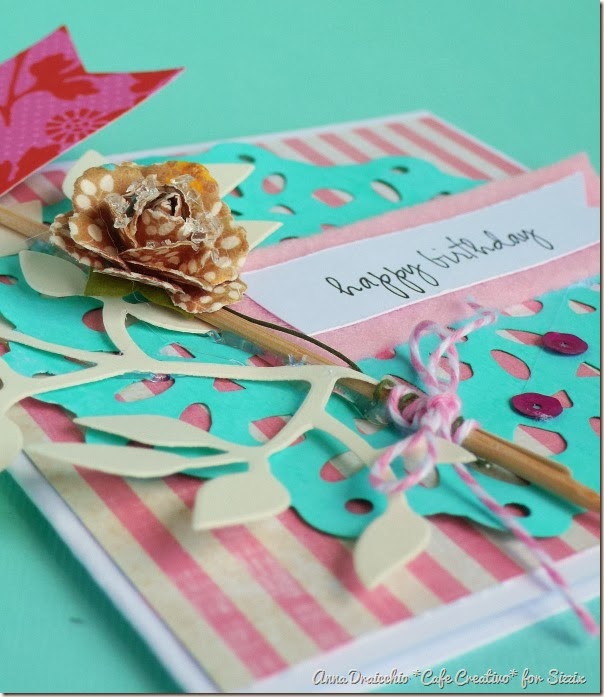
This one's a square card (white) that was layered with another patterned paper. Next up, came a turquoise doily that I die cut with the Sizzix Bigz Die - Doily, Classical Lace, positioned right in the center of the card.
 
cafe creativo - Anna Draicchio - sizzix big shot - card - doily (2)
 
Then came a cluster of leaves die cut with Sizzix Bigz Die - Garden Greens.
Lastly, I added a pink flag. And to finish things off, I added a flower and a banner sentiment.
 
cafe creativo - Anna Draicchio - sizzix big shot - card - doily (3)
 
I wish you all crazy creative weekend - see you soon on the blog!
 
Items used:
cardstock
patterned paper
scrap of pink felt
paper flower (Prima)
twine
wooden skewer
sequins
hot glue, glue

**************************************
Flag_of_Italy Per le amiche italiane! :)
Ciao! Ecco un nuovo appuntamento con Anna.
Spero abbiate passato una bella settimana. Eccomi con una nuova ispirazione... e spero tanto che vi piaccia :)
Oggi ho un'altra card da condividere con voi, ultimamente mi piace proprio fare le card e con Sizzix è tutto più facile ;)
Questa è un biglietto quadrato (bianco) su cui ho sovrapposto un altro quadrato di carta fantasia a righe rosa.
Poi c'è un centrino turchese, che ho fustellato con la Sizzix Bigz Die - Doily, Classical Lace, posizionato proprio al centro della card.
Quindi ho aggiunto il ramo di foglie fustellato con la bellissima fustella Sizzix Bigz Die - Garden Greens. Ho provato ad usarla anche con il feltro ed è fantastica! 
Infine, ho aggiunto una bandierina rosa incollata su uno stecchino di legno, su cui ho arrotolato un fiore. E per finire, ho aggiunto un banner di feltro con l'augurio.
Come avete visto è abbastanza semplice da rifare questa card ;)
 
Auguro a tutti voi un divertente e creativo week-end con la vostra Big Shot. Grazie per essere passati di qui!
Arrivederci a presto su questo blog.
 
Materiali:
cartoncini tinta unita
carte fantasia
ritaglio di feltro
fiore di carta (Prima)
spago bicolore
spiedino di legno
paillettes
colla a caldo, colla

Photo Baby Blocks

$
0
0


It seems like forever since I designed these dies! It was back when my daughter was expecting her first baby. Now that she has had her second one, I have lots of pictures to organize! I decided to make a stack of baby blocks to commemorate the birth of baby Hunter, using the new Blocks/Cubes die from the Cherished collection.

The blocks are super versatile and also a great value because it allows you to cut all three blocks (as seen in the photo) with one pass through the Big Shot- 2.5", 2" and 1.5" (two pieces of matboard make a set of three blocks). The blocks may be used for so many things- you can use them as gift boxes, for storage, as art blocks, for photos or to commemorate special events (like having a new baby in the family!)


To create the blocks, die cut two pieces of matboard. Print photos on your home printer in black and white cropped to squares and printed in sizes to fit on the blocks. You can also use color photos but I did black and white because I thought color might be distracting. Plus I was near the end of my color ink cartridges in my printer!


Apply the photos to the blocks using a glue stick.


Use markers, stamps and inks to decorate the squares of the blocks. (I used my new Clearsnap ColorBox Blends inks for this project- it's a new kind of applicator which helps keep your hands clean while inking! The soft sponge tip allows the ink to get in spaces where traditional ink pads can't. It's also really easy to distress the edges with this new tool). For the squares with photos, I brought a little color in by lightly inking around the edge.


 I also used some of my new CraffitiDirect clear stamps designed to match the Cherished dies to decorate the blocks. The mini animals fit great on the smaller blocks.


I used permanent black markers to letter the baby's name and birth date, then colored it in with Copic markers. The Monkey & Lion and Elephant & Giraffe Framelits Sets were also used to decorate the blocks.


After decorating each square, assemble the blocks. Fold over each score line and form into a "U" shape. Hold one in each hand facing each other, rotate one hand 90 degrees and fit blocks together. The blocks will stay together without adhesive but you may want to apply double sided tape to each tab and assemble for a more permanent bond.


And here's the star of the show! Welcome little guy- Mimi loves you...

March Card by Gerry van Gent

$
0
0

Hello Sizzix Friends!
Can you believe it? It`s already March.
And that means that Spring is just around the corner.
To Welcome the month of March I created a card for you
where I am using the new Jumbo Tatttered Florals die.

March Card_Fotor
657900 Sizzix Big Shot Machine
659441 Sizzix Bigz XL Die Jumbo Tatttered Florals
658720 Sizzix Bigz Die Ornate Frame
659436 Sizzix Bigz Die Garden Greens
657716 Sizzix Textured Impressions Embossing Folder Frame & Succulent Set
658252 Sizzix Sizzlits Decorative Strip Die Cobblestones
656938 Sizzix Movers & Shapers L Die Tag & Bookplates

*     *     *

To make the flowers I used white soft packaging material.
I die cut two sizes of the tattered flowers - 
for each flower I die cut a few of the flowers.
I also used 4 different colours paint (sprays!).
Once the flowers were dry I used a heat tool to wrinkle the petals.
N.B. It takes only a second to heat in the middle so the petals will pop up.
March Card_flowers 1_Fotor

This is how they looked like before I added the brads in the centres.
March Card_flowers_Fotor

MC 2_Fotor

MC 1_Fotor

The leaves were die cut from the Garden Greens.
I die cut them from corrugated cardboard and pattern paper.
The die-cut leaves from pattern paper were also embossed and
then adhered on top of the corrugated cardboard ones.
MC3_Fotor

OTHER PRODUCTS I USED:
Maja Design "Vintage Spring" Paper Collection
Lindy's Stamp Gang Sprays
Brads (unknown)

*     *     *

Have a great Sunday!

project of the month

Sizzix at Creativa Zaragoza

$
0
0
Hi everybody!

This past weekwend I was in creativa Zaragoza teaching some workshops and of course I had to use the Big Shot and some Sizzix dies!


We used three die sets to create this cover. The Damask Frame Framelits Die set, the Circle Wrappers Framelits Die set and the Stamps-Phrases Framelits Die set. You know how I love shapes that can be used in different ways and these three die sets can be used in many ways.


Here are some pics of the workshop, we had a good time in Zaragoza playing with the Big Shot!


Happy Monday!
..............

¡Hola a todos!

El pasado fin de semana estuve en Creativa Zaragoza impartiendo unos talleres y, por supuesto, utilizamos la Big Shot y sus troqueles.

Para hacer la portada de este mini utilizamos tres sets distintos, el Damask Frame Framelits Die set, el Circle Wrappers Framelits Die set y el Stamps-Phrases Framelits Die set. Ya sabéis lo mucho que me gustan las formas básicas y versátiles y estos tres sets de troqueles se pueden utilizar de muchísimas maneras.

Aquí tenéis un par de instantáneas de los talleres. ¡Nos lo pasamos genial con la Big Shot!

¡Feliz lunes!

Hello friend....

$
0
0


Hi everyone... hope you had a great week...today I have a paperbag card with a tag to show you.


Supply list:
657900 Sizzix Big Shot machine 
657687 Sizzix Bigz Die - Dog, Puppy
658252 Sizzix Sizzlits Decorative Strip Die - Cobblestones
658553 Sizzix Sizzlits Decorative Strip Die - Tapered Fringe
657481 Sizzix Sizzlits Decorative Strip Die - Vintage Lace

Papers: Pion Design - A Day in May, old book paper, Manila Tag # 10, paperbag
Stamps: Stampers Anonymous Tim Holtz collection
Inks: Distress ink Pad - Walnut Stain, Peeled Paint, Mowed Lawn, Spiced Marmelade, Salty Ocean, Dylusions ink Spray - Cut Grass
Other: Gesso, Glue N'seal, Tissue tape, Rubons, Seam Binding ribbon, Perfect Pearls - Turquoise

How to do:

 Die cut border in patterned paper with Sizzix Sizzlits Decorative Strip Die - Cobblestones
Cut out two layers and glue it together with tissue tape. 


Glue tissue tape to on both sides of the paperbag. Die cut border with Sizzix Sizzlits Decorative Strip Die - Vintage Lace
Cut out a panel in patterned paper, use some of the cobblestone and glue it to the panel with Gesso.  Glue tissue tape and old book paper to the panel with Glue N'seal.
Die cut the dog in patterned paper with Sizzix Bigz Die - Dog, Puppy
Distress the dog with Distress ink Pad - Salty Ocean and water. Glue the dog to the panel with Glue N'seal. Spray Dylusions ink Spray - Cut Grass on the panel. Die cut grass in patterned paper with Sizzix Sizzlits Decorative Strip Die - Tapered Fringe
Spray  Dylusions ink Spray - Cut Grass over the grass. Let it dry.

Cut out two butterflies from patterned paper and distress with Distress ink Pad - Spiced Marmelade.


Glue the grass and a Vintage lace on the panel. 
Glue panel to the paperbag.


Distress Manila Tag # 10 with Distress ink Pad - Salty Ocean and Perfect Pearls - Turquoise...and some water. Dry with a heat gun. Distress the rest of the tag with Distress ink Pad - Peeled Paint and Mowed Lawn. Distress the edges with Distress ink Pad - Walnut Stain. Glue some grass on the tag with Glue N'seal. Stamp some text and motif in the background of the tag.


Wish you a great day and thanks for stopping by.
Anne Kristine

♥♥♥♥♥♥

Heisann... håper du har hatt en fin uke...i dag har jeg et posekort med tag å vise deg.

Produkter liste:
657900 Sizzix Big Shot machine 
657687 Sizzix Bigz Die - Dog, Puppy
658252 Sizzix Sizzlits Decorative Strip Die - Cobblestones
658553 Sizzix Sizzlits Decorative Strip Die - Tapered Fringe
657481 Sizzix Sizzlits Decorative Strip Die - Vintage Lace

Papir: Pion Design - A Day in May, gammel bokside, Manila Tag # 10, papirpose
Stempler: Stampers Anonymous Tim Holtz collection
Inks: Distress ink Pad - Walnut Stain, Peeled Paint, Mowed Lawn, Spiced Marmelade, Salty Ocean, Dylusions ink Spray - Cut Grass
Annet: Gesso, Glue N'seal, Tissue tape, Rubons, Seam Binding bånd, Perfect Pearls - Turquoise

Beskrivelse:
Stans ut en bord i mønsterark med Sizzix Sizzlits Decorative Strip Die - Cobblestones
Kuttes i to som passer i str. til en sløyfe. Limes sammen med Tissue tape.

Lim Tissue tape på begge sider av papirposen. Stans ut bord med Sizzix Sizzlits Decorative Strip Die - Vintage Lace
Skjær et panel i mønsterark, bruk det du har til overs fra borden og lim dette til panel med Gesso.   Lim Tissue tape og gammel bokside til panel med Glue N'seal.
Stans ut hunden i mønsterark med Sizzix Bigz Die - Dog, Puppy
Distress hunden med Distress ink Pad - Salty Ocean og vann. Lim hunden til panelet med Glue N'seal. Spray Dylusions ink Spray - Cut Grass på nederste kant av panelet. Stans ut gress i mønsterark med Sizzix Sizzlits Decorative Strip Die - Tapered Fringe
Spray  Dylusions ink Spray - Cut Grass over gresset og la det tørke.

Klipp ut to sommerfugler fra mønsterark og distress disse med Distress ink Pad - Spiced Marmelade.

Lim gresset sammen med Vintage Lace bord til panelet. 
Lim panel på papirposen.

Distress Manila Tag # 10 med Distress ink Pad - Salty Ocean og Perfect Pearls - Turquoise...pluss litt vann. Tørk med varmepistol. Distress resten av tag'en med Distress ink Pad - Peeled Paint og Mowed Lawn. Distress kantene med Distress ink Pad - Walnut Stain. Lim gress til tag'en med Glue N'seal. Stemple tekst og motiv på tag'ens bakgrunn.

Ønsker deg en herlig dag og takk for at du stikker innom her.
Anne Kristine

Love

$
0
0
Hi everyone
I hope you all had a great week, today i will show you a tag using the beautiful  Tim Holtz  Die  Tattered Florals, Spring Greenery
 
Items used:
Sizzix Bigz  Die  Tattered Florals 656640
Sizzix  Sizzlits decorative Strip Die Spring Greenery
Sizzix Movers & Shapers L tag & Bookplates 656938
Supply list:
Paper: Old music paper, cardstock
Ink: Hero Arts Shadow ink Cup o Joe Mid-Tone
Stamp: Tim Holtz Collection
Gaze, ribbon, brads and embossing creme white

How to make.
Die cut using cardstock and music paper  Tag & Bookplates distress and ink the edged , glue the music paper to the cardstock
Die cut the  tattered florals put on embossing creme on all edged
Die cut using the spring greenery , stamp "Love" on the tag and decorate using the die cuts, put some gaze back the flower


Thanks for stopping by, se you next Tuesday
Wish you a great week
Hej alle
jeg håber I alle har haft en dejlig uge, i dag vil jeg vise en tag hvor jeg har brugt flere af Tim Holtz fantastiske dies.
Sizzix dies jeg har brugt:
Sizzix Bigz  Die  Tattered Florals 656640
Sizzix  Sizzlits decorative Strip Die Spring Greenery
Sizzix Movers & Shapers L tag & Bookplates 656938
Supply list:
Papir: gammels nodepapir og karton
Sværte: Hero Arts Shadow ink Cup o Joe Mid-Tone
Stempler: Tim Holtz Collection
Gaze, bånd, bradsog embossing creme hvid
Fremgangsmåde:
Jeg starter med at udstanse tagen i karton og nodepapir ved at bruge tag og Bookplates die, dristresser og ink kanterne inden jeg limer nodepapiret på karton tagen. udstans de øvrige die, sæt blomsten sammen med en brads og brug embossing creme på blade og kanterne af blomsten og rundt på tagen, Under blomsten har jeg sat et stykke gaze, stempel på tagen og lim de øvrige dele fast til tagen
Tak fordi du kiggede forbi, vi ses næste tirsdag
Ønsker dig en dejlig uge
Pia


And on and on......

$
0
0


Last weeks blog was entitled 'My Heart Will go on' I had a lot of fun creating animals from simple Framelits heart dies, so much fun that I couldn't help myself and set about creating a few more ideas to share with you.

I again used  the Framelits Hearts die set 657561 for all the projects, this consists of 5 identical heart shapes in a range of sizes. 

For all you font fans the font I used on this and last weeks post is free (and easy) to download. It's called 'no color' and is available at dafont.com and many other free font sites.


The first card features a cute piggy, I die cut the 3 hearts and cut one down the centre using a craft knife. I folded the two halves as shown and attached them to the head forming the ears, the nostrils are simply circles cut using a standard office hole punch, the eyes are adhesive pearl gems.


I created the phrase using my PC, trimmed it to size and matted it onto a rectangle of magenta card, the piggy's hands and bottom where die cut from pink card and the tail was simply a strip of pink card which was wound around a dowel in a spiral.


Next up a panda card. As you can see I cut a variety of black and white hearts, four of which I strategically snipped the edges with my scissors to give the illusion of fur.before mounting them together as shown below.


Next, I attached two black hearts to which I added adhesive pearls for the eyes. Finally, I die cut one small white and one pink heart and overlapped them as shown.


I attached the overlapped hearts beneath the panda's chin using 3D foam pads and mounted the finished panda to my base card together with the phrase 'Thank You'


Here is one of my personal favourites from this collection, it turned it so much better than I hoped it would and I love the cheese idea too! I started by die cutting a selection of grey, pink and yellow hearts. The large heart I cut down the centre, one half for the face and the other for the body. Next, I assembled and mounted the ears.


To create the cheese, I die cut two small hearts in slightly different shades of yellow card, the lighter of the two I attacked with my Crop-A-Dile punching a random pattern of holes before mounting onto the other heart using 3D foam pads. Next, I trimmed a small grey heart in half to use for the hands/arms and attached them to the cheese/body together with the assembled head, I also used two adhesive pearls for eyes and a black pearl at the tip of the nose.

The base card was printed with the legend 'Miss You' the assembled mouse was attached with 3D foam pads before adding a curly tail made from a thin strip of the grey card wound in a spiral around a dowel.


Last but not least, the chicken. This was one of those ideas which popped into my head after reading a story book to my 3 year old daughter. I came into work the next day and had the card fully formed in my head. I wish it always happened like that!

I die cut two hearts from different shades of yellow before using a smaller heart die to trim the deep yellow heart as shown before attaching it to the pale yellow heart, this forms the main body/head of the bird.


Next, I die cut a selection of sizes/shades of hearts and trimmed some in half with a craft knife before adding to the body of the chicken as shown. I then wound a strip of the deep yellow card around a dowel in a spiral as shown.

I printed the  greeting onto my card using my PC and attached the main body of the chicken using 3D foam pads before adding the feet and the spiral or 'spring' as the title suggests.


I do hope you have all enjoyed these cards, my intention was to only make a couple but I was on a roll so I couldn't allow a good idea to wither on the vine could I?


Spring Layout By Karine

$
0
0


Hello!

Today a new lay-out very spring-like!

Supply list:

Papers: American Crafts
Cardstock: American Crafts
Stickers: Evalicious
Alphabets: American Crafts, Infocréa
Masking Tape
Stamps: Techniques Tuesday
Spray inks: Glimmer Mist
Stencil: The Crafter's Workshop
Felt-tip pens: Stabilo Pen68

Dies:

659068 Sizzix Thinlits Die -Doily
659573 Sizzix Sizzlits Decorative Strip Die-Spring Greenery

I started by working on my background with a 12x12 stencil and ink sprays (green and yellow colours).
While my background dries, I cut a doily out of white cardstock with my Big Shot and some foliage out of green printed paper.
I inserted the elements around my picture, wherever there was a free space.
As a finishing touch, I added some drops of black ink and striped masking tape to add contrast.
The title “life is good” is a combination of stamp and alphabet letters.

A very simple and colourful lay-out! I hope it will inspire you!


Have a lovely day,


Karine

Bonjour !

Une nouvelle page ce jour qui sent bon le printemps !

Matériel :

Papiers : American Crafts
Cardstock : American Crafts
Stickers : Evalicious
Alphabets : American Crafts, Infocréa
Masking Tape
Tampons : Techniques Tuesday
Encres en spray : Glimmer Mist
Pochoir : The Crafter's Workshop
Feutres : Stabilo Pen68

Dies utilisés :

659068 Sizzix Thinlits Die -Doily
659573 Sizzix Sizzlits Decorative Strip Die-Spring Greenery

J'ai commencé par retravailler mon fond de page à l'aide d'un pochoir 12x12 et de deux couleurs d'encres en spray ( vert et jaune).
Pendant que mon fond sèche, j'ai découpé à l'aide de ma Big Shot, un napperon dans du cardstock blanc et des feuillages dans un imprimé vert.
Tous les éléments sont intégrés autour de ma photo, profitant d'un espace libre.
J'ai rajouté en touche finale quelques gouttes noires, du masking tape zébré afin d'ajouter du contraste.
Le titre " Life is Good" est composé de tampon et d'alphabets.

Une page toute simple et colorée, qui je l'espère vous inspirera !

Bonne journée

Karine

Pinwheel perfect

$
0
0

This week I thought it would be nice to make a big  - either for a cushion, or a really quick quilt! How does 18" sound? and it only uses one die 657628 -
 
For each block you will need 2 pieces of fabric  8" x 42".
As the die is asymmetrical you will need to make sure that you cut all the trapezoids the same - so I decided to cut each fabric with right side uppermost. You can turn the die 180 degrees to make the best use of the fabric -
 

Each block needs 12 trapezoids of each colour.
Join  4 pairs of patterned trapezoids together, 4 pairs of plain and 4 with one plain and one patterned - see photo below -

 
Join these 3 pieces together -
 
Make 3 more of these, and then join the 4 pieces together to complete the block -
.
The photo  doesn't do justice to the size of this block - you could just make 20 of these and have a small quilt.
There will be more on this block next week - I think - maybe a super quick quilt.
Until then keep sewing.
Angela


Bookmarks for children and friends

$
0
0

Hi Everyone! This is Anna.
It's a gorgeous day, and one could almost imagine that Spring had sprung!
Did you have time making projects during week?
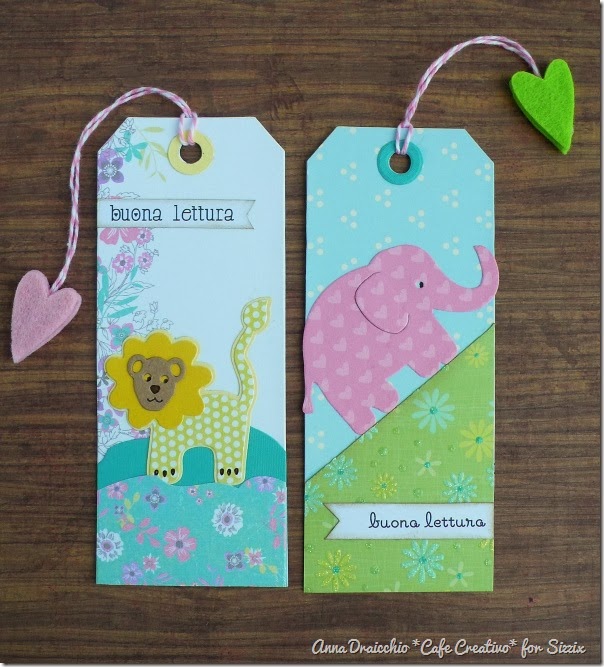
I had lots of paper scraps to use up so I made these bookmarks for some children. For this bookmarks I used the new Thinlits Die Set 7PK - Elephant & Giraffe and Thinlits Die Set 8PK - Lion & Monkey.

cafe creativo - Anna Draicchio - sizzix big shot - bookmark (1)

First I die cut a tag from cardstock or patterned paper.
To create my grass, I used a patterned paper and die cut it with Framelits Die Set - Labels, Ornamental.

cafe creativo - Anna Draicchio - sizzix big shot - bookmark (2)

I used the new dies to cut out each critter.
I added the banner sentiment “good reads”.
I threaded some twine through the bookmark and I glued in the ends two felt hearts or circles, that I had cut out with the Bigz dies of Starter Kit.
With these fabulous dies make a quick and easy bookmark that you can thread in your child’s school bag or have them give as a gift to their friends!

cafe creativo - Anna Draicchio - sizzix big shot - bookmark (3)

cafe creativo - Anna Draicchio - sizzix big shot - bookmark (4)
 
Items used:
Sizzix Big Shot Starter Kit (Powder Blue & Teal) (658300)
Sizzix Thinlits Die Set 7PK - Elephant & Giraffe (658972)
Sizzix Thinlits Die Set 8PK - Lion & Monkey (658973)
Sizzix Framelits Die Set 6PK - Labels, Ornamental (658976)
Sizzix Bigz Die - Garden Greens (659436)
Sizzix Movers & Shapers Die - Tag & Tie (657859)
scrap of cardstocks
scrap of patterned papers
scrap of felt
twine
glue, hot glue

 
cafe creativo - Anna Draicchio - sizzix big shot - bookmark (5)
 

I hope it inspires you to create your bookmark! :)
Enjoy the weekend! ♥

**************************************
Flag_of_Italy Per le amiche italiane! :)

Ciao! Ecco un nuovo appuntamento con Anna.
E' una splendida giornata e si potrebbe quasi dire che la primavera è arrivata.
Avete avuto modo di dedicarvi a vostri hobby durante questa settimana?
Io sono stata abbastanza produttiva.
Ho una scatola con un sacco di ritagli di carta da usare così ho pensato bene di usarli per creare questi segnalibri, che regalerò ai miei nipoti, visto che siamo a metà anno scolastico e un po' d'incoraggiamento dopo le pagelle ci vuole.
Per questo i segnalibri ho usato le nuovissime e deliziose fustelle Thinlits Die Set 7PK - Elephant & Giraffe e Thinlits Die Set 8PK - Lion & Monkey
Non sono dolci?!

Come fare:
Per prima cosa ho fustellato una tag da cartoncino o carta fantasia.
Per creare l'erba, ho usato la fustella Framelits Die Set - Labels, Ornamental, così come vedete nella foto in alto.
Ho quindi usato le nuove fustelle della stessa linea per tagliare ogni animaletto.
Ho aggiunto poi il banner con la scritta stampata "buona lettura".
Ho infilato un po' di spago bicolore attraverso il foro del segnalibro ed ho incollato alle estremità due cuori di feltro o cerchi, che avevo tagliato precedentemente con la fustella Bigz dello Starter Kit.
Con queste favolose fustelle è facile creare un segnalibro semplice e veloce come questo, che si può infilar nello zainetto di scuola dei vostri ragazzi o far regalare ai loro amici!

Materiali:
Sizzix Big Shot Starter Kit (Powder Blue & Teal) (658300)
Sizzix Thinlits Die Set 7PK - Elephant & Giraffe (658972)
Sizzix Thinlits Die Set 8PK - Lion & Monkey (658973)
Sizzix Framelits Die Set 6PK - Labels, Ornamental (658976)
Sizzix Bigz Die - Garden Greens (659436)
Sizzix Movers & Shapers Die - Tag & Tie (657859)
avanzi di cartoncini
avanzi di carte fantasia
avanzi di feltro
spago
colla, colla a caldo

Grazie della visita! Buon weekend! ♥

Flowers For Mum ...

$
0
0


Hello to you all,

Well, it has certainly been a while since I last posted on here! As some of you may know I was expecting my fourth child in December.  He arrived as a late christmas present and was born on 28th December.

So here we are in March already, where has that time gone?  Keeping to theme of March I am going to share a Mothers Day project with you.

A Pretty Jar Of Flowers 


Using the Bigz Die Flower Layers #8 I have die-cut 8 of them, folded along the score lines and threaded paper straws through the centre to create the stems.


I have used bright, vibrant papers that have a lovely spring feel to them.  


I have then taken a kilner jar and decorated it using string and papers along with the Butterfly die from the Sizzix Starter Kit.


The beauty of sharing these on Mother's Day is they will keep forever and be sure to make Mum smile!

You can find the full tutorial over on my blog from Saturday 8th March.

Have a lovely weekend and I will be back with another project to share soon.


Darkroom Door & Sizzix Artist Trading Card Swap

$
0
0


 Hello!

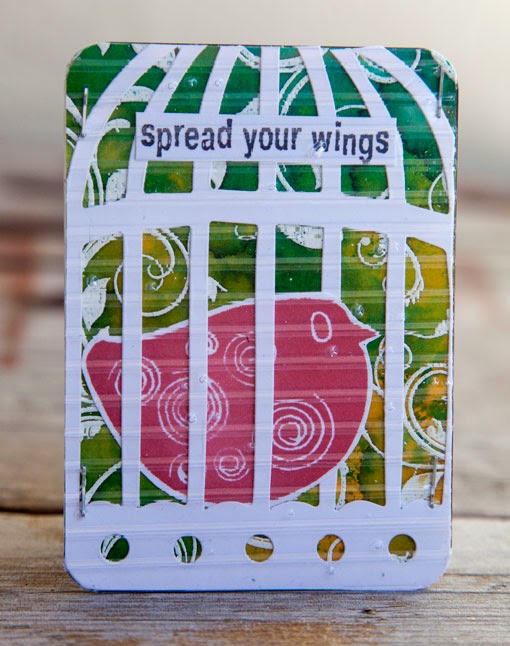
Every month on the Darkroom Door blog we hold an Artist Trading Card swap. It's a great way for crafters to share a bit of their own artwork with other like minded crafters around the world and gain some new ideas and inspiration! Each month has a different theme. Recently one of the themes was 'Darkroom Door & Sizzix' where all the artists needed to use a Darkroom Door stamp or paper product combined with a Sizzix die or embossing folder.

It was so much fun watching the ATC's arrive in the mailbox and seeing what all the artists created! Each idea was different and the combinations of dies, stamps and embossing folders used gave us all some new great ideas on how they can be used.

Here are all of the ATC's that were created for this swap:


Created by Jenny Webster. A Darkroom Door Art de Fleur Photochip was cut using the Sizzix Movers & Shapers Magnetic Die Set Butterflies #658367 on a Sizzix Base tray.


Created by Rachel Greig (that's me!) using Darkroom Door Kimono Montage and Wordstrip, framed with the Sizzix Thinlits Scallop Polka Dot Frame Layers Die #659129


Created by Vicky Fernando using Sizzix Mini Flourish Alterations die #657205, Darkroom Door Wildflowers Vol 1 Rubber Stamps& the sentiment from Gothic Arches Rubber Stamp set.  

I'm sure you'll agree with me that the different ideas and artwork from all of these artists is amazing!  

If you are interested in participating in the ATC Swaps, please click here for all of the information! We'd love to have you take part!! It's a lot of fun :) 

Hope you have a creative weekend! Thanks for stopping by today! 


A Spring Card by Gerry van Gent

$
0
0

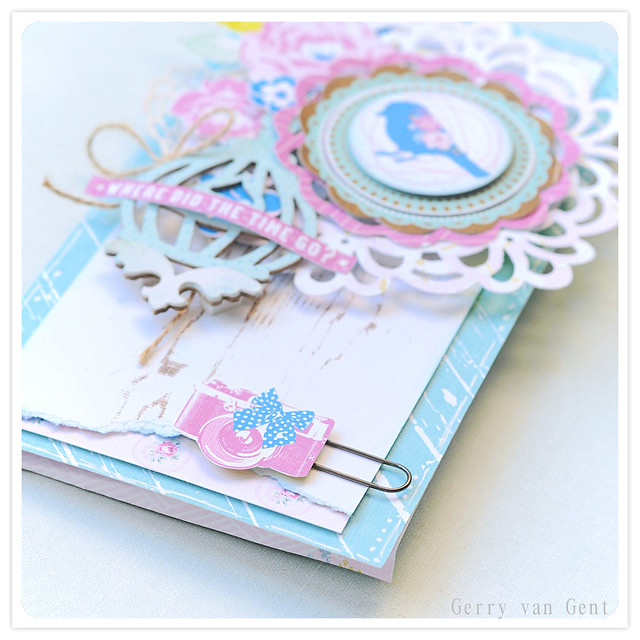
Hello Sizzix Friends!
Waving Hi from sunny Holland!
It`s a beautiful day here and I am already
in a Spring mood. And you?
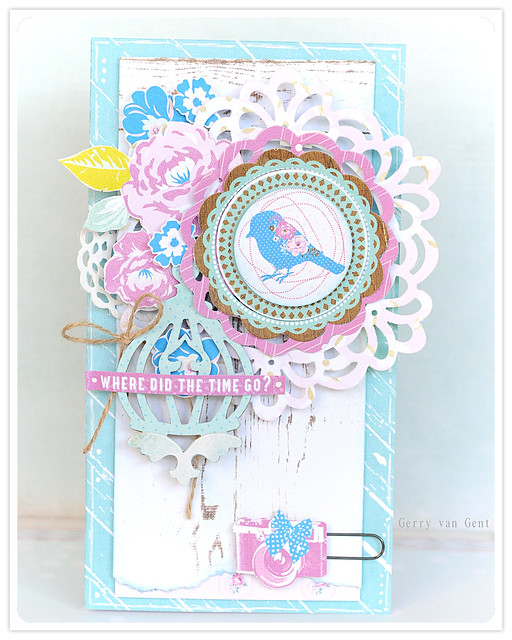
Today I have another layered card I created for you
using, of course, awesome dies from Sizzix.

Card_gerry_Fotor
Size: 11 cm x 20 cm
657900 Sizzix Big Shot Machine
659127 Sizzix Thinlits Dies Frame Layers & Flowers #2
658223 Sizzix Originals Die Bird Cage
658506 Sizzix Sizzlits Die Vintage Doily
*    *    *
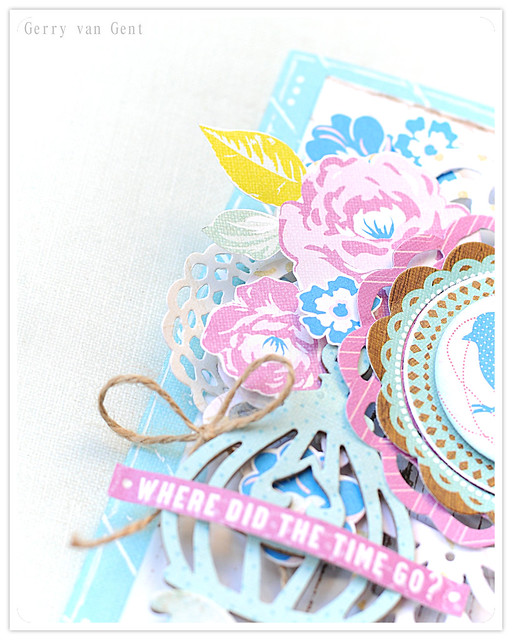
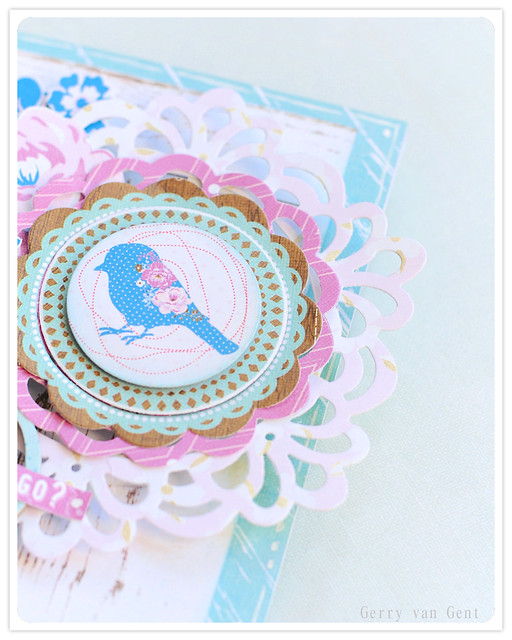
Here are a few close-ups for you....
The bird cage is die cut from corrugated 
cardboard and pattern paper.
C1_Fotor
I combined a few fussy cut flowers from the paper
collection with the doilies...
C3_Fotor
C2_Fotor
Use foam squares with your favourite dies -
it gives such a beautiful dimension to your project!
C4_Fotor
OTHER PRODUCTS I USED:
Webster's Pages "Sweet Routine" Paper Collection
*    *    *
Hope you enjoyed my card today!
See you next week!

rapture

$
0
0


Hello again and happy monday!

I've had a busy week, I have a new job so I'm now working away in an office 3 days of the week, and last week I was filming for Quilt Monkey so I didn't get a lot of time for sewing.

Fortunately I found a couple of hours to finish off a quilt top I'd been working on for a couple of weeks. I used the Big Shot to cut out a gazillion squares for this (I used 3.5" squares) and I had the design mapped out on graph paper - which was a little confusing at times because my colour chart didn't match my fabrics...the seam ripper and me got friendly on a few occasions which is pretty normal for me, I must admit.

Here's a sneaky peek of my quilt, I can't give too much away as it'll be in a magazine later this summer.

The fabrics I used are all by Pat Bravo for Art Gallery Fabrics. I love this line (which is called Rapture), it's so pretty and delicate and subtle, you can check out the look book for the line by clicking here (& you can find UK stockists via Hantex, the UK distributors).


No I need to piece a backing and prepare the binding and it'll be ready to quilt!
I hope you have a lovely week with plenty of time to sew!

Make it happen LO

$
0
0
Hi everybody!

Today I want to share with you my latest Lay Out. Sometimes we all need something to lift up our spirits and one of my ways to do it is scrapbooking.


Supply list:

In this LO I have used some polypropylene to die cut the Garden Greens shapes. I love the look of it, and it is very easy to die cut a lot of materials with a Sizzix Bigz Die :)

I have used one of Miquel martí i Pol's verses to make my journaling, and I have written it repeatedly on the right of the page, as a decorative element.

It says: "Everything is to be done. Everything is possible" Isn't it a good mantra?

Happy Monday!

.......................

¡Hola a todos!

A veces todo el mundo necesita algo que le levante el ánimo, ¿verdad? Y una de mis maneras para hacerlo es scrapear un poco.

En esta página he usado un poco de polipropileno para  troquelar las hojas. me encantan cómo quedan con este material, y además con los Bigz Dies de Sizzix se pueden troquelar un montón de materiales diferentes de manera muy fácil.

Para mi crónica he utilizado uno de los versos del Poeta Miquel Martí i Pol y lo he escrito repetidamente a la derecha de la página como un elemento decorativo más.

El verso dice: "Todo está por hacer. Todo es posible"¿Es o no es un buen mantra?

¡Feliz lunes!

Frame it!

$
0
0


Hi....today I have a card to show you with homemade frames. I love to make my own frames with Sizzix Dies. Letthe frame dothe decorationsonyour card.


Supply list:
656633  Sizzix Movers & Shapers Die - Baroque

Papers: Pion Design - Shoreline Treasures, chipboard
Inks: Distress ink Pad - Pumice Stone, Walnut Stain, Stormy Sky
Other: Distress Crackle Paint - Picket Fence, Distress Paint - Picket Fence, cheesecloth, Seam Binding ribbon, button

How to do:
Die cut frame in chipboard with  Sizzix Movers & Shapers Die - Baroque and Sizzix Movers & Shapers Magnetic Die - Mini Baroque
Paint the frame with Distress Crackle Paint - Picket Fence.
Die cut swirl in chipboard with Sizzix Originals Die - Botanical Flourish
Paint the swirl with Distress Crackle Paint - Picket Fence. 
Color Seam Binding Ribbon with Distress ink Pad - Stormy sky.


Die cut the frame in chipboard with  Sizzix Movers & Shapers Magnetic Die - Mini Baroque and
Paint the frame with Distress Paint - Picket Fence. Let it dry. Emboss the frame with  Sizzix Texture Fades Embossing Folders 4PK - Springtime Background & Borders Set


Thanks for stopping by. 
Anne Kristine

♥♥♥♥♥♥
Heisann.... i dag har jeg et kort å vise deg med rammer som du enkelt kan lage selv. Jeg liker godt å lage mine egne rammer med Sizzix Dies. La rammen være dekorasjonene på ditt kort.

Materialer:
656633  Sizzix Movers & Shapers Die - Baroque

Papir: Pion Design - Shoreline Treasures, chipboard
Inks: Distress ink Pad - Pumice Stone, Walnut Stain, Stormy Sky
Annet: Distress Crackle Paint - Picket Fence, Distress Paint - Picket Fence, osteklut, Seam Binding bånd, knapp

Beskrivelse:
Stans ut rammen i chipboard med  Sizzix Movers & Shapers Die - Baroque og Sizzix Movers & Shapers Magnetic Die - Mini Baroque
Mal rammen med Distress Crackle Paint - Picket Fence.
Stans ut swirl i chipboard med Sizzix Originals Die - Botanical Flourish
Mal swirl med Distress Crackle Paint - Picket Fence. 
Farg Seam Binding bånd med Distress ink Pad - Stormy sky.

Stans ut ramme i chipboard med  Sizzix Movers & Shapers Magnetic Die - Mini Baroque og
Mal rammen med Distress Paint - Picket Fence. La det tørke. Emboss rammen med  Sizzix Texture Fades Embossing Folders 4PK - Springtime Background & Borders Set

Takk for at du stikker innom her.
Anne Kristine

Happy Easter

$
0
0
Hi everyone
i hope you all had a great and creative week, today i will show you a wall hanger using the beautiful Tim Holtz bigz die
 
Items used:
Supply list:
paper: Cardstock
Ink: Distress ink-dusty Concord-, -Peeled paint-
Glimmermist from Tattered Angels-Fully Purple and forest green, Mister Huey's color mist -white-
Tim Holtz stencils Honeycomb THS 005 and Cargo THS 001, white featheres
 
How to make
Cut out a cardstock 15x25 cm, one 14x24cm and one 12x22 cm
Die cut uing Jumbo Tattered Florals and Garden Greens, spray with water and glimmermist
 
Thanks for stopping by, Wish you a great week
Pia
Hej alle
Jeg håber i alle har haft en dejlig og kreativ  uge, i dag vil jeg vise et vægophæng som kan pynte når det bliver påske.
Sizzix dies jeg har brugt:
Andre materialer:
papir: Karton
Ink: Distress ink-dusty Concord-, -Peeled paint-
Glimmermist fra Tattered Angels-Fully Purple og  forest green, Mister Huey's color mist -white-
Tim Holtz stencils Honeycomb THS 005 og Cargo THS 001,  hvide fjer
Fremgangsmåde:
Skær karton i 15x25 cm, et i 14x24cm og et i 12x22 cm
Udstans Jumbo Tattered Florals and Garden Greens, spray med vand og  glimmermist
Tak fordi du kiggede forbi, ønsker dig en dejlig uge
Pia
Viewing all 2033 articles
Browse latest View live