Quantcast
Channel: Crafting ideas from Sizzix UK
Viewing all 2033 articles
Browse latest View live

Bente's Sunday mixed media page

$
0
0

Hi there!
Today I have a page that I had a lot of fun creating. I pulled out some of my mists, gesso, stencils, gelatos etc and had a play. This is what I came up with. The hard part is knowing when to stop! :-)


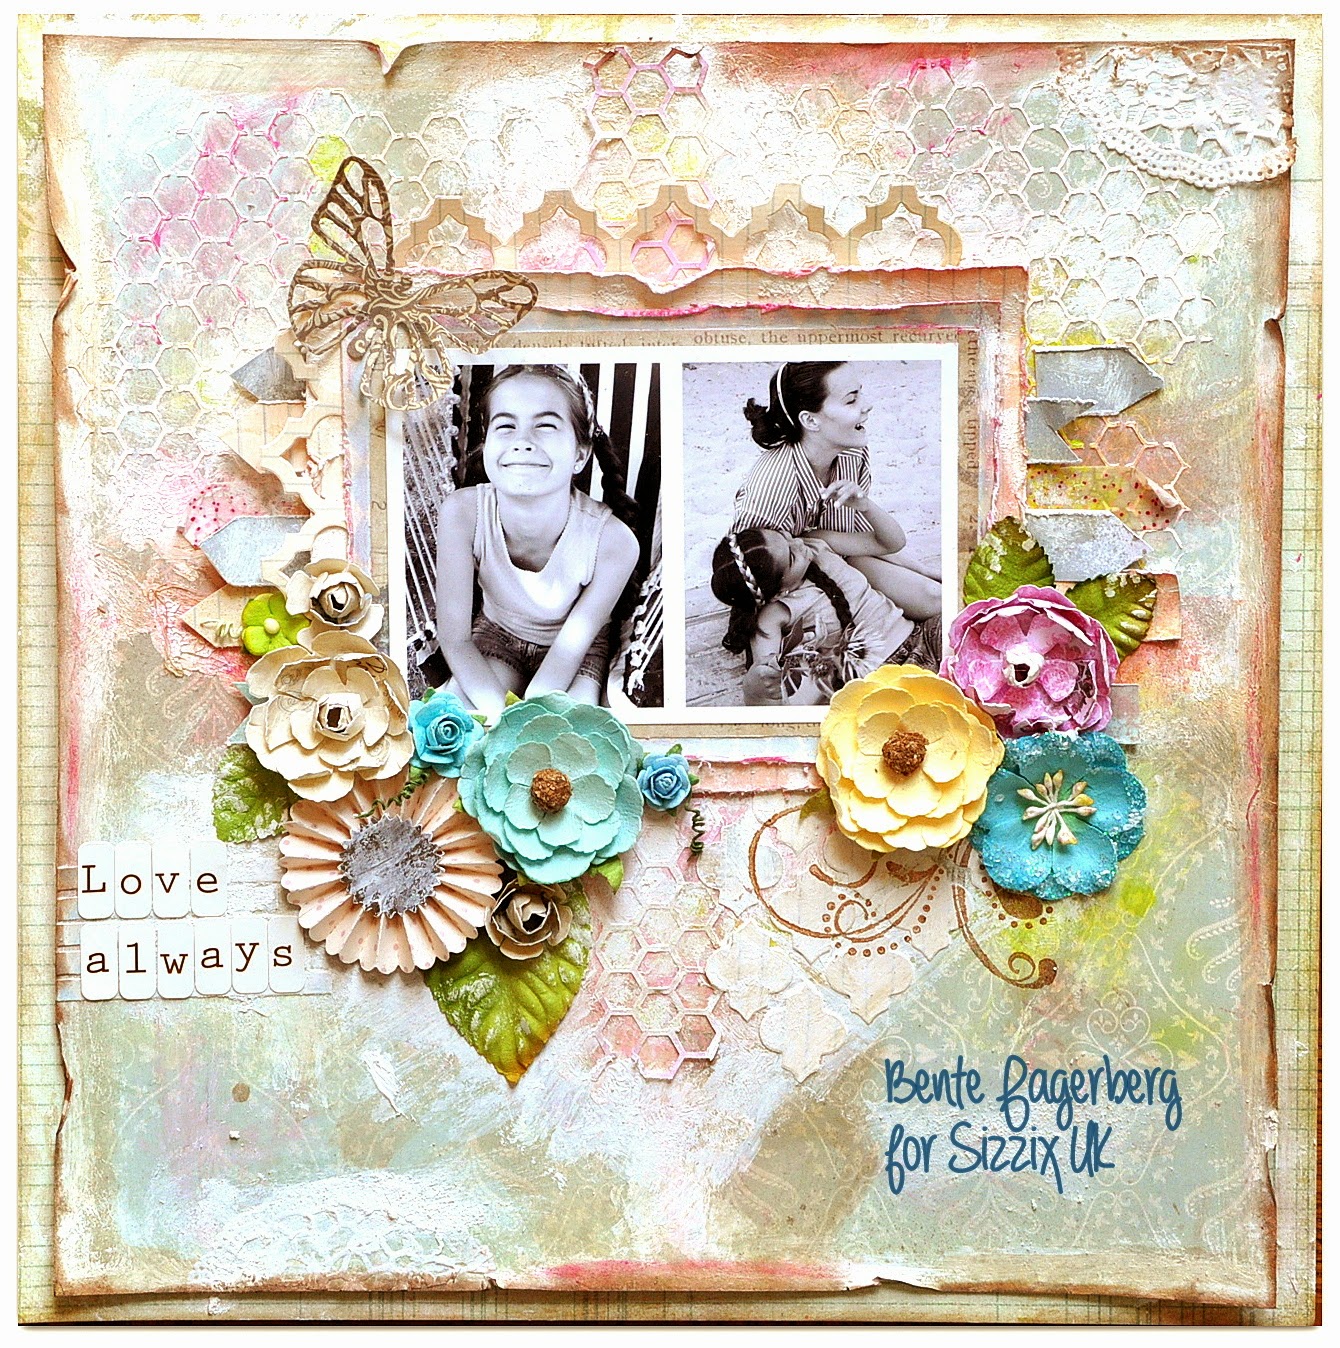
I used a number of fabulous Sizzix products to make this page. 
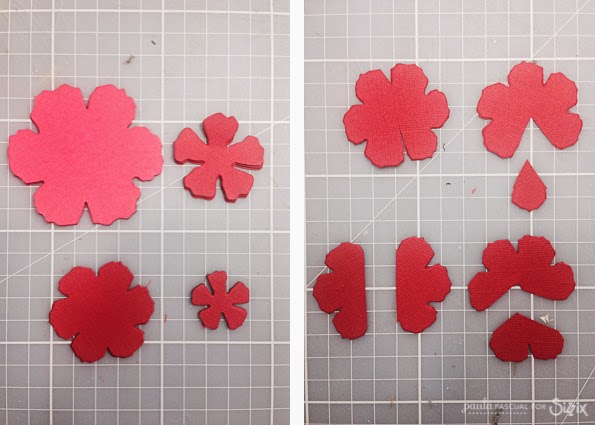
Of course I started with my beloved Big Shot and starter kit. And to make those beautiful Tattered florals I had great help from the Susan's Garden tool kit. I really enjoy using it so much!


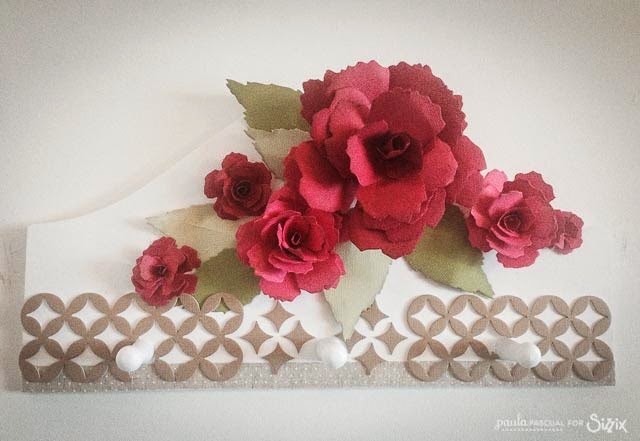
 Don't you agree the combination of hand made and store bought flowers looks good?! :-)


The butterfly is part of the starter set together with the Big Shot.


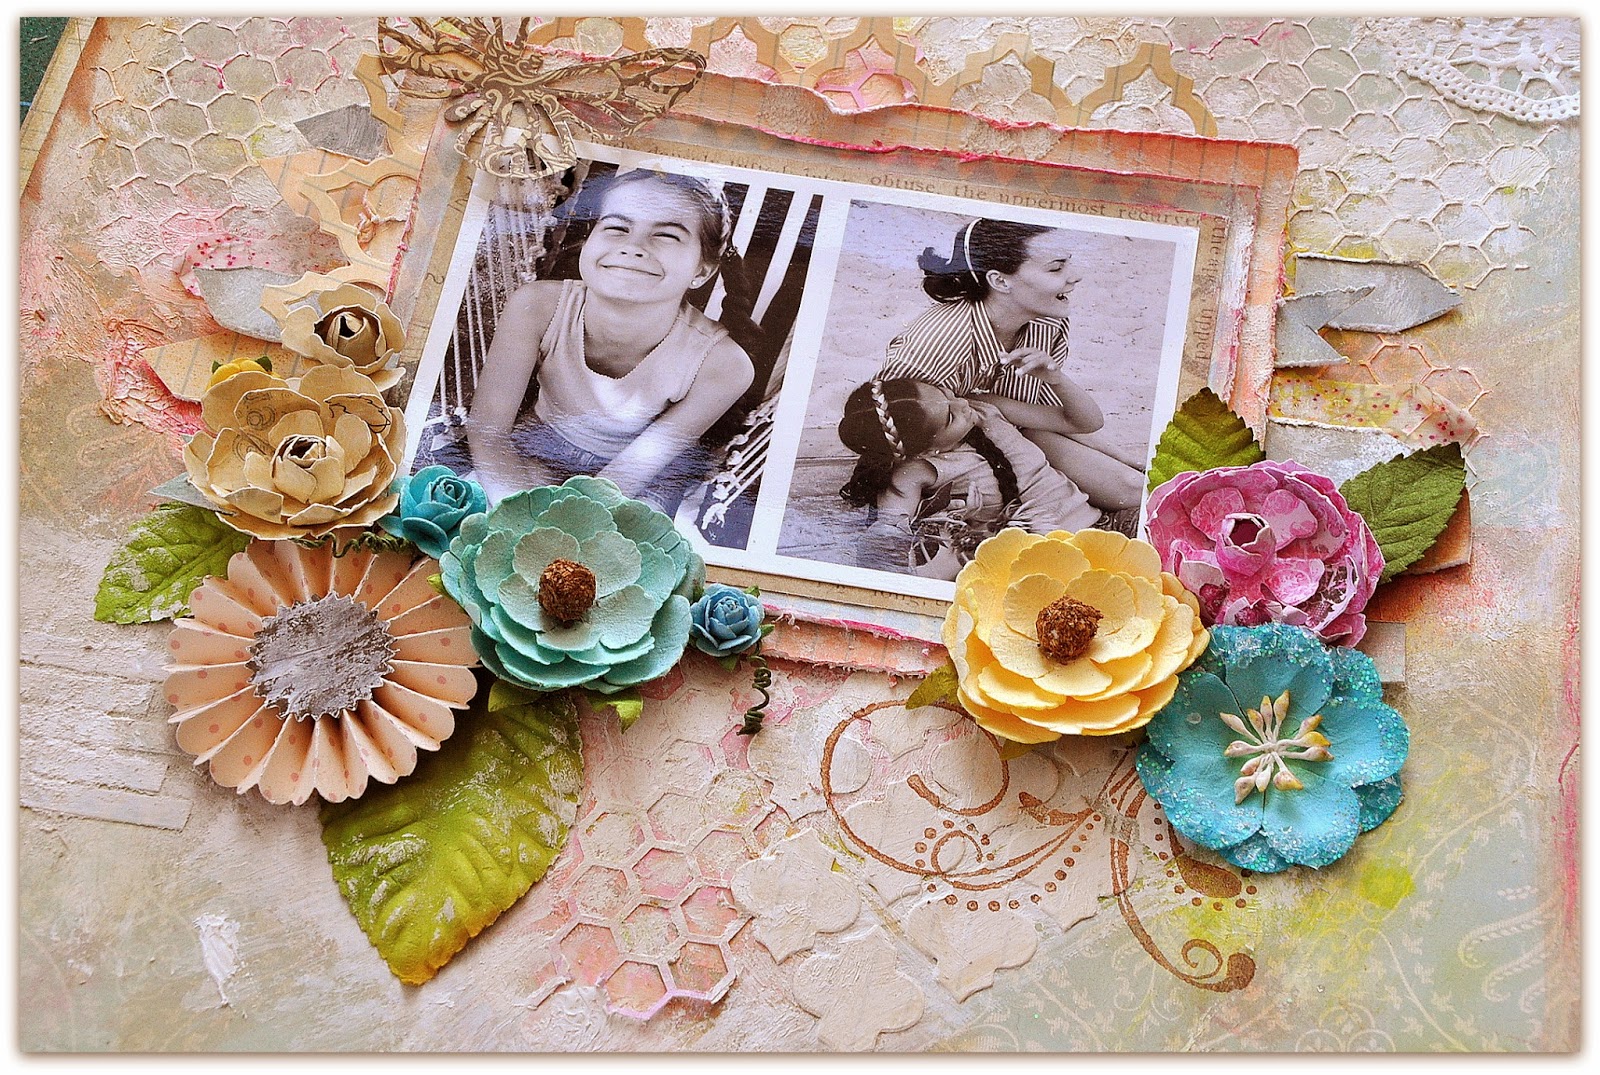
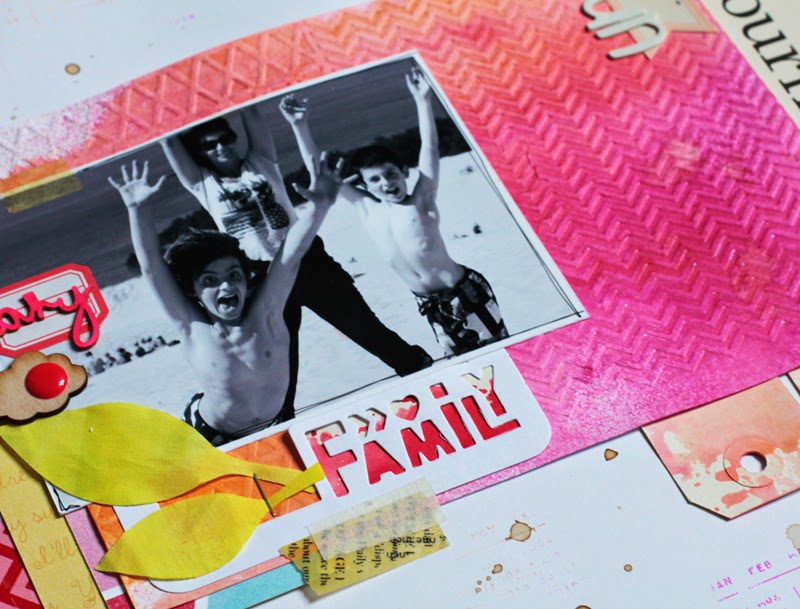
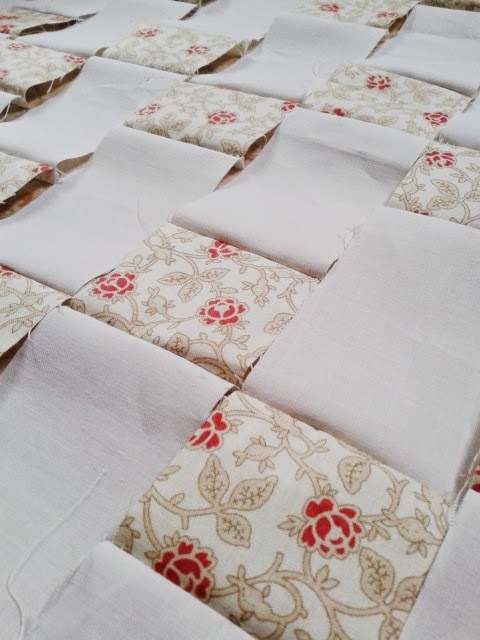
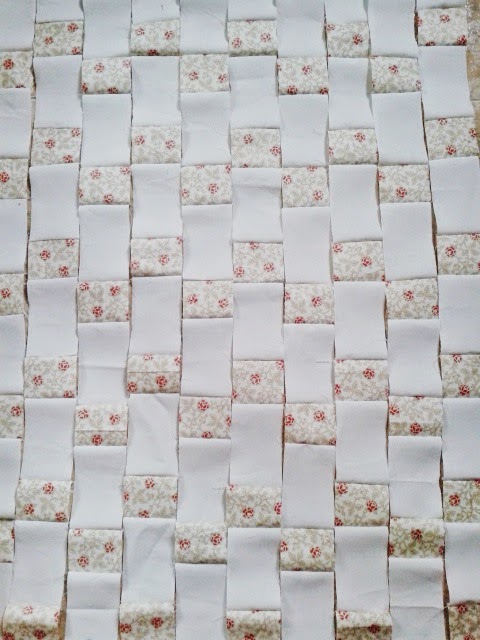
In the photo below you can see how I used the negative pieces from the 'Trellies' to help build up some textuere for the background. I then covered them in gesso to make them a little more subtle.


Apart from these products I used papers from the Songbird collection by Prima Marketing and some of their beautiful flowers as well.
--------------------------------------------------------------------

Hejsan!
Idag bjuder jag på en sida där jag använt några av mina många mistflaskor, gesso, gelatos stenciler etc. Och jag njöt i stora drag när jag fick kladda med alla dessa ,...problemet är bara att veta när man ska stoppa!
Jag använde flera av mina sköna Sizzix produkter på denna mixed media sida. Jag började såklart med att plocka fram min Big Shot med starter kit. Och för att göra de snygga Tattered florals som jag gillar skarpt hade jag stor hjälp av Susan's Garden tool kit. Jag är verkligen stormförtjust i dom!
 Jag tycker verkligen att kombinationen av handgjorda och köpta blommor gör sig bra!
Håller ni inte med? :-)

I det nedersta fotot kan nio se hur jag använde bitarna som blev över efter att ha skurit ut mitt 'Trellies' mönster. Efter att lager med gesso sjunker de precis lagom in i bakgrunden och ger mig efterlängtad tekstur.


Förutom produkterna ovan från Sizzix har jag använt mönsterpapper ur 'Songbird' kollektionen av Prima Marketing.
 

back from quilt market!

$
0
0


Last week I was in Pittsburgh at International Quilt Market. For those that don't know, it's a bi-annual industry show for quilting. It's where you see all the new fabrics and gadgets ahead of release.

So, what kinds of fabrics will you be buying later this year?

The biggest trend was metallic ink - it was all over the place. So, for those of you that aren't a big fan that might be a disappointment. Personally, I love a bit of sparkle so I'm looking forward to getting my hands on all of these collections as they come out, so keep your eyes open for them!....

Arizona by April Rhodes for Art Gallery Fabrics (should be in shops any day now, and over in the UK in the next month or so)


Cotton + Steel (a new division of RJR fabrics) (will start arriving to shops in July)


Brambleberry Ridge by Violet Craft for Michael Miller Fabrics (will start arriving to shops in July)


I was hoping to share some progress on the clamshell project, but my sewing machine decided to blow up this weekend. I'm seriously hoping it isn't going to cost me an arm and a leg to get fixed, but I have a horrible feeling that when your sewing machine goes bang and smoke comes out the top of it, it's not a good sign.


Jumbo and Tattered Florals for Home Decor projects

$
0
0


One of the most popular Sizzix dies has to be Tattered Florals. They are fantastic as there are four flowers in different sizes and shapes and being a Bigz die means that versatility is warrantied. Loads of us crafters cheered when Tim Holtz released the Jumbo Tattered Florals.
I adore flowers, layering them, using them in different sizes and making them 3D.  That is why I was really looking forward to the opportunity to use the original Tattered Florals and the Jumbo ones. 

There are plenty of tutorials out there on how to assemble the Tattered Florals, but here is a quick reminder.


I die cut four large flowers. Then I made some cuts (clockwise): On one made just a cut, on the second I cut a petal off, on the third one I cut two petals off and finally on the fourth flower I cut three petals or cut in half.
Then I glued each end petals to each other and shaped the ends of the flowers using the Susan's Garden Tool Kit.


To assemble the layers I started with the centre (but you may want to start with the larger layer) rolling up the single petal and then added the other layers of petals. Trim the bottom ends of the flowers to be able to layer the petals closely together. To glue the layers, I used a cold melt glue gun. Quick and strong hold.


I repeat the same process with the largest flower from the original Tattered Florals. And the final results on the right hand side. Top is the Jumbo one and bottom the original Florals, quite a big difference is size.


I did the same with the rest of the flowers in both the Tattered Florals and the Jumbo ones.


All in all, six fine 3D flowers. I attached them to this nice wooden coat hanger, added the leaves using the Jumbo Florals I finished the decorating by adding a die cut Frameworks Courtyard.

#thankyou

$
0
0

Hi everyone....hope you all had a great and creative week...today I have a envelope and a tag to show you.


Supply list:
657900 Sizzix Big Shot machine
659202 Sizzix Framelits Die Set 7PK - Labels, Regal
659575 Sizzix Sizzlits Decorative Strip Die - Butterfly Frenzy  
659573 Sizzix Sizzlits Decorative Strip Die - Spring Greenery 
659434 Sizzix Sizzlits Decorative Strip Die - Tattered Curvy Banners
659424 Sizzix Frameworks Die - Courtyard
659449 Sizzix Texture Fades Embossing Folders 2PK -Courtyard & Trellis Set

Papers: Glassine, Pion Design - Flower Frames, Manila tag # 8
Stamps: Stampers Anonymous Tim Holtz collection, Lili of the Valley
Inks: Distress ink Pad - Spun Sugar, Pumice Stone
Other: Roses - Wild Orchid Crafts, cheesecloth, Seam Binding Ribbon, Gesso, button


How to do:


Die cut the envelope in glassine or vellum with Sizzix Framelits Die Set 7PK - Labels, Regal
Sew it together as a pocket. Emboss the envelope with  Sizzix Texture Fades Embossing Folders 2PK -Courtyard & Trellis Set.
Die cut banner in patterned paper with  Sizzix Sizzlits Decorative Strip Die - Tattered Curvy Banners
Die cut framework in patterned paper with Sizzix Frameworks Die - Courtyard
"Glue" framework and cheesecloth to the tag with Gesso 
Distress the edges with Distress ink Pad - Pumice Stone
Die cut greenery in patterned paper with Sizzix Sizzlits Decorative Strip Die - Spring Greenery
Glue roses,greenry, cheesecloth in the front of the envelope. Add a bow and a banner.

Die cut butterflies in patterned paper with Sizzix Sizzlits Decorative Strip Die - Butterfly Frenzy  
Glue butterflies in the front of the tag, add a button in the top of the tag


Thanks for stopping by...wish you a great day ♥
Anne Kristine

♥♥♥♥♥♥

Heisann i dag har jeg en konvolutt med en tag å vise deg

Materialer:
657900 Sizzix Big Shot machine
659202 Sizzix Framelits Die Set 7PK - Labels, Regal
659575 Sizzix Sizzlits Decorative Strip Die - Butterfly Frenzy  
659573 Sizzix Sizzlits Decorative Strip Die - Spring Greenery 
659434 Sizzix Sizzlits Decorative Strip Die - Tattered Curvy Banners
659424 Sizzix Frameworks Die - Courtyard
659449 Sizzix Texture Fades Embossing Folders 2PK -Courtyard & Trellis Set

Papir: Matpapir, Pion Design - Flower Frames, Manila tag # 8
Stempler: Stampers Anonymous Tim Holtz collection, Lili of the Valley
Inks: Distress ink Pad - Spun Sugar, Pumice Stone
Annet: Roser - Wild Orchid Crafts, osteklut, Seam Binding bånd, Gesso, knapp.

Beskrivelse:
Stans ut konvolutten i matpapir eller kalkerpapir med Sizzix Framelits Die Set 7PK - Labels, Regal
Sy det sammen til en lomme. Emboss lommen/konvolutten med Sizzix Texture Fades Embossing Folders 2PK -Courtyard & Trellis Set.
Stans ut banner i mønsterark med  Sizzix Sizzlits Decorative Strip Die - Tattered Curvy Banners
Stans ut framework i mønsterpapir med Sizzix Frameworks Die - Courtyard
"Lim" framework og osteklut til tag'en med the tag Gesso 
Distress kantene med Distress ink Pad - Pumice Stone
Stans ut gren i mønsterpapir med Sizzix Sizzlits Decorative Strip Die - Spring Greenery
Lim roser, gren, osteklut i front på konvolutten. Sett på sløyfe og banner.

Stans ut sommer fugler i mønsterark med Sizzix Sizzlits Decorative Strip Die - Butterfly Frenzy  
Lim sommerfuglene i front på tag'en, lim fast en knapp i toppen av tag'en.

Takk for at du stikker innom her og ha en herlig dag ♥
Anne Kristine


Vintage postcard

$
0
0
Hi everyone, i hope you all had a great week. Today I have a vintage card to show you using Sizzix
  Frameworks Courtyard and Gardens Greens
Items used:
Supply list:
Paper: Tim Holtz Idea-Ology stash 12x12 wall Flower,Giro Flee, Alheli
Stamps: Stempelglede-Postcard from Paris-
Ink: Distress ink- Vintage Photo-Peacock feathers from Ranger
Ribbon, flowera, Pountura Paint Blue, 3 D foam and Glossy accent
The card is 14,5x14,5 cm
 Here i used the top of courtyard die
Here I used glossy accent
 I have cut out the leaves from the bigz die garden greens and decorate using glossy accent

Thanks for stopping by, wish you a lovely week
Pia
Hej alle
jeg håber du har haft en fantastisk uge og nydt det gode vejr. I dag har jeg et vintage kort at vise hvor jeg har brugt Sizzix Frameworks Courtyard and Gardens Greens
Sizzix dies jeg har brugt:
Andre materialer:
Papir: Tim Holtz Idea-Ology stash 12x12 wall Flower,Giro Flee, Alheli
Stempler: Stempelglede-Postcard from Paris-
Ink: Distress ink- Vintage Photo-Peacock feathers fra Ranger
Bånd, blomster, Pountura Paint Blue, 3 D foam og Glossy accent
Kortes størrelse er14,5x14,5 cm
Tak fordi du kiggede forbi, ønsker dig en dejlig uge
Vi ses næste tirsdag
Pia

To a very special friend..

$
0
0


Hello to all:) Today I have a one card I made to a very special friend. I love to use flowers (as most of us, I think) on my cards and for this I used Sizzix Thinlits Die Set 10PK - Flower, Alstroemeria 658851.


Sizzix products:
Sizzix Big Shot Machine 657900
Sizzix Thinlits Die Set 10PK - Flower, Alstroemeria 658851
Sizzix Accessory - Susan's Garden Tool Kit 658437

Other supplies:
Pion Design papers: My Precious Daughter, Memory Notes, Vintage Garden
gauze
Distress Ink: Peeled Pain, Walnut Stain
pink embossing powder
glue, douple-sided tape

How to do:
1. Cut the backgroundpaper about size 15 cm × 15 cm, sew all the edges and ink with Walnut Stain.
2. Cut the other paper size 10 cm × 10 cm or use  ready for its size piece and sew all the edges and ink them with the same as above. Attach this  to the cardboard in size little bit bigger. Finally tape in the middle of the backgroundpaper.
3. Cut the flower and leaves using Sizzix Thinlits Die Set 10PK - Flower, Alstroemeria 658851. Add some Distress Ink Peeled Paint to the leaves and shape them as well the flower using  Sizzix Accessory - Susan's Garden Tool Kit 658437. Assemble the flower, add a bit of glue to the ends of stamen and then f.e. embossing powder. (I didn`t had anything else:)
4. Cut piece of gauze, make it as "nest"  and attach on to the corner. Glue the flower and leaves on to the gauze. Add a sentiment and butterflies.
5.Finally tape this ready cover to the card.

Have a nice day,Minna

*  *  *  *


Keskiviikko ja uusi helppo kortti:) Nykyään olen ihastunut näihin itsetehtyihin kukkiin ja tässä kortissa käytinkin ensimmäistä kertaa stanssia Sizzix Thinlits Die Set 10PK - Flower, Alstroemeria 658851.


Sizzix tarvikkeet:
Sizzix Big Shot Machine 657900
Sizzix Thinlits Die Set 10PK - Flower, Alstroemeria 658851
Sizzix Accessory - Susan's Garden Tool Kit 658437

Muut tarvikkeet:
Pion DEsign paperit: My Precious Daughter, Memory Notes,  Vintage Garden
harsoa
Distress Ink musteet: Peeled Paint ja Walnut Stain
vaaleanpunainen embossausjauhe
liimaa, kaksipuoleista teippiä

Kuinka teet tämän kortin:
1. Leikkaa taustapaperi noin 15 cm × 15 cm kokoiseksi, ompele reunat ja lisää Walnut Stain mustetta.
2. Leikkaa toinen paperi 10 cm × 10 cm kokoiseksi tai käytä valmista, ompele reunat, lisää mustetta ja kiinnitä hieman isompaan kartonkiin. Teippaa lopuksi taustapaperin keskelle.
3. Leikkaa kukka ja lehdet käyttäen stanssia Sizzix Thinlits Die Set 10PK - Flower, Alstroemeria 658851.
Lisää vähän vihreää väriä lehtiin Peeled Paint musteella ja muotoile ne ja kukat käyttäen Sizzix Accessory - Susan's Garden Tool Kit 658437. 
Kokoa kukka, laita hieman liimaa heteen päihin ja lisää embossausjauhetta tai vastaavaa (minulla ei ollut muuta:)
4.Leikkaa pala harsoa ja muotoile se "pesäksi" kukalle ja kiinnitä kulmaan. Liimaa kukka ja lehdet harson päälle. Lisää teksti ja perhoset.
5. Lopuksi kiinnitä kansi korttipohjaan.

Mukavaa keskiviikkoa, Minna


Getting Shirty (part 2)

$
0
0

Fathers day is just over two weeks away here in the UK and last week I featured a card with a men's shirt as the central motif and this week I want to show you a couple more variations on the same theme.

The dies I am using are all decorative strips designed by none other than Mr Tim Holtz and they are Bow/Tied and Vintage Lace one of my favourite and most used dies.

I started with a template which has the same measurements as in the previous blog with the exception of the creases in the top corners to create the wing collars


For this shirt I wanted a slightly more distressed look or tattered elegance as opposed to the crisp black and white of the last blog post. I was thinking more 1970's prom shirt so I started by gently inking around the edges of a rectangle of ivory card before scrunching the card after which I went over the creases and around the edges with an ink applicator to give added contrast.

I followed the measurements on the templates to cut and crease the collars before folding them in and securing them at the base of the collar with a tiny blob of hot glue. Next, I folded over the wing collars along the crease lines before cutting and scrunching two 5 x 15 cm strips of ivory card.

I die-cut the card strips using my Tattered Lace Decorative Strip die and chose the pieces I wanted to use before inking as before, concentrating on the edges and the creases. Once I had my lace ready I drew a pencil line down the centre of the shirt as a guide before mounting the lace strips using strong, narrow double-sided tape from the good folks at Stix2. Next, I cut a 15 mm wide strip of ivory card and used my pattern makers wheel to add rows of faux stitching along each edge.


I scrunched and inked the strip as before and applied it down the centre of the shirt. Next, I die-cut the bow tie from ivory card and coloured it with blue, green and purple Distress Inks on both sides before gently spritzing to blend the colours a little and splattering with water before drying with a heat tool to achieve a mottled effect.


I assembled the bow, added a few adhesive pearls down the centre in place of buttons and mounted onto a corrugated base card measuring 11 x 15 cm.


The word 'Geek' is an insult used to deride anyone of a bookish nature or with an seemingly unhealthy interest in their chosen hobby, which makes me a guitar geek I suppose! And who amongst you shares my burning passion for dies, embossing, paper, card, inks, acrylics, stamps etc..... That's right, we all have to feed our inner geek!

Lately, the word has been been adopted as a desirable epithet emblazoned across t/shirts, bags etc. Geek chic is all the rage and has given rise to Hipster culture which is also seeping down into the world of crafts in the form of beards, moustaches and big square glasses etc. (you can probably guess where the rest of this blog is going?)

I started by following the measurements of the template in last weeks blog to cut a 10 x 15 cm rectangle of check/plaid double sided card alongside a 2 cm wide strip before using my pattern makers wheel around the perimeter of both to leave rows of tiny holes which I joined with a fine black marker pen to give the impression of a stitched seam. Next, I used an ink applicator (Weathered Wood Distress Ink) around the edge to add a little definition.


I attached the strip down the centre and turned back the collars, securing at the top with a little hot glue before die-cutting and assembling an orange bow tie, I used the Inks to give the edge a little definition too.
I added a few mismatched buttons down the central strip (very geeky!!) and created the name badge using my PC before rounding off the corners and attaching to the shirt with a 3D foam pad. Finally, I mounted the shirt onto a brown base card measuring 11 x 15 cm.


I really had fun making these cards, I hope yo like them? Next week we will be looking at some fab 1950's themed dies which are perfect for Father's day or any masculine themed card, Can't wait!


Black bird singing...

$
0
0


Last week I showed you a card with a cute owl on it and this week my card sports another bird: I know a little girl whose name means black bird and I when I make birthday cards for her, I make sure to encorporate a black bird. This year I went big:


Using one of the birds from Sizzix Bigz Die - Birds #3 I made a black bird the main motif of the card. I simply die cut the bird and its wing from black cardstock, the beak in patterned paper and added the eye in white cardstock decorated with a googly eye.

I made the background look somewhat like the bird was perched on a fence by choosing a patterned paper with a woodgrain / fence look.
 
 
In order to add some extra embellishments I diecut a cloud and a sun from Sizzix Framelits Die Set 9PK w/Stamps - Welcome Home in neutral patterned paper. I even stamped the diecut shapes with the coordinating stamps and then I decorated the sun with an enamol dot before adding it to the card on a few foam squares.
 

I had tied a piece of seam binding around the card where the two patterned paper met in order to hide the seam between the papers. It gave me a chance to add a tag made using a die from Sizzix Framelits Die Set 12PK - Tags, Sentiments. I decorated the tag with a small cloud and a heart from Sizzix Framelits Die Set 9PK w/Stamps - Welcome Home.

Supply list:
Sizzix Big Shot Starter Kit (Powder Blue & Teal)
Sizzix Bigz Die - Birds #3
Sizzix Framelits Die Set 12PK - Tags, Sentiments
Sizzix Framelits Die Set 9PK w/Stamps - Welcome Home
Cardstock
Patterned Paper: My Mind's Eye
Enamel Dots: Prima & My Mind's Eye
Ink: VersaFine
Stickers: Lily Bee
Seam binding
Baker's twine
Button
Googly eye

---o---

I sidste uge viste jeg jer et kort med en nuttet ugle på, og igen i denne uge er der en fugl på mit kort: Jeg kender nemlig en lille pige, hvis navn betyder solsort, og når jeg laver fødselsdagskort til hende, sørger jeg for at der er en solsort på. I år satsede jeg på en stor fugl.

Jeg brugte en af fuglene fra Sizzix Bigz Die - Birds #3 til at lave en solsort som det primære motiv på kortet. Jeg udstansede ganske enkelt fugl og vinge i sort karton, næbbet i mønstret papir, øjet i hvidt. Øjet fik også et mindre rulleøje for at give det lidt mere detalje.

Det var mit mål at baggrunden skulle få det til at se ud som om fuglen sad på et stakit, hvilket jeg opnåede ved at bruge et mønstret papir med et træmønster.

For at få lidt ekstra pynt på kortet udstansede jeg en sky og en sol fra Sizzix Framelits Die Set 9PK w/Stamps - Welcome Home i neutrale mønstrede papirer. Jeg brugte de koordinerende stempler til at give sky og sol ekstra detaljer, og endelig dekorerede jeg solen med en enamel dot, før jeg monterede den på kortet på 3d-puder.

Det bånd jeg havde bundet omkring kortet, hvor mine to mønstrede papirer mødtes, gav mig anledning til at tilføje en tag fra Sizzix Framelits Die Set 12PK - Tags, Sentiments, som jeg pyntede med en lille sky og et hjerte fra Sizzix Framelits Die Set 9PK w/Stamps - Welcome Home.

Ingredienser:
Sizzix Big Shot Starter Kit (Powder Blue & Teal)
Sizzix Bigz Die - Birds #3
Sizzix Framelits Die Set 12PK - Tags, Sentiments
Sizzix Framelits Die Set 9PK w/Stamps - Welcome Home
Karton
Mønstret papir: My Mind's Eye
Enamel Dots: Prima & My Mind's Eye
Sværte: VersaFine
Stickers: Lily Bee
Seam binding
Baker's twine
Knap
Rulleøje


A bright layout !

$
0
0

Hello!

Let’s think about holidays with this new page with bright colours and a fun picture!

Supply list:

Papers: Jenni Bowlin Mercantile
Cardstock: American Crafts
Wood Embellishment: Jenni Bowlin Studio
Enamel Dots: Studio Calico
Sticker: Studio Calico, Crate Paper
Alphabets: American Crafts
Masking Tape
Acrylic paint
Stamp: Glitz Design
Ink: Prima
Spray inks: Tattered Angels
Others: Tag, Ephéméria label, wood word, cloth

Dies:

658300 Sizzix Big Shot Starter Kit
659448 Sizzix Texture Fades Embossing Folders 2PK-Chevron & Lattice Set
659749 Sizzix Thinlits Die Set 4PK-Forever & a Day

Let’s start by preparing our background. Print a Glitz Design stamp pattern with orange and pink inks.
My picture mat is embossed twice with complementary patterns. Then it is sprayed with two ink colours: orange and pink.

I applied yellow acrylic paint on a cloth piece. Once it is dry, use it in your Big Shot Machine. To ease the process, I stapled my two pieces together.

While everything dries, I cut the second part of my title “Family” out of white cardstock.

The word “Crazy” is coloured with neon pink.

Then I added inked tags and stickers.

I made some splashes with coffee.


I hope today’s creation will make you feel like playing with colours!

Have a lovely day,

Karine

Bonjour !

Une nouvelle page aujourd'hui qui sent bon les vacances avec des couleurs acidulées et une photo assez fun !

Matériel :

Papiers : Jenni Bowlin Mercantile
Cardstock : American Crafts
Embellissement en bois : Jenni Bowlin Studio
Enabels Dots : Studio Calico
Stickers : Studio Calico, Crate Paper
Alphabets : American Crafts
Masking Tape
Peinture acrylique
Tampon : Glitz Design
Encre : Prima
Encres en spray : Tattered Angels
Divers : Tag, étiquette Ephéméria, mot en bois, tissu

Dies utilisés :

658300  Sizzix Big Shot Starter Kit
659448  Sizzix Texture Fades Embossing Folders 2PK-Chevron & Lattice Set
659749 Sizzix Thinlits Die Set 4PK-Forever & a Day

J'ai commencé par préparer mon fond de page en imprimant en rose et orange un tampon Glitz Design.
Mon mat photo est doublement embossé avec deux motifs complémentaires, il est ensuite vaporisé avec deux couleurs d'encres : orange et rose.

J'ai coloré un morceau de tissu blanc à l'acrylique jaune. Une fois sec, découpez-le à la Big Shot. Pour plus de facilité mes deux feuilles sont agrafés.

Pendant que mes fonds sèchent, j'ai découpé la seconde partie de mon titre "Family" dans du cardstock blanc.

Le mot "Crazy" est colorisé en rose fluo.

Ma page est ensuite complétée avec des tags teintés et des stickers.

Elle sera ensuite éclaboussée avec du café.

J'espère que ma création du jour vous donnera envie de vous mettre à la couleur !

Très bonne journée à vous

Karine


In a spin with my pinwheel quilt

$
0
0


Hello again - I hope those of you in the UK enjoyed the Bank Holiday weekend - I decided to spend a part of the time trying to tidy and sort my sewing room - and 3 hours later I decided that I probably need to move into a larger room! so over the next couple of weeks I intend to do that - I'll let you know progress!
I have also managed to make quite a bit of progress on the tessellating pinwheel quilt for Oona.
As each block links into the surrounding blocks I had to lay all the blocks out before I could stitch them together - here it is part done ,

It is much easier to create a pinwheel quilt with half of the pinwheels in the same fabric to form a background - but I really like this random effect and think it's worth the extra time and effort to create. Take time to make sure that you are joining each block in the right order.
I  made 35 blocks to create a 5 x 7 block quilt centre - 40" x 56".
 
I'm really pleased with the result, and I've enjoyed piecing the blocks because the fabric is so precisely cut with the Big Shot and Bigz Dies. 
I would like the quilt to be a bit bigger, so I am going to audition some plain fabrics to see which colour enhances the quilt the most, and then I will finish with a pieced binding using the small left overs from the fat quarters - but that will have to wait until next week.
I hope you'll look in again next week to see if the quilt is finished - and if I've made any progress on moving my sewing room!
Enjoy your weekend.
Angela 

Card Inspiration: how to create a background

$
0
0

Good morning crafty friends! It's Annahere to share some ideas using Sizzix products.
I wanted to share the details on the card I created this week. I have a short tutorial on how I made my background.
I know that scrapbook papers are everywhere and very reasonably priced but sometimes it is nice to create something yourself. In this way you can match the paper exactly to your project in terms of colour and design.
I am using the new dies of “Life Made Simple” collection.

cafe creativo - sizzix big shot - scrapbookimg card chalk (1)

I colored a sheet of light blue cardstock with my simple chalks, using three colors.
Rub the cotton wool over your paper. Chalks tend to give a lovely soft finish, which is quite unique. Block the color with a lick of paint, transparent or glitter.
Die-cut hearts background out of white cardstock.
Die-cut the Basic large rectangle from the painted paper and die-cut the card base.
Adhere the painted rectangle to card front and apply the hearts background.
Add two flags and the sentiment.

cafe creativo - sizzix big shot - tutorial - scrapbookimg card chalk
 
I love using chalks in my card making. I hope you like the project I shared with you.
Thanks so much for joining me today
 
Items used:

cardstocks
scrap of patterned paper
chalks
sequins
twine
cotton wool
 
cafe creativo - sizzix big shot - scrapbookimg card chalk (2)
 
**************************************
Flag_of_Italy
Per le amiche italiane! :)

Ciao, sono Anna e sono qui per condividere alcune idee utilizzando i prodotti Sizzix.
oggi vorrei condividere una card che ho creato questa settimana. Ho anche un breve tutorial su come ho realizzato il mio sfondo.

So che le carte da scrapbooking sono bellissime e si trovano in giro a prezzi molto ragionevoli, ma a volte è bello creare qualcosa da sé, completamente, partendo dallo sfondo. In questo modo è possibile abbinare esattamente lo sfondo al progetto in termini di colore e forma.
Per questo progetto ho usato alcune fustelle di “Life Made Simple” collection.

Come ho fatto:
Ho colorato un foglio di cartoncino celeste con i miei semplici gessetti, quelli da lavagna, utilizzando tre colori.
Strofinare un batuffolo di cotone sopra lil colore, per sfumare. I gessetti tendono a creare una bella texture morbida, che è abbastanza unica nel suo genere. Se volete potete fissare il colore con una mano di vernice trasparente o glitter, come ho fatto io.
Fustellare con la Big Shot uno sfondo a cuori su cartoncino bianco.
Prendere lo sfondo colorato e ritagliare un rettangolo con bordi arrotondati, usando le fustelle base della collezione. Allo stesso modo tagliate un cartoncino piegato a metà per creare il biglietto base.
Incollare il rettangolo dipinto sul fronte della card e applicare sopra lo sfondo a cuori.
Aggiungere due bandiere e il vostro augurio.
 
Devo dire che mi piace usare gessetti nei miei lavori con la carta ed erano molti anni che non li usavo più.
Sto già realizzando un'altra card simile con questa tecnica.

Spero che vi sia piaciuto il progetto che ho condiviso con voi.
Grazie per essere passati di qui
 
Materiali:
cartoncini
ritagli di patterned paper
gessetti
pailletttes
twine
batuffolo di cotone


Rectangles and squares

$
0
0


What about your week ?  Mine was flying and here I´m again with a new project for Sizzix.
This time I came back to the squares and rectangles dies to try a new quilt.
I like to combine  different options   and I wanted to do something simple and maybe some modern like the last modern quilts that are being a lot of popular.


Supplies


658324
Sizzix Bigz XL 25" Die - Squares, 2" Finished (2 1/2" Unfinished)

657605 ( 659837 new code )

Sizzix Bigz Die - Rectangle, 2" x 4" Finished (2 1/2" x 4 1/2" Unfinished)656847  Sizzix Accessory - Cutting Pads, Bigz XL 25", 1 Pair

657900Sizzix Big Shot Machine Only (Powder Blue & Teal)

White fabric
Print fabric 


I started  cutting a lot squares and rectangles in two different fabrics. This is only an  idea , you can use two prints, one of them   lighter for example.

The thing is very simple , just  sew  one rectange to a square  and  go on.
 I choose  six squares. All of mine are the same fabric but you can sew fabrics with different prints  , same scheme of color ....


I spent some time sewing a sewing  until I liked the size. 
Now it will be time to finish  all  the rows and think in a border and maybe a background and more about quilting. Some idea ? 


Using these dies you   can get  a bunch of pieces of fabric ready to sew. It ´s amazing how quick is this process and I love it. 
I hope you like  this new project that I  want to finish soon. 

Hope you have a wonderful weekend!!!I can ´t believe we are in June so soon!!

Love


Mercedes

..................................................................************* .................................................................. 


¿ Qué tal os ha ido la semana ? La mía se ha ido volando y ya estoy otra vez aquí con un nuevo proyecto para Sizzix.
Esta vez  he vuelto a los cuadrados y rectángulos para probar un nuevo quilt. Me gusta combinar diferentes opciones y quería  hacer algo  sencillo y simple al estilo de los últimos quilts de estilo moderno que parece están siendo más populares.

Empecé cortando un montón de cuadrados y rectángulos en dos telas diferentes . Esto es solo una idea porque puedes combinar telas  en las que una sea la más clara.
La cosa es bien sencilla, solo tienes que coser un cuadrado a un rectángulo y así continuar hasta que tengas una tira lo suficientemente larga como a tí te guste.
Mis cuadrados son del mismo estampado pero puedes escoger telas  que sean diferentes  o el mismo tipo de color.

Después de estar cosiendo y cosiendo , conseguí tener una medida  adecuada. Cada tira tiene seis cuadrados.
Echa un vistazo a las fotos y te darás  una idea del montaje y dirección  de los bloques.

Una vez que están todas las tiras cosidas , toca ahora  hacerlo unas a otras . Tengo que pensar en un borde , la trasera y el acolchado. ¿ Se te ocurre alguna idea ?

La verdad es que usando estos troqueles puedes conseguir un montón de bloques listos para coser en menos que canta un gallo.
Espero que te guste este nuevo proyecto que ya estoy deseando ver acabado.

Materiales :


658324

Tela blanca
Tela estampada


Que tengas un maravilloso fin de semana.
No me puedo creer que ya esté junio aquí encima .
Cariños
Mercedes 


"Men and kids" layout

$
0
0


Hello all!

Today I would like to share with you my new layout. I used several dies for this men's LO but the amazing dies and butterflies make it look very soft and touching. On the whole I think that men always look very touching when dealing with kids - on photos or in life)) Besides the kids on this photo do not belong to the men... The elder one is mine, the other one is a baby-girl - a daughter of a neighbour.... Though each of this men has 3 children of their own!))


Here are the products I used:


Have a nice day!

Regards,

Всем привет!

Это моя новая страничка. Для оформления этой мужской странички я добавила бабочек, чтобы она смотрелась еще более трогательно и нежно. Вообще, на мой взгляд, мужчины всегда смотрятся очень трогательно, когда они рядом с детьми - и на фото, и в жизни. Самое интересно, что на фото эти мужчины держат не своих детей - старший мой, младшая девочка - соседский ребенок. Но, тем не менее, у каждого из них есть трое своих детей))

Всем хорошего дня!!

Botanical Flourish Card

$
0
0


Hi there,

It's been a while since I have posted a new project - the last few weeks I have been travelling through New Zealand! This was my 5th time teaching craft classes in New Zealand, I really love it there! This was also the first time I was able to really explore the country. So it was a fabulous trip!

Back onto the crafting I have to share today, it's a simple card, perfect for those times you need a beautiful card to send to a friend.


Instructions:
1. Stamp the Darkroom Door Grid Background Stamp onto a folded card using Archival Magenta Hue ink pad.
2. Trim two images from the Darkroom Door 'Viva La Flora' Montage sheet and adhere to the card using double sided adhesive.
3. Die cut a label using the Banner & Borders Thinlits #658788 using light pink cardstock. Stamp a sentiment onto the label from the Darkroom Door 'Etched Flowers' Rubber Stamp Set using Archival Jet Black ink pad. Adhere to the card using 3D foam adhesive.
4. Die cut some green foliage using the Botanical Flourish #658226 die and tuck it in behind the label. Adhere it to the card using small dabs of wet glue.

Supplies used:
Sizzix Originals Die: Botanical Flourish #658226
Sizzix Thinlits Die: Banner & Borders #658788
Darkroom Door Rubber Stamp Set: Etched Flowers DDRS088
Darkroom Door Background Stamp: Grid DDBS037
Darkroom Door Montage: Viva La Flora
Archival Ink: Magenta Hue, Jet Black
Pink & Light Pink Cardstock

Hope you enjoyed this small project today! I look forward to sharing more with you soon!

Rachel

Some quick cards with 'Life Made Simple' dies.

$
0
0


Hi there and a great Sunday afternoon to you!!
I have made two cards that I would like to show you today. They are pretty clean and simple, at least for me ;-)


The first one is based on a journaling card on top of the woodgrain base and then some pieces die cut with the 'Life Made Simple' basics. I think those speach bubbles are very sweet. Of course I had to use my fave flower die on this card as well!!

For number two I used the basics set again, and the 'Life Made Simple''Smile for the Camera' set. These are so cool and funky!


Sizzix products used:

658300 Sizzix Big Shot Starter Kit (Powder Blue & Teal)

659747 Sizzix Thinlits Die Set 8PK - Basics 

659755 Sizzix Thinlits Die Set 3PK - Smile for the Camera

656640 Sizzix Bigz Die - Tattered Florals

Other products:

I used papers from the French manufacturer Les Papiers de Pandore , Prima flowers, Rangers liquid pearls, colour Bisque, Papirdesign paper doily.

---------------------------------------------------------------------------------------------------------------------------

Hej hej och god söndag till er alla! Idag har jag gjort två kort i en rätt så 'clean' stil, allafall om man jämför med hur jag oftast scrappar.

Det första har jeg byggt upp på toppen av ett journalkort och med en woodgrain bakgrund. Sedan har jag skurit ut några delar med 'Life Made Simple' basics. De där pratbubblorna är jättesöta tycker jag!! Och såklart måste jag ha med min favoritt die för att göra blommor, Tattered florals!

För kort nummer två använde jag 'basics' igen men även 'Life Made Simple''Smile for the Camera'. Dessa diesen är bara såå jättecoola.!

Sizzix produkter:

658300 Sizzix Big Shot Starter Kit (Powder Blue & Teal)

659747 Sizzix Thinlits Die Set 8PK - Basics 

659755 Sizzix Thinlits Die Set 3PK - Smile for the Camera

656640 Sizzix Bigz Die - Tattered Florals

Andra produkter:

Jag använde papper från franska Les Papiers de Pandore , Prima blommor, Rangers liquid pearls, i färgen Bisque, Papirdesign doily.


having fun with hexies!

$
0
0


 A very enjoyable day was spent at Oh Sew Sweet Shop in Barnsley this past Saturday. I had a class of ladies all learning how to english paper piece, using the Big Shot to cut their papers.


It's always great to watch them use a Big Shot for the first time, the look of amazement as it magically turns paper or fabric into shapes!


If you are local to Barnsley in South Yorkshire then why not sign up for Angela's half day class this Thursday. Give the shop a call on 01226 386863


Let's celebrate!

$
0
0
Hi everybody!

There is always a reason to celebrate: a birthday, anniversary, father's day... and today I want to share with you a tag that can be used as a card.


I love this cupcake die. You can make different thing with it and use it in many ways. This time I put some pattern paper behind each section to create a "paper pieced" effect, but much easier :)


Happy Monday!

...............................

¡Hola a todos!

Siempre hay alguna buena razón para celebrar algo: un cumpleaños, aniversarios, fiestas varias... Hoy os enseño un tag que puede ser utilizado como tarjeta en estas ocasiones.

Me encanta este troquel de cupcake. Lo podéis utilizar de muchas maneras y para muchas cosas. Hoy simplemente he puesto trocitos de papel decorado detrás de cada parte para conseguir un efecto de "paper piecing" pero muchísimo más fácil y rápido.

¡Feliz lunes!


..for you...

$
0
0

Hi everyone...hope you had a great week... today I have a "PostCard" to show you.


Supply list:
657900 Sizzix Big Shot machine
659430 Sizzix Frameworks Die - Honeycomb 
659426 Sizzix Sizzlits Decorative Strip Die - Bow-Tied
659448 Sizzix Texture Fades Embossing Folders 2PK - Chevron & Lattice Set

Papers: Pion Design - My Precious Daughter, Bazzill
Stamps: Stampers Anonymous Tim Holtz Collection
Inks: Distress ink Pad - Pumice Stone
Other: Cheesecloth, Seam Binding Ribbon, button, 3D foam

How to do:
Cut out card in cardstock and patterned paper 16x14cm
Die cut frameworks in patterned paper with  Sizzix Frameworks Die - Honeycomb 
Glue framework to the main card over some cheesecloth. Glue motif in the front with 3D foam.
Die cut bow in patterned paper with Sizzix Sizzlits Decorative Strip Die - Bow-Tied

Glue the bow in front.

Backside of the PostCard
Emboss patterned paper with Sizzix Texture Fades Embossing Folders 2PK - Chevron & Lattice Set
Glue it to the main card. Add a journal card and a bow.


Wish you a great day and thanks for stopping by ♥
Anne Kristine

♥♥♥♥♥♥

Heisann...håper du har hatt en fin uke...i dag har jeg laget et "postkort".

Materialer:
657900 Sizzix Big Shot machine
659430 Sizzix Frameworks Die - Honeycomb 
659426 Sizzix Sizzlits Decorative Strip Die - Bow-Tied
659448 Sizzix Texture Fades Embossing Folders 2PK - Chevron & Lattice Set

Papir: Pion Design - My Precious Daughter, Bazzill
Stempler: Stampers Anonymous Tim Holtz Collection
Inks: Distress ink Pad - Pumice Stone
Annet: Osteklut, Seam Binding bånd, knapp, 3D puter

Beskrivelse:
Skjær et kort i kartong og mønsterark som måler 16x14cm
Stans ut "frameworks" i mønsterark med  Sizzix Frameworks Die - Honeycomb 
Limes til hovedkortet over osteklut. Lim motivet med 3D puter i front
Stans ut sløyfe i mønsterark med Sizzix Sizzlits Decorative Strip Die - Bow-Tied

Lim sløyfen i front.

Baksiden av postkortet:
Emboss mønsterark med Sizzix Texture Fades Embossing Folders 2PK - Chevron & Lattice Set
Limes til hovedkortet. Lim på et journalkort og sløyfe.

Ønsker deg en herlig dag og takk for at du stikker innom her ♥
Anne Kristine


LIFE ISN'T

$
0
0
Hi everyone
I hope you all had a great week, today I have a card to show you using some of Tim Holtz dies
 
Itemes used:
Supply list:
Paper: Studiolight-Tres chic-, Shabby chic-
Stamps: Kaisercraft clearstamps-Today-
Ink: Archival ink-Watering can- and  Distress ink-Vintage Photo- from ranger
3D foam
How to make:
I made a cardbase 14,5x14,5 cm , patterned paper 14,2x14,2 cm and one 13x13 cm, decorate using Bow tied and Chevron dies.
 
Thanks for stopping by, wish you a great week
Pia
Hej alle
Jeg håber du har haft en skøn uge. I dag vil jeg vise et kort hvor jeg har brugt Tim Holtz dies.
Sizzix dies jeg har brugt:
Andre materialer:
Papir: Studiolight-Tres chic-, Shabby chic-
Stempler: Kaisercraft clearstamps-Today-
Ink: Archival ink-Watering can- and  Distress ink-Vintage Photo- from ranger
3D foam
Fremgangsmåde:
Jeg har brugt en kort base på  14,5x14,5 cm , mønstret papir14,2x14,2 cm og et andet på13x13 cm, Dekorer med de udstansede sizzix dies
Tak fordi du kiggede forbi, ønsker dig en dejlig uge
Pia

Wedding card

$
0
0

Hello to all:) Here is my new card for you... Wedding card. I wanted to make something really different than usually, clean and simply card; no flowers, lace, many layers, distressing or anything what I often use in my cards. This one is made for Wedding couple but I think this is as good f.e. for invitation card:)


Sizzix products:
Sizzix Big Shot Starter Kit (Powder Blue & Teal) 658300
Sizzix Textured Impressions Embossing Folders 2PK - Swirls, Butterflies & Dragonflies Set 658077

Other supplies:
Pion Design papers: Fairytale of Spring
cardboard
outline sticker "Wedding couple"

How to do:
1. Cut the patterned paper to size 11 cm × 14,5 cm and emboss it using Sizzix Textured Impressions Embossing Folders 2PK - Swirls, Butterflies & Dragonflies Set 658077.
2. Cut the next patterned paper a little bit bigger than the embossed and the third paper continues to bigger than these two:) Place them on top and sew the edges.
3. Place the papers on your cardboard (size 14 cm × 17 cm) usind doublesided tape.
4. Cut the paper strip to size 13 cm × 3 cm and tape it horizontally.
5. Cut the hearts using the dies included Sizzix Big Shot Starter Kit (Powder Blue & Teal) 658300.
And place them like above usind 3d pillows. Add the outline sticker.

Happy crafting,Minna

*  *  *  *
Keskiviikko ja uusi kortti:) Halusin tehdä vaihteeksi jotain ihan erilaista mitä yleensä eli sellaisen simppelin kortin ilman mitään mielettömiä koristuksia. Tästä tuli kortti hääparille mutta miksei kävisi vaikkapa kutsukortistakin.

Sizzix tarvikkeet:
Sizzix Textured Impressions Embossing Folders 2PK - Swirls, Butterflies & Dragonflies Set 658077

Muut tarvikkeet:
Pion Design papereita: Fairytale of Spring
korttipohja
ääriviivatarra "Hääparille"

Kuinka teet tämän kortin:
1. Leikkaa kuviopapari 11 cm × 14,5 cm kokoiseksi ja kohokuvioi käyttäen Sizzix Textured Impressions Embossing Folders 2PK - Swirls, Butterflies & Dragonflies Set 658077.
2. Leikkaa toinen kuviopaperi hieman suuremmaksi kuin kohokuvioitu ja kolmas edelleen hieman isommaksi kuin nämä kaksi. Aseta kaikki kolme paperia päällekkäin ja ompele reunat.
3.Teippaa paperit korttipohjalle (koko 14 cm × 17 cm)
4.Leikkaa paperisuikale  13 cm × 3 cm ja kiinnitä se vaakasuoraan korttiin.
5. Stanssaa sydämet stansseilla jotka sisältyvät settiin Sizzix Big Shot Starter Kit (Powder Blue & Teal) 658300 . Kiinnitä ne 3d tarroilla kuten kuvassa. Lisää lopuksi ääriviivatarra.

Hauskaa keskiviikkoa,Minna

Viewing all 2033 articles
Browse latest View live