Quantcast
Channel: Crafting ideas from Sizzix UK
Viewing all 2033 articles
Browse latest View live

Oval shaker

$
0
0


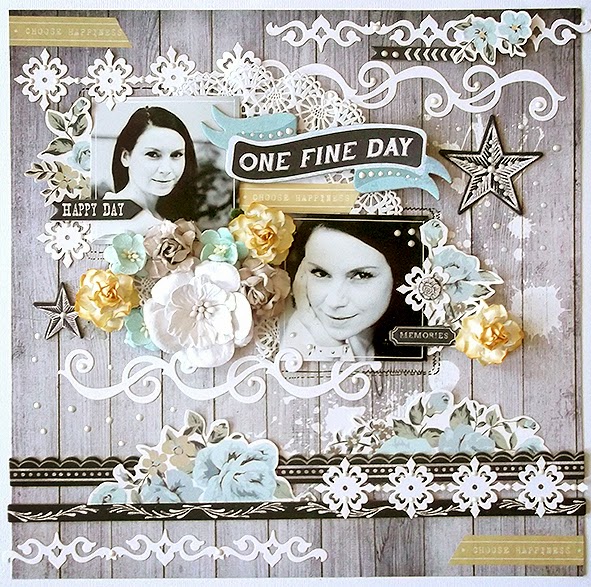
This week I wanted to show how you can use basic shapes to make your own shaker boxes to be used on cards or other projects.
 

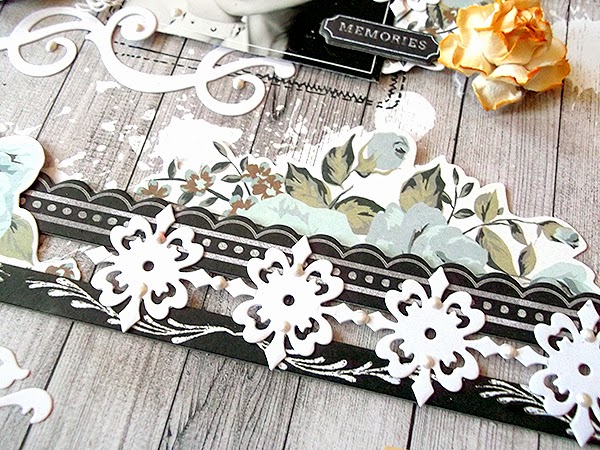
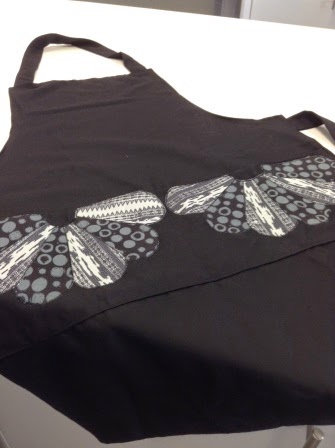
I used a scallopped and a plain oval to make my shaker element and then I decorated it with a white oval and a few butterflies. I mounted the whole thing on a piece of cardstock embossed using the Flourish Set embossing folder.


Making a shaker element doesn't have to be difficult.
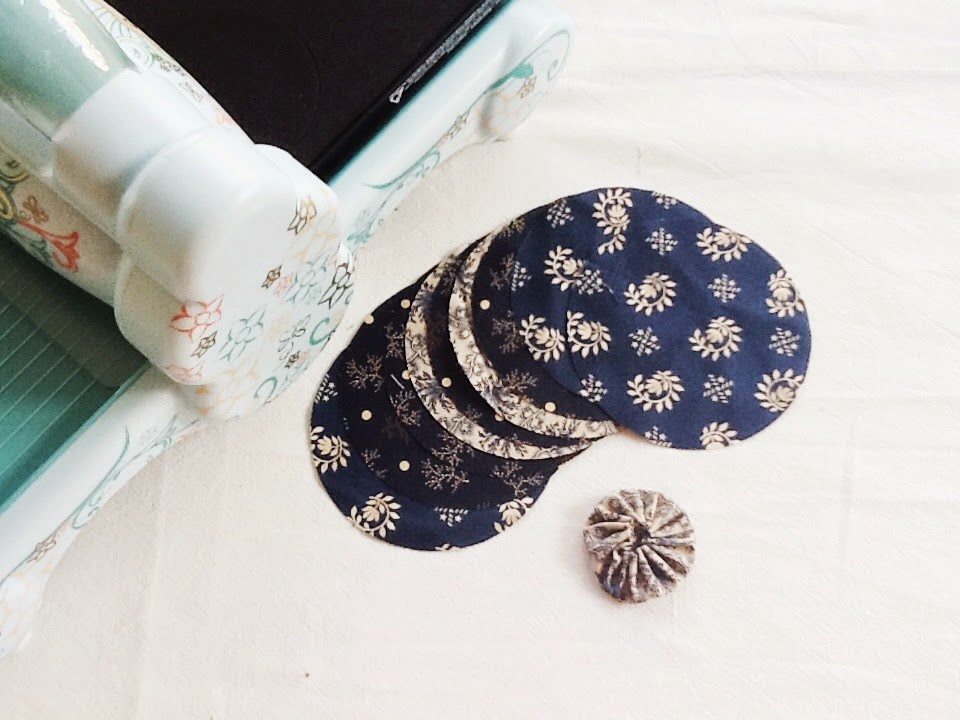
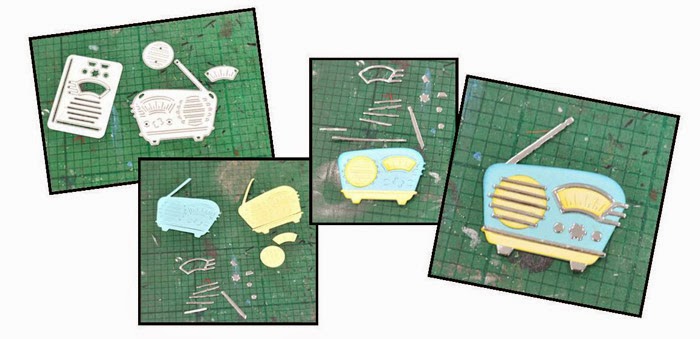
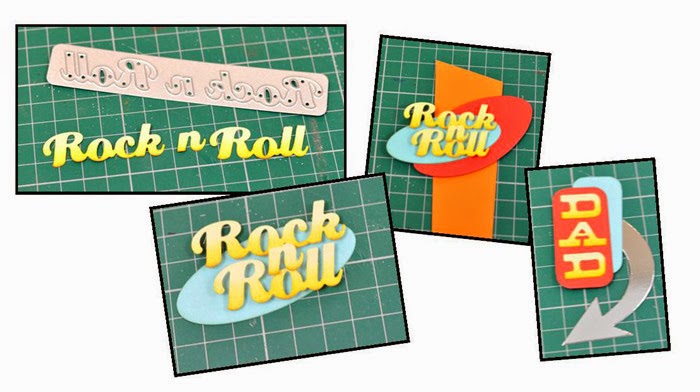
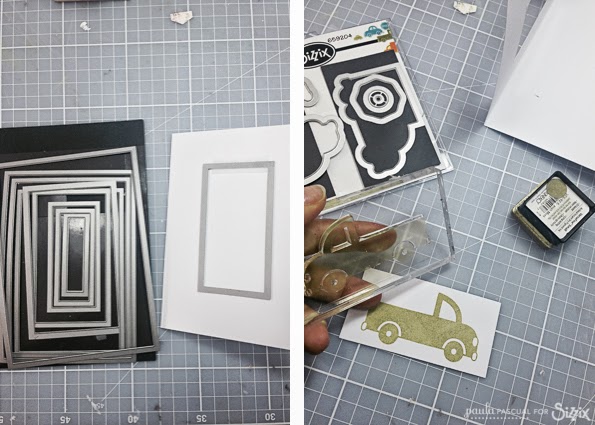
1. Using Sizzix Accessory - Magnetic Platform for Wafer-Thin Dies and two coordinating dies die cut the outer shape of your shaker.
2. Using the same die as you used for the inner circle, and one that is a bit larger, die cut a piece of foam.
3. Make a sandwich consisting of the outer shape, a piece of clear cardstock and the foam shape.
4. The last step is to make a background for the shaker element, stamp on it (if you want to).


Now you fill the shaker with glitter, sequins or other goodies that can move around when the recipient shakes the card. Glueing the background to the foam shape will make the shaker element tight and nothing will drop out of it when it is shaken.

Supply list:
Sizzix Big Shot Starter Kit (Powder Blue & Teal)
Sizzix Accessory - Magnetic Platform for Wafer-Thin Dies
Sizzix Framelits Die Set 4PK - Ovals, Scallop
Sizzix Framelits Die Set 7PK - Ovals
Sizzix / Hero Arts: Flourish Set
Sizzix / Doodlebug: Flutter Friends
Cardstock
Clear cardstock
Stamp: Sizzix, Papertrey Ink
Ink: VersaFine, Papertrey Ink
Glitter etc.

---o---


 I denne uge vil jeg vise jer, hvordan man kan bruge enkle, almindelige former til at lave egne shakerelementer, som man kan bruge på kort eller andre projekter.

Jeg brugte en scallopped og en glat oval til at lave mit shakerelementer, og så dekorerede jeg det med en hvid oval strimmel og lidt sommerfugle. Hele molevitten monterede jeg på et stykke karton, som jeg havde embosset med embossingfolderen fra Flourish Set.

Det behøver ikke være vanskeligt at lave et shakerelement:
1. Brug Sizzix Accessory - Magnetic Platform for Wafer-Thin Dies og to koordinerende dies til at lave omkredsen af dit shakerelement.
2. Brug den die du havde inderst i ovenstående mix sammen med en, der er lidt større, til at udstanse et stykke mosgummi, som skal give shakerelementet højde.
3. Lav en sandwich af omkredsen, gennemsigtigt karton og mosgummi.
4. Sidste skridt er at lave en baggrund, som du kan stemple på, hvis du vil det.

Nu fylder du dit shakerelement med glitter, pailetter eller andre fine sager, som kan bevæge sig, når kortets modtager ryster kortet. Når du limer baggrunden fast på mosgummiet, slutter shakerboxen tæt, og der burde ikke ryge noget ud, når kortet rystes.

Ingredienser:
Sizzix Big Shot Starter Kit (Powder Blue & Teal)
Sizzix Accessory - Magnetic Platform for Wafer-Thin Dies
Sizzix Framelits Die Set 4PK - Ovals, Scallop
Sizzix Framelits Die Set 7PK - Ovals
Sizzix / Hero Arts: Flourish Set
Sizzix / Doodlebug: Flutter Friends
Karton
Gennemsigtigt karton
Stempler: Sizzix, Papertrey Ink
Sværte: VersaFine, Papertrey Ink
Glitter etc.


Hey Daddy-o!

$
0
0

If you said 'Hey Daddy-o!' to a kid today you would get the strangest look, If however you said it in 1956 then you would be a real cool cat!

I love everything about 1950's Americana, the music, cars, guitars and especially the designs and colours that they favoured back then. This week I want to take a look at some new dies released just in time for Father's Day, not that they were designed specifically for that but they are perfect for the man in your life none the less.

If you want to create some 1950's themed Father's Day cards we have some worksheets and free downloadable papers on the website, here is a link

There are four die sets in the range designed by a very talented young lady by the name of Jen Long and I have listed them below so you can click on the link and check them out. There is so much going on in each set which means that they represent great value for money too.

As I mentioned I wanted to create something with a Father's day theme and stick to a limited 50's style colour palette, The juke box is so well thought out as a die that's it hard to mess up (even me!). so I started by cutting all the bits out ready to assemble.


I have shown the steps below in constructing the juke box from start to finish, the trims were cut from metallic gold card.

Here is the finished card, as you can see I used the Boardwalk Decorative Strip alphabet by Tim Holtz and one of the cute border dies from the Thinlits Borders Set by Stephanie Barnard.
I die cut the letters and used Distress Inks to add a gentle tint to their base before mounting onto an asymmetric rectangle of red card before rounding off the corners with a punch. As well as this fab juke box you also get an LP record die and a music notation die (see image above). A perfect set for the music lover in your family.


Next up, I wanted to use the Radio from Vintage Car and Radio set, and if you love this cute little radio you'll flip when you see the car (Maybe next week?). I die cut the radio from blue and cream card and all the other bits from silver metallic card before mounting them all together as shown. The dies are so well designed, I can't tell you how much fun they were to use.

Next, I die cut the 'Rock 'n Roll' phrase from cream card and inked the base to add a little contrast before mounting onto a die-cut oval ( Oval Framelits set), next I added a larger red oval and mounted it all onto an asymmetric orange strip.

I die-cut the letters to spell out 'DAD' and inked them as before and attached them to a rectangle of red card before rounding off the corners. I attached this to a similar blue rectangle and die-cut an curved arrow from silver card using the Bigz Artful Arrows die by Tim Holtz, a die which has no fewer than 12 different arrows to choose from.

Here's the finished card, you can see I've also added another arrow, some tiny adhesive pearls and some check card thrown in for good measure. I might make a few more next week...Too much fun!!!


Love Layout by Karine

$
0
0


Hey!

Let’s be romantic today! Soft pastel colours are used to wrap up this picture of us

Supply list:

Papers: Crate Paper
Cards: Webster's Page
Brads: American Crafts
Stickers: Studio Calico, Basic Grey
Masking Tape
Others: Tag

Dies:

658300 Sizzix Big Shot Starter Kit
656545 Sizzix Bigz Die-Flowers 3-D
659749 Sizzix Thinlits Die Set 4PK-Forever and a Day

I built my page by gluing cards and labels all around my 6x8 cms picture.

Journaling text is cut out of a white paper scrap. I took off some of the letters, others are complete. I had fun replacing the O of You by a pretty flower cut out of white cardstock.

I worked on my page to obtain a soft atmosphere: tone-on-tone stickers are added and I created little volume.


Have a wonderful day,

Karine

Bonjour !

Une page placée aujourd'hui sous le signe du romantisme. Des couleurs douces et pastels pour mettre une photo de nous :)

Matériel :

Papiers : Crate Paper
Cartes : Webster's Page
Brads : American Crafts
Stickers : Studio Calico, Basic Grey
Masking Tape
Divers : Tag

Dies utilisés :

658300 Sizzix Big Shot Starter Kit
656545Sizzix Bigz Die-Flowers 3-D
659749 Sizzix Thinlits Die Set 4PK-Forever and a Day

Ma page est construite tout simplement en collant des cartes et étiquettes tout autour de ma photo au format 6x8cm.

J'ai découpé mon texte qui fera office de journaling dans une chute de cardstock blanc. Certaines lettres sont retirées d'autres sont complétées. Je me suis amusée à remplacer le "O" de "You" par une jolie fleur découpée dans du cardstock blanc.

Je me suis ensuite amusée à travailler ma page tout en douceur en la complétant avec des autocollants ton sur ton et très peu de volume.

Très bonne journée à vous


Karine.

Pinwheel celebrations

$
0
0


Hello again - I hope you've all had a good week - I have managed to complete Oona's quilt - and am quite pleased with it -
 

I shadow quilted the pinwheel shapes.
Using the Big Shot and Strip die 658328 http://www.sizzix.co.uk/product/658328/sizzix-bigz-xl-25-die-strips-2-1-2-wide I cut 6 strips of orange stripey fabric for the binding.
I just have to slip stitch the binding to the back of the quilt and maybe add some quilting in the borders, which are 4 1/2" wide.
Now I'm going to make another quilt using the same die - http://www.sizzix.co.uk/product/658661/sizzix-bigz-die-tessellating-pinwheel-4-1-2-assembled to make a quilt with elephants on it for Abi, big sister aged 3.
I was going to make a quilt for Eve who is 5 but she has just started making her own quilt - photos and progress reports to follow!!
as for progress on my sewing room - the sorting and tidying still continues - but I am going to try re-organising before moving room - it will be so much quicker !
today I've been to run 2 workshops at Oh Sew Sweet Shop nr. Barnsley - we had a lot of fun -
 
and of course I had to buy some fabric!!!
That's all for now until next week, enjoy your weekend.
Angela


Pure white borders die-cuts

$
0
0


Hello Sizzix fans! Today is my turns to inspire you with brand new Sizzix project! 
For today's post I made a layout about the one amazing day I spent a year ago with lots of my friends. The photos were taken by my talented friend and I love it. This time I reached for the filigree border dies - Thinlits Die Set 4PK - Borders. I just love the design of the all Thinlits dies, as I am lace lover, so they are absolutely in my taste. 


My idea for decorate a layout is using these stunning borders in a pure, white color for the layout background arrangement. Very often we cut out die cuts of colored paper, usually from patterned scrapbook paper. Surprisingly, however, how beautiful small delicate patterns looks in pure white! 


I cut out all 4 borders from the set 2 times and I used them to make lacey composition on woodgrain background. I would recommend the use of white die cuts on a contrasting background, then it is definitely better to highlight their beautiful shapes. 


Borders can successfully substitute cotton fabric lace and other trims. In addition, you can color in any way - using ink mists, paints, chalks and other mediums. I most like the white version, because look great and besides, it's really fast way to design eye-catching decoration.

Sizzix supplies used:


Thank you for visit us today! 
Have a wonderful weekend! 
~~ Karola ~~ 

****************************


Witajcie polskojęzyczni fani Sizzix-a! Dziś moja kolej aby zainspirować Was całkiem nowym sizzixowym projektem! Do dzisiejszego posta przygotowałam layout, ze zdjęciami zrobionymi przez moją zdolną koleżankę, podczas jednego ze wspaniałych dni, w ubiegłym roku. Tym razem sięgnęłam po delikatne, koronkowe bordery z zestawu Thinlits Die Set 4PK - Borders. Uwielbiam wszystkie wykrojniki Thinlits, jako, że jestem nieustannie zakochana w koronkach, a te wykrojniki są po prostu idealnie w moim guście. Mój pomysł na ozdobienie scrapa to wykorzystanie delikatnych borderów w czystej, białej postaci, konkretnie do wypełnienia tła. Bardzo często wycinamy wykrojnikami z kolorowego papieru, najczęściej z wzorzystego papieru do scrapbookingu. Jednak zaskakujące jak pięknie wyglądają wszelkiego rodzaju drobne wycinanki w bieli! Ja wycięłam dwukrotnie wszystkie 4 bordery z zestawu, aby stworzyć koronkowe motywy na tle z motywem drewna. Polecam wykorzystanie białych wycinanek na kontrastowym tle, wówczas zdecydowanie lepiej podkreślimy ich piękne kształty. Bordery mogą z powodzeniem zastąpić nam koronki czy inne tasiemki z tkaniny. Dodatkowo, wycięte z papieru bordery, możemy dowolnie kolorować - za pomocą tuszy, mgiełek, kredy czy innych mediów. Moja ulubiona wersja to czysta biel, ponieważ w tej postaci bordery wyglądają przepięknie a jednocześnie jest to naprawdę szybki sposób na stworzenie efektownej dekoracji w projekcie. 

Wykorzystane produkty Sizzix:


Dziękuję za dzisiejsze odwiedziny na naszym blogu i życzę Wam 
wspaniałego, kreatywnego weekendu! 
~~ Karola ~~

A Vintage wool bag with crocheted lace.

$
0
0


Lately I could  get some new cotton to crochet . I love crocheting too and  just in a moment I thought I needed a bag for  my balls. And here it is  a nice and vintage little bag. This is my project for this week using Sizzix dies.
I sew hexies again but this time smaller. They are in  front of it. I crocheted some ending lace too  and a ribbon  to close the bag,  just with the new cotton that it is inside. 
I ´m very happy with the  end result , what´s your opinion ?


Here  they are the supplies :

658317


658318


657900


Two pieces of polka dots fabric ( pink ) 10" x 14"
Two pieces of polka dots fabric ( blue ) 10" x 14"
Fabric for the hexagons , mine are from the Mary Rose collection from my stash.
Two pieces of batting , same size before
White Thread cotton 8 for quilting
Lace , mine is  the pattern #75 from the book " Around the corner Crochet Borders "
Ribbon


But let the pics talk.
Choose your fabric for the hexagon. Here I  have chosen a nice rose that I have put in the middle.
Use your favourite method to sew them and do the flower.


Aplique the sew hexagon with the same color thread of your flower,  mine is white , to the pink fabric.
Don´t forget to get the flower in the middle and botton.


Add one piece of batting in the same size of the pink fabric  and to do quilting with the 8 cotton thread around  the hexagon and in the  middle of the flower.

Pin the lace down and some more for the ribbon letting 4" from the top.


Sew around, and take out the bag. Press.


Sew the  two blue fabrics around right face down. This will be the lining.

Now take a look to the pics to sew  the lining inside.


Put inside  the pink bag , the blue one  and press again. 
You will have the bag finished. 


I  will spend  my weekend crocheting with my new bag . Now I have got a very  vintage and chic bag for my wools. 


Hope you have a wonderful weekend!
Love
Mercedes


..................................................................************* .................................................................. 


Hace poco que conseguí unos ovillos de algodón para  hacer algo de ganchillo. También me encanta hacer crochet y en un momento pensé que nccesitaba una bolsa para guardarlos. Así que aquí está mi proyecto de esta semana usando los troqueles de Sizzix, una  bonita y vintage bolsa.
De nuevo he usado los hexágonos pero esta vez algo más pequeños. También tejí una puntilla  y una cinta en el mismo algodón que había comprado y que guardaría dentro.
Estoy muy contenta cómo ha quedado, ¿ qué te parece ?

Los materiales que he necesitado han sido:

658317

658318

657900


2 piezas de tela de lunares ( rosa ) de 25. 5 x 35.5 cm
2 piezas de tela de lunares ( azul )  de 25.5 x 35.5 cm
Tela para los hexágonos, la mía es de la colección de Mary Rose
2 piezas de guata de la misma medida de la tela.
Hilo de algodón del número 8 en blanco , para acolchar
Puntilla , la mía está tejida usando el patron 75 del libro “ Around the corner Crochet Borders “
Cinta para cerrar la bolsa , la mía está tejida a dos vueltas de punto bajo.


Echa un vistazo a las fotos para hacerte una idea.
Elige tu tela para los hexágonos. Yo he seleccionado una rosa que he centrado al cortarla con el troquel.Cose formado la flor   con tu método favorito.

Aplica con hilo del mismo color de la tela de los hexágonos. Recuerda centrar la flor en la parte inferior de la tela rosa dejando 5 cm desde el borde inferior.


Añade una pieza de guata debajo y haz el acolchado alrededor y en el centro de la flor. Sujeta con alfileres la puntilla y las presillas para la cinta  hacia adentro , dejando  10 cm de separación desde el borde superior.
Cose alrededor de los tres lados , saca hacia afuera y plancha.
Cose las dos telas azules revés con revés por tres lados  y echa un vistazo  cómo he colocado y cosido  el forro interior con la tela azul.
Por ultimo  mete hacia adentro  el forro y vuelve a planchar. Tendrás tu bolsa acabada.

Como puedes imaginar mi fin de semana lo pasaré  crocheteando. Ahora tengo una pequeña bolsa vintage y chic para mis lanas.

Que tengas un maravilloso fin de semana.
Cariños
Mercedes


A lilac card for my best friend

$
0
0


Hello all!

Today I would like to show you my new card and the flowers I created using amazing Sizzix dies. I often use roses in my Sizzix projects but this time I also created new flowers with no name))
I also used my favourite palette - yellow, green and lilac colours.


Here they are:


I cut out 6 petals, stuck them altogether in the center and made a round hole to put stamens through the hole.
Sounds very simple and it really is. Next time I'll show you the way I did this.


These are the products I used:

Sizzix Frameworks Die - Honeycomb


Sizzix Big Shot Starter Kit (Powder Blue & Teal)


Use the dies and have fun!!
Have a nice day))

Olga

Всем привет!

Сегодня я хочу показать вам новую открыточку с разными цветочками, которые я сделала с помощью ножей Sizzix. Я часто использую розочки в своих работах, но на этот раз я решила создать новые цветочки. Делать их очень просто: я вырезала 6 лепестков, склеила их и в центре сделала отверстие для тычинок. Вот и все - цветок готов)) Их и правда несложно делать и в следующий раз я покажу процесс создания таких цветов.

Всем чудесного дня! 

Ольга

Follow the #PaperTrail!

$
0
0
Hi everyone- I am off on an exciting adventure and hope you will join me!
On June 2, I packed up my 1976 Serro Scotty camper with crafty supplies and vintage suitcases filled with inspirational samples. For four weeks, I will be visiting and stores in the northeastern US and teaching classes using my Sizzix product line.

Here's Scotty...


In addition to teaching, we will be stopping at events along the way, like the Country Living Fair in Rhinebeck, NY, which we attended yesterday. I'll also be visiting and interviewing some of my celebrity crafter and blogger friends.

I am on Day 6 of the trip and hope you will join me along the way. You can come to my blog where where I update each day's adventures, and if you follow me on Facebook, Twitter and Instagram you will see BTS (behind the scenes) pics and videos.

Scotty developed two leaks so we have had to juggle the schedule until repairs can be made. Caulk is my friend! But that is life on the road...

Hope to see you on the #PaperTrail!


Bente's shabby chic page

$
0
0


Hi there.
Today I have a shabby chic scrapbook page to share with you.
I primed my bautiful paper with gesso and a little mist using a stencil as well for added texture.


I cut two large circles using decorative scissors and stitched them to my paper. With a paintbrush I added gesso diluted with water to tone down the background music pattern. It could esily look very busy. I cut and embossed a smaller circle and used it as a mat for my two photos.


I made these gorgeous flowers in two sizes with the Tattered Florals die set that I love. It is just soo good for when you need some flowers to tone in with your papers.


I made my flower clusters tying in a swirly chipboard piece and also a light blue lace ribbon rosette.


I also fussy cut some pretty butterflies from a matching patterned paper using the Susan's Garden Tool Kit which has become one of my absolute favourites to use when I craft. All the tools in the kit are really very useeful!


Thanks for looking and I hope you'll enjoy the rest of your day!! :-)

I used these Sizzix products for my page:
Sizzix Big Shot starter kit (Powder Blue and Teal)
Sizzix Accessories Susan's Garden's Tool Kit
Sizzix Bigz Die, Tattered Florals
Life Made Simple, Sizzix thinlits basic set (I used the small heart)

Patterned papers: Inkido Beautiful Memories, Spring Time
Mini roses: Papirdesign
Lace: Papirdesign
Other flowers Prima, Petaloo
----------------------------------------------------------------------------------------------------------------------------

Hejsan!
Idag har jag en shabby chic scrapbooking layout att visa er.
Jag preparerade det vackra papperet med gesso och lite mist och använde dessutom en stencil för att skapa lite mera tekstur.
Jag skar ut två större rundlar med mina dekorativa saxar och sydde dom fast på papperet med min symaskin.Jag spädde ut lite gesso med vatten och målade lite på musikpapperet för att göra mönstret lite mera diskret. Jag ville inte att mönstret ska ta för mycket uppmärksamhet. Jag skar ut en mindre cirkel som jag embossade och använde som matta för mina två foton.
Sedan gjorde jag dessa underbara blommor i två storlekar med Tattered Florals Bigz dies so jag ju är sååå förtjust i! Denna die är ju helt perfekt när du vill ha blommor som passar dina papper perfekt!
Jag skapade mina blomsterklungor och blandade in en fin chipboard swirl och en liten ljusblå spets rosett.
Dessutom klippte jag ut några fjärilar från ett matchande papper med saxen som ingår i Susan's Garden Tool kit. Detta kit har snabtbt blivit oumbärligt för mig och jag vill helst inte skapa något utan att ha mina favoritverktyg till hands!! Alla delarna är bara helt suveräna :-)

Tack för att ni tittar inom och ha det så fint under resten av eftermiddagen!!

Jag använde dessa Sizzix produkterna på min sida:
Sizzix Big Shot starter kit (Powder Blue and Teal)
Sizzix Accessories Susan's Garden's Tool Kit
Sizzix Bigz Die, Tattered Florals
Life Made Simple, Sizzix thinlits basic set (Jag använde det lilla hjärtat)

Mönstrade papper: Inkido Beautiful Memories, Spring Time
Mini rosor: Papirdesign
Spets: Papirdesign
Andra blommor: Prima, Petaloo

Card Card for a child!

$
0
0

I can take or leave pick-up cars, but it seems that men like them very much. So when I saw a cars set by Stephanie Barnard (659204 Sizzix Framelits Die Set 8PK w/Stamps - Cars) I knew I would made some cards with it.


I started by creating an aperture on a A6 card with one of the medium sized rectangles (  658610 Sizzix Framelits Die Set 10PK - Rectangles #2). On the left over I stamped the pick up stamp using green ink.


I placed the matching Framelit die over it  and die cut it. I then create a frame using two of the larger rectangles. I attached those to the front of the card.


I die cut the wheels also included on the same set. Then I stamped the message and trimmed it down as a banner.


And this is the finished card. Simple but effective!


Thanks....

$
0
0

Hi everyone... today I have a card to show you.


Supply list:
657900 Sizzix Big Shot machine
659573 Sizzix Sizzlits Decorative Strip Die - Spring Greenery 
656640 Sizzix Bigz Die - Tattered Florals
659436 Sizzix Bigz Die - Garden Greens

Paper: Pion Design - My Precious Daughter, Watercolor cardstock
Stamps: Hero Arts, Unity Stamp
Inks: Distress Stain - Tumbled Glass, Salty Ocean, Peeled Paint, Mowed Lawn, Archival Ink - Jet Black, Manganese Blue
Other: Tulle, Seam Binding Ribbon, Button

How to do:
Cut out patterned paper 15x15 cm.
Color Watercolor cardstock with Distress Stain - Tumbled Glass ,Salty Ocean and water.
Die cut flower with Sizzix Bigz Die - Tattered Florals
Die cut greenery in patterned paper with Sizzix Sizzlits Decorative Strip Die - Spring Greenery 
Color Seam Binding Ribbon with Distress Stain - Salty Ocean
Sew ribbon and greenery to the main card.


Color Watercolor cardstock with Distress Stain - Peeled Paint, Mowed Lawn and water.
Die cut greenery with Sizzix Bigz Die - Garden Greens
Sew a button and tulle on the flower. Glue flower and greenery to the main card.


Color Watercolor cardstock with Distress Stain - Tumbled Glass ,Salty Ocean and water.
Color Seam Binding Ribbon with Distress Stain - Salty Ocean.


Thanks for stopping by ♥
Anne Kristine

♥♥♥♥♥♥

Heisann...i dag har jeg et kort å vise deg...

Materialer:
657900 Sizzix Big Shot machine
659573 Sizzix Sizzlits Decorative Strip Die - Spring Greenery 
656640 Sizzix Bigz Die - Tattered Florals
659436 Sizzix Bigz Die - Garden Greens

Papir: Pion Design - My Precious Daughter, akvarell papir
Stempler: Hero Arts, Unity Stamp
Inks: Distress Stain - Tumbled Glass, Salty Ocean, Peeled Paint, Mowed Lawn, Archival Ink - Jet Black, Manganese Blue
Annet: Tyll, Seam Binding bånd, knapp

Beskrivelse:
Skjær ut et kort i mønsterark str. 15x15 cm.
Farg akvarell papir med Distress Stain - Tumbled Glass ,Salty Ocean og vann.
Stans ut en blomst med Sizzix Bigz Die - Tattered Florals
Stans ut grener i mønsterark med Sizzix Sizzlits Decorative Strip Die - Spring Greenery 
Farg Seam Binding bånd med Distress Stain - Salty Ocean
Sy bånd og grener til hovedkortet.

Farg akvarell papir med Distress Stain - Peeled Paint, Mowed Lawn og vann.
Stans ut grener med Sizzix Bigz Die - Garden Greens
Sy en knapp og tyll i midten av blomsten. Lim blomst og grener til hovekortet.

Farg akvarell papir med Distress Stain - Tumbled Glass ,Salty Ocean og vann.
Farg bånd med Distress Stain - Salty Ocean.


Vintage baby tag

$
0
0
Hi everyone
Today I have a vintage tag to share with you.
Items used:
Supply list:
Paper: Wood texture paper bloc 15x30 from Joy crafts
Ink: Arhival ink Watering Can and Coffee
Stamp: Stempelglede-Vintage baby-
Ribbon, button,embossing creme White / Viva, flowers, embossing Gold and White / Ranger
How to make:
I have die cut a tag using Tag & Bookplates, paint using embossing creme round the edged.Die cut using Courtyard glue to the buttom of the tag, die cut using Ornate Frame embos using gold and White embossing, stamp using the sweet baby glue to the centre of the tag. decorate using ribbon and flowers


Thanks for stopping by, wish you a great week
Pia
Hej alle
Jeg håber du har haft en dejlig Pinse. I dag vil jeg vise en vintage tag
Sizzix dies jeg har brugt:
Andre materialer:
Papir: Wood texture paper bloc 15x30 from Joy crafts
Ink: Arhival ink Watering Can and Coffee
Stempler: Stempelglede-Vintage baby-
Bånd, knapper,embossing creme White / Viva, flowers, embossing Gold og White / Ranger
Fremgangs måde:
Jeg har udstanset Tag & Bookplates, malet kanterne med embossing creme .Udstanset Courtyard limet den til bunden af tagen, udstans Ornate Frame embos med gold og White embossing, stempel med det søde foto af baby lim begge dele til midten af tagen. dekorer med blomster og bånd
Tak fordi du kiggede forbi, ønsker dig en dejlig sommeruge
Pia

Believe in YOURSELF

$
0
0


Hello to everyone:) It`s Wednesday and my turn to show my card I  have done.


Sizzix products:
Sizzix Big Shot Machine 657900
Sizzix Sizzlits Decorative Strip Die - Card Edges, Flower Vines 658073

Other supplies:
Pion Design papers: From My Heart II 6 × 6" , Flower Frames, A Day in May
white and grey corrugated cardboard
flowers
gesso and structure paste
Stempelglede stamp "Believe in yourself"
Distress Ink Walnut Stain
stencil "brick wall"
grey paper yarn
glue

How to do:


1. Apply gesso on to the patterned paper (size 6 × 6") and allow it to dry. Then use brick wall stencil and apply structure paste like in the second picture. Once again allow to dry.
2. Cut the flower vines using Sizzix Sizzlits Decorative Strip Die - Card Edges, Flower Vines 658073
3. Tear a piece of grey corrugated cardboard 5 × 12 cm. Place this and both of the floral vines in the middle of the patterned paper and sew them like in the picture. I also cut the strips (1,5 cm) off both of the sides because it looked better this way.
4. Sew the edges, distress them and add Distress Ink Walnut Stain.
5. Decorate the card now. Place the piece of  (1,5 × 7,5 cm) white corrugated cardboard horizontally in the middle of the card.Take a piece of paper yarn and make the circle (diameter 4 - 5 cm). Glue it on to the white corrugated cardboard. Add the flowers like picture above.
6. Take little pieces of different papers f.e. cut outs from 6 × 6" designs and place them around the flowers. 
7. Stamp the sentiment and glue it under the flowers. Finally add some gesso on to the edges and tape the cover on to the card board.

Have a nice day,
Minna

*   *   *   *

Moi vaan kaikille:) Keskiviikko jälleen ja yksi kortti jonka tein:)

Sizzix tarvikkeet:
Sizzix Big Shot Machine 657900Sizzix Sizzlits Decorative Strip Die - Card Edges, Flower Vines 658073

Muut tarvikkeet:
Pion Designin papereita; From My Heart II, Flower Frames, A Day in May
valkoinen ja harmaa aaltopahvi
gessoa ja struktuuripastaa
kukkia
Stempelgleden leima "Believe in Yourself"
sabluuna "tiiliseinä"
harmaata paperinarua
liimaa
Distress Ink muste Walnut Stain

Kuinka teet tämän kortin.
1. Levitä gessoa taustapaperille (kokoa 6 × 6") ja anna kuivua. Tämän jälkeen tee struktuuripastalla tiiliseinäkuviota sabluunaa apuna käyttäen. Anna kuivua.
2. Leikkaa kukkaköynnökset stanssilla   Sizzix Sizzlits Decorative Strip Die - Card Edges, Flower Vines 658073.
3. Revi pala (5 × 12 cm) harmaata aaltopahvia. Kiinnitä tämä ja kukkaköynnokset taustapaperin keskelle ompelemalla kuten kuvassa. Leikkasin myös 1,5 cm:n suikaleet taustapaperin molemmista reunoista pois koska näytti näin kivemmalta:)
4. Ompele reunat, ressaa ne ja lisää Distress INk mustetta Walnut Stain.
5.Koristele kortti nyt. Ota pieni pala valkoista aaltopahvia (1,5 ×7,5 cm) ja kiinnitä se vaakasuoraan kortin keskelle.Ota pätkä paperinarua ja kieputtele se ympyräksi jonka halkaisija on noin 4-5 cm. Liimaa aaltopahvin päälle. Liimaa myös kukat kuten kuvassa .
6. Ota pieniä paperinpalasia esim. leikattavia kuvioita 6 × 6" papereista ja asettele ne kukkien ympärille.
7. Leimaa teksti ja kiinnitä se kukkien alapuolelle. Lopukasi lisää hieman gessoa kortin reunoille. Kiinnitä "kansi" valmiiseen korttipohjaan.

Mukavaa keskiviikkoa,
Minna

Skoleklar / Ready for school

$
0
0


Wednesday again and this week I decided to create a layout using a few of Sizzix Framelit dies. They are terrific all round dies that can be used for cards, layouts and all kinds of projects.


I find that when using shapes on a layout they stand out less than when using them on a card but that is fine by me: I want to create a whole. I clustered by two pictures on top of a large tag made using the Sizzix Framelits Die Set 9PK - Tags #2. On the buttom of the tag I added a sliver of a different pattern paper die cut with the Sizzix Framelits Die Set 6PK - Squares, Scallop.


I didn't have room to fit in a large title so I felt I needed to anchor the title somewhat. I die cut two tags using Sizzix Framelits Die Set 12PK - Tags, Sentiments and then added my title to the tag. This is a good way to make sure a small title can still be seen.


I even got around to incorporating some hexagons as a contrast to the circles from the balloons.
 
 
Supply list:
Sizzix Big Shot Starter Kit (Powder Blue & Teal)
Sizzix Accessory - Magnetic Platform for Wafer-Thin Dies
Sizzix Framelits Die Set 6PK - Squares, Scallop
Sizzix Framelits Die Set 10PK - Hexagons
Sizzix Framelits Die Set 9PK - Tags #2
Sizzix Framelits Die Set 12PK - Tags, Sentiments
Paper: Echo Park
Stickers: LilyBee
Other: Paper decorations from Bazzill
Cardstock

---o---

Onsdag igen, og jeg havde lyst til at lave et layout i denne uge. Jeg brugte nogle forskellige Sizzix Framelit dies til layoutet, fordi de er så all round dies, som kan bruges på layouts, kort og alle mulige andre projekter.

For mig at se flyder formerne mere sammen, når man bruger dem på et layout i forhold til, hvis man brugte dem på et kort, men det gør ikke noget: Jeg vil jo have, at layoutet bliver et hele. Jeg samlede mine to billeder ovenpå en stor tag lavet med Sizzix Framelits Die Set 9PK - Tags #2. På bunden af taggen tilføjede jeg en lille stribe anderledes mønstret papir udstanset med Sizzix Framelits Die Set 6PK - Squares, Scallop.

Jeg havde ikke rigtig plads til en stor titel, så jeg følte, at det var vigtigt, at give min lille titel en base. Derfor udstansede jeg to tags med Sizzix Framelits Die Set 12PK - Tags, Sentiments, og derpå satte jeg min titel. Det er en god måde at sikre sig, at en lille titel fortsat kan ses.

Jeg fik endda plads til nogle sekskanter, som virker som kontrast til ballonernes cirkelformer.

Ingredienser:
Sizzix Big Shot Starter Kit (Powder Blue & Teal)
Sizzix Accessory - Magnetic Platform for Wafer-Thin Dies
Sizzix Framelits Die Set 6PK - Squares, Scallop
Sizzix Framelits Die Set 10PK - Hexagons
Sizzix Framelits Die Set 9PK - Tags #2
Papir: Echo Park
Stickers: LilyBee
Andet: Paper decorations from Bazzill
Karton

Vintage Auto

$
0
0

Last week we took a look at some of the fab new 1950's dies designed by Jen Long and I mentioned the car die set which I am very fond of so I thought I would share it with you today.

Father's Day is just around the corner here in the UK so if you want a bit of inspiration check out this link which will take you to 6 project sheets and oodles of FREE downloadable papers to create retro style 1950's style cards. We love that word so I'll write it again....FREE!

Here are the dies I used today:

I went for a typical 1950's colour palette and rather than make it easy for myself I decided to try to create a two tone style car. I started by cutting all the different elements including the headlights, hub caps, Bumper ( I should say fender really!) etc.

I trimmed away the parts of the blue car I didn't need along with the windscreen and steering wheel of the cream car. Next, I attached the separate sections of the blue car to the cream car before adding the wheels and hub caps.

After adding the bumper and headlights I attached the steering wheel and soft top as well as the silver wind screen surround.
Here is  a card made following most of the steps above but I have added a few twists like the white wall tires and I have substituted black for grey to give a softer effect. I also used Distress inks sparingly to add a little dimensional depth as well as a few white highlights with a gel pen.

I used a couple of the circled dies to create a silver frame with the check paper in the centre before die cutting the letters from silver card. I cut all the asymmetric shapes by hand before mounting everything onto the base card.


Well that, as they say is that! but I did have one tiny idea which I want to share.

I wanted to create the same car but have it look like a rusty old banger, I die-cut all the bits as above and roughly applied Walnut Stain Distress Ink around the edges before assembling the car.

I pressed down onto the die-cut car using an embossing ink pad before applying the Vintage Photo Distress embossing powder and shaking off the excess prior to setting it with a heat tool.

After this I went to work with my Distress inks starting with yellow and orange tones before introducing a little blue. The results were quite effective and it will probably find it's way onto a project at some point in the future.


Go Green ! By Karine

$
0
0

Hello!

Here is a new lay-out with a Spring atmosphere starring Clementine, a lovely little girl who will be the main theme of my creations this month! I take the opportunity to thank her mom for giving me all these nice inspiring pictures!

Supply list:

Papers: Crate Paper, Pink Paislee
Tracing paper: Studio Calico, Crate Paper
Alphabets: Jillibean Soup
Labels: 4heures37, Ephéméria
Wood embellishments: Studio Calico
Stickers: Basic Grey, Bazzill
Chipboards: Studio Calico
Masking Tape

Dies:

659758 : Sizzix Thinlits Die Set 3PK-Overall Patterns
659436 : Sizzix Bigz Die-Garden Greens
658300  Sizzix Big Shot Starter Kit

Start by gluing your picture. Build your page in a horizontal lay-out with pattern paper scraps.

Brim over the frame by placing stickers, masking tape strips and printed tracing paper.

In a chevrons-patterned tracing paper, cut two pretty leaves with the help of your Big Shot machine. Fix them with liquid glue or a glue stick. Put some weight on if necessary.

Let’s start with decoration now! Add stickers and chipboards for more volume.
I also used a die from the Life Made Simple Overall Patterns set that I particularly like.
It is a pretty card with hexagons patterns. I use the small patterns as embellishments! My page is scattered with little kraft die cuts that are glued with liquid glue.


See you next Thursday for a new page!

Karine

Bonjour !

Une nouvelle page aujourd'hui aux allures printanières avec la jolie petite Clémentine que vous retrouvez tout au long de mes posts en ce mois de Juin ! Je remercie sa maman pour toutes ces jolies photos si inspirantes !

Matériel :

Papiers : Crate Paper, Pink Paislee
Calque : Studio Calico, Crate Paper
Alphabets : Jillibean Soup
Etiquettes : 4heures37, Ephéméria
Embellissements bois : Studio Calico
Autocollants : Basic Grey, Bazzill
Chipboards : Studio Calico
Masking Tape

Dies :

659758 : Sizzix Thinlits Die Set 3PK-Overall Patterns
659436 : Sizzix Bigz Die-Garden Greens
658300 Sizzix Big Shot Starter Kit

Commencez par coller votre photo, puis reconstituer votre page avec des chutes de papiers imprimés en envisageant une mise en page horizontale.

Débordez un peu du cadre en collant des étiquettes, des petits bouts de Masking Tape et du calque imprimé.

Découpez ensuite à l'aide de votre Big Shot deux belles feuilles dans un imprimé calque chevrons.
Collez avec de la colle liquide ou bâton. Mettez sous presse si nécessaire.

Place maintenant à la décoration ! Ajoutez des autocollants, des chipboards pour ajouter un peu de relief.
J'ai utilisé également un die que j'affectionne particulièrement du set Life Made Simple Overall Patterns.
Il s'agit d'une belle carte avec des motifs hexagonaux, j'utilise les petites formes en guise d'embellissements ! Ma page est parsemée de petites découpes kraft qui sont collées avec de la colle liquide.

A Jeudi prochain pour une nouvelle page !

Karine

Barbecue Apron

$
0
0


In honour of Father's Day I have made an apron that he might  wear when cooking up a storm on the barbecue! I'm not sure but here goes - it's a nice apron anyway.

The apron measures 27" across and 35" long, and the ties are 2" x 40" finished and the neck band is 2"x 24" finished. The pocket is 27" x 17" unfinished. You will need approx. 1 1/2 - 2 yards of fabric depending on the width.
The ties, and neck band are made by pressing a 1/4" seam allowance onto the wrong side of the fabric along both sides of the length of the tie. Then fold the tie in half, wrong sides together along the length and press, folding one end into a point on each tie. Stitch along both folds.
Fold the pocket in half along the length, with right sides together, and stitch a 1/4" seam. turn the pocket right side out and press so that the seam is along the bottom edge of the pocket.

For the Dresden Plate I chose 2 co-ordinating fabrics 18" x 8", and I ironed a fusible web onto the wrong side of the fabric.
Using the Big Shot http://www.sizzix.co.uk/product/657900/sizzix-big-shot-machine-only-powder-blue-teal, and the large Dresden Plate Bigz Die http://www.sizzix.co.uk/product/659847/sizzix-bigz-l-die-dresden-plate-large - I cut 6 plates from each fabric.
I fused them in place on the pocket to create 2 semi-circles and then zig-zag stitches around the edges.
to complete the apron - press a narrow double hem around all the edges of the apron. Fold and pin the neck band and ties into the apron hem and stitch in place. Then stitch all around the apron hems.
Fold the sides of the pocket to the wrong side and pin in place to the apron. Stitch the pocket in place and then stitch a seam down the middle to make 2 pockets.
I'm not sure whether he'll wear it - but it is a nice apron! and it could be made in pretty fabrics for Mum at another time!
Keep sewing.
Angela

Tag Notes and Bookmark

$
0
0

Hello! It's Annahere to share some ideas using the Frameworks Die – Chevron , I have a couple of new projects to share with you today: a notes and a bookmark.
 
Anna Draicchio - sizzix big shot - notes bookmark (1)
 
I had already shared another notes HERE using this wonderful and playful collection by Tim Holtz.
I created a notes using the tags: to just cut out the individual tags and slip a metal ring through them to hold the notes together and decorate the cover with papers and Sizzix dies.
 
Anna Draicchio - sizzix big shot - notes bookmark (2)
 
I made a background with stripes of patterned paper, adding a chevron stripe that I cut out with my Big Shot machine.
 
Anna Draicchio - sizzix big shot - notes bookmark (3)
 
I made the bookmark using the same process. I then cut a strip to make the bookmark, I have sewn the edges, I added an eyelet and a wool yarn pom pom.

Thanks for visiting
 
Tag Notes
Items used:

cardstock
patterned papers
cardboard
hinged ring
distress ink
strass
strip of fabric
pom pom yarn
 
Bookmark
Items used:
Sizzix Frameworks Die – Chevron (659428)

cardstock
patterned papers
distress ink
strass
pom pom yarn
eyelet
sewing machine
 
Anna Draicchio - sizzix big shot - notes bookmark (4)
 
**************************************
Flag_of_Italy
Per le amiche italiane! :)

Ciao, Annaè qui per condividere alcune idee con la fustella Frameworks Die – Chevron.
Ho un paio di progettini da farvi vedere oggi: un piccolo notes ed un segnalibro. Due simpatiche idee regalo, anche come set da allegare ad un libro.
Avevo già condiviso un notes simile QUI, dove avevo utilizzato sempre una fustella di questa fantastica collezione di Tim Holtz.

Ho creato il blocchetto notes utilizzando le tag: è facile, perchè basta tagliare solo le singole pagine e far scivolare tutto attraverso un anello richiudibile, per tenere le pagine insieme. Naturalmente ho decorato la copertina con carte fantasia e le fustelle Sizzix, compreso l'alfabeto.
In sostanza ho realizzato uno sfondo con strisce di carta patterned, aggiungendo anche una striscia “chevron” che ho tagliato con la mia BigShot. Ho giocato un po' con le varie “frecce” cambiando colori e fantasie, per dare un po' di movimento.

Ho creato il segnalibro utilizzando lo stesso procedimento della copertina del notes. Ho tagliato poi una striscia per fare il segnalibro, ho cucito i bordi, aggiunto un occhiello e un filo di lana pom pom che fa più allegria.

Spero vi sia piaciuta anche questa variante a zig zag!
Se avete dubbi non esitate a scrivere qui nei commenti
Grazie per la visita.
 
Tag Notes
Items used:

cartoncino
patterned papers
cartone
anello apribile
distress ink
strass
striscia di stoffa
lana pom pom
 
Bookmark
Items used:
Sizzix Frameworks Die – Chevron (659428)

cartoncino
patterned papers
distress ink
strass
lana pom pom
eyelet
macchina da cucire

Gift boxes with butterflies

$
0
0


Hello everyone! It's Karola here with some new inspirations. This time I don't have a card or layout for you, but just an simple idea for small gift wrapping. In Poland and probably most of Eauropean countries, the school year ends very soon. It's opportunity to express gratitude to the teachers for their dedicated time, knowledge, care and support. For this occasion I decided to make pillow boxes as a small gifts wrapping. Creating pillow boxes with Sizzix Movers & Shapers L Die - Pillow Box w/Labels is amazingly easy, just as 1 - 2 -3 and after 5 minutes you have a great base for a beautiful gift packaging. 


I decorated my boxes using die cuts I've made using Sizzix Frameworks Die - Trellis and white cardstock. Butterfly is a very versatile motif to decorating anything you need - it's perfect for any occasion, so I cut out a few butterflies in 2 color options, using butterfly die from Sizzix Big Shot Starter Kit (Powder Blue & Teal) and decided to create layered embellishment with them. As you can see, I wanted to decorate my butterflies a little bit more and I used hand circle punch to made a few tiny holes in each paper butterfly. This way makes paper die cuts airy and delicate. 


Sizzix supplies used:
658268 Sizzix Movers & Shapers L Die - Pillow Box w/Labels
658300 Sizzix Big Shot Starter Kit (Powder Blue & Teal)
659431 Sizzix Frameworks Die - Trellis


Thank you for visit us today! 
Have a wonderful weekend! 
~~ Karola ~~ 

****************************

Witajcie! Tu znów ja - Karola z odrobiną nowych inspiracji. Tym razem nie mam dla Was kartki czy layoutu, lecz przynoszę ze sobą prosty pomysł na opakowanie niewielkiego prezentu. W Polsce, jak i prawdopodobnie w wielu europejskich krajach - wkrótce kończy się rok szkolny. To doskonała okazja do wyrażenia wdzięczności nauczycielom za poświęcony czas, wiedzę, opiekę oraz za wsparcie. Z tej okazji postanowiłam zrobic kilka poduszkowych pudełeczek jako opakowania na maleńkie prezenty, jako wyraz wdzięczności. Tworzenie poduszkowych pudełeczek z wykrojnikiem Sizzix Movers & Shapers L Die - Pillow Box w/Labels jest niesamowicie proste i szybkie, po prostu 1 - 2 -3 i już po pięciu minutach mamy świetna bazę pięknego opakowania prezentu. 
Moje pudełeczka ozdobiłam wycinankami z wykrojnika 659431 Sizzix Frameworks Die - Trellis. Motyle to bardzo uniwersalne motywy, którymi możemy dekorować właściwie wszystko, są doskonałe na każdą okazję. Wycięłam zatem kilka motyli w dwóch opcjach kolorystycznych, wykorzystując wykrojnik z motylem z zestawu startowego maszyny Sizzix Big Shot Starter Kit (Powder Blue & Teal) i postanowiłam stworzyć z nich warstwową dekorację. Jak widzicie, chcąc dodatkowo ozdobić moje motyle, wykorzystalam dziurkacz - kombinerki, którym zrobiłam trochę maleńkich dziurek w każdym z papierowych motylków. Ten sposób sprawia, że papierowe dodatki, jakie pozyskujemy za pomocą wykrojników stają się lekkie i delikatne. 

Wykorzystane produkty Sizzix:


Dziękuję za dzisiejsze odwiedziny na naszym blogu i życzę Wam 
wspaniałego, kreatywnego weekendu! 
~~ Karola ~~

Doing yo- yos

$
0
0


Hi everyone, here I go with a new project using Sizzix dies.I´m in the way for a new quilt that will have cute yo-yos. So I thought it would be quick to cut all those circles with the circles die.
You can find three sizes of them in the same die, great!
First I did some models and saw what size was perfert for my idea.
I´m using the Clover yo - yos makers .


Supplies

Bigz L Die- Circles 2",3"& 4"

Scrap of fabrics
Clover yo -yos maker


Finally I decided bigger it was the best size , so I cut in just 1 second eight circles that are perfet to fit in the 45mm maker.


I spent some time doing my big  yo- yos but I need a bunch yet.
This is a good work to take away and do everywhere , just now weather is warm and sunny here and you can enjoy your free time outdoor.


Well, think all the possibilities having a lot of circes cut in just some few minutes!
This is one idea and I hope to find more with this die.
 
Hope you have a wonderful weekend
 
Love
Mercedes
 
 
...........................................*************............................................

Hola a todo el mundo , ya estoy aquí con un proyecto nuevo usando los troqueles de Sizzix .
He empezado un nuevo quilt que tendrá yo- yos así que pensé que sería estupendo y rápido cortar todos los círculos que necesitaba con uno de los troqueles que tiene hasta 3 tamaños de círculos.
Primero hice algunos modelos and vi cuál era el tamaño mejor para lo que quería , para ello estoy utilizando   los Quick  Makers de Clover que se adaptan perfectamente al tamaño de cada uno de los círculos del troquel , ya que necesita que dicho círculo  que cortamos de tela sea un poquito más grande  que el aparatito de Clover.


Materiales:

Bigz L Die Circles  2", 3 "& 4"
trozos de telas
Quick yo- yo Makers


Al final me decidí por el más grande que viene perfecto para  el troquel grande. Coloqué las telas sólo sobre el troquel de círculo grande y corté ocho de una vez ahorrándome la pesada tarea de hacerlo a mano.

He preparado unos cuantos pero aún necesito un montón.

La verdad es que es un trabajo estupendo para llevarte fuera y disfrutar del buen tiempo, cálido y soleado que estamos teniendo por aquí y a punto de entrar en el verano.


Que tengas un maravilloso fin de semana
Cariños
Mercedes
Viewing all 2033 articles
Browse latest View live