Quantcast
Channel: Crafting ideas from Sizzix UK
Viewing all 2033 articles
Browse latest View live

Article 0

$
0
0


This week I have been inspired by the Prima dies that just been released this month.
I love Gears, I do think they are great as less feminine flowers, a perfect add on to cards and layouts, but the also make lovely jewelry.

I made a similar one using the old Tim Holtz gear dies a few years a go. But as it is made out of mount board - or passepartout as it is called in some areas, the stuff used to mount art piece on frames - it tends to age fast if worn a lot.

So I decided to make a new version using the new Prima die Sizzix Bigz Die - Love Gears 659709.


I die cut several gears out of mount board. At the end I only used two designs out of the four included on the die. I attached them together with strong wet glue and I let them dry completely.

Then I used Liquid Leaf which is a high shine metallic medium and painted all over it. To distress it a bit, I added some other metallic tints using a wax from the same manufacturer.

Finally I added a chain using a jump ring and the own circle hole of each gear to unite it.


It is an statement piece, but I think it is perfect as they are all the rage now!


25 years card

$
0
0
Hi everyone
I hope you all had a great week today i will show you a card 15x 21 cm made for our niece and her husband who has been married for 25 years. i think it was so fine to use Tim Holtz bigz die Victorian Carolers
 

Itemes I have used:
Supply list:
Paper: Purple Violets design galeriapapiere
Stamp: Joy Crafts Typewritter Keys
Ink: Memento Sweet Plum
Viva Pontura paint Lilla, ribbon


Thanks for stopping by, se you nextT Tuesday
Pia
Hej alle
Jeg håber du har haft en dejlig sommeruge, i dag har jeg et kort at vise 15 x21 cm, kortet har jeg lavet til min niece og hendes mands sølvbryllup. jeg tænkte at Tim Holtz  Victorian Carolers var så fin at bruge til denne anledning
 
Sizzix dies jeg har brugt:
Andre materialer:
Papir: Purple Violets design galeriapapiere
Stempler: Joy Crafts Typewritter Keys
Ink: Memento Sweet Plum
Viva Pontura paint Lilla, bånd
 
Tak fordi du kiggede forbi, vi ses næste tirsdag
Pia

If nothing ever changed....

$
0
0

Hello to all:) What a wonderful weather we have had here in Finland! The sun is shining and it`s really warm:) I and my family have spent the weekend at our cottage and I forgot my camera there, lol! So, sorry my photo taken by my phone:)

Here is the card I made to show you and I have used Prima butterfly dies released this month.


Sizzix products:
Sizzix Big Shot Starter Kit (Powder Blue & Teal) 658300
Sizzix Textured Impressions Embossing Folders 2PK - Swirls, Butterflies & Dragonflies Set 658077
Sizzix Thinlits Die Set 2PK - Winged Beauties 659707

Other products:
Pion Design papers; Alma`s Sewing Room
corrugated cardboard
cardboard
Stempelglede sentiment stamp from the set "Follow Your Heart"
Distress Ink Frayed Burlap
gesso
glue
douple-sided tape
Archival Ink Jet Black

How to do:
1. Cut the piece of patterned paper (11,5 cm × 14,5 cm) and emboss it using Sizzix Textured Impressions Embossing Folders 2PK - Swirls, Butterflies & Dragonflies Set 658077.
2. Distress all the edges, ink them with DI Frayed Burlap and sew all the edges.
3. Take the other piece of paper ( I have used a one corner from the patterned paper). The lenght of the sides about 12 cm and 13 cm. Distress, ink and sew the straight sides.
4. Take the piece of corrugated cardboard 2 cm × 11 cm and apply the gesso, allow to dry.
5. Cut the butterflies (two small and a one big) using the  Sizzix Thinlits Die Set 2PK - Winged Beauties 659707. 
6. Place  the embossed  and  the corner paper on to the cardboard (size 13 cm × 16 cm) and tape them. Attach the dried corrugared cardboard and butterflies using glue.
7. Stamp the sentiment using Archival Ink and cut the words. Tape them on to the card.

Have a wonderful day,Minna

*   *   *   *   *

Moi:) Mikä upea viikko ollut ainakin sään suhteen, ihanan lämmintä:) Olemme viettäneet aikaa mökillä ja unohdin kamerani sinne joten anteeksi tämä kuva joka otettu puhelímella:)

Tässä kortissa käytin tässä kuussa myyntiin tulleita uusia Prima Marketingin perhosstansseja.

Sizzix tuotteet:
Sizzix Big Shot Starter Kit (Powder Blue & Teal) 658300
Sizzix Textured Impressions Embossing Folders 2PK - Swirls, Butterflies & Dragonflies Set 658077
Sizzix Thinlits Die Set 2PK - Winged Beauties 659707

Muut tuotteet:
Pion Design paperit; Alma`s Sewing Room
aaltopahvia
kartonkia
Stempelgleden tekstileima setistä Follow Your Heart
Distress Ink Frayed Burlap
gessoa
liimaa
kaksipuoleista teippiä
Archival Ink muste Jet Black
 
Kuinka teet tämän:
1. Leikkaa 11,5 cm × 14,5 cm kokoinen pala kuviopaperia ja embossaa se käyttäen Sizzix Textured Impressions Embossing Folders 2PK - Swirls, Butterflies & Dragonflies Set 658077.
2. Ressaa kaikki reunat, levitä DI mustetta Frayed Burlap ja ompele kaikki reunat.
3. Ota toinen pala kuviopaperia (minä olen käyttänyt yhtä kulmaa isosta paperista). Sivujen pituus noin 12 ja 13 cm. Ressaa, levitä mustetta ja ompele suorat sivut.
4. Ota pala aaltopahvia n. 2 cm × 11 cm ja levitä gessoa, anna kuivua.
5. Leikkaa perhoset (kaksi pientä ja yksi iso) käyttäen Sizzix Thinlits Die Set 2PK - Winged Beauties 659707. 
6. Asettele embossattu- ja kulmapaperi kartongille kokoa 13 cm × 16 cm ja teippaa kiinni. Kiinnitä kuivunut aaltopahvi ja perhoset käyttäen liimaa.
7. Leimaa teksti Archival Ink musteella ja leikkaa sanat irti. Teippaa korttiin.

Mukavaa keskiviikkoa, Minna


Notepad dressed up

$
0
0


A few weeks ago I bought a small notepad (on sale) at a new favourite store. My idea was to have the pad stay on my work table and be the place where I jot down lists of various kinds so I was slightly disappointed when I couldn't remove the sales sticker from the front.
 
 
Since it is just a little pad I decided to dress up the front covering the sticker with a fairly simple design and not a lot of bulk.
 
 
I cut an ombre paper the same size as the notepad and then I die cut a white delicately patterned paper and a bright green cardstock using the Frameworks Die - Courtyard. I began by attaching the white die cut and then I used a roller stamp to stamp multiple sentiments haphazardly across the paper. Finally, I added a few green diamonds to the white die cut.


I liked the idea that the green diamonds stand out due to the fact that I didn't stamp on them. It adds some contrast to the entire project.
 
Supply list:
Notepad
Roller stamp (Hema)
Stickers (Søstrene Grene)
VersaFine, black ink
Paper (American Crafts)
Cardstock
 
---o---
 
For et par uger siden købte jeg en lille notesblok i en ny favoritbutik med den intension, at den skulle bo på mit skrivebord, så jeg kunne bruge den til diverse lister. Derfor var min skuffelse også stor, da jeg ikke kunne fjerne tilbudsklistermærket.
 
Løsningen blev at give blokken en ny og relativt enkel forside uden at tilføje for mange lag til den.
 
Jeg skar et stykke papir i samme størrelse som notesblokken, og derefter udstansede en hvid og en hidsig grøn figur ud med Frameworks Die - Courtyard. Først limede jeg den hvide figur fast, og stemplede med et rullestempel mere eller mindre tilfældigt over en stor del af forsiden. Herefter monterede jeg nogle af de grønne diamanter, hvilket gav en fin kontrast, fordi de ikke er blevet stemplet på.
 
Ingredienser:
Notesblog
Rullestempel (Hema)
Klistermærker (Søstrene Grene)
VersaFine, black ink
Papir (American Crafts)
Karton

No Rust for the wicked!

$
0
0

If I am wicked then my worst crime is the use of terrible puns in the title of my blogs as I'm sure you will all agree?

A little while back I gave a beautiful die cut 1950's car the 'rusty' treatment and I said at the time that I will use it at some point in the future. I have scrapped the car idea but I want to use the rust technique which was featured in Tim Holtz'Creative Chemistry 102 online classes...Hey! if your gonna steal, steal from the best I say!!! 

Seriously though, follow the link and sign up, it's jam packed with inspirational ideas showing how to get the best out of all your favourite inks, stains and acrylics and there's plenty of Sizzix inspiration to feast your eyes on too.

The dies I'm using this week are:

As last week, it's another mash-up of designs from different collections which work particularly well together. This week I am again using dies from Prima and Lori Whitlock with one of my old favourites namely the big ol' tag die from Tim Holtz.

I started by die-cutting four cogs two heart locks (for layering), a key (which didn't make the final project) and a delicious butterfly from ivory card. Next I lightly applied some embossing ink before sprinkling with Vintage Photo Distress Embossing Powder which is great for adding a gritty texture and works in a different way to conventional embossing powders in that it gives random coverage, ideal for distress applications.


I fixed the powder with a heat tool and inked the die-cuts with a combination of Distress inks to achieve the rusty iron look. Next I die-cut the beautiful flourish from ivory card and gave it the same rusty treatment.
I applied a rectangle of patterned paper (My Mind's Eye Nostalgia Collection) to a piece of mount board before die-cutting the tag before selectively inking around the perimeter. Next I stamped onto the top right-hand edge using various Distress inks and my trusty Dear Lizzy Lucky Charm rotary phrase stamp before stamping onto ivory card, trimming to size and distressing the edges. Finally, I attached the phrase to the tag using tiny staples.


Now all I need to do is attach the cogs and flourish to the tag, I have used screw head brads in the centre of some of the cogs. I attached the layered padlock using a couple of tiny jump rings and then I lightly inked the butterfly before curling back the wings and dousing with Clear Rock Candy Distress Glitter followed by a little strategically placed crushed glass glitter around the edges, I had to add a bit of bling with all that rust, and I love the contrast it gives.

And that, as they say....is that! except for a bit of Crinkle Ribbon dyed to match the rust colours for a finishing touch. I love the flourish so next week I'm going to put it to good use on my wife's birthday card. 


Mini book by Karine

$
0
0


Hello!

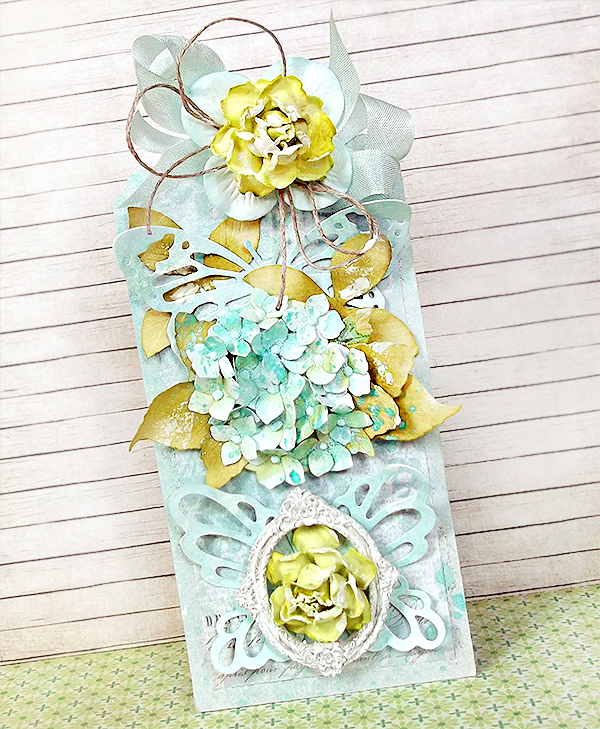
I hope you’re all fine and that you’re spending great holidays! Here is a new mini book that I will soon teach in class.

Supply list:

Papers: Basic Grey, Crate Paper
Alphabets: Glitz Design
Stickers: Basic Grey, Jenni Bowlin Studio, Glitz Design
Wood embellishment: Scrapfellow
Stamps: Florilèges Design
Inks: Chalks
Spray inks: Scrap Plaisir
Others: tag, masking tape, 3D foam, twine

Die:

658300 : Sizzix Big Shot Starter Kit
657721: Sizzix Borders & Hydrangeas
659436: Sizzix Bigz Die-Garden Greens

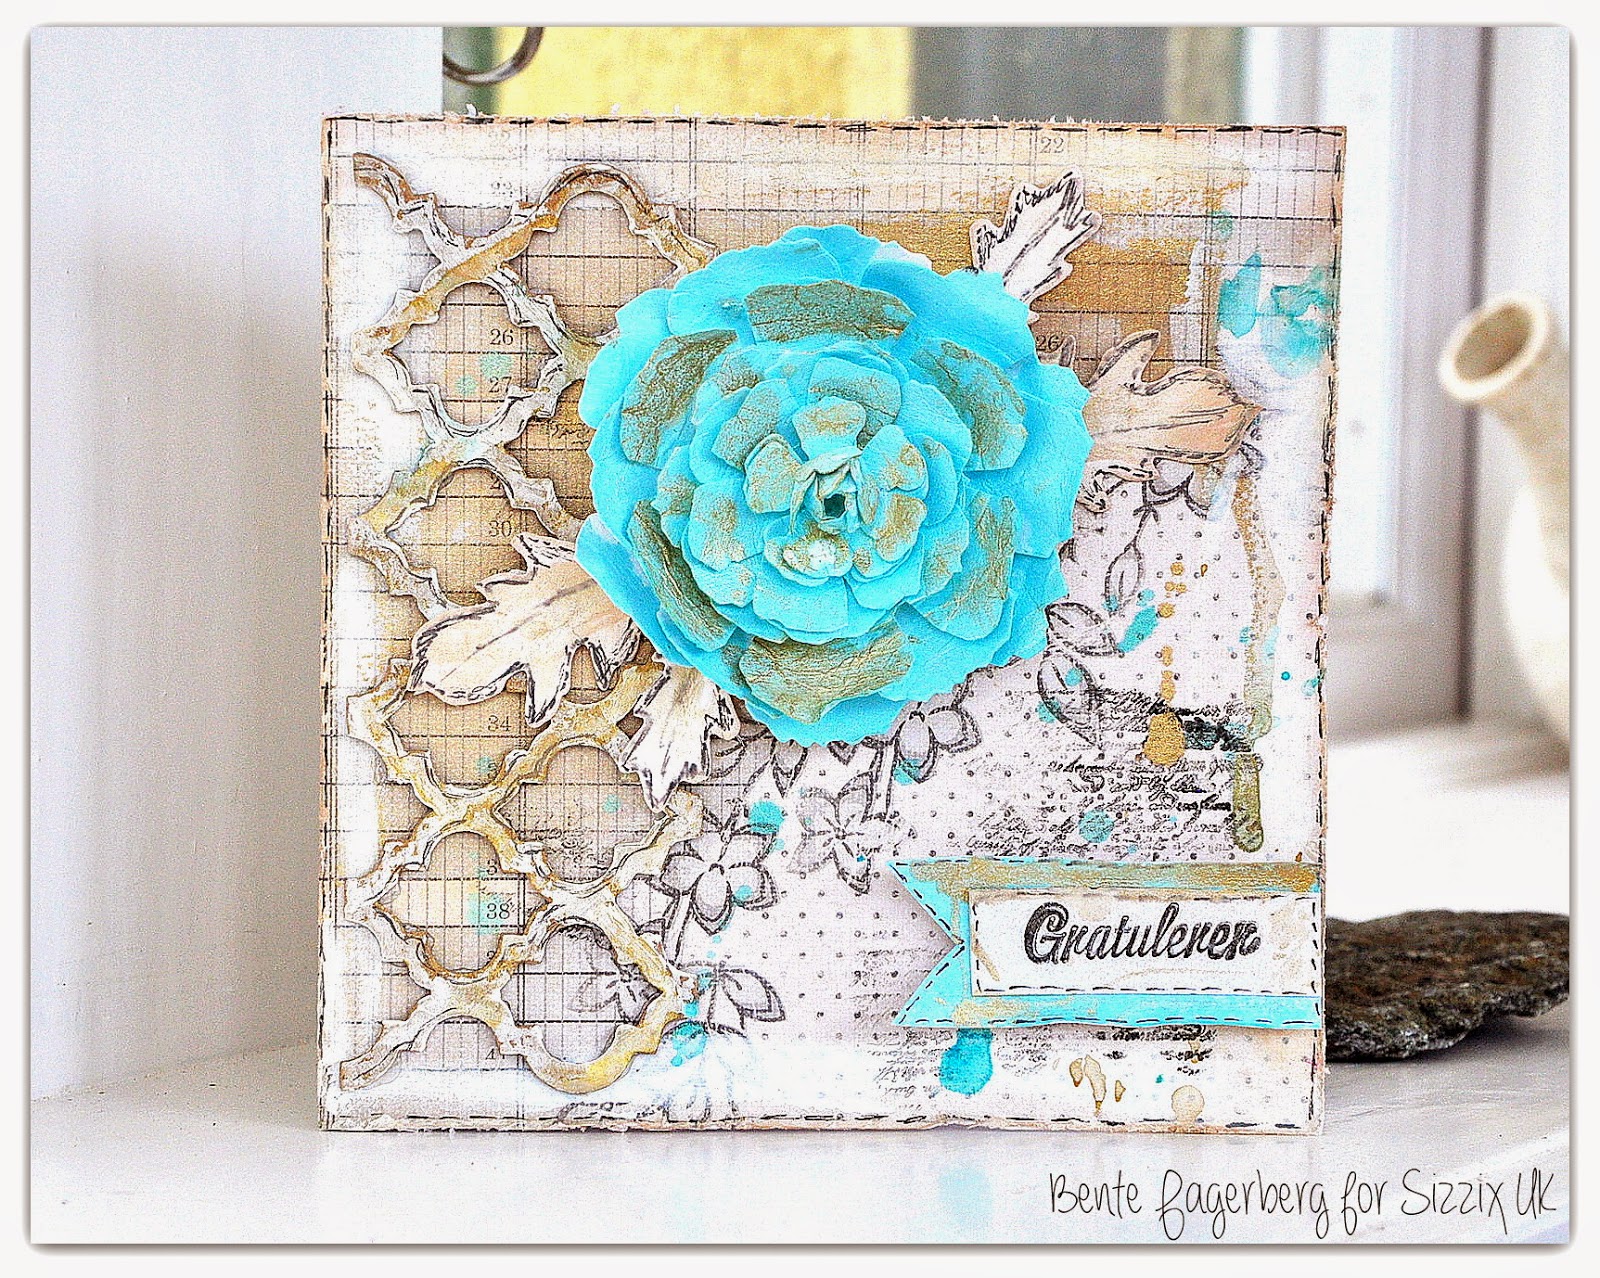
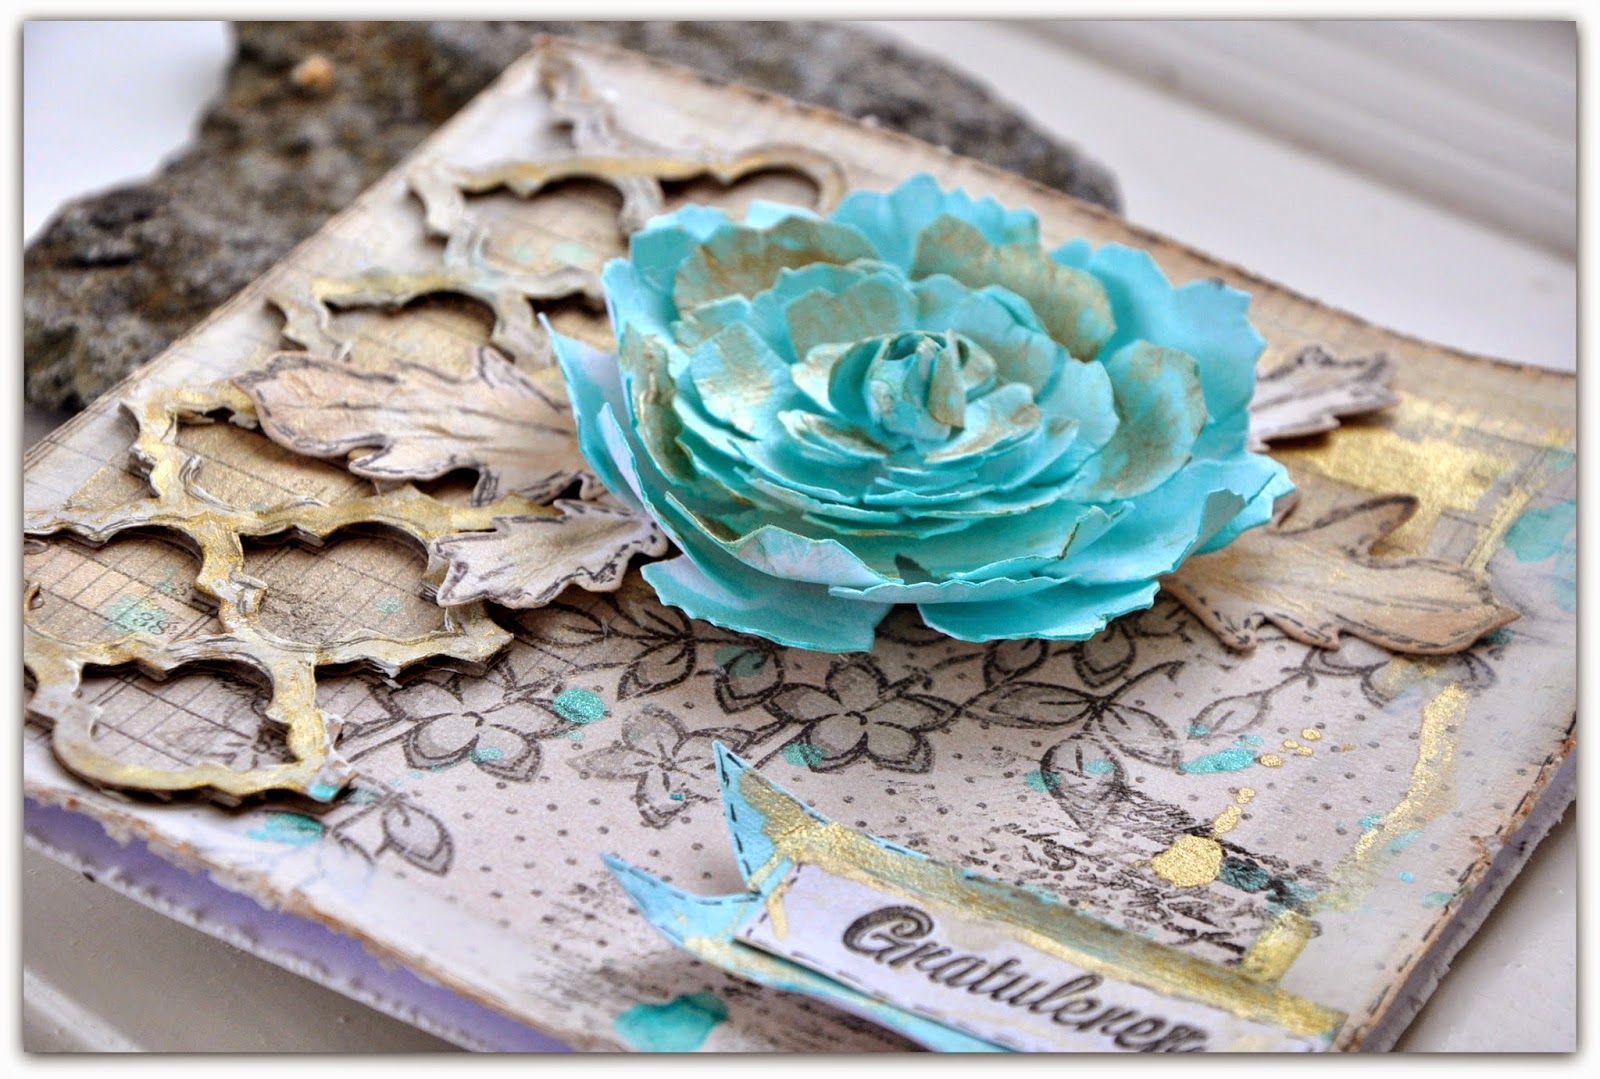
I started by using one of my favourite dies of the moment: the foliage one! I colorized it with spray inks. This die is cut out of white Bristol and sprayed with two ink colours (green & turquoise). Use a water spray if you wish to lighten your shades and let the colours spread!
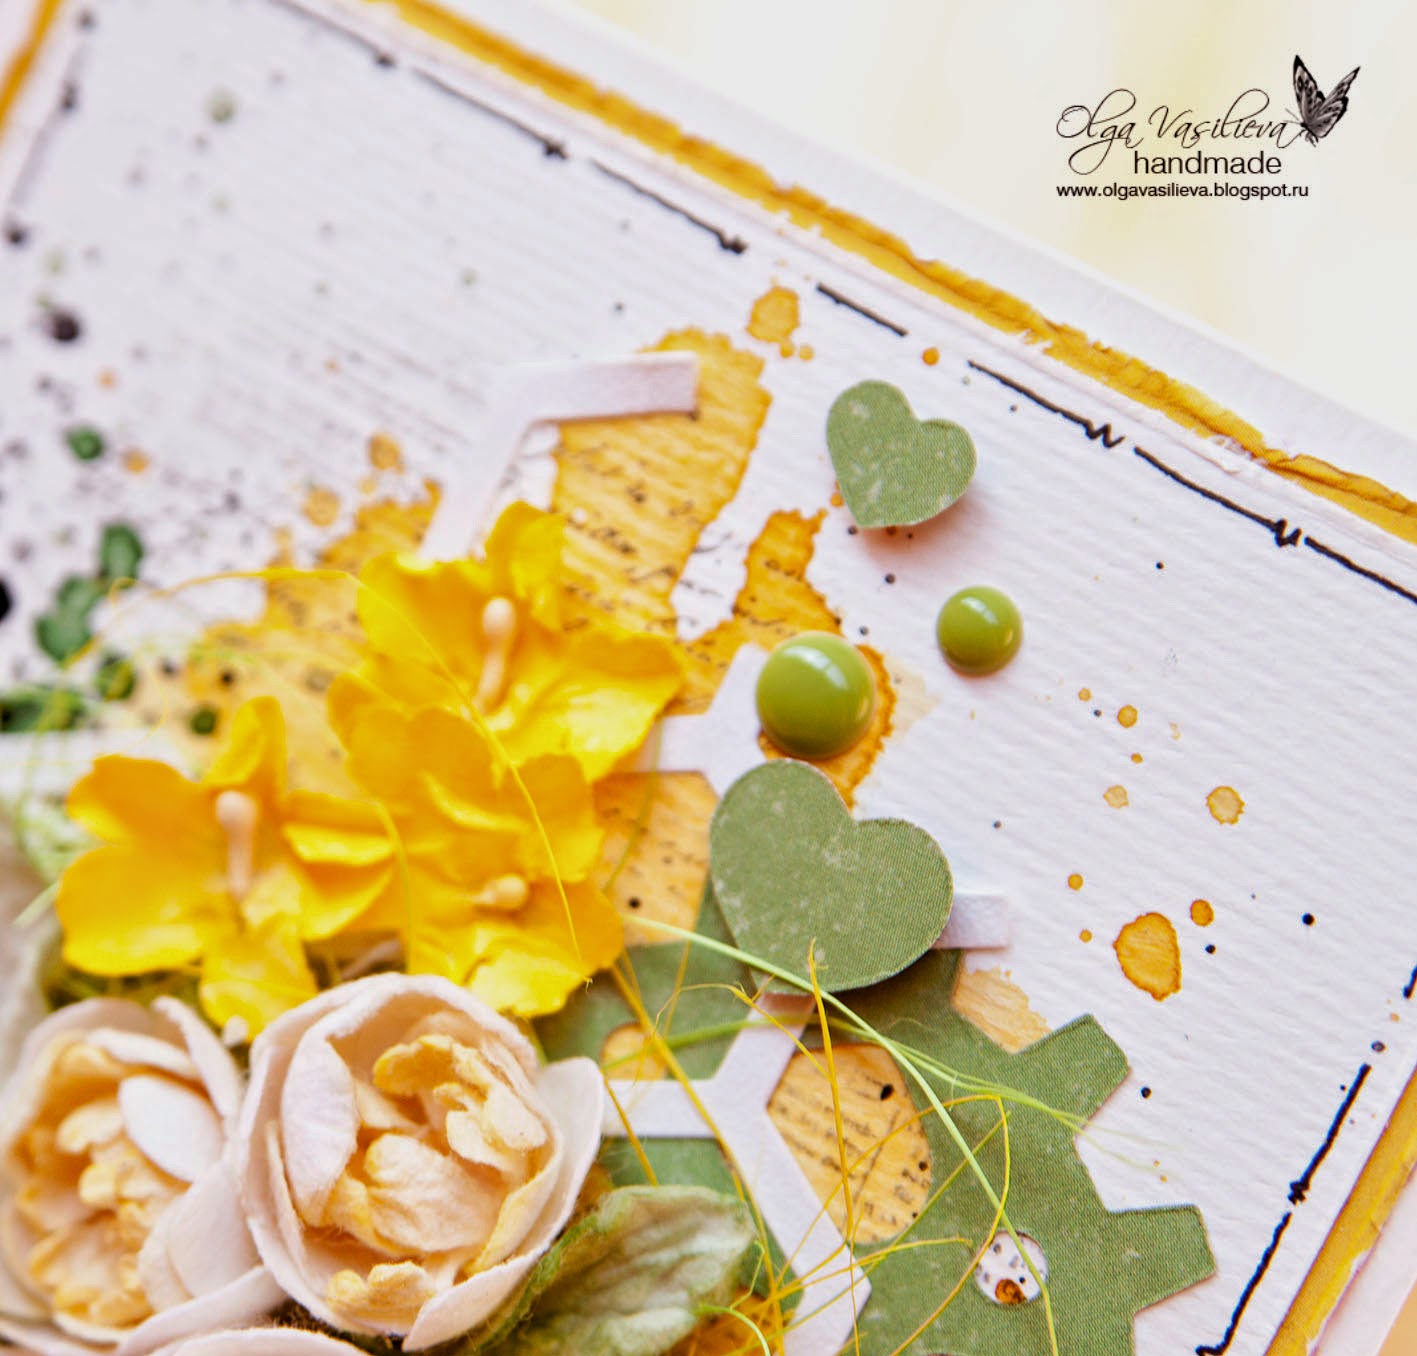
Print a text stamp tone-on-tone.
Let it dry in the open then glue on your page with double-sided tape.

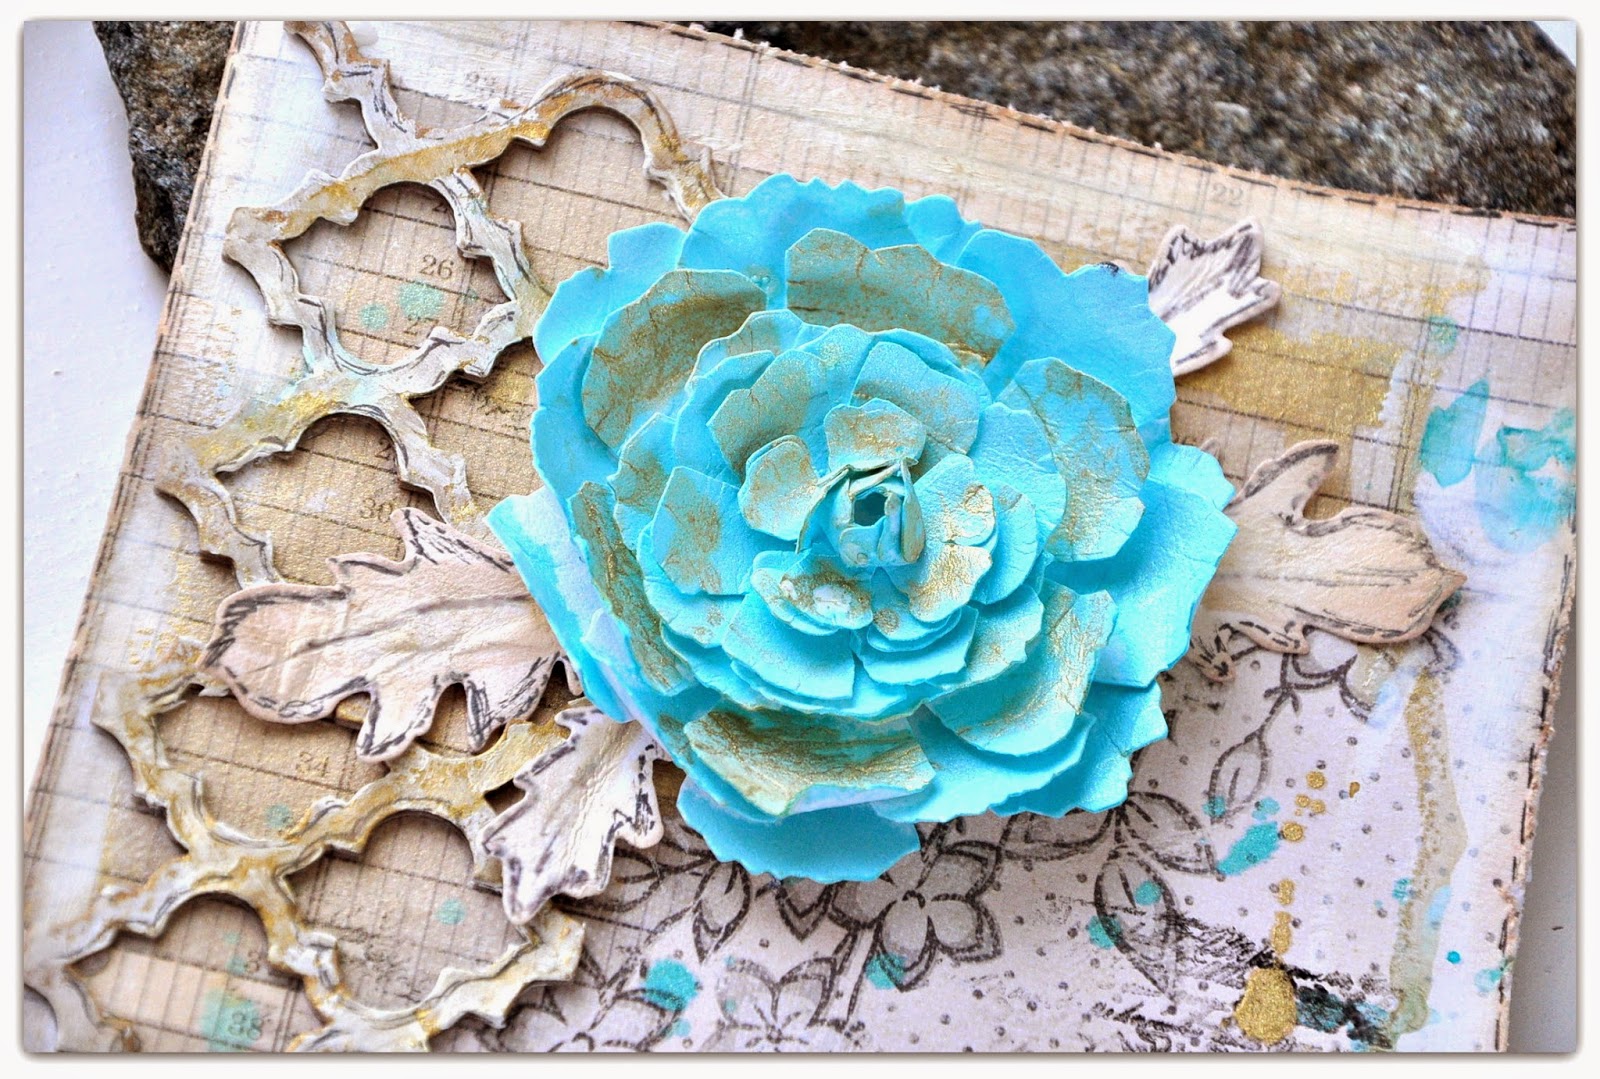
I also cut some little flowers in orange leather thanks to my Sizzix Borders & Hydrangeas die. It is cut really easily! You can add a brad or a button as a flower center.


I wish you have a creative day!

See you soon!


Karine

Bonjour !

J'espère que vous allez bien et que vous passez de bonnes vacances ! Voici aujourd'hui un des mini que je présenterai en atelier prochainement.

Matériel :

Papiers : Basic Grey, Crate Paper
Alphabets : Glitz Design
Autocollants : Basic Grey, Jenni Bowlin Studio, Glitz Design
Décoration en bois : Scrapfellow
Tampons : Florilèges Design
Encres : Chalks
Encre en spray : Scrap Plaisir
Divers : tag, masking tape, mousse 3D, cordelette

Die :

658300 : Sizzix Big Shot Starter Kit
657721: Sizzix Borders & Hydrangeas
659436: Sizzix Bigz Die-Garden Greens

J'ai tout d'abord utilisé mon die feuillage préféré du moment que j'ai colorisé avec des encres en spray. Celle-ci est découpée dans du Bristol blanc puis vaporisée avec deux couleurs d'encre ( vert et turquoise). Utilisez un vaporisateur d'eau si vous souhaitez éclaircir vos teintes et faire fuser les couleurs !
Complétez avec une impression de tampon texte ton sur ton.
Laissez sécher à l'air libre puis collez avec du double face sur votre page.

J'ai également découpé des petites fleurs dans du cuir orange grâce à mon die Sizzix Borders & Hydrangeas. La découpe se fait très facilement ! Vous pouvez compléter le centre avec une attache parisienne ou un bouton.

Je vous souhaite une très bonne journée créative !

A bientôt

Karine

Pin cushions and tablerunners!

$
0
0

 Are you enjoying the summer sun? I'm  hoping that it will be sunny tomorrow morning so that I can have breakfast on the patio - I'll pretend I'm on holiday and that the Festival of Quilts is still weeks away!
I'm working in the office today - and have a fan blowing straight on me - it's the only way not to melt.
I am making progress with the preparations for the show - this week the pin cushions are all completed - and one of the patchwork table runners is ready to be quilted - I've used the tessellating pinwheel for the table runner -http://www.sizzix.co.uk/product/658661/sizzix-bigz-die-tessellating-pinwheel-4-1-2-assembled , and the pin cushions were in last weeks blog.


the next task is to make 2 more patchwork table runners -
As you can see the pieces are already cut a nd ready to sew - the dies I've used for these are - Equilateral triangle -http://www.sizzix.co.uk/product/658663/sizzix-bigz-l-die-triangle-equilateral-4-3-4-h-x-5-1-2-w-unfinished and the Half Hexagon - http://www.sizzix.co.uk/product/658880/sizzix-bigz-die-5-half-hex.
 
Without the Big Shot and the Bigz Dies I wouldn't even contemplate trying to get so much done in just under 2 weeks - because I haven't mentioned the applique table runners still to be made.
I know I've mentioned counting down to an event by the number of sleeps - well in this case I feel it might be a case of how many sleepless nights are left!!!
Well I'm going to switch from the computer to the sewing machine and see how much I can accomplish this afternoon.
I hope you can keep cool and enjoy the summer.
Angela


Love - Wedding Mini Album

$
0
0


Hello! It's Annahere to share some ideas using Sizzix products.
I love making mini albums and today I want to share with you a quick and easy mini album that you can make for someone you love.
I made this mini album for a friend who got married recently. To make the cover I used an ring binder for office. Here is the cover which has been finished.

Anna Draicchio - sizzix big shot - scrapbooking album (1)

For embellishments I am using some Sizzix Dies: a Doily Classical Lace and dies of “Life Made Simple” collection.

Anna Draicchio - sizzix big shot - scrapbooking album (2)

To streamline the process, choose an easy size to work with. My album is essentially 20x20 cm, so trimming down papers was simple and fast. I love the look of albums with different size and shape pages, but those fabulous minis will take some extra time.

Anna Draicchio - sizzix big shot - scrapbooking album (3)

Anna Draicchio - sizzix big shot - scrapbooking album (4)

I wish you all crazy creative weekend - see you soon on the blog!
 
Items used:
ring binder
cardstock: vanilla, turquoise, kraft
patterned papers
buttons
acrylic paint
washi tape
stapler
 
**************************************
Flag_of_Italy
Per le amiche italiane! :)

Ciao, sono Anna e sono qui per condividere alcune idee utilizzando i prodotti Sizzix.
Mi piace fare mini album da regalare e oggi voglio condividere con voi un mini semplice e veloce.
Ho realizzato questo mini album per due cari amici che si sono sposati da poco, dopo anni di convivenza. Per loro non volevo creare il classico album da matrimonio tutto fiori e pizzi color avorio. Ho scelto quindi di fare qualcosa di più allegro e moderno, scegliendo di usare per la copertina, un quaderno ad anelli trovato da un rivenditore per materiali per ufficio. Ha la possibilità di infilarvi un foglio di carta nelle buste trasparenti esterne, così ho inserito carte fantasia, che prima avevo macchiato con qualche goccia di acrilico.
Ho poi completato decorando con alcuni ritagli di carte, tag e naturalmente forme ritagliate con le mie belle fustelle!
Ho fustellato un centrino turchese (Classical Lace) e poi ho creato una tag con la scritta LOVE usando la collezione “Life Made Simple”, con cui ho realizzato anche il fumetto con il cuoricino. Adoro queste fustelle!
Gli interni, che non ho fotografato, sono comunque molto semplici per dare la possibilità ai miei amici di incollare le foto secondo le loro preferenze, giusto piccoli abbellimenti fustellati agli angoli di qualche pagina.
Un consiglio per aiutarvi a realizzare mini album in modo più veloce: per semplificare il processo, scegliete una dimensione facile da lavorare, il mio album è circa 20x20 cm. Mi piacciono gli album con pagine di diverse dimensioni, ma occorre più tempo per la loro creazione. Se poi dovete regalarli e non avete da subito le foto da inserire, una misura costante quadrata permetterà di incollare le foto standard sia nel formato orizzontale che verticale.

Auguro a tutti voi un simpatico week-end creativo! Arrivederci a presto sul blog Sizzix!
 
Materiali:
quaderno ad anelli da ufficio
cartoncini: panna, turchese, kraft
patterned papers
bottoni
coloi acrilici
washi tape
graffettatrice


Fresh hydrangeas and winged beauties

$
0
0


Welcome to another Sizzix blog post, in which I would like to share with you my new inspiration, created using the fantastic Sizzix dies and Big Shot machine.
This time I decided to create a tag in the summery, fresh colors, which can be a small home décor, an element of greeting card or addition to gift wrapping. The main decoration in my tag is a bouquet of hydrangea, created using a set of dies designed to create handmade flowers from a very popular Susan’s Garden line - Susan’s Garden - Sizzix Thinlits Die Set 5PK - Flower, Hydrangea.


Dies from this set cut out tiny hydrangea petals, I cut them and using fantastic Sizzix Accessory - Susan's Garden Tool Kit, I tried to add more dimension and more realistic look to my small bouquet. After modeled of each petal, I sprayed them with a turquoise mist, and when petals dried I adhered together each part of each flower. After gluing and dried petals, I embellished centre of each flower creating a  small dots using 3D paints (you can use liquid pearls as well). Before 3D paint dried, I sprinkled petals with turquoise embossing powder, without melting it, and only creating light texture on the petals. In addition to the petals, I cut out the leaves, using dies from the sets:Sizzix Thinlits Die Set 5PK - Flower, Hydrangeaand Sizzix Thinlits Die Set 8PK - Flower, Rose.Leaves was also modeled with a Sizzix Accessory - Susan's Garden Tool Kit. I really love the non-stick pad from this set - allows you to ink the edges of the petals and leaves or coloring using any other mediums - any paint, mist or ink do not stick to this small but very practical mat and can be easily washed off (wet wipes or paper towel).


Another dominant embellishment on my tag are absolutely wonderful butterflies, cut out with new dies from the line Prima Marketing Flora Grande line - Sizzix Thinlits Die Set 2PK - Winged Beauties. These extraordinary dies from Thinlits series are the essence of gentleness and romanticism – die cutting with these dies is very comfortable, and the cutouts are beautiful, very open-work and very versatile. I cut out butterflies using white card stock and colored them a little bit using turquoise mist.


Sizzix supplies used:

Thank you for visit us today! 
Have a lovely, creative weekend! 
~~ Karola ~~ 


****************************

Witam serdecznie w kolejnym poście, w którym chciałabym podzielić się inspiracją stworzoną z wykorzystaniem fantastycznych wykrojników Sizzix.
Tym razem postanowiłam stworzyć tag w letniej, świeżej kolorystyce, który może stać się niewielkim elementem wystroju wnętrz, elementem na kartce okolicznościowej lub dodatkiem do prezentu. Główną ozdobą w moim tagu jest bukiecik hortensji, stworzony z pomocą kompletu wykrojników do samodzielnego tworzenia przestrzennych kwiatów z serii Susan’s Garden- Sizzix Thinlits Die Set 5PK - Flower, Hydrangea.
Wykrojniki z tego zestawu wycinają maleńkie płatki hortensji, które po wycięciu modelowałam za pomocą zestawu narzędzi do tego przeznaczonych - Sizzix Accessory - Susan's Garden Tool Kit. Po wymodelowaniu każdego płatka, spryskałam je turkusową mgiełką, wysuszyłam, a następnie sklejałam ze sobą części każdego kwiatka. Po sklejeniu i wyschnięciu płatków, ozdobiłam środki tworząc małe kropeczki z farbki 3D. Zanim farbka 3D wyschła, posypałam płatki turkusowym pudrem do embossingu, nie topiąc go, a jedynie tworząc lekką teksturę na płatkach. Oprócz płatków, wycięłam również liście, korzystając z wykrojników z zestawów: Sizzix Thinlits Die Set 5PK - Flower, Hydrangea i Sizzix Thinlits Die Set 8PK - Flower, Rose. Liście również modelowałam narzędziami z zestawu Sizzix Accessory - Susan's Garden Tool Kit. Ogromnie podoba mi się mata „Non-stick pad” z tego zestawu - pozwala na tuszowanie brzegów płatków i liści czy kolorowanie innymi mediami - żadne media nie przywierają do tej małej ale bardzo praktycznej maty i z łatwością dają się zmyć (mokra chusteczka).
Kolejną dominującą ozdobą na moim tagu są przecudne motyle, wycięte za pomocą nowych wykrojników z linii Flora Grande, sygnowanych logo marki Prima Marketing - Sizzix Thinlits Die Set 2PK - Winged Beauties. Te niezwykłe wykrojniki w serii Thinlits to esencja delikatności i romantyzmu - motyle wycinają się bardzo komfortowo, a wycinanki są przepiękne, bardzo ażurowe i bardzo uniwersalne. Motyle wycięłam w białym cienkim brystolu i pokolorowałam je, tak jak kwiatki - turkusową mgiełką.

Wykorzystane produkty Sizzix:

Dziękuję za dzisiejsze odwiedziny na naszym blogu!
Życzę Wam cudownego, kreatywnego weekendu!
~~ Karola ~~


Scrappy Crossroads sew along by Lori Holt

$
0
0

Hi again ! Today I  want to share a new project that I´m working on and it´s sure you have heard lately. First I will tell you I was wishing to get my package with all these nice fabrics with a vintage  and  childhood touch. I spent time chosing them so it was a pleasure when I could   see them in my hands.
They are  from the collections : Toy Box, 1930´s Classics, Pam Kitty Picnic, Aunt Grace Miniatures, Old New Fabric Collection 30', Everything but the kitchen sink X, Storybook Playtime, Vintage Happy....... So with these beauties I  took my  Big Shot and started to cut .....


My plans were different at the begining but then I found the sew along Scrappy Crossroads  by Lori Holt  ( Bee in my bonnet ) for this summer .If you are a vintage girl and love patchwork, you know her , sure. That is my case, I love Lori Holt work and like instagramer  I went to there I learnt about her scrappy crossroads  tutorial soooo easy and perfect for my loved fabrics.


It looks like the block is being done for lot of quilters and you can find vartiations because the fabric combination.
So I took my Sizzix Bigz XL 25" Die - Squares, 2" Finished (2 1/2" Unfinished  just the size that the tuto calls,  and  cut a bunch of them. You will need too  4.5" squares , mine are white.


I spent some time playing with my squares on a mini design board ( you can find Lori ´s tutorial in her blog if you like )  and sew quickly.


Here it is my first block finished. I plan doing three more and complete a quilt.
I´m in love with this scrappy block and my die that let me to save time. 
Go to Instagram and then  to  " beelori1" if you want to try too. 


Thanks so much to Lori Holt for this tutorial and  much of them you can find in her blog. 


Hope you have a wonderful weekend!!

Love
Mercedes


...........................................*************............................................


Hola de nuevo, Hoy quiero compartir con vosotros un nuevo proyccto que tengo en curso y que seguro habéis oído hablar de él.
Pero primero os contaré que estaba deseando recibir mi paquete con nuevas telas con un aire vintage e infantile.La verdad es que estuve un montón de tiempo eligiendo las que quería y ahora que las tengo ha merecido la pena.
Son de las siguientes colecciones si te interesa:Toy Box, 1930´s Classics, Pam Kitty Picnic, Aunt Grace Miniatures, Old New Fabric Collection 30', Everything but the kitchen sink X, Storybook Playtime, Vintage Happy.

En un principio los planes eran otros pero entonces encontré este bloque en el blog de 
Lori Holt  ( Bee in my bonnet ) que está haciendo para este verano. Si eres una chica con estilo vintage y te gusta el patchwork , entonces  la conoces seguro. A mí me encanta el trabajo que hace y como instagramer fui a su cuenta y ver cómo era el tutorial, facilísimo y perfecto para las telas que había recibido.

Al parecer el bloque está siendo hecho por un montón de quilters y puedes encontrar variaciones en función de las telas escogidas.
Así que cogí mi troquel  
Sizzix Bigz XL 25" Die - Squares, 2" Finished (2 1/2" Unfinished  ,justo el tamaño requerido de cuadrados y corté un montón. También necesitarás cuadrados de 4.5” , en mi caso en tela blanca.

Estuve un rato probando mis cuadrados en mi tablero de diseño ( puedes encontrar el tutorial en el blog de Lori ) y lo cosí rápidamente.

En la última foto podéis verlo acabado. Haré tres más para completar una colcha. Me encanta este bloque y mi troquel que me permite ahorrar  bastante tiempo.
Ve a Instagram y allí a la cuenta de “ beelori1” si quieres intentarlo.
Muchas gracias a Lori Holt por este tutorial y tantos otros que ofrecen en su blog.


Que tengas un maravilloso fin de semana
Cariños 
Mercedes

Flowers and gears

$
0
0


Hello all!

Here is my new card with wonderful Sizzix dies. As usually I made the background using stamps, watercolour and a gel pen. But this time I decided to add some "steampunk" elements to my style.


These are peons and a rose created with the Sizzix dies:


I used foam tape for the hearts:


The products I used:

Sizzix Frameworks Die - Honeycomb

Sizzix Bigz Die - Love Gears


Have a nice day!

Olga

Всем привет!

Это моя новая открыточка, в которой я решила к своему стандартному стилю добавить элементы "стимпанка" - это шестеренки с сердечками, которые можно использовать и как отдельные элементы. Роза и пион сделаны с помощью ножей, а сердечки я приклеила на объемный скотч.

Всем хорошего дня!

Congratulations!!

$
0
0
Hello again Sizzix friends, it's me Bente back with a new project to share :-)
Today I did not make a page , but quite a straight forward shabby card instead. 
I have a few birthdays coming up and it's nice to have a small pile of cards stashed away.


1.I used the Framelits die Trellis and cut a piece of chipboard with it. 
2. I prepared both the die cut and the cardbase with stamps, gesso and mists and used a black pen for outlining.
3. I made and added a Tattered Floral bloom that I had misted a lovely turquoise colour.
4. I used the Susan's Garden dies to cut out a few leaves to add to my flower.
5. I stamped and aged a sentiment for my card. 


      I love that you can vary the Tattered Florals bloom so much, both in size and appearance.


     The Bigz dies are wonderful for cutting thicker materials and they cut through it like butter!!


        --------------------000000000000----------------------

Hej igen Sizzix fans! Idag har jag ingen layout att visa utan ett kort i shabby stil.
Det er snart flere som har bursdag og det er bra å ha noen kort i reserve.

1.Jag använde Frameworks Trellis diesen för att skära ut en bit i chipboard.
2. Jag förberedde underlaget på kortet och det utskurna motivet  med stempel, gesso och mist, och använde en svart penna för att markera runtom.
3. Jag tillverkade en Tattered Florals blomma som jag mistade med en herlig turkos färg
4. Jag använde Susan's Garden dies för att stansa ut några blad till min blomma.
5. Sedan stämplade jag 'Gratulerer' og distressade det lite innan jag limmade det på kortet. 

Jag gillar skarpt hur Tattered florals blomman kan varieras i det oändliga, både i storlek och utseende.

Bigz diesen är helt underbara vad gäller att skära genom tjockare material och skär dom som smör!


-------------------------0000000000000-------------------------

Back to basics: Album using the Starter Kit and basic shapes

$
0
0

As you can see, this was a very big project, with 40 photos and I wanted to keep it simple yet beautiful and time resistent so I chose a clean and simple style and basic shapes. Thats why I love the Big Shot Starter Kit and all the basic shape dies like hearts, cicles, scallops, swirls, stars... You can use them in many ways, and they never will be out of style.


Happy Monday!

...............

¡Hola a todos!

Hoy quiero enseñaros un álbum que hice para una amiga mía.  Como podéis ver éste era un proyecto de bastante envergadura, con unas 40 fotos, así que me decidí por un estilo limpio y que resistiera el paso del tiempo. Por eso me gustan tanto los troqueles del Starter Kit y las formas básicas de Sizzix: Las puedes utilizar de un montón de maneras diferentes y nunca van a pasar de moda.

¡Feliz lunes!


You are beautiful

$
0
0
Hi everyone
I hope you all had a great week , today i will show you a tag
 
 
Items I have used:
Supply list:
Paper: Pion design Sweet baby
Ink: Distress ink Peeled Paint, Arhival ink Coffee
Stamp: Follow Your Heart Stempelglede.com design:
flowers and ribbon
I wish you all a great summer week, Thanks for stopping by
Pia
Hej alle
Jeg håber du har haft en fantastisk sommer uge. I dag vil jeg vise en tag
Sizzix dies jeg har brugt:
Andre materialer:
Papir: Pion design Sweet baby
Ink: Distress ink Peeled Paint, Arhival ink Coffee
Stempler: Follow Your Heart Stempelglede.com design:
Små blomster og bånd
Jeg ønsker dig en dejlig sommeruge og tak fordi du kiggede forbi
Pia

A tag - Live the life you have...

$
0
0

Hello to all my friends:) Nowadays I have been really excited  making tags..so quickly  to make and wonderful little gifts.
Here is my new tag to show you.


Sizzix products:
Sizzix Big Shot Starter Kit (Powder Blue & Teal) 658300
Sizzix Bigz Die - Tattered Florals 656640
Sizzix Thinlits Die Set 2PK - Winged Beauties  659707

Other products:
Pion Design papers; Studio of Memories, Flower Frames
kraft and white cardboard
Stempelglede sentiment stamp
Glimmer mists; blue and kraft
gesso
black marker
glue tape 
rose
gauze

How to do:
1. Cut the tag out from cardboard size 16 cm × 8,5 cm and also the same sized piece of patterned paper. Glue or tape the paper on to the cardboard.
2. Take the piece of other patterned paper and tape it on to the edge of the tag.
3. Apply some gesso on to the tag and allow it to dry.
4. When dried add some glimmer mists blue and kraft and dry.
5. Cut the wings out from white thin cardboard using Sizzix Thinlits Die Set 2PK - Winged Beauties  659707
and add some glimmer mist blue on to the wings.
6. Cut also the little tattered flower out from the kraft cardboard using
Sizzix Bigz Die - Tattered Florals 656640 and the heart out from light yellow patterned paper using the die included Sizzix Big Shot Starter Kit (Powder Blue & Teal) 658300.
7. Stamp the sentiment and put the embellishments together; tape the heart, then piece of gauze, wings, little flower and finally rose.
8. Draw the lines around the tag using black marker.

Happy crafting,Minna

*   *   *   *

Moi, jälleen uusi tagi. Olen innostunut tekemään näitä koska ovat niin nopeita tehdä ja kivoja pikkulahjoja:)

Sizzix tarvikkeet:
Sizzix Big Shot Starter Kit (Powder Blue & Teal) 658300
Sizzix Bigz Die - Tattered Florals 656640
Sizzix Thinlits Die Set 2PK - Winged Beauties  659707

Muut tarvikkeet:
Pion DEsign paperit; Studio of Memories ja Flower Frames
ruskeaa (kraft) pahvia
valkoista kartonkia
Stempelglede tekstileima
Glimmer mist suihkeet; sininen ja kraft/ruskea
gessoamusta tussi
ruusu
liimaa
teippiä
 harsoa

Kuinka teet tämän:
1. Leikkaa tagi pahvista kokoon 16 cm × 8,5 cm ja myös samankokoinen pala kuviopaperista. Liimaa tai teippaa paperi pahviin.
2. Ota toinen pala kuviopaperia ja liimaa se tagin reunaan.
3.Levitä gessoa tagiin ja anna kuivua.
4. Kun gesso on kuivunut suihkauta glimmer mistejä tagiin keskelle, kuivaa.
5.Leikkaa siivet valkoisesta ohuesta kartongista käyttäen Sizzix Thinlits Die Set 2PK - Winged Beauties  659707 ja lisää glimmer mistiä, sinistä.
6. Leikkaa myös pieni kukka pahvista käyttäen Sizzix Bigz Die - Tattered Florals 656640 ja sydän kellertävästä kuviopaperista käyttäen stanssia joka sisältyy Sizzix Big Shot Starter Kit (Powder Blue & Teal) 658300.
7.Leimaa teksti tagiin ja asettele koristeet; teippaa sydän, sitten pala harsoa, siivet, pieni stanssattu kukka ja lopuksi ruusu.
8. Piirrä rajaukset tagin reunaan mustalla tussilla.

Mukavaa keskiviikkoa,Minna


Hexagon greetings

$
0
0


This week I decided to break the square and make a card with six edges using a few sizes from the Framelits Die Set 10PK - Hexagons.


First step was to make my cardbase and for that I folded a white piece of cardstock and chose the largest die from Framelits Hexagons. I let one edge of the die extend out over the fold of the paper so the die wouldn't cut here. Once I had run my sandwich through the Big Shot Starter Kit (Powder Blue & Teal) I was left with a hexagon that opened on one side and could be used as my cardbase.


Next step was to make the patterned paper for my card and I chose matching papers and a single solid cardstock and die cut them using a smaller hexagon. Once I had die cut a few of each paper, I traced a hexagon on a piece of white cardstock (using one of the dies as template) and started to assemble my pattern using the traced lines as my guide. When I had filled out the entire traced area, I ran the paper and the matching die through the Big Shot and was then left with a patterned hexagon-shaped piece of paper. Now all I had to do was put my card together.


Using the labels that come with the Big Shot Starter Kit I diecut two labels and sandwiched those with a handcut banner giving my sentiment some interest. I also tied a piece of seam binding around the patterned paper prior to attaching on the cardbase.


And then I called the card done. When doing something like the patterned paper using simple shaped dies, I don't think you need much in ways of embellishments and thus I kept mine to a minimum.

Supply list:
Big Shot Starter Kit (Powder Blue & Teal)
Framelits Die Set 10PK - Hexagons
Cardstock
Patterned Paper
Seam Binding
Stamp (Papertrey Ink)
Ink (VersaFine)

---o---

I denne uge ville jeg springe boxen og lave et kort med seks kanter, og jeg tog Framelits Die Set 10PK - Hexagons til hjælp.

Første skridt var at lave min kortbase, og til det formål foldede jeg et stykke hvidt karton og placerede den største die fra Framelits - Hexagons, så den hang lidt ud over folden. På den måde bliver der ikke skåret dér, hvor dien hænger ud over kanten. Da jeg havde kørt sandwichen gennem min Big Shot, havde jeg et sekskantet kort lige klar til at dekorere.

Næste skridt var at lave mit mønstrede papir, og her valgte jeg en mindre sekskant-die, som jeg brugte til at udstanse sekskanter i forskellige mønstrede papirer og i karton. Da jeg havde skåret nogle stykker af hvert papir, brugte jeg en af diene til at tegne en sekskant på et stykke hvidt karton. Det fyldte jeg nu ud med mine små sekskanter, og da jeg havde fyldt hele sekskanten ud, kørte jeg den og dien igennem min Big Shot, hvorefter jeg havde et sekskantet stykke mønstret papir til mit kort.

Jeg brugte de labels, der følger med Big Shot Starter Kit (Powder Blue & Teal) til at udstanse to labels, som jeg lagde sammen med et håndklippet grønt banner imellem. På den måde fik kortets tekst også lidt ekstra opmærksomhed. Endelige bandt jeg et stykke seam binding omkring det mønstrede papir. Når man laver kort, som er så busy, som dette, synes jeg ikke, at man behøver alverden af dekorationer.

Ingredienser:
Big Shot Starter Kit (Powder Blue & Teal)
Framelits Die Set 10PK - Hexagons
Karton
Mønstret papir
Seam Binding
Stempel (Papertrey Ink)
Sværte (VersaFine)

Dearly Beloved

$
0
0

Whenever I have been naughty, my wife always starts by saying "You know what you've done don't you?" to which I almost always reply " What now my beloved?" in the vain hope that one little endearment will help to calm the waters.

I'm not that naughty really, just minor day-to-day irritants like forgetting to fill the water filter jug or forgetting to pick up milk or..... it's usually forgetting something or other!..... MEN!!!

 This week I'm going to make her birthday card (21 again!) and I thought I would use some of the new dies/folders from Lori Whitlock and Prima listed below.

I started by cutting a 10 x 12 cm rectangle of ivory card and die-cutting a flourish from the same card. I used the flourish as a template and traced around the edge on the base of the rectangle with a pencil before trimming around the pencil line and rounding off the upper corners with a suitable punch.

I embossed the floral pattern onto the card and gently inked over the embossed image using the Weathered Wood Distress Ink pad applied with a blending tool followed by the Shabby Shutters ink pad. I also applied a little Mustard Seed ink which is a very strong yellow so use with caution, it adds a little freshness where needed. I used the same colours on the flourish.
 Remember the beginning of the blog? well this is where the 'Beloved' part comes in. I measured the tab die from the Ornate Labels set and created the word 'Beloved' on my PC before printing onto ivory card. Next I cropped the word with the die and die-cut the ornate label from gold card which I then distressed with a sanding pad. I also cut the label background onto which I matted the ornate label followed by the die-cut phrase. This is a seriously useful set of dies and I urge you to check them out. 
For the finishing touch I wanted to add a pretty little flower and who better to design such a set of dies but Prima. This is one of five different flowers in the same set and they are a die-cut essential in my opinion. I inked the edges of the petals using the same inks as before and set about applying a little texture and dimension to the petals using my trusty tool kit by Susan Tierney-Cockburn. I added a Crystal to the centre as the finishing touch and......

.....Here's the finished card.


I had so much fun I decided to make another one using the same elements but changing the colours slightly. I also used a different ornate label and flower, both from the same sets though.


And here they are together, now all I've got to do is choose which one I think she will like..... and then give her the other one as I'm bound to get it wrong!!!


Holiday Layout by Karine

$
0
0


Hi!

Here is my new page “Enjoy” made with a picture from our holidays.

Supply list:

Kit Jenni Bowlin Mercantile
Paper: My Mind's Eye, Pebbles
Cardstock: American Crafts
Alphabets: American Crafts
Stickers: Chic Tags
Embellishments: Jenni Bowlin Studio, My Mind's Eye
Masking Tape
Spray ink : Poussière de fée Scrap Plaisir

Dies:

658300 : Sizzix Big Shot Starter Kit
659436 : Sizzix Bigz Die-Garden Greens

This is a simple page built on a wood-patterned paper. All the elements are gathered around my black & white picture.

I played with paper scraps, tickets and small golden accents.

I used my Big Shot to cut a nice foliage pattern out of white cardstock. Then I sprayed my die cut with gold ink as to match my embellishments. To obtain various shades, I mixed my ink with a bit of water. While my die cut dries in the open, I splashed my page with black drops to create contrast and add extra decoration to my background.

Then I added some 3D decoration, for instance small flowers glued with 3D adhesive foam.


Have a nice day,

See you next Thursday,


Karine

Bonjour !

Une nouvelle page aujourd'hui “Enjoy” avec une photo souvenir de vacances.

Matériel :

Kit Jenni Bowlin Mercantile
Papier : My Mind's Eye, Pebbles
Cardstock : American Crafts
Alphabets : American Crafts
Stickers : Chic Tags
Embellissements : Jenni Bowlin Studio, My Mind's Eye
Masking Tape
Encre en spray : Poussière de fée Scrap Plaisir

Dies :

658300 : Sizzix Big Shot Starter Kit
659436 : Sizzix Bigz Die-Garden Greens

Une page toute simple construite sur un imprimé à motif bois. Tous les éléments sont concentrés autour de ma photo en noir et blanc.

Je me suis amusée avec des chutes d'imprimés, des tickets et des petites décorations dorées.

J'ai utilisé ma Big Shot pour découper un joli feuillage dans du cardstock blanc. J'ai ensuite vaporisé ma découpe d'encre en spray dorée pour être en accord parfait avec mes embellissements. Pour créer des nuances, j'ai mélangé mon encre avec un peu d'eau. Pendant que ma découpe sèche à l'air libre j'ai éclaboussé ma page de quelques gouttes noires pour créer du contraste et habiller mon fond.

Complétez simplement avec quelques décorations en volume, telles des petites fleurs montées à l'aide de mousse 3D.

Très bonne journée à vous,

A jeudi

Karine

Festival Madness

$
0
0


 OK so that's a slight exaggeration - but if you have a look
then you'll see that there is still quite a bit of work to do - but after a while - all this will look like this --
 432 workshop kits - all neatly packed in individual plastic bags - ready and waiting for all of you to come and take part in the workshop!! We'll be on stand  E1 and workshops start at 10.15 each day - they're free - chance to have a try out of the Big Shot and Bigz Die. ( also a chance to take the weight off your feet!)
We will also have demonstrators with Abakhan Fabrics, Cotton Patch, Lady Sew and Sew and Popular Patchwork - it will be difficult to miss us.
Now you may be wondering how the table runners are coming on - it has taken me 2 days to cut fabric, 2 days to fuse and iron fabric - so they still all have to be finished!!! How many sleeps do I still have until the show  - 7, well only 6 really because we have to set up on Wednesday.
To find out if I manage to get everything completed in time - you'll just have to come and see me at the show!!!
Don't forget - E1
I'm off to pack some more kits - see you next week.
Angela


Doodled Watering Can

$
0
0


Lately I have really been having fun with lettering. What makes it fun is to allow yourself to experiment and play with the words and shapes. If you mess up, just erase or start over. It's amazing how freeing it is not to feel like it has to be perfect!

I used the Sizzix ScoreBoards Watering Can as a base and die cut it from matboard. This material is such a great surface to draw on- so smooth and sturdy too!


Die cut one watering can and two side pieces from matboard.

    Draw your design or lettering in pencil, then trace over it with a permanent marker. 
    (I used a Sakura Sensei pen). Once everything is traced, erase the pencil lines. 


      Add flowers, stitching lines, and 3D embellishments.
      Select a color palette of about ten markers (I used Copics).

        Color in the letters as desired. Add strong double sided adhesive to the flaps on each side of the surround and press into position on the base of the watering can.

          And that's it! This project goes together so nice and fast- would be the perfect project to do with your kids.

          Hope you all are having a great summer. See you next time...
          Viewing all 2033 articles
          Browse latest View live