Quantcast
Channel: Crafting ideas from Sizzix UK
Viewing all 2033 articles
Browse latest View live

A tray - basket for my wips

$
0
0

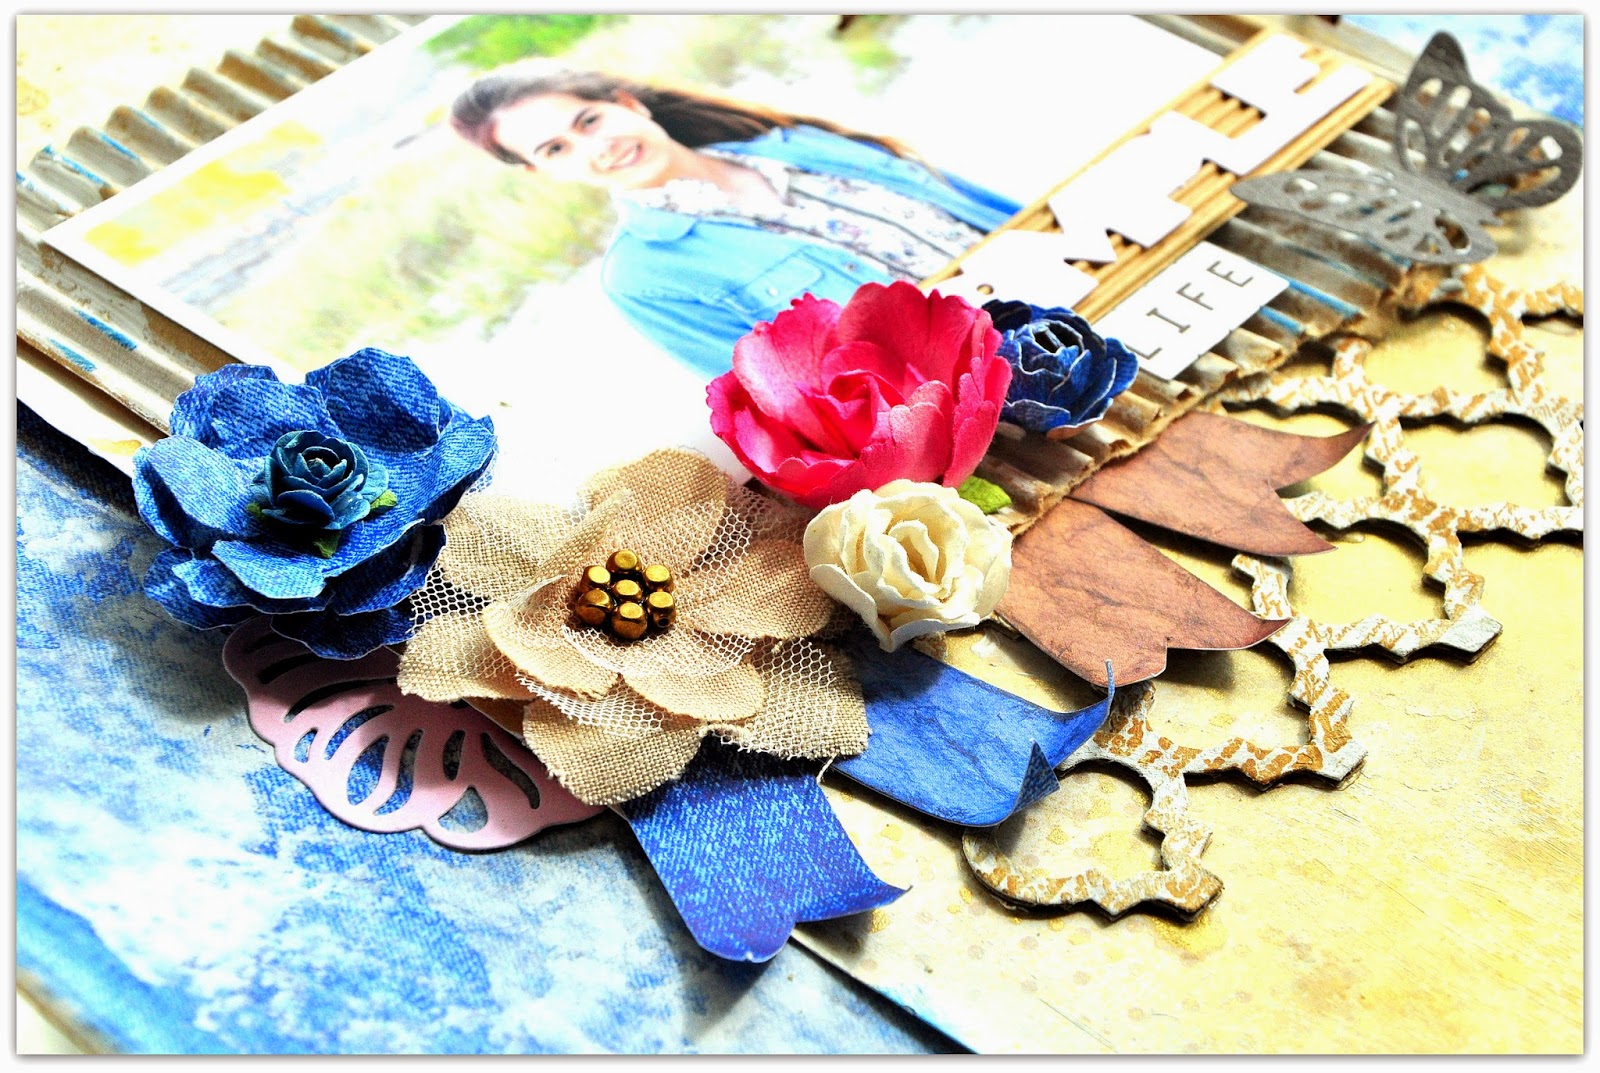
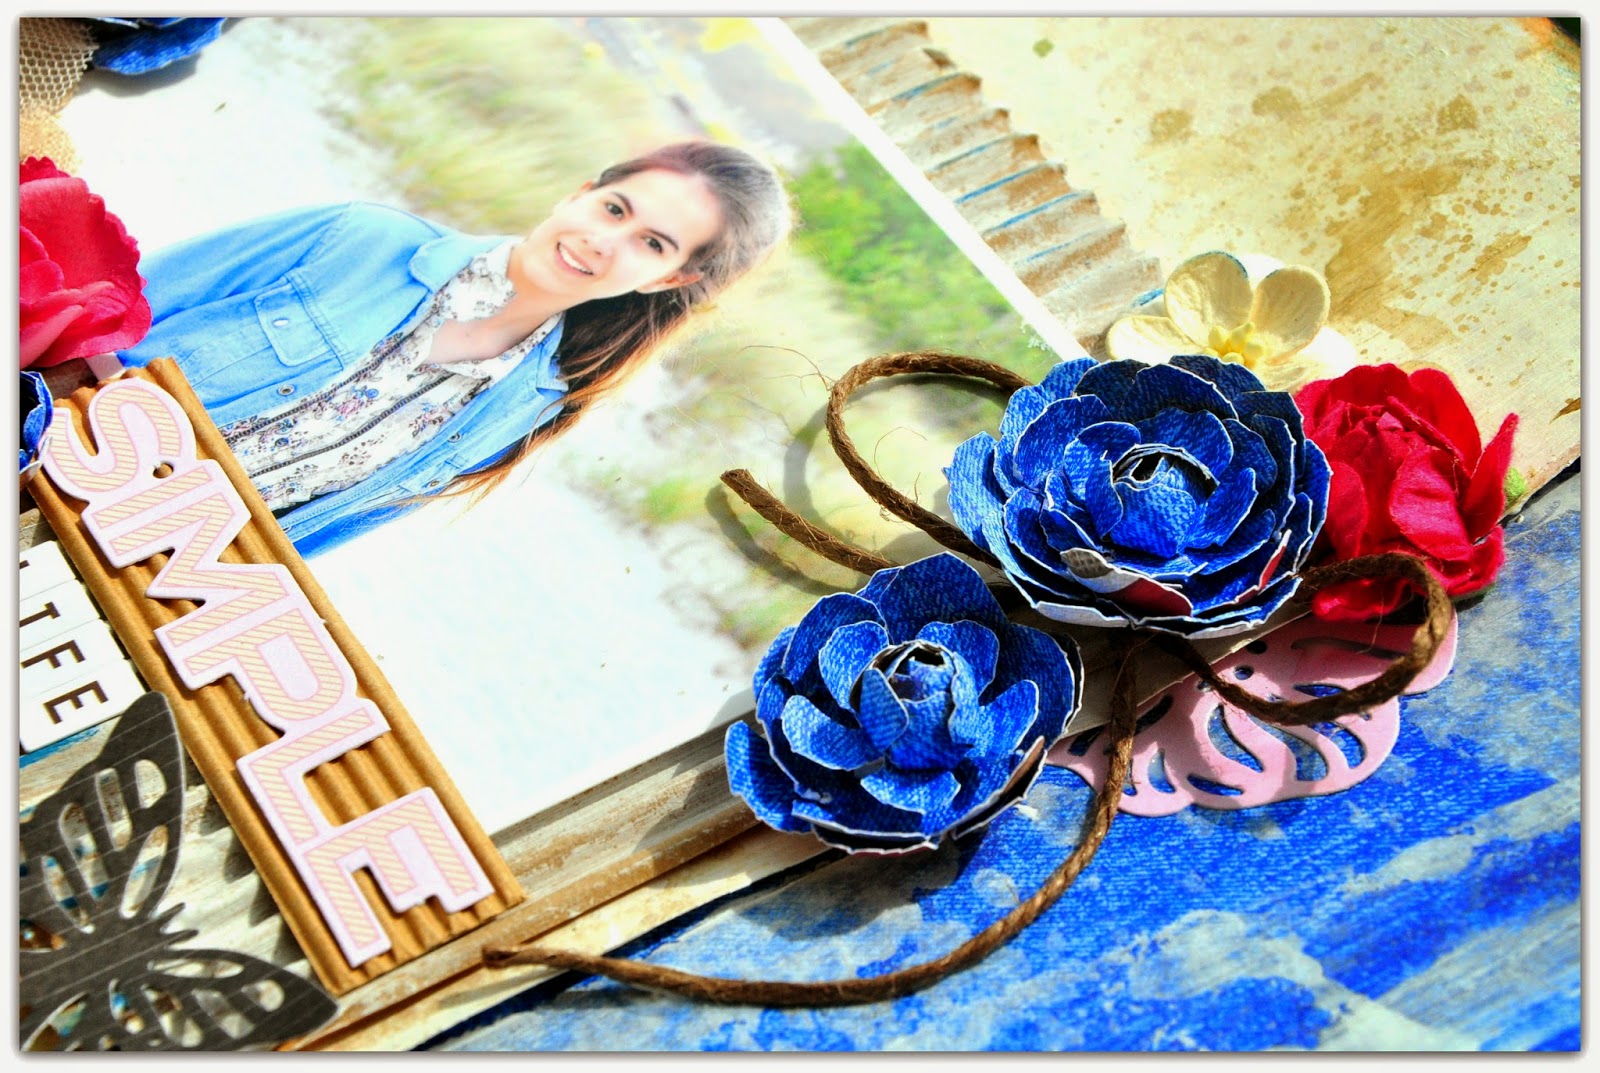
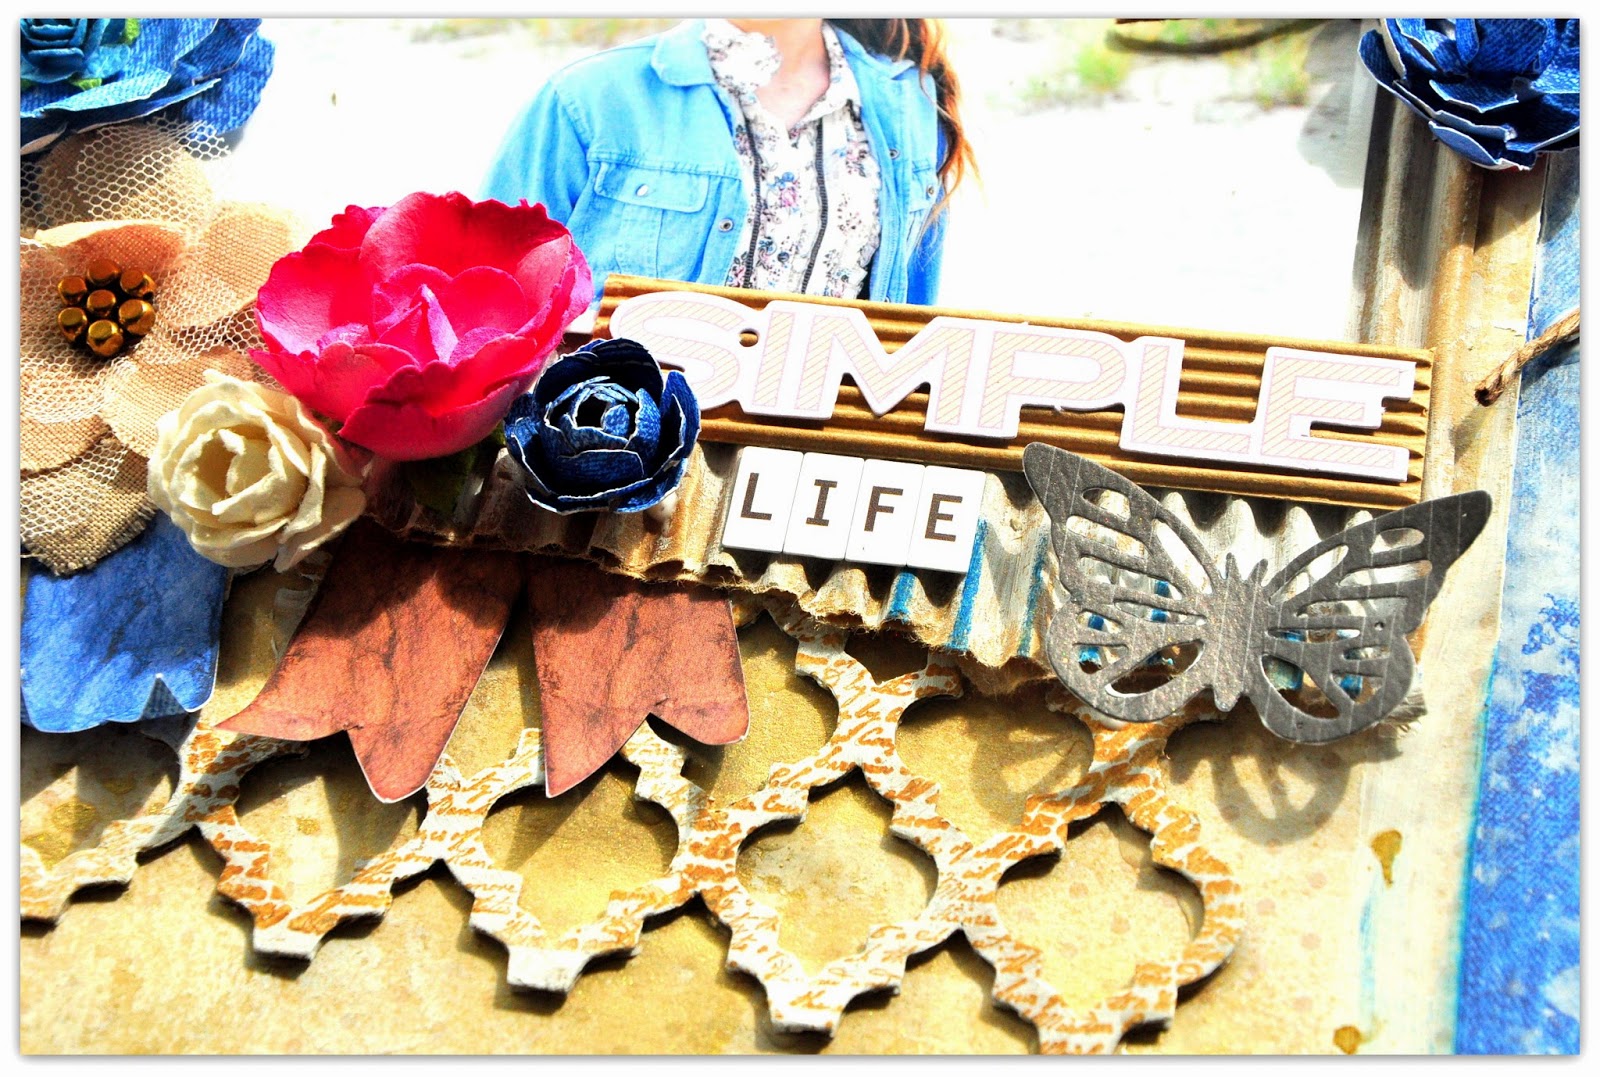
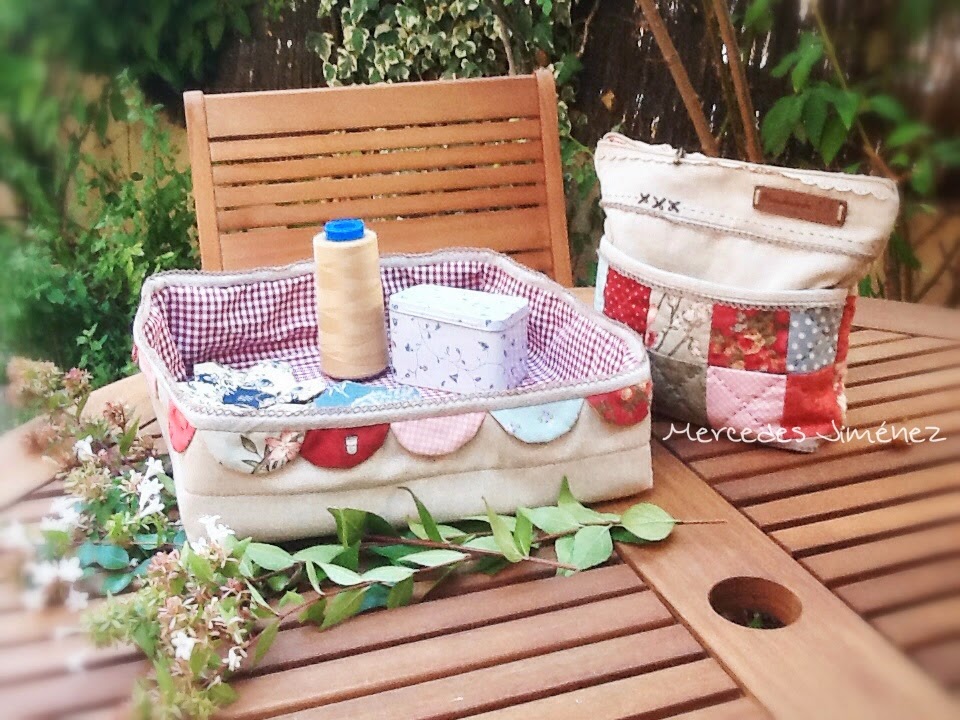
I love doing baskets, but these time I needed something big , like a fabric tray , for my wips. Then I designed  a nice " tray basket" that matched with  my needlework project bag that I showed some weeks ago here and the tutorial for sew it. 
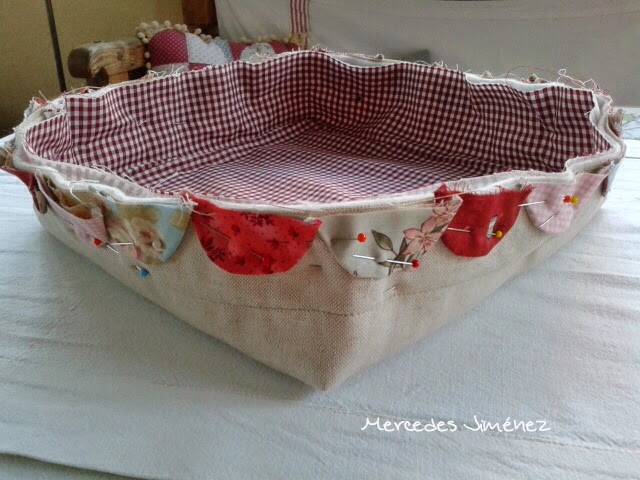
I used the circle die  to add  the half circles made with fabric.

Now I can enjoy i with these cute kit and sew  my hexagons in my patio.


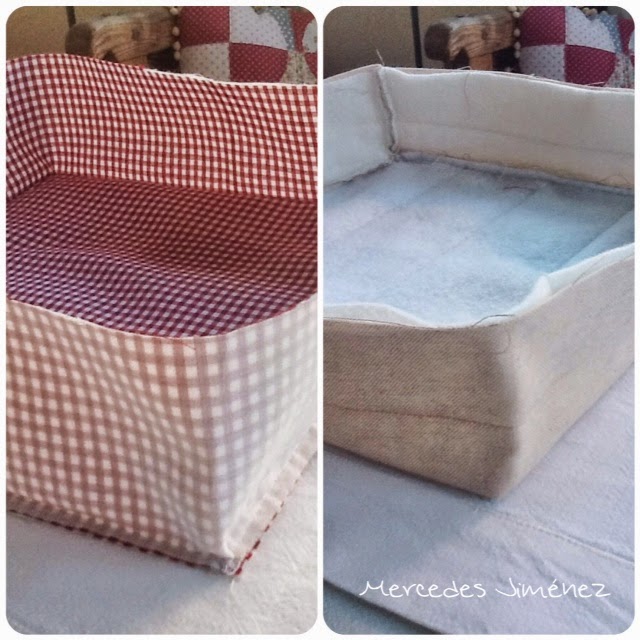
Here you can see some details and the quilting on the back of the  tray.


Supply List : 


657900


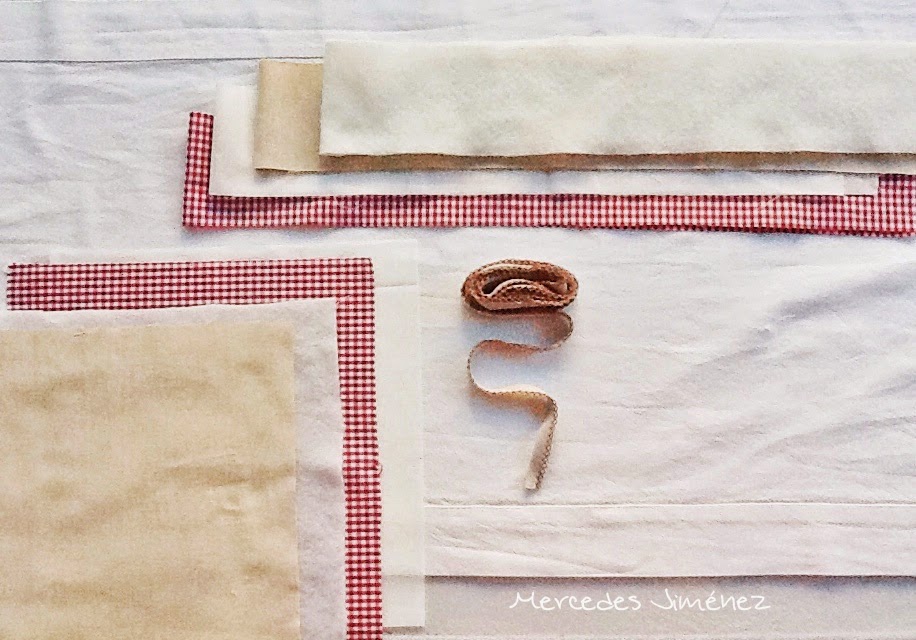
47"x 3.5" cotton fabric , gingham fabric , batting, fusible web ( same size for everthing )
11.5"x 11.5"  cotton fabric , gingham fabric , batting, fusible web ( same size for everthing )
Scraps for the circles
44" lace bias


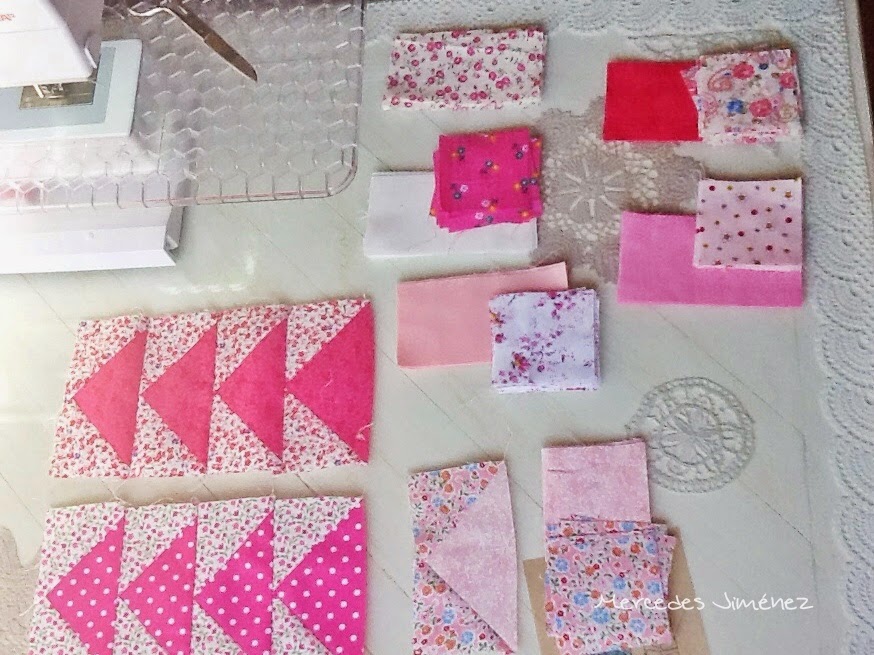
I cut  40 , 3" circles in different scraps. 
Sew in pairs as I liked. 
Cut in the middle
Took  out and pressed


Press the fusible web to the  gingham fabrics ( rectangle and square )
Sew the rectangle and after that I sew to the square.
I did the same with the batting and the cotton fabric.First I quilt them with straight lines.


Pinned  the  half circles  around the out side of  the cotton tray ( 5 in each side ).
Put the gingham tray inside the other and pinned again .


Then  I sew the bias tape  on the out side and finished by hand and that´s all. 


I think it´s a practical tray and you don´t need  time to sew it. I love mine!!


Hope you have a wonderful weekend!!

Love
Mercedes


...........................................*************............................................


Me encanta hacer  cestas y esta vez necesitaba algo más grande, similar a una bandeja , para mis proyectos en curso. Entonces diseñé una  “ cesta bandeja “ que fuera a juego con  la última bolsa que hice para mis proyectos que  enseñé aquí  hace algunas semanas  y el tutorial para hacerla.
Para ello , usé el troquel de los círculos  para añadir un adorno alrededor .
Ahora ya puedo disfrutar de este  bonito kit  y coser en mi patio.

En las fotos puedes ver el acolchado que hice  alrededor  y en la base de esta bandeja de tela.

Materiales :


657900


119cm x 9 cm de tela de algodón , tela de vichí, guata y entretela de pegar con la plancha por un lado ( el mismo tamaño para todo )

29cm x 29cm de tela de algodón  tela de vichí , guata y entrele de pegar con la plancha por un lado ( el mismo tañamo para todo )
Restos de telas para los círuclos
112 cm de biés con puntilla


Estos son los pasos que seguí . Puedes guiarte a través de las imágenes.

Corté  40 cículos con el troquel del  círculo mediano de 7.5 cm
Los cosí  del revés como me gustaron y los corté por la mitad
Les dí la vuelta y planché.
Planché la entretela a las telas de vichí ( cuadrado y rectángulo )
Cosí cerré el  rectángulo con una costura por el revés y lo cosí al cuadrado de  vichí.
Hice lo mismo con la tela de algodón que previamente había acolchado con unas líneas en la base y una en el medio del lateral de la cesta.
Sujeté con alfileres los medios círculos en la parte de afuera de la cesta de tela de algodón ( 5 en cada lado )
Coloqué dentro el forro de vichí y sujeté todo con alfileres.
Cosí el biés por encima y lo terminé a mano.


Creo que es una bandeja práctica y no necesitas mucho tiempo para coserla.
 ¡ A mí me encanta la mía !
Que tengas un maravilloso fin de semana 
Cariños  
Mercedes 


Rounds are all around

$
0
0

Hello all!

Today I would like to share with you my new layout. This time I used just rounds - but I made them the main object of my project. I used different sizes and colours to make it bright and creative. Besides I used just the dies which are included in the Starter Kit so if you buy it you'll get a number of dies and will be able to create a project of the kind without addition purchases.

 
"Limited Edition" means my two little sons as I'm the only one who has these two wonderful creatures))


I used a stencil with rounds and paste to make the background so the round dies matched it perfectly.


The products I used:

Have a nice day!!

Olga

Всем приветики!!

Сегодня я хочу показать вам свою новую страничку. На этот раз я использовала только круги, но в большом количестве - разных цветов и размеров, поэтому они стали главным объектом работы.Кроме того, все эти ножи входят в "стартовый набор"вместе с машинкой, поэтому купив его, можно делать подобные работы не покупая дополнительные ножи.
Фраза Limited Edition - про моих мартышек. Они существуют только в одном экземпляре каждый и только у меня)) 
Для фона я использовала маску с кругами и пасту, поэтому вырезанные круги очень гармонируют с ним.

Всем чудесного дня!

Ольга 


'Lovely' using Frameworks die Trellis

$
0
0


 Hello to you all! I wonder if you are enjoying the same warm weather we are....?
At the moment it feels like it will stay like this for ever...

Today I have a project to share with a picture that we took in Spring before the heat set in.
We were enjoying a late afternoon at the nearest beach.


I used an old cardboard box to diecut my Frameworks Trellis and wanted to do something fun with the leftover bits.
I used a stencil with gesso to make a patterned background and then added the leftover bits that just happened to be the exact same size. I like the effect a lot!


Together with mists and stamps the Trellis create a great background for my black and white picture.


Lately I love the look of the drips from different coloured  media, sometimes the messier the better .-)


I also made a Tattered Florals flower, and I don't think anybody has missed that they are really my favourites....

These are the products that I used for my page:
Thank you for looking!!


-----------------------------------------------------------------------------------------------------------------------

Hej på er all ihop. Undrar om ni alla har lika underbart soligt väder som vi har här...?
Just nu känns det faktisk som det ska fortsätta såhär för alltid!
Idag har jag något litet att visa er med ett foto jag tog tidigt i våras innan värsta värmen kom.
Vi njöt av en liten eftermiddagstur till närmaste sandstranden.

Jag stansade ut min Framework Trellis die ur en gammal papplåda jag hade och ville gärna använda bitarna som blev till övers också. Jag använde en stencil och gesso för att göra ett bakgrundsmönster. Sedan limmade jag dit småbitarna som faktisk hade precis samma storlek som mönstret i stencilen. Jag tycker det blev en jättekul effekt!

Tillsammans med stencil, mist , stämplar och gesso blir mina Trellis en kanon bakgrund för det svart/vita fotot. Dessutom gillar jag skarpt allt som har med droppande färg att göra för ögonblicket. Härligt med lite kladd!!
Slutligen gjorde jag en blomma med min Tattered Florals die. Det är nog ingen som missat att det
är en stor favorit!!

Här är vad jag använt för min sida:
658437 Susan's Garden Tool Kit 

Tack för att ni tittar in!


A clean and simple Congratulations card

$
0
0


I have always loved very clean and simple cards, but as the years have passed I have also dipped my toes on more elaborate designs.

Today i wanted to go back to my clean and simple roots with a congratulations card.

I used the large Circle and Heart from the Framelits set of the Big Shot Starter Kit - 658300 Sizzix Big Shot Starter Kit (Powder Blue & Teal).


I placed the heart die exactly where I wanted the aperture to be and secured with Magic Lowtack Tape, then I die cut it. I cut a few hearts using patterned paper.


I placed them on the card, then using washi tape as guides to keep them straight while I glued them.


I then trimmed the escess off the edges. I die cut two more hearts one in yellow and one in green. The yellow one was a guide, so I glue it through the aperture and place it exactly in its centre.


I glued the green heart to a circle and then used the yellow heart as a guide to where position exactly the green heart.


Finally I stamped the random dots and the Congratulations from my same set of stamps and added some enamel dots.

And here you have the finished card. I hope you like it!


FOR YOU

$
0
0


Hi everyone
I hope you all had a great week, today i have a decoratet paper bag to show you.
 
items used:
Suplly list:
Paper Studiolight Chabbychic
Stamp: IO clear stamp
Ink: Vintage Photo/ Ranger
Paper bag 9x16 cm,ribbon
How to do:
Cut out a patterned paper 8,5x15,5 cm and put it into the embossing folder, die cut 2 tag using Tag Collection , one to decorate the fronside of the paperbag and a bigger to put into the paperbag where you can writte a text. Die cut using Bow-Tied dies , decorate the paper bag.


Thank you for stopping by, see you next Tuesday
Pia
 
Hej alle
Jeg håber I har nydt den danske sommer, i dag vil jeg vise en dekoreret papirspose
 
Dies jeg har brugt:
Andre materialer:
Papir: Studiolight Chabbychic
Stempler: IO clear stamp
Ink: Vintage Photo/ Ranger
Papirs pose 9x16 cm, bånd
fremgangs måde:
Skær mønstret papir 8,5x15,5 cm og sæt det ind i embossing folder, stands ud 2 tag ved at bruge Tag Collection , en lille til at dekore forsiden af pose og en større til at bruge indeni posen hvor der kan skrives en tekst. Udstands Bow-Tied og dekorer posen og sæt bånd på den store tag
Tak fordi du kiggede forbi, håber vi ses igen næste tirsdag
Pia

Bon Voyage!

$
0
0

Last week, here at Sizzix Central, we bid farewell to the lovely Helen Young who has left to have a little baby and we all wish her well. As is the custom, I made a card signed by the crew to send her on her way.

I couldn't resist using the new Jillibean Soup and KI Memories for Hampton Art collection. A collection so good that it took the collective minds of three excellent companies to create.

I LOVE THIS COLLECTION!!! sorry to shout but I really do love it! it's so fresh and contemporary and I'm sure it will be equally well received by both card makers and their scrapbooking cousins.

I dipped into a few of the die/embossing folder sets to make the card which is easy because they work so harmoniously together. the sets I used are:


I started by debossing the front of a square ivory base card whose corners I had rounded with a punch. I placed the folder at an angle so as to only partially emboss the card. Next, I gently applied Seedless Preserves and Crushed Olive Distress inks using foam blending tools over the debossed image. Not only are these two of my favourite colours, they also blend beautifully well together.

Next, I set about  die-cutting and embossing all the elements I want to use. I must tell you, at this point I haven't got a clue how this is all going to fit together which is all part of the fun with this style of card making.
I stamped the phrase using the Crushed Olive Distress Ink and die-cut it with the corresponding die before mounting it onto a die-cut speech balloon using 3-D foam pads. I die-cut the button and star from gold card which I then distressed with a sanding block. 
Next, I cut an asymmetric rectangle of ivory card and embossed it with the 'smile' folder before inking over the raised surface. I die-cut the mini banner and butterfly from the ivory card and inked the butterfly using the same two colours before threading the button with twine
Finally I was ready to assemble all the elements on the base card. I did this by placing them in position and moving them around until I found a pleasing composition. I used a combination of double sided tape and 3D foam pads to add a little dimension before adding a crystal gem in the centre of the star. I will be using these dies/folders quite a bit in the coming month as there is so much creative scope. They represent such great value as there are so many elements in each set. I hope you like them as much as I do?


For a friend

$
0
0

Hello to all:) Today I have this flower card I made using new Prima flower dies.


Sizzix products:
Sizzix Big Shot Machine 657900
Sizzlits Die, Flower, 3D &Vine 658064
Sizzix Thinlits Die Set 5PK - Couquette 659701

Other products:
Pion Design papers; Fairytale of Spring, Flower Frames
cardboard
gesso, structure paste
brick stencil
Distress Inks Bundled Sage, Tumbled Glass and Walnut Stain
black marker
black mist
glue, tape
sentiment stamp "For a friend"

How to do:
1. Cut the patterned paper size 11 cm × 15 cm, distress all the edges with DI Walnut Stain. Apply some gesso and allow to dry.
2. When dried, make brick figure using stencil and structure paste, allow to dry.
3. Apply some color on to the card using DI Bundled Sage and Tumbled Glass, add some spots using black mist.
4. Cut the flowers using Sizzix Thinlits Die Set 5PK - Couquette 659701; four big and four small. Make them ready as above.
5. Cut also the flower branches using Sizzlits Die, Flower, 3D &Vine 658064.Cut the leaves out from the branches and make them again like in the photo above:)
6. Now you can make your card ready; place the flowers, branches and leaves and glue them. Stamp the sentiment. Finally draw the lines using black marker.

Happy crafting, Minna

*   *   *   *   *

Tässä tällainen kortti tänään näytille:)

Sizzix tarvikkeet:
Sizzix Big Shot Machine 657900
Sizzlits Die, Flower, 3D &Vine 658064
Sizzix Thinlits Die Set 5PK - Couquette 659701

Muut tarvikkeet:
Pion DEsign paperit; Fairytale of Spring, Flower Frames
kartonkia
gessoa, struktuuripastaa
tiiliseinä sabluuna
Distress Ink musteet;Bundled Sage, Tumbled Glass ja Walnut Stain
musta tussi
musta suihke
liimaa, teippiä
tekstileima "Ystävälle"

Kuinka teet tämän:
1. Leikkaa kuviopaperi kokoon 11 cm × 15 cm, levitä reunoihin DI mustetta Walnut Stain. Levitä korttiin vähän gessoa ja anna kuivua.
2.Tee tiilikuvioita käyttäen sabluunaa ja pastaa, anna kuivua.
3. Lisää taustaan väriä käyttäen DI musteita Bundled Sage ja Tumbled Glass, lisää muutamia "pisteitä" mustalla suihkeella.
4. Leikkaa kukat käyttäen stanssia Sizzix Thinlits Die Set 5PK - Couquette 659701; neljä isoa ja neljä pientä kukkaa. Kasaa ne kuten kuvassa.
5. Leikkaa myös kukan oksat käyttäen stanssia Sizzlits Die, Flower, 3D &Vine 658064. Leikkaa lehdet pois varresta ja kokoa ne uudelleen kuten kuvassa.
6. Nyt voit tehdä kortin valmiiksi; asettele kukat, varret, lehdet ja liimaa ne. Leimaa teksti. Lopuksi piirrä ääriviivat mustalla tussilla.

Terveisin,Minna


Menig Skovgaard / Private Skovgaard

$
0
0


This week I've been working with some fun new products from Sizzix and Tim Holtz: Bigz XL Alphabet Die - Block Talk Lowercase and Framelits Die Set 12PK w/Stamps - Here & There. They are quite different products but they play well together.


I combined them on a layout of our bonus nephew, Bertram from when he and his family visited us last December. Bertram used mud and leaves to dress up as a soldier training in the woods.


I used the Bigz XL Alphabet Die - Block Talk Lowercase to create my title in very thick cork. That is one reason to really love this alphabet: You can cut all sorts of cool materials to form your title and there by create your own dimensional stickers.


I used the Framelits Die Set 12PK w/Stamps - Here & There to do a couple of arrows that work as embellishmets on the page. The arrows have the right worn touch that go well with a layout and story like this. It was very easy to stamp the arrows first and then die cut them using the coordinating dies and the Magnetic Platform for Wafer-Thin Dies.
 

Supply list:
Sizzix Bigz XL Alphabet Die - Block Talk Lowercase
Sizzix Framelits Die Set 12PK w/Stamps - Here & There
Sizzix Accessory - Magnetic Platform for Wafer-Thin Dies
Sizzix Big Shot Starter Kit (Powder Blue & Teal)
Cardstock
Patterned Paper (American Crafts)
Ink (Memento)
Dymo
Brads
Cork

---o---

 I denne uge har jeg arbejdet med nogle herlige nye produkter fra Sizzix og Tim Holtz: Bigz XL Alphabet Die - Block Talk Lowercase og Framelits Die Set 12PK w/Stamps - Here & There. Det er egentlig ret forskellige produkter, men de leger fint sammen alligevel. Jeg kombinerede dem på et layout fra December, hvor vi havde besøg af vores bonus-nevø, Bertram og hans familie. Vi var en tur i skoven, og Bertram brugte mudder og bregner til at klæde sig ud som en soldat på øvelse i skoven.

Jeg brugte Bigz XL Alphabet Die - Block Talk Lowercase til at skære titlen ud i meget tyk kort, og det er en af årsagerne til at holde af dette alfabet: Du kan bruge det til at skære alle mulige cool materialer ud, og dermed lave dine egne dimensionelle bogstaver.

Jeg anvendte Framelits Die Set 12PK w/Stamps - Here & There til at lave et par stykker pynt til siden. Pilene har det rette slidte udtryk til en side og en historie som denne. Det var super nemt at stemple pilene først, og derefter udstanse dem ved hjælp af de koordinerende dies og Magnetic Platform for Wafer-Thin Dies.


Ingredienser:
Sizzix Bigz XL Alphabet Die - Block Talk Lowercase
Sizzix Framelits Die Set 12PK w/Stamps - Here & There
Sizzix Accessory - Magnetic Platform for Wafer-Thin Dies
Sizzix Big Shot Starter Kit (Powder Blue & Teal)
Karton
Mønsterpapir (American Crafts)
Sværte (Memento)
Dymo
Brads
Kork

Neon addict by Karine

$
0
0

Hello!

Here is a new page with bright colours feeling like holidays and sun!

Supply list:

Cardstock: American Crafts
Papers: Jenni Bowlin Mercantile
Stickers: Chic Tags
Alphabets: American Crafts
Stamps: Jenni Bowlin Mercantile
Ink: Neon Hero Arts
Masking Tape
Izink ink: Fluo Aladine

Dies:

658300 : Sizzix Big Shot Starter Kit
659436 : Sizzix Bigz Die-Garden Greens

A 100% free-style background realized with Aladine Neon inks! Apply a small drop of pink ink, then yellow, spray some water and apply your white cardstock on the ink mix. The colours are mixing together and are settling at random!
Let it dry in the open.

While it dries, cut a foliage pattern out of white cardstock. Shade it lightly with orange and black inks to give more contrast.

Once your background is dry, print several times the same oval stamp in neon pink. Add some tone-on-tone splashes.

Glue your foliage shape then your tiny picture astride of it. Add some stickers and here you are!


Have a lovely day,


Karine

Bonjour !

Une nouvelle page aux couleurs acidulées qui sent bon les vacances et le soleil !

Matériel :

Cardstock : American Crafts
Papiers : Jenni Bowlin Mercantile
Autocollants : Chic Tags
Alphabets : American Crafts
Tampons : Jenni Bowlin Mercantile
Encre : Neon Hero Arts
Masking Tape
Izink : Fluo Aladine

Dies :

658300 : Sizzix Big Shot Starter Kit
659436 : Sizzix Bigz Die-Garden Greens

Un fond de page 100% patouille réalisé avec des encres Neons Aladine ! Déposez une petite goutte de rose puis une touche de jaune, vaporisez d'eau et appliquez votre cardstock blanc. La couleur se mixe et se dépose au hasard !
Laissez sécher à l'air libre.

Pendant ce temps-là, découpez dans du cardstock blanc une forme feuillage. Encrez-là légèrement avec du orange et de l'encre noire pour plus de contraste.

Une fois votre fond sec, imprimez en rose fluo plusieurs fois le même tampon ovale, complétez avec quelques éclaboussures ton sur ton.

Collez votre feuillage, votre mini photo à cheval, un titre, des stickers et le tour est joué !

Très bonne journée à vous

Karine

DIY Summer Party Decorations

$
0
0

Hello! It's Anna posting today.
Party decorations can get expensive, so why not make them yourself? Handmade touches make any party extra special. With Sizzix we have the tools you need to add personal touches to decorations, party favors and more.
I thought I would share these sweet little DIY cocktail recipe cards that I whipped up for my friends of B&B Campodisole for an italian style Party.

Anna Draicchio - sizzix big shot - party decoration (1)

I used a Scallop Card to make the card base. I cut out the recipe with a Fancy Label and I used the new Rock 'n Roll Sundae to make some embellishments, to the Sizzix 1950s collection. I Adore it!!! From the phrases of the day to the iconic images, these versatile shapes possess a classic cool that never goes out of style!

Anna Draicchio - sizzix big shot - party decoration (2)

Anna Draicchio - sizzix big shot - party decoration (3)

Anna Draicchio - sizzix big shot - party decoration (4)

Finally I created several place cards with die Silverware Tags. This is very easy and fun place cards for the dinner table.

Anna Draicchio - sizzix big shot - party decoration (5)

Anna Draicchio - sizzix big shot - party decoration (6)

Thanks for stopping by, I hope you enjoyed these ideas for adding a few paper crafted touches to your Party!
 
COCKTAIL RECIPE CARDS
Items used:
Sizzix Big Shot Starter Kit (Powder Blue & Teal) (658300)
Sizzix Thinlits Die Set 9PK - Rock 'n Roll Sundae (659505)
Sizzix Framelits Die Set 7PK - Labels, Fancy #6 (658831)
Sizzix Bigz XL Die - Card, Scallop #4 (657372)
cardstocks
patterned papers
 
PLACE CARDS
Items used:
Sizzix Big Shot Machine Only (Powder Blue & Teal) (657900)
Sizzix Bigz Die w/Bonus Textured Impressions - Silverware Tags (659187)
cardstocks
patterned papers
 
Anna Draicchio - sizzix big shot - party decoration (7)
 
**************************************
Flag_of_Italy
Per le amiche italiane! :)

Ciao, sono Anna e sono qui per condividere alcune idee utilizzando i prodotti Sizzix.
Le decorazioni per le feste possono essere piuttosto costose e impersonali, quindi perché non fare da soli? Qualche piccolo tocco handmade può rendere speciale qualsiasi festa. Grazie a Sizzix abbiamo gli strumenti necessari per aggiungere un tocco personale e allegro alle decorazioni, bomboniere e altro ancora.
Quindi per ispirarvi un po' oggi ho pensato di condividere queste "carte cocktail" con ricetta, che mi hanno commissionato i miei cari amici del B&B Campodisole. I cartellini possono essere sistemati su di un tavolo per far creare ai vostri ospiti i cocktail da soli oppure per mostrare gli ingredienti che avete usato.
Per realizzarli ho usato la fustella card con bordo scallop per fare la base. Ho poi tagliato la ricetta con i Framelits ed ho usato le nuove fustelle Rock 'n Roll Sundae per fare alcuni abbellimenti. Le fustelle fanno parte della divertente collezione Sizzix 1950s. L'adoro! Dalle frasi alle immagini vintage anni 50, queste forme versatili hanno un chè di fresco e classico che non passa mai di moda!
Per fare il bicchiere bombato con il cocktail ho usato la fustella tagliando via il bordo superiore. L'arancia l'ho realizzata con il piccolo cerchio dello starter kit, mentre il bicchiere semplice l'ho tagliato a mano, ma la fetta di limone è stata tagliata sempre con la fustella dello Starter kit.
Ho anche creato diversi segnaposti con la fustella Silverware Tags. E' molto facile e divertente fare i segnaposti per la tavola in questo modo: ho tagliato a mano le bandierine con i nomi ed aggiunto un tocco decorativo con le posate fustellate ed embossate.

Grazie per la visita, spero che vi siano piaciute queste idee per aggiungere qualche tocco personale alle feste estive!
 
CARTELLINI COCKTAIL
materiali:
cartoncini vari
patterned papers
 
SEGNAPOSTI
materiali:
cartoncini vari
patterned papers


The Festival of Quilts - it's begun!

$
0
0


Hello from sunny Birmingham - yes we have a lovely blue sky over the NEC, and there are so many lovely stands, and quilts on display.


I've already purchased some fabric -  just a little to make some fabric books for my youngest grand-daughter - and that was before the show started!!!

So did I manage to make everything ready for the show - yes I did  - and we think the stand looks fantastic as you can see -


I love the new colours for the bunting and the table runners - apparently they are this summer's wedding colours.


The workshops are in full swing -


if you want to join in remember to come early to get a seat at stand E1, or visit our demonstrators who are with The Cotton Patch, Lady Sew and Sew, Abakhan Fabrics and Popular Patchwork.

Enjoy the show - I'll show you my highlights during the next couple of weeks.
Angela

Sewing flying geese

$
0
0


Summer is a good time at home to change something in my home. This time it´s the turn of my daughter ´s room. She´s is thirteen just  today  and although I´m behind the date  I have started a new quilt for her. 
I have chosen some of my pink and light pink , fucsia and white fabrics from my stash and  cut a lot of rectangles and squares.

Supplies


657605


658324


657900


I ´m sewing a block with four flying geese and  here it is how I´m starting  it. 


You can see my progress here. 
It´s not a very clear pic but you can do an idea.


I have no plans about the size , maybe for her bed ,maybe just only as a top.I´m happy to try this quilt  that I wanted to  sew some time ago . 


Hope you have a wonderful weekend!!

Love
Mercedes


...........................................*************............................................


El verano es una buena época para hacer algún cambio en casa. Esta vez ha sido el turno de la habitación de mi hija que justamente hoy hace trece años.  Aunque ando un poco detrás de la fecha del cumpleaños , he empezado un nuevo quilt para ella.

He elegido telas en rosa , fucsia y blanco de las que tenía en casa  y he cortado un montón de rectángulos y cuadrados.

Materiales


657605


658324


657900


Telas de tu elección. 


Estoy cosiendo un bloque con cuatro vuelos de la oca. Ahí puedes ver cómo va  el comienzo.


En  la útlima foto  se ve el avance que llevo. Siento que la foto no sea un poco más clara pero puedes hacerte una idea.
Ahora mismo no tengo planes sobre el tamaño, quizá para su cama o simplemente como un top sobre ella, pero estoy contenta de   coser este quilt que quería hacer hace tiempo.


Que tengas un maravilloso fin de semana 
Cariños  
Mercedes 
 

A blue and yellow card by Olga

$
0
0
Hello all!

Today I would like to share with you my new card. To make it look light and soft I created a "napkin" on the background using a very beautiful die - "Heavenly". It contains several kinds of wings and I decided to use them in a different way. I cut several wings to 2 parts and then put them circle-wise.


I also used my favorite flowers dies:


The products I used:

Sizzix Thinlits Die Set 2PK - Heavenly

'A Simple Life'

$
0
0


Time for another post from me here on the blog.
Today I have a page with a photo and colours to celebrate 'The Simple Life'.


I used a sheet of jeans-patterned paper as my base and also used my Tattered Florals die to make jeans-flowers. I love the fresh blue colour that goes so well with seaside pictures.


I added a couple of Prima flowers and some from Norwegian Papirdesign for extra measure and a diecut from Heidi Swapp to make up my title, 'Simple Life'.


I find I like to use my Frameworks Trellis die more and more.
Since it's a Bigz die I especially love using it with cardboard to make cuts that resemble  rich wonderful chipboard.  Like I did here....


As you can see I altered the Trellis die cut a little. Firstly I painted it with gesso, and when dry I used a script stamp from Prima to add extra interest to the cardboard.


The cute butterfly is from the latest collaboration between Sizzix and Prima, a collection  called
Flora Grande. If you look closely behind my flower clusters you will see something pink and lacey peeking out. I used half of a die cut flower from the same collection for some softness.
Underneath it all I used loads of Prima Color Bloom mist in a gold shade.


I hope to se you here on the Sizzix blog next Sunday again!
 Have a great week!


Sizzix BIg Shot Starter kit
Sizzix Thinlits dies Whinged Beauties
Sizzix die set Heavenly
Tattered Florals Bigz die
Susans garden tool kit

Patterned papers-Papirdesign
Flowers- Papirdesign, Prima, handmade
Letter stickers- Papirdesign
Die cut title- Heidi Swapp
Mist- Prima

-------------------------------------------------------

Tid för en ny blogg post här på Sizzix bloggen.

I dag har jag en sida att visa er med ett mjukt foto och färger som betonar 'Det Enkla I Livet'
Jag använde ett ark i blått jeansmönster som bakgrund och gjorde även jeansblommor ed min Tattered Florals die. Jag gillar verkligen den fräscha blåa färgen som passar så bra med strand foton.

Jag använde några Prima blommor och några från Papirdesign tillsammans med en diecut titel från Heidi Swapp.

Jag har kommit på mig själv att jag gillar min Frameworks trellis die mer och mer....
Sedan den är en Bigz die är det speciellt kanon att stansa ut saker från pappkartong så att det liknar härliga chipboard bitar. Som här.....

Som du ser så ändrade jag utseende på min 'chipboard'. Först målade jag den med gesso och när det torkat stämplade jag på ytan.
Den söta fjärillen tillhör den senaste gemensamma kollektionen mellan Sizzix och Prima som kallas Flora Grande. Om du tittar närmare bakom mina blomklasar kan du se något rosa skirt som tittar fram. Det är två halvor av en utstansad blomma från samma kollektion.
Under mina lager har jag sprayat med Prima Color Bloom mist i en guldig kulör.

Hoppas att se er snart igen här på Sizzix bloggen!
Ha en skön vecka!

Sizzix BIg Shot Starter kit
Sizzix Thinlits dies Whinged Beauties
Sizzix die set Heavenly
Tattered Florals Bigz die
Susans garden tool kit

Mönster papper-Papirdesign
Blommor- Papirdesign, Prima, handmade
Bokstavs stickers- Papirdesign
Die cut titel- Heidi Swapp
Mist- Prima


Hexagon bee card

$
0
0
Hi everybody!

These summer days I have been a lot in the country and I have seen a lot of bees, so I thought that it would be nice to use my basic shape dies to create a funny bee card :)


To create the bee you just have to die cut some ovals and circles out of yellow and black card and some vellum as shown in the picture. Then just ink the edges and put it together with some adhesive. I have made the eyes using both sides os my Crop-a-dile to create small circles and the little antennas are made with two head pins. Isn't it cute?


For my card base I have used the Hexagon Framelits die set. I thought It went so wellwith my bee and that shape is quite unusual for a card, but it works very good :)


Happy Monday!

.................

Hola a todos!

Estos días de verano he estado bastante en el campo y he visto muchas abejas, así que se me ha ocurrido utilizar las formas básicas de los troqueles de Sizzix para crear una tarjeta con una abeja.

Para hacer la abeja sólo hay que troquelar algunos círculos y óvalos tal como veis en la foto con cartulina amarilla, negra y papel vegetal. Después entintamos los bordes y lo juntamos todo con pegamento y foam adhesivo. Para hacer los ojos he utilizado los dos agujeros de mi crop-a-dile. ¿Verdad que queda mona?

Para la base de la tarjeta he utilizado el set de framelits de hexágono. Me ha parecido que es una forma muy original para una tarjeta y que además le venía muy bien a mi abejita :)

¡Feliz lunes!


Birthday card

$
0
0


Hi everyone
I hope you all had a great week, today i will show you a card
Itemes I have used:
Sizzlits medium 3 Dies Lovely Labels Set 658051
Sizzix Bigz Die Artful Arrows 659433
Supply List:
Paper: Graphic45 Steampunk Spells
Ink: Arhival ink watering can
Ribbon and glossy accent
Card base 14,5x 14,5 cm
I cut patterned paper, 2 pieces 14x14, one 13x13, one 12x12, one 11x11 cm


Thanks for stopping by, wish you a great week
Pia
Hej alle, håber I har haft en fantastisk uge, i dag vil jeg vise et kort jeg har lavet
Sizzix dies jeg har brugt:
Andre materialer:
Papir: Graphic45 Steampunk Spells
Ink: Arhival ink watering can
Bånd og glossy accent
Kort base 14,5x 14,5 cm
Jeg har skåret i mønstret papir 2 stykker 14x14, 1 stk 13x13, 1 stk12x12, 1 stk 11x11 cm
Tak fordi du kiggede forbi, ønsker dig en dejlig uge
Pia

Wedding card

$
0
0

Hello to everyone:) It`s Minna here and my turn to show you this wedding card I made.


Sizzix products:
Sizzix Big Shot Starter Kit (Powder Blue & Teal) 658300
Sizzix Frameworks Die - Courtyard 659429
Sizzix Thinlits Die Set 2PK - Heavenly 659704
Sizzix Thinlits Die Set 8PK - Pandora 659705

Other products:
Pion Design paper; Days of Winter
cardboard
Distress crackle paint Rock Candy
baker twine
flowers
"Wedding"sentiment stamp

How to do:
1.Cut the patterned paper size 13,5 cm × 10,5 cm and emboss it using folder which is included  Sizzix Big Shot Starter Kit (Powder Blue & Teal) 658300. 
Sew all the edges and tape it on to the cardboard.
2. Cut the framework out from the cardboard using Sizzix Frameworks Die - Courtyard 659429  and paint it with DI crackle paint, allow to dry.
3. Cut also the wings, key and lock using dies Sizzix Thinlits Die Set 2PK - Heavenly 659704 and Sizzix Thinlits Die Set 8PK - Pandora 659705
4. Take the other piece of patterned paper, sew the edges and place it on to the other side of card.
5. Place the framework on to card and attach it, glue the flowers and wings. Tie the key and lock together using baker twine and glue them on to the card. Finally stamp the sentiment.

Wishing,Minna

*   *   *   *   *

Moi, tällainen hääkortti tällä kertaa:)

Sizzix tarvikkeet:
Sizzix Big Shot Starter Kit (Powder Blue & Teal) 658300
Sizzix Frameworks Die - Courtyard 659429
Sizzix Thinlits Die Set 2PK - Heavenly 659704
Sizzix Thinlits Die Set 8PK - Pandora 659705

Muut tarvikkeet:
Pion Design paperit; Days of Winter
kartonkia
Distress krakleerausmaali Rock Candy
leipurinnyöriä
kukkia
"Hääparille" tekstileimasin

Kuinka teet tämän:
1. Leikkaa kuviopaperi kokoon 13,5 cm × 10,5 cm ja embossaa se käyttäen kansiota joka sisältyy settiin 
Sizzix Big Shot Starter Kit (Powder Blue & Teal) 658300. 
Ompele kaikki reunat ja kiinnitä kartonkiin.
2. Leikkaa frameworkkartongista käyttäen stanssia Sizzix Frameworks Die - Courtyard 659429 ja maalaa se krakleerausmaalilla, anna kuivua.
3. Leikkaa myös siivet, avain ja lukko stansseilla Sizzix Thinlits Die Set 2PK - Heavenly 659704 and Sizzix Thinlits Die Set 8PK - Pandora 659705.
4. Ota pala kuviopaperia ja ompele reunat, kiinnitä kortin toiselle reunalle.
5. Kiinnitä kuivunut framework, kukat ja siivet. Solmi lukko ja avain leipurinnyörillä yhteen ja liimaa korttiin. Leimaa teksti "Hääparille".

Terveisin,Minna


Set of CAS cards

$
0
0


Prior to using the Framelits Die Set 12PK w/Stamps - Here & There for last week's layout, I used them on a set of clean and simple cards.


I thought that even though the arrows have a slightly distressed / worn look they would work well for a very simple card design. I simply stamped a row of one of the arrows along the bottom of each card using a dark brown ink.


To give each card a little something something, I stamped one of the arrows in a bright colour and then I die cut this arrow. Finally, I added it towards the right side of the card using foam adhesive. This adds some dimension and interest to this very clean design.


Simply changing the colour of this contrasting arrow really makes each card different from the other cards. So when making a set of cards sometimes just using different colours is enough to ensure your cards remain fresh and fun.


The last step in finishing each card was to add a sentiment and I used one from the Framelits Die Set 10PK w/Stamps - Flowers & Tags using the same brown ink as the majority of the arrows.
 
Supply list:
Sizzix Framelits Die Set 12PK w/Stamps - Here & There
Sizzix Framelits Die Set 10PK w/Stamps - Flowers & Tags
Sizzix Accessory - Magnetic Platform for Wafer-Thin Dies
Sizzix Big Shot Starter Kit (Powder Blue & Teal)
Ink (Memento and Papertrey Ink)
Cardstock
 
---o---
 
Inden jeg brugte Sizzix Framelits Die Set 12PK w/Stamps - Here & There på sidste uges layout, brugte jeg de samme stempler og dies til at lave et sæt enkle kort. Jeg mente, at til trods for at pilene har et slidt look, kunne de bruges som motiv for et stramt kortdesign.
 
Jeg stemplede en række pile nederst på et kort i en mørk brun sværte, og for at give hvert enkelt kort noget ekstra, stemplede jeg en af pilene i en konstrasterende farve. Denne farvede pil udstansede jeg med sættets medfølgende dies, hvorefter jeg monterede den på 3d-puder hen mod den højre side af kortet.
 
Noget så enkelt som at ændre farverne på hvert enkelt kort kan være med til at holde hvert kort i et sæt friskt og unikt.
 
Det sidste skridt var at stemple en tekst på kortene, og her valgte jeg at bruge en hilsen, som stammer fra Framelits Die Set 10PK w/Stamps - Flowers & Tags.
 
Ingredienser:
Sizzix Framelits Die Set 12PK w/Stamps - Here & There
Sizzix Framelits Die Set 10PK w/Stamps - Flowers & Tags
Sizzix Accessory - Magnetic Platform for Wafer-Thin Dies
Sizzix Big Shot Starter Kit (Powder Blue & Teal)
Sværte (Memento and Papertrey Ink)
Karton

Perfect 10

$
0
0


It is ten years to the day since my wonderful girlfriend became my wonderful wife. She is probably the only woman in the UK who gets dragged into craft shops by her husband so I thank her for her patience and understanding.

She does get a special handmade card every birthday/Christmas/Valentines/anniversary and she has amassed quite a collection thus far. I have made her a special card this time but I also wanted to commemorate the occasion with a little piece of framed art, the making of which I would like to share with you today.

Once again I reached for the new Jillibean Soup collection of dies and folders because I LOVE IT! but more importantly because I think she will too. I haven't itemised the dies used but if you follow the link above you will get to see them all together as it should be.

I also used the new Block Talk Lowercase alphabet die by Tim Holtz and the Decorative Strip die Antiqua Numbers by Brenda Walton which is one of my favourite go-to dies for birthday cards because it has what I like to think of as a contemporary vintage vibe! which is an oxymoron which makes perfect sense to me (and me alone probably!).

I attached a square of pure white card to a 7 inch (just over 17 cm) square of mount board before die-cutting the number 10 from thin white paper and attaching to the board with low tack spray adhesive. I then proceeded to apply Distress Ink with an applicator, this was built up gradually blending the blue and the green (Broken China and Shabby Shutters) and the orange and red in the top right (Wild Honey and Worn Lipstick). Next, I took two Distress Paint daubers  and watered the colours to a milky consistency.

After strategically splattering the paint onto the square with the paint brush I pealed off the die-cut numbers and traced around the masked area with a fine black marker pen, it doesn't have to be too accurate. 

All the decorative paper used comes from a 6" x 6" paper pad from Basic Grey featuring the fab Hipster collection and I used a sheet of pale green patterned paper to cover some scrap mount board before using it to die-cut the letters for the word 'perfect' which I then attached to the square above the numbers. That extra dimension really makes all the difference for me.
Now, this is where things get a bit crazy, random, scatter shot... take your pick!!

 I knew what I wanted to do with the photo which I printed from my PC before trimming into a Polaroid style shape before adding a few stamped sentiments using my Dear Lizzy roller stamp. After that it was just a question of cutting, stamping, sanding, inking and folding a seemingly disparate collection of designs in the vain hope that they might work together on the page... I'll let you be the judge.
Here is the finished frame, you can see that I mounted the square into the centre of a box frame bought from IKEA (I think?) I spent a long time moving the various die cut elements around the page before I found a pleasing composition which for me is all part of the fun!

Every thing is attached using double sided tape or 3D foam pads adding a sense of depth and dimension, you will also notice a random smattering of adhesive pearls/gems in a selection of hues and sizes.

I hope you like it but more importantly, I hope my wife does too!


Here is a bit of close-up detail.


A soft & masculine layout by Karine

$
0
0


Hi everyone!

Here is a new page with my favourite subjects! Here are masculine but soft tones to highlight a summer mini picture.

Supply list:

Papers: Crate Paper, 4heures37
Alphabets: Jenni Bowlin Studio
Stickers: Studio Calico
Die cuts: Heidi Swapp, 4heures37
Badge: Studio Calico
Heart: Studio Calico
Masking Tape
Stamps: Tim Holtz
Ink: Chalk Prima
Other: Stabilo Pen68

Dies:

658300 : Sizzix Big Shot Starter Kit
659436 : Sizzix Bigz Die-Garden Greens

I chose a squared paper as a background. I love school stationery! I partially worked on my background by printing several times nice butterflies in sky blue ink.
Then I added a touch of watercolour effect thanks to my Stabilo 68 felt-tipped pens! Scribble on a Teflon mat, add a bit of water, withdraw the colour with a thin paintbrush and make splashes on your background!
Let it dry in the open.

While it dries, cut a nice foliage pattern with my favourite die of the moment, the Garden Greens! Use the same process to colour it with your felt-tipped pens.

Then add a pattern paper piece, matching stickers and text stickers.

Glue your small picture; add the title and the page is done!


Have a lovely day,

Karine

Bonjour tout le monde !

Une nouvelle page aujourd'hui avec mes sujets préférés ! Des tons masculins mais très doux pour mettre en valeur une mini photo estivale.

Matériel :

Papiers : Crate Paper, 4heures37
Alphabets : Jenni Bowlin Studio
Autocollants : Studio Calico
Die cuts : Heidi Swapp, 4heures37
Badge : Studio Calico
Coeur : Studio Calico
Masking Tape
Tampons : Tim Holtz
Encre : Chalk Prima
Divers : Stabilo Pen68

Dies utilisés :

658300 : Sizzix Big Shot Starter Kit
659436 : Sizzix Bigz Die-Garden Greens

J'ai choisi un fond de page quadrillé, les papiers de type scolaires sont mes préférés ! J'ai retravaillé partiellement mon fond en imprimant plusieurs fois des jolis tampons papillons en bleu ciel.
Ensuite j'ai ajouté une touche d'aquarelle avec mes stylos Stabilo Pen68 ! Crayonnez sur un tapis téflon, ajoutez un peu d'eau et éclaboussez votre fond !
Laissez sécher tranquillement.

Pendant ce temps-là, découpez un joli feuillage avec mon die préféré du moment, le Garden Greens ! Colorisez de la même façon avec vos feutres.

Ajoutez ensuite un morceau de papier imprimé, des étiquettes assorties et des stickers textes.

Collez votre petite photo, ajoutez votre titre et la page est terminée !

Très bonne journée à vous !


 Karine
Viewing all 2033 articles
Browse latest View live