Quantcast
Channel: Crafting ideas from Sizzix UK
Viewing all 2033 articles
Browse latest View live

Downton dilema

$
0
0

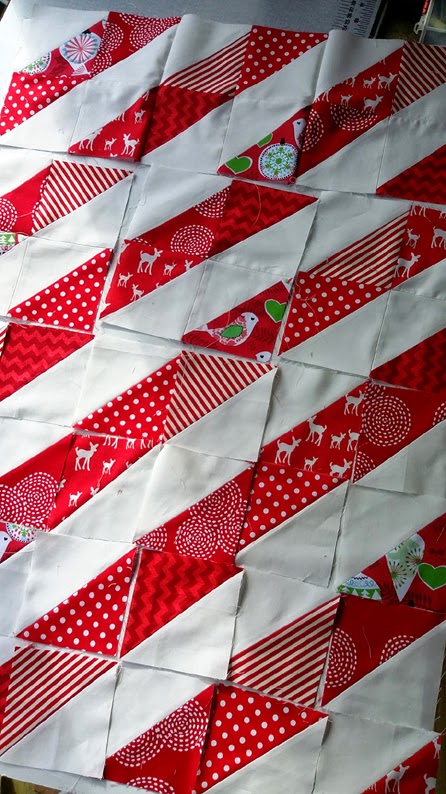
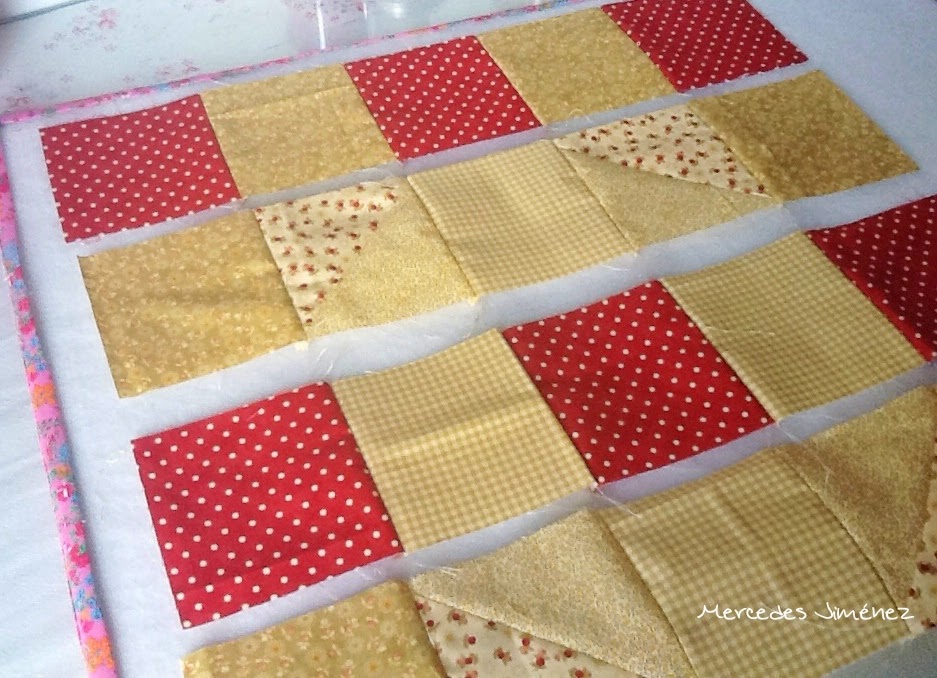
 Well it's only how to put the quilt together! - there's and easy way for the piecing, which is difficult to plan, or there is a difficult way to piece which is very easy to plan - still not sure which option to take - here are the options -
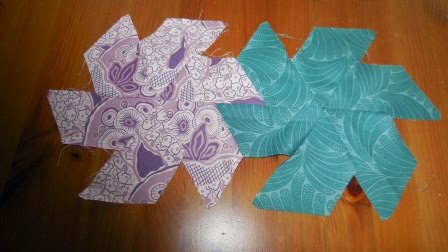
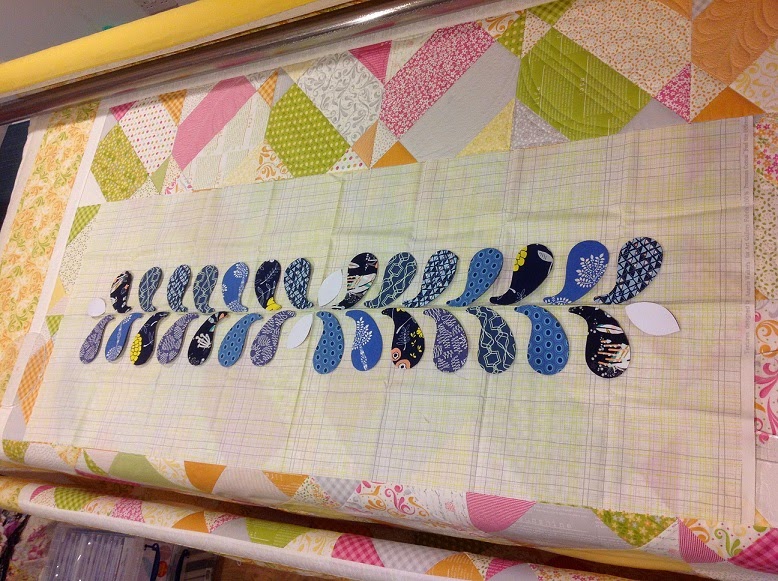
 

 I can make each pinwheel complete and then lay them out to get a balance of colour and pattern - but the piecing will be complicated, or
 
I can stitch the shapes into triangles - but as you can see from the numbering on the pieces in each triangle that it is quite complicated - so I'm off to the sewing machine to see which method I'm going to adopt - back soon.
The decision is made - this method was quite tricky to stitch precisely although as previously discussed it's easy to plan.
 This triangle method gives me a much neater result - not so many difficult half seams - so I'm going to attempt this method and hope that I can plan it well enough.
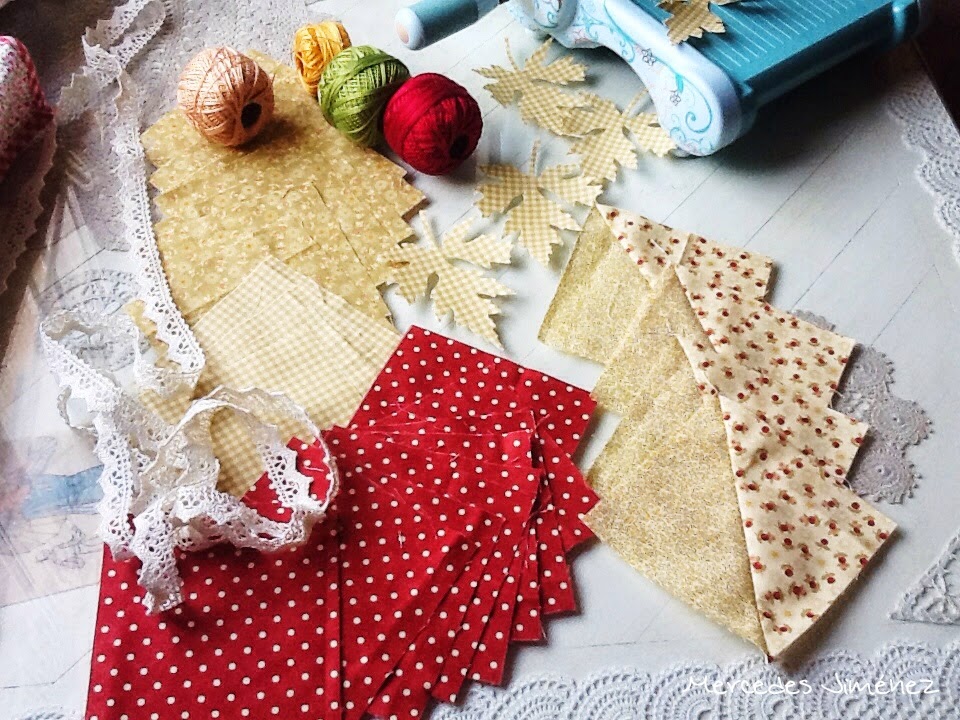
As I have about 20 different fabrics to work with I think this method will work.
My next task is to cut some more half hexagons with die -http://www.sizzix.co.uk/product/658880/sizzix-bigz-die-5-half-hex and get sewing again. I'm going to cut 24 half hexagons from each fabric and see how far I get - this may just end up as a bed runner-or a single bed quilt - I'm not sure yet. I'll keep you informed as it progresses!
Next week I'm demonstrating at Alexandra Palace at the Knitting and Stitching show. I'll be on The Cotton Patch stand, I'm not sure of the number, so if you're at the show come and say hello.
Hope to see you next week.
Angela


Paisley Daisy Feathers

$
0
0


Hi, its my first day here, so be gentle with me! For the benefit of those who don't know me, I'm Trudi, I'm a Quilter, Long Armer, mother of both a teenager and an adult child, allotment grower, and on other days I also work part time.  Mostly, I'm a quilter.

I'm absolutely thrilled to be here and have plenty of ideas of how to make life just a little bit simpler with the Sizzix Big Shot.  I've been quilting for close to 25 years now, a stroker and collector of fabrics, and mainly make big quilts.  I guess I am a modern traditionalist, I like all the pretties!  Since my children have gotten to the stage they can forage for themselves I get more time for quilting.

So, to break myself in gently I recently went on a retreat, and part of which was to decorate the ticket tote for another attendee,  As a long arm quilter, I love feathers, and was recently lucky enough to demonstrate with the Nel Whatmore dies at Festival of Quilts.  Whilst there I had time to percolate a few ideas.


I selected some Art Gallery fabrics from my stash, and the Paisley Daisy die, and with a few bits of packaging from a recent purchase cut myself some plain paisley shapes. 


Having roughly cut the shape about 1/4" bigger than the cut papers, I like to glue baste them.  I use a cuticle tool, to smooth down the edges and ease the fabrics evenly on the convex (outside) sides.  It also helps snipping within a few threads of the edge on the concave (inside) curves as it  persuades the fabrics to lie flat. 


Once the glue is dry, after a good press with a dry iron, I removed the papers, pressed again to ensure my seams would lie flat, and machine appliqued my paisley shapes to the back part of the bag.  Nothing fancy in this, I just used my normal sewing foot, and a straight stitch, but was careful to pivot with the needle down when I needed to adjust my direction of sewing. 

As my bag had been deconstructed, I could load it up on the long arm for quilting.  As the quilting is small scale and dense around the appliqued shapes, they take on a trapunto feel about them. 

The circle for the center was cut free hand, however, the Circles die would be a great addition for this, as it has 3 sizes to choose from. 


I am pleased to report the recipient of the bag was thrilled!  As was I with the results, so much so, I have a  table runner planned, along with the addition of the Leaves die, which I intend to hand applique. A nice project for the cooler evenings now the nights are drawing in.


Til next time, when I hope to have something a little seasonal for you. 

Happy Birthday Cupcake Card By Anna

$
0
0

Good morning crafty friends! It's Annahere to share some ideas using Sizzix products.
I wanted to share the details on the card I created. Who doesn’t love cupcakes?

cafe creativo - big shot sizzix - cupcake card (1)

cafe creativo - big shot sizzix - cupcake card (2)

For this card I combined specific Sizzix products from the Stephanie Barnard Collection (Triplits) and Paula Pascual Collection (Thinlits).
For my card, I used a standard A2 card base. I die cutted the frame with “happy” and added the word "birthday" to complete the sentiment.

cafe creativo - big shot sizzix - cupcake card tutorial (3)

By cutting and layering 3 different patterned papers and cardstock I created a cupcake which I adhered using dimensional stickers to add deepness.
A simple card, but so cute with cupcake, polaroid frame, sequins, twine and stitching!

cafe creativo - big shot sizzix - cupcake card tutorial (4)
 
I hope you like my pretty cupcake card.
Have a sweet day!
 
Items used:
cardstocks
patterned papers
sequins
strass
twine
foam board tape
sewing machine
 
**************************************
Flag_of_Italy
Per le amiche italiane! :)

Ciao, sono Anna e sono qui per condividere alcune idee utilizzando i prodotti Sizzix.
Oggi vorrei mostrarvi la mia ultima card, decisamente "zuccherosa"!
Chi non ama i cupcake, alzi la mano! Io li adoro, anche quelli non commestibili e sono un soggetto molto carino per i compleanni.
Ecco quindi una semplice card, ma resa particolarmente dolce e festosa grazie alla cupcake e alla cornice con scritta “traforata”.
Per la mia card, sono partita da una base standard A2 di cartoncino bianco.
Ho fustellato la cornice tipo polaroid, con la scritta “happy” ed ho aggiunto la parola "compleanno" per completare l'augurio. Niente di più facile!
Tagliando poi e sovrapponendo le varie parti, ho creato una cupcake, che ho incollato con scotch tridimensionale per aggiungere profondità. Con questa fustella sono infinite le combinazioni per creare la vostra cupcake preferita.
Una cornice cucita con tante paillettes e un fiocco hanno completato il tutto.
Come vedete, per questa card ho combinato specifici prodotti Sizzix della Collezione di Stephanie Barnard (Triplits) e Paula Pascual Collection (Thinlits).

Vi saluto e spero possiate trascorrere un "dolce" week end!!!
 
Materiali:
Sizzix Big Shot Machine (657900)
Sizzix Triplits Die Set 9PK – Cupcakes (659927)
Sizzix Thinlits Die Set 10PK - Phrase Cards (659977)
cartoncini
carte fantasia
paillettes
strass
cordoncino bicolore
scotch spessorato
macchina da cucire

Glittered snowflkes and lovely ornaments

$
0
0


Hello Sizzix UK fans! Today I have for you 2 small Christmas inspirations. It would seem that now is even so far to Christmas, but usually we (crafters!) create Christmas cards much earlier. My today's cards are mine first Christmas cards this year!


To create a custom shape cards I used dies from Framelits Die Set 12PK - Fancy Cards set. Due to the fact that the set contains many different sizes and shapes of dies, we can create an interesting card base in various sizes and create layers on our cards or pages.


The main decoration on my cards are a large snowflakes, which I cut out using Bigz Die - Snowflakes #3. I love dies in this line, because we can cut out in thicker materials and shapes are always very impressive, both in terms of size and design. I painted my snowflakes using mint acrylic paint and then I added some glitter powder on the top.


Tremendously love the dies in Christmas ornaments and baubles shapes. To add more Christmas touches on my cards, I cut out a couple of beautiuful ornaments using new Triplits Die Set 9PK - Ornaments. Each of the small ornaments can be further embellish or you can cut them with a variety of interesting materials. I added small dots made using 3D paint on these lovely elements.


Sizzix supplies used:


Are you already create Christmas cards? If yes, don't forget to use some amazing new Christmas Sizzix dies!


Thank you for visit us today! 
Have a lovely, creative weekend! 
~~ Karola ~~ 


****************************

Witajcie! Dziś mam dla Was świąteczne inspiracje. Wydawałoby się, że jeszcze daleko do Świąt, ale zwykle tworzenie kartek świątecznych zaczynamy dużo wcześniej. Moje dzisiejsze kartki to moje pierwsze karteczki świąteczne w tym roku! 
 Do stworzenia nietypowego kształtu kartek wykorzystałam wykrojniki z zestawu: Framelits Die Set 12PK - Fancy Cards. Dzięki temu, że zestaw zawiera wiele różnych rozmiarów w kilku kształtach, możemy tworzyć ciekawe bazy kartek w różnych rozmiarach oraz tworzyć warstwy na naszych kartkach. 
Głównymi ozdobami na moich kartkach są duże śnieżynki wycięti wykrojnikiem Bigz Die - Snowflakes #3. Uwielbiam wykrojniki z tej serii, ponieważ możemy wycinać nimi w grubszych materiałach a wzory są naprawdę imponujące, zarówno pod względem rozmiaru jak i designu. Moje śnieżynki pomalowałam miętową farbką oraz dodałam trochę sypkiego brokatu na wierzch. 
Ogromnie podobają mi się wykrojniki z motywem świątecznych bombek i ozdób na choinkę. Aby dodać więcej świątecznych akcentów, dodałam do kartek kilka tego typu ozdób wyciętych wykrojnikami z zestawu Triplits Die Set 9PK - Ornaments. Każdą z małych bombek można dodatkowo ozdobić lub wyciąć je z różnych ciekawych materiałów. Ja ozdobiłam te urocze elementy dodając trochę kropeczek z farbek 3D.
A czy Wy tworzycie już kartki świąteczne? Jeśli tak, nie zapomnijcie użyć kilku wspaniałych, nowych wykrojników Sizzix! 

Wykorzystane produkty Sizzix:


Dziękuję za dzisiejsze odwiedziny na naszym blogu!
Życzę Wam cudownego, kreatywnego weekendu!

~~ Karola ~~

My seed bag with the cute little fox

$
0
0


Hi everyne, how is going these first weeks  of autumn? I ´m really enjoying with the new dies by Sizzix. This time I chose the cute little fox die to sew a seed bag to  heat in the microwave for some pain or just  hot your bed before sleeping , again with civil war reproduction fabrics.


Supplies

656499


657900

659907

11"x 15 1/4" dark fabric
scraps of fabrics for the fox
fusible web
3 little beads
39" beige lace

Sewline glue or similar
wheat
lavender

I took some pics for the process again. So it´s easy  you can make an idea.
First I pressed the fussible web on the wrong side of the little scraps and layed on the Magnetic Platform , really good fr Thinhlits. It let nothing move it.!!


With all the pieces and did the little fox and sew with a glue for fabric. Then I  pinned it on the right bottom corner , around 1.5 ".


Stitch with my Bernina  ( • stitch 45 )with a variegate Mettler thread. First pieces inside and after all around.
Then sew the lace, folded the bag in a rectangle and sew on the wrong side with something open to fill the seeds.
Sew the little beads for eyes and nose.


Filled with wheat and  lavender and finished with hidden stitches

.

..............And here it is , a good seed bag for this autumn and winter !!
Oh, if you like the face foxes cushion can find my tuto here. 


Hope you have a wonderful weekend!!!
Love
Mercedes

...............................................................................************************* ..................................................................


Hola a todo el mundo, ¿ qué tal van estas primeras semanas de otoño?

Sigo disfrutando de los nuevos troqueles de Sizzix, esta vez con un pequeñito zorro que he usado para hacer una bolsa de semillas  para calentar en el microondas  para calmar dolores  simplemente  la cama antes de acostarte. Elegí telas de la era  civil americana.

Materiales


656499


Sizzix Thinlits Die Set 9PK -Fox   

28cm x 40cm de tela oscura

99 cm de puntilla en color crema
restos de telas para el zorrito
3 abalrios pequeñitos
entretela
pegamento Sewline  o similar
trigo y lavanda para rellenar

De nuevo he tomado unas fotos para que sea más fácil seguir el proceso  y poder hacerte una idea.
Primero planché la entretela sobre el revés de las telitas y corté con la Big Shot. Usé la  base magnética que ayuda bastante a que no se muevan los finos troqueles metálicos.
Con todas las piezas hice el zorro , pegándolas y sujetándolas con alfileres  sobre la tela base, justamente  en la esquina inferir derecha, aproximadamente unos cuatro cm.
Hice  un punto de festón ( puntada 45 de Bernina ) alrededor de las piezas internas primero y luego las externas. Usé un hilo matizado de Mettler.
Cosí primero la puntilla alrededor y luego por el revés de la bolsa dejando una parte abierta por la que dí la vuelta. Cosí los abalorios para los ojitos y nariz
Rellené con trigo y lavanda y cerré con puntada escondida..
Y ya está , una estupensa bolsa de semillas para este otoño e invierno.
Oh, si te gusta el cojín de las caritas de zorro ,puedes ver mi tutorial aquí. 
Que tengas un maravilloso fin de semana
Cariños
Mercedes

A Thank you card by Olga

Fall Family Fun.

$
0
0
Hello, it's me Bente here with an Autumn/Fall inspired page.
The air is much crisper now than only a couple of weeks ago and up here in the Scandinavian countries the days have grown much shorter.


 I think you can tell I had a lot of messy fun with this page. I added a couple of my all time favourite dies. As you probably know by now, the Tattered Floral die is just perfect for making your own flowers and the Frameworks dies are all wonderful to use both as a background or as a special feature on their own.


I took the picture yesterday when we went for a stroll in the beechforest looking for any remaining delicious chanterelles. We came home pretty emptyhanded, but we all ejoyed our little outing very much.


I used the large Tim Holtz Leaf die with its embossingfolder. I think it is absolutely beautiful. In my previous post I used it as well, on a couple of cards.


Finally a little close up of one of my Tattered Florals (medium sixed).

So today was an explosion of colour. I hope you enjoyed my Fall inspired page and I will be looking forward to seeing you same place and same time next Sunday! :-)

The Sizzix products I used are:
Sizzix Big Shot Starter Kit (Powder Blue & Teal)
Sizzix Frameworks Die - Courtyard
Sizzix Bigz Die - Tattered Florals
Sizzix Bigz Die w/Texture Fades - Layered Leaf

Papers are Prima and Les papiers de Pandore. Flowers are Prima, Petaloo, Magnolia

Have a nice new week!

Bente

Advent Calendar part

$
0
0


This is my first ever blog post for Sizzix, it's about an advent calendar project and I'm a bit worried that posting a Christmas-related project in October is a risky move, I know it's still a long way off so please keep reading! The head start is only to ensure that there's plenty of calm making time before the hectic Christmas season with all of its other commitments starts up in a month or two.

The first stage is the background that the pockets will be sewn onto.
I used the Half-Square Triangles, 4 1/2in Finished Square die to cut 48 white triangles (approximately half a yard) and 48 red printed ones to arrange in diagonal stripes to look like candy-cane stripes.
I used a selection of 6 red printed fabrics, 8 of each different print works out perfectly (approximately a third of a fat quarter for each print) but I just chopped away with my Big Shot as the mood took me (it's easy to carried away) so have more of some than others. Also, a fabric that has a print with a clear 'right way up' like the deer one can't be folded over for cutting but needs to be laid the right way up on the die with the diagonal line dividing the triangles on the die running in the same direction as the pieced stripes will. Otherwise some of the triangles will be cut the wrong way round (I *might* have some leftover wrong-way-round triangles lurking on my cutting table).

Next each red triangle was sewn to a white one, pressed and then laid out in a 6 squares by 8 squares rectangle.
After much tinkering with the layout they were finally sewn into 2 x 2 blocks and then into rows before being joined fully (finished size approximately 24" x 32").
It was so quick to make and I'm so pleased with the result that I think a festive cushion in the same candy stripe pattern may have to be added to my to-do list for later.

Next up is the Square, 4in Finished die and Lollipop Shadow Numbers to make the pockets - which I'll post about next time.


Thank you card

$
0
0
Hi everybody! Today I want to show you a new card, made with the Be Thankful die set from Jillibean soup.


First of all I have dry embossed a peace of white cardstock to create my background. I love my textured impressions embossing folders, they give a completely different look to a simple white card!


Then I have die cut the other elements of the card out of pattern paper and i have adhered them with adhesive squades to create a lot of volume. I have cut some of the squares into very small pieces to fit behind the thanks word. 

Happy Monday!

....................

Hola a todos!

Hoy os enseño una tarjeta que he hecho utilizando el set de troqueles be thankful de Jillibean Soup. 

Primero de todo he utilizado una carpeta de embossing para dar textura a la cartulina de fondo. Me encanta cómo con un simple gesto cambia completamente el look de la cartulina :)

Después he troquelado los demás elementos de la tarjeta y los he pegado con foam adhesivo para darle mucho volumen. Para pegar las letras de la palabra Thanks he cortado en trocitos muy pequeños los cuadraditos de foam. Parece que la palabra flota!

Feliz lunes!


Embossed details with Lilith

$
0
0
I love details and always try to add them to my layouts. For today's layout I wanted to focus on the embossing folders. They are such a great tool and add oodles of detail

I started by choosing some grey cardstock that would work with some grey patterned paper. I picked a couple of embossing folders and embossed several strips of the grey cardstock and patterned paper. These strips are the base of the layouts. On top I added my photoand a cluster of embellishments.


To create a sense of movement and flow I placed some embossed butterflies. They also help draw the eye towards the photo. I love having a closer look at the layout to see the embossed details


I hope you'll get your folders out and emboss pretty details onto some paper.

Happy Scrapping

Lilith

Supplies:
OTHER: Studio Calico Poet Society & Dickinson Kit, doily, Mint Julep Mr Huey's,


Best Wishes

$
0
0


Hi everyone
I hope you all had a great week, today i will show you a tag using Sizzix Bigz die Snowflakes and Ornate Labels

Items I have used:
Supply list:
Paper:Craft & you design Frozen Paper
Stamps: JustRite
Cheesecloth,button, ribbon, brads and acrylic paint to the edges

 
Thanks for stopping by, se you next Tuesday
Pia
 
Hej alle 
Jeg håber du har haft en skøn uge. I dag vil jeg vise en  tag hvor jeg har brugt 3 forskellige dies
Items I have used:
Andre  materialer:
Papir:Craft & you design Frozen Paper
Stempel: JustRite
Ostelærred,knap, bånd, brads og akryl maling til alle kanter.
Tak fordi du kiggede forbi, vi ses næste tirsdag
Pia

Joy

$
0
0

Good morning to everyone:) Today I want to show you my first Sizzix Christmas card:)


Sizzix products:
Sizzix Big Shot Machine 657900
Sizzix Thinlits Die Set 5PK - Card Front, Ornaments 659587
Sizzix Thinlits Die Set 9PK - Christmas Phrase Cards 659973
 
Other products:
Bo Bunny papers: Snowfall collection, white cardboard, Versamark watermark stamp pad, embossing powder"Snowflake", glue

Cut the ornaments using die Sizzix Thinlits Die Set 5PK - Card Front, Ornaments 659587 and emboss it using watermark stamp pad and embossing powder. Glue this on to the backgroundpaper size 15 cm × 15 cm. Cut also the sentimetn using the die included set Sizzix Thinlits Die Set 9PK - Christmas Phrase Cards 659973. 
Finally tape the card front on to the cardboard.

Happy crafting, Minna

*    *    *    *
Moi, tässä ensimmäinen Sizzix joulukorttini.

Sizzix tarvikkeet:
 
Muut tarvikkeet:
BoBunny paperit; Snowfall collection, valkoinen kartonki, vesileima muste, embossausjauhe Snowflake, liimaa.
 
Leikkaa kuvio stanssilla Sizzix Thinlits Die Set 5PK - Card Front, Ornaments 659587.  Kohokuvioi käyttäen vesileimamustetta ja embossausjauhetta. Liimaa kuvio kuviopaperiin. Leikkaa myös teksti stanssilla joka sisältyy settiin Sizzix Thinlits Die Set 9PK - Christmas Phrase Cards 659973 . Lopuksi kiinnitä korttipohjaan.

Terveisin, Minna


Socks on the mantel

$
0
0


It is only October but I still work on my Christmas cards. I guess I will have to confess that I love making Christmas cards and actually work on them at all times of the year. This week my card took a turn towards the more distressed / aged look which is something I don't often do.


I designed a card around one of the images from the new and fun Thinlits Die Set 4PK - Christmas Trims. The three sock are really cute and intricate and there is something very cozy about the idea of socks hanging on a mantel.


I diecut the image with the sock in a delicately patterned paper and then I used a small stamp to stamp all along the edge of the diecut. Afterwards I diecut parts of the image to be able to fill in the empty spots in the three socks.


To make sure the socks were clearly visible against my stamped background I mounted the diecut on a scallopped square cut with the Framelits Die Set 6PK - Squares, Scallop. As a last detail I decided to add some holly to two of the corners of the diecut. The leaved and berries were diecut using the Bigz L Die - Wreath, Banner, Holly & Poinsettia and I think it is so cool that the Bigz dies let you cut multiple leaves at the same time - it is a time saver. To give the berries a little something I added some Wink of Stella to each of them.
 
Supply list:
Sizzix Big Shot Starter Kit (Powder Blue & Teal)
Sizzix Accessory - Magnetic Platform for Wafer-Thin Dies
Patterned paper (Basic Grey)
Cardstock
Wink of Stella
Jute twine
 
---o---
 
Det er kun oktober, men jeg er i fuld gang med julekortene. Faktisk holder jeg så meget af jul og julekort, at jeg arbejder på mine kort året rundt. I denne uge tog mit kort en drejning mod det mere rustikke og slidte, hvilket jeg ellers ikke laver ret tit.
 
Jeg designede mit kort med et af motiver fra Thinlits Die Set 4PK - Christmas Trims som mit hovedmotiv. De tre sokker er super nuttede og detaljerede, og der er noget rigtig hyggeligt over ideen om sokker, der hænger på pejsen.
 
Jeg udstansede motivet i et svagt mønstret papir, og derefter brugte jeg et lille tekststempel til at stemple kortets hilsen hele vejen rundt langs motivets kant. Derefter udstansede jeg dele af motivet, så jeg havde til at udfylde hullerne i hver enkelt sok.
 
For at sikre mig at sokkerne stod frem i forhold til den stemplede baggrund, monterede jeg dem på en scallopped firkant, som jeg udstansede med Framelits Die Set 6PK - Squares, Scallop. Som en sidste detalje besluttede jeg at sætte lidt kristtjørn i to af motivets hjørner, og jeg brugte Bigz L Die - Wreath, Banner, Holly & Poinsettia til at lave kristtjørnen. Det er cool, at man kan udstanse flere blade på én gang med Bigz dies - det sparer en lidt tid. For at give bærrene lidt ekstra løb jeg dem over med lidt Wink of Stella.
 
Ingredienser:
Sizzix Big Shot Starter Kit (Powder Blue & Teal)
Sizzix Accessory - Magnetic Platform for Wafer-Thin Dies
Mønstret papir (Basic Grey)
Karton
Wink of Stella
Jute-garn
 

Father.... Christmas!

$
0
0


Today I want to share an idea which I used as a demo at Sprinkle Twinkle in Kings Lynn recently. The one thing I hear more than any other is that It's not easy finding an original idea for a man's card, they seem to follow the same old worn-out clichés and Christmas time it seems is no exception.

As I said last week, I'm very fond of the new collection designed by Tim Holtz amongst which are some fab new Texture Fades embossing folders. Today I will be using the Holiday Knit Set together with the ubiquitous Framelits Tags Collection 

I started by embossing a rectangle of ivory card using one of the holiday knit folders. Next, I used a scrap piece of card as a mask before applying Ripe Persimmon Distress Ink, for the red bands I blended this with the aptly named Festive Berries Ink.


Next, I coloured the other bands using a combination of Shabby Shutters and Crushed olive ink pads. The coverage doesn't have to be perfect, in fact slight imperfection is preferred in this case!


NOW! it's time to brake out the scissors because we are going  to cut the embossed/inked rectangle into a jumper shape together with a separate collar. If you prefer you can mark this out with a pencil on the back of the rectangle of card prior to embossing. Once your jumper is cut to size its time to ink around the edges using Vintage Photo to add a little contrast.
 I used my PC to print the 'Merry Christmas DAD' sentiment onto kraft card before die-cutting my tag with one of the Framelits tags set I cut the circle for the top at the same time. To complete the look I used my tracing wheel to add the stitched effect around the perimeter and joined the dots using a fine marker before gently inking the edges.
I covered a blank A6 card with wood effect paper from the Dovecraft 'Krafty Christmas' paper set. Next, I curled the tag slightly so that it stands proud of the base card before threading it with string. Finally, I attached the jumper using adhesive foam pads.

I might just send it to myself but knowing my luck I'll get the Jumper itself!!


Black and white layout by Karine

$
0
0


Hi there!

Let me show you today a page with my favourite products these days! Black & white and a dash of colours…

Supply list:

Cardstock: American Crafts
Labels: Ephéméria
Stamps: Méli-Mélo stamps, Stampers Anonymous
Black Versafine ink
Neon ink: Hero Arts
Izink ink: Aladine

Photo credit: Les Jolis Moments

Dies:

658300 : Sizzix Big Shot Starter Kit
659436: Sizzix Bigz Die-Garden Greens

Start by printing a stamp with a large pattern at the center of your page with black Versafine ink. Here I used a Tim Holtz stamp that I particularly like.
Apply a drop a yellow Izink ink and a drop of pink Izink ink and spray with water. Let it dry in the open.
Write some text with a black charcoal pen and shade it off slightly with your finger.

The small picture will be glued with 3D adhesive foam. One of the foliage die cut of the Garden Greens set is cut with a pair of scissors. The white little leaves are glued all around my picture. I can’t help using this die again and again! I like to cut it out or to use its entire pattern! You can really use it in various ways!

One of my favourite pages these days! What about you?


Have a nice day,

Karine

Bonjour !

Aujourd'hui une page avec mes produits préférées du moment ! Du noir & blanc et un soupçon de couleurs !

Matériel :

Cardstock : American Crafts
Etiquettes : Ephéméria
Tampons : Méli-Mélo stamps, Stampers Anonymous
Encre Versafine noire
Encre néon : Hero Arts
Encre Izink : Aladine

Crédit Photo : Les Jolis Moments

Die utilisé :

658300 : Sizzix Big Shot Starter Kit
659436: Sizzix Bigz Die-Garden Greens

Commencez par tamponner un gros motif au centre de votre page à l'encre Versafine noire. J'ai utilisé ici un tampon Tim Holtz que j'adore :)
Déposez une goutte d'encre Izink rose et une jaune et vaporisez d'eau. Laissez sécher à l'air libre.
Ecrivez du texte à la main à l'aide d'un fusain noir, estompez légèrement au doigt.

La petite photo sera montée en 3D à l'aide de mousse autocollantes. Un des feuillage du die Garden Greens est découpé aux ciseaux, les petites feuilles blanches sont collées tout autour de ma photo. Je ne me lasse pas de cette découpe ! J'adore l'utiliser en la redécoupant ou dans son intégralité, un die vraiment versatile !

Une de mes pages préférée du moment ! Et vous ?

Très bonne journée à vous


Karine

Knitting and Stitching Show

$
0
0

 This week I'm busy demonstrating at the Knitting and Stitching show at Alexandra Palace, on the Cotton Patch stand, which is F27 -

I'm taking the opportunity to start making Christmas presents using the heart dies  http://www.sizzix.co.uk/product/656334/sizzix-bigz-die-hearts and http://www.sizzix.co.uk/product/656335/sizzix-bigz-die-hearts-primitive - below are photos of 2 cushions that I'm working on 


I'm also planning to make I-phone covers and felt Christmas decorations.
Come along and see me - the show is open until 5 pm on Sunday - and see what I'm up to.
If you can't make it you'll have to wait to see the projects as I feature them here on the blog in the run up to Christmas.
I haven't had any time to work on the Downton dilemma but I hope to show some progress next week.
I hope to meet some of you in the next few days.
Angela


An autumn table topper: the begining

$
0
0


Hi everyone, this week I looked for some pretty autumn fabric in my stack and find a little amount of fat quarters I have had since years waiting for something .
So , I decided to sew a table topper for my fall decorations at home.


I wanted to add one of the last leaves die by Tim Holtz  for the season.

660039


I cut  five of them but previously I pressed fusible web on the wrong side.


I wanted to give a chance to try  some new big square and triangles dies that I got thank to Sizzix.


These are :


So, here I go with all my fabrics ready !!


I hope to finish next week.
Here  it is how the table topper  is  going. I need to do some applique and quilt by hand with cotton 8.
Have a nice week !!!


Love
Mercedes


.....................................................*****************.......................................................


Hola a todo el mundo, esta semana  busqué telas otoñales y encontré un pequeño montoncito que tenía hace tiempo, la mayoría fat quarters.
Decidí coser un tapete para la mesa y  añadirlo a la decoración otoñal en casa.

Quería probar uno de los últimos troqueles de Tim Holtz, una bonita hoja.

660039


Corté cinco de ellas ,planchando previamente entretela de doble cara  en el revés de la tela de cuadritos.
  
También quería dar una oportunidad a un par de troqueles nuevos que había recibido gracias a Sizzis, uno grande de cuadrado y otro de medios triángulos .


Ya véis en las fotos mis avances. Espero acabar la semana que viene.
Tengo que hacer el aplicado y acolchado a mano con hilo de algodón del número 8.
Espero que tengáis una semana estupenda.
Cariños
Mercedes


A birthday card by Olga

$
0
0
Hello all!

Here is my new card which I'm happy to share with you. I used several dies, lace, stamps, watercolour, die-cut, and some flowers to create it. 


Wonderful roses dies help to create flowers which look very natural - this is one of the reasons why I love these dies:


The products I used:

Sizzix Thinlits Die Set 2PK - Flower, Mini Petals


Have a nice day!

Olga


Foxhead pincushion and small bag in one.

$
0
0

Hi there. So happy you came to check out my Sunday project.
This week I had some fun with a recently released die from the 'Woodland creatures' collection by Debi Potter. It's a cute fox face. I used it to embellish a small bag that I will use for my sewing yarns. At first I was going to give it as a present to my god daughter but in the end I decided to make something else for her...


 I used the Bigz die to diecut the pieces for the fox's head from heavy felt. The Bigz dies are wonderful for cutting almost any craft material that is a little heavier.


I stitched together two round pieces of felt to make a round purse. I left a piece open at the top.
I assembled the foxhead and stitched around the edges. I used some black floss to make the eyes and nose. Finally I added a white button so I will be able to close the bag after I put my embroidery wool inside it. -And the good thing is it doubles as a cute pincushion as well :-)


 One more close up.
 I know I will use my Bigz dies with felt or other materials more often. This was great fun!!!

Thanks for taking a look. 
Next Sunday I will be here again and I hope I'll see you here as well <3
I used this die:
Tilda felt from Panduro Hobby
--------------------------------------------------------------------------------------------------------
Hej, så kul att ni ville titta på mitt Söndagsprojekt!
Denna veckan har jag roat mig med de nya 'Woodland creatures' diesen som gjordes av Debi Potter.
Jag använde det fina rävhuvudet för att dekorera en liten sypåse. Jag hade först tänkt ge den som en present till min guddotter, men bestämde att jag får hitta på något annat till henne :-)
Bigz diesen är suveräna när du behöver stansa ut i material som är tjockare än cardstock eller göra flera lager på en gång. Denna gången stansade jag ut i tjock filt.
Jag sydde ihop två runda delar, men lämnade en öppning upptill. Jag satte ihop huvudets delar och sydde runtom. Sedan broderade jag ögon och näsan på plass med svart briderigarn. Jag satte dit en knapp så den går att stänga..Det som också är bar att 'påsen' dessutom fungerar bra som nåldyna. :-)
Jag måste påminna mig själv att utnyttja mina Bigz dies mera för de är bara fantastiska. Detta var ett lite annorlunda projekt för mig, men sååå kul!!
Tack för att ni tittar inom. Nästa söndag är jag tillbaka igen och då hoppas jag såklart att se er här igen! <3
Jeg brukte denne diesen:
 Tilda filt från Panduro Hobby

Advent Calendar part 2

$
0
0


The next stage of the advent calendar I started last week is the numbered pockets. First of all, using my Square, 4in Finished die I cut out 24 pocket fronts and 24 pocket linings with my Big Shot. I used the same fabric (Essex linen) for both but the lining could be made from any of the fabrics used in the calendar. Half a yard of fabric should be enough for 24 squares.

Next up were the numbers and I can't even guess at how much time (and hand-cramp) was saved by using the Lollipop Shadow Numbers die rather than drawing out and cutting by hand - hours though! Plus every number was consistent and perfectly cut out. By applying a piece of iron-on adhesive to the reverse of the fabric before the numbers were cut meant all that was left was to peel the backing paper off and iron them on. So, so quick and easy! How much fabric is required for the numbers depends on how efficiently they are cut out but a fat quarter should be plenty (I used approximately two thirds of a fat quarter).

To make the best, most efficient use of the fabric (and adhesive) scraps can be cut from between the holes in previously used sections and used again. Thirteen number 1's need to be cut out but being a narrow number quite a few can be cut from scrap pieces (others will have to be cut from measured out pieces of fabric though).

Here's a list of how many of each of the numbers are required:

Number 0 - 2
Number 1 - 13
Number 2 - 8
Number 3 - 3
Number 4 - 3
Number 5 - 2
Number 6 - 2
Number 7 - 2
Number 8 - 2
Number 9 - 2

Once all of the numbers were ironed in place in the centre of a pocket front, I sewed around the edges to make absolutely sure they can't go anywhere.

Before sewing a front and lining together a 1/4in fold was pressed to the wrong side along the bottom edge of them all. Then, with right sides together, a front was pinned to a lining and sewn together leaving an opening along the bottom. The corners were snipped off and each pocket turned the right way out and pressed flat.

The final part for me to get on with this week is to fix the pockets to the background and finish the advent calendar, I'll blog about that next time.
Viewing all 2033 articles
Browse latest View live


Latest Images