Quantcast
Channel: Crafting ideas from Sizzix UK
Viewing all 2033 articles
Browse latest View live

Christmas Step-Ups Card by Anna

$
0
0

christmas-challenge-blog-strip-week1

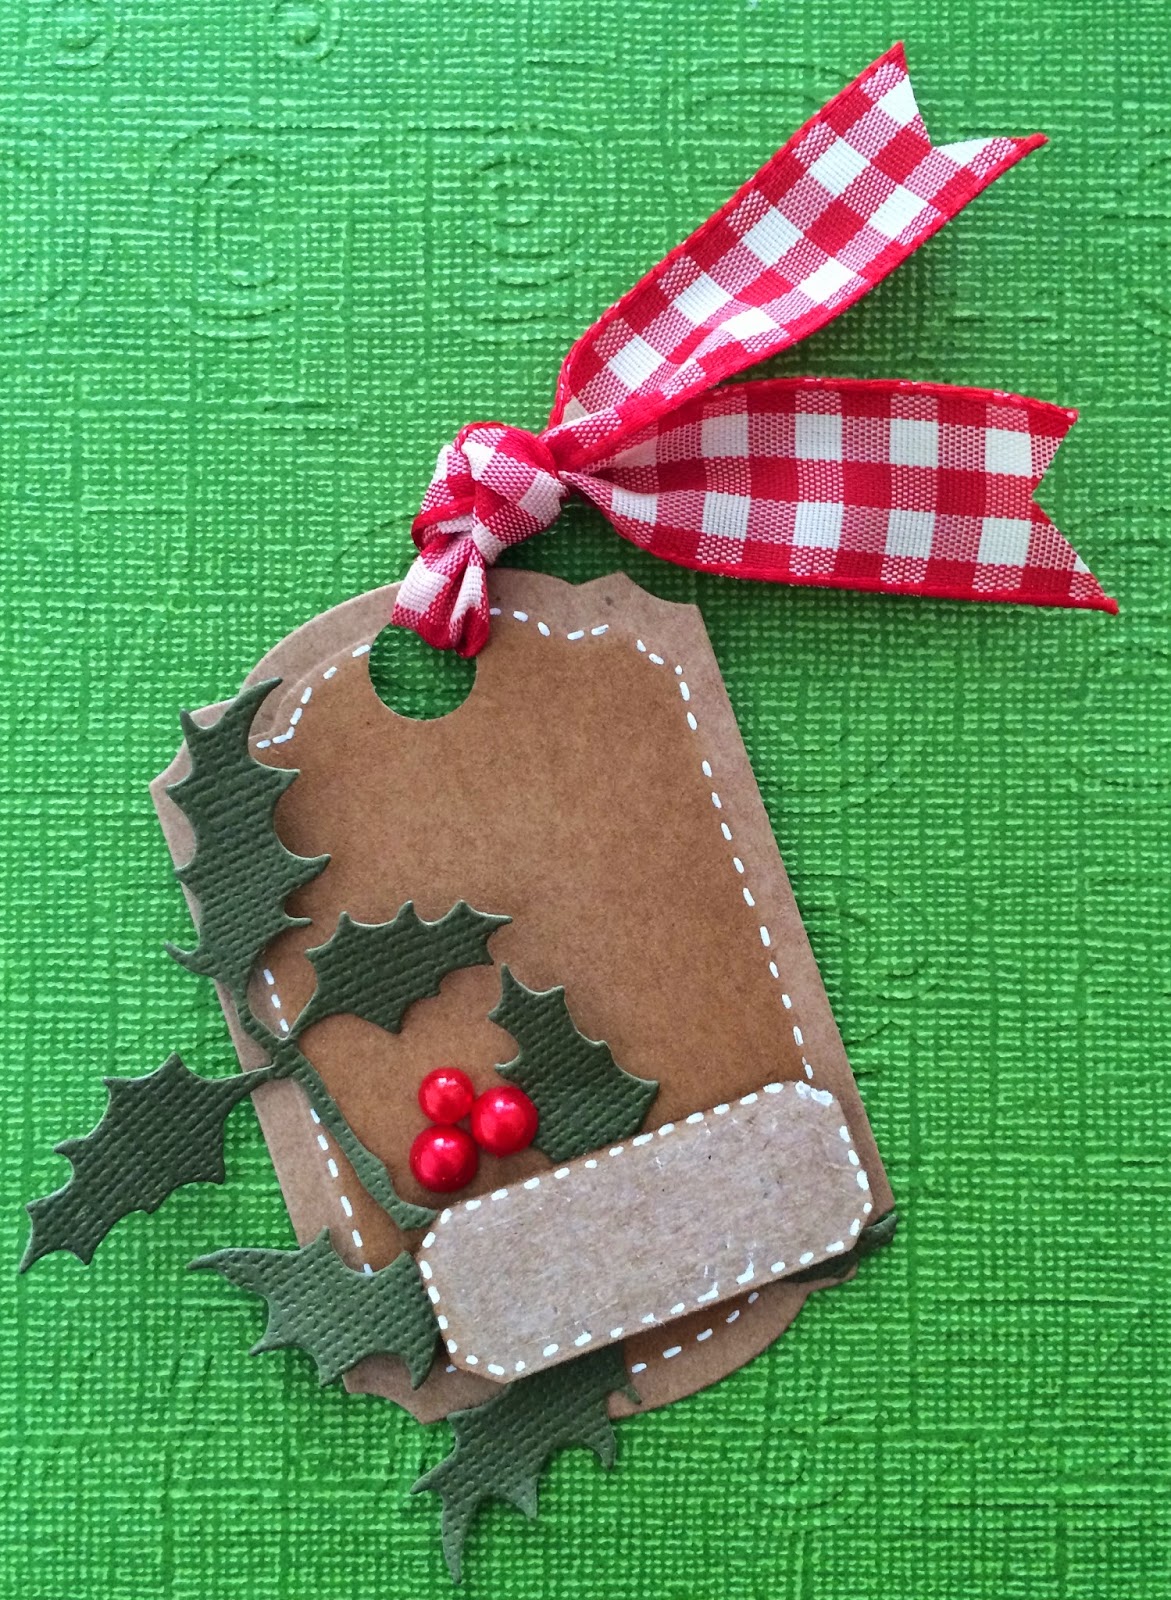
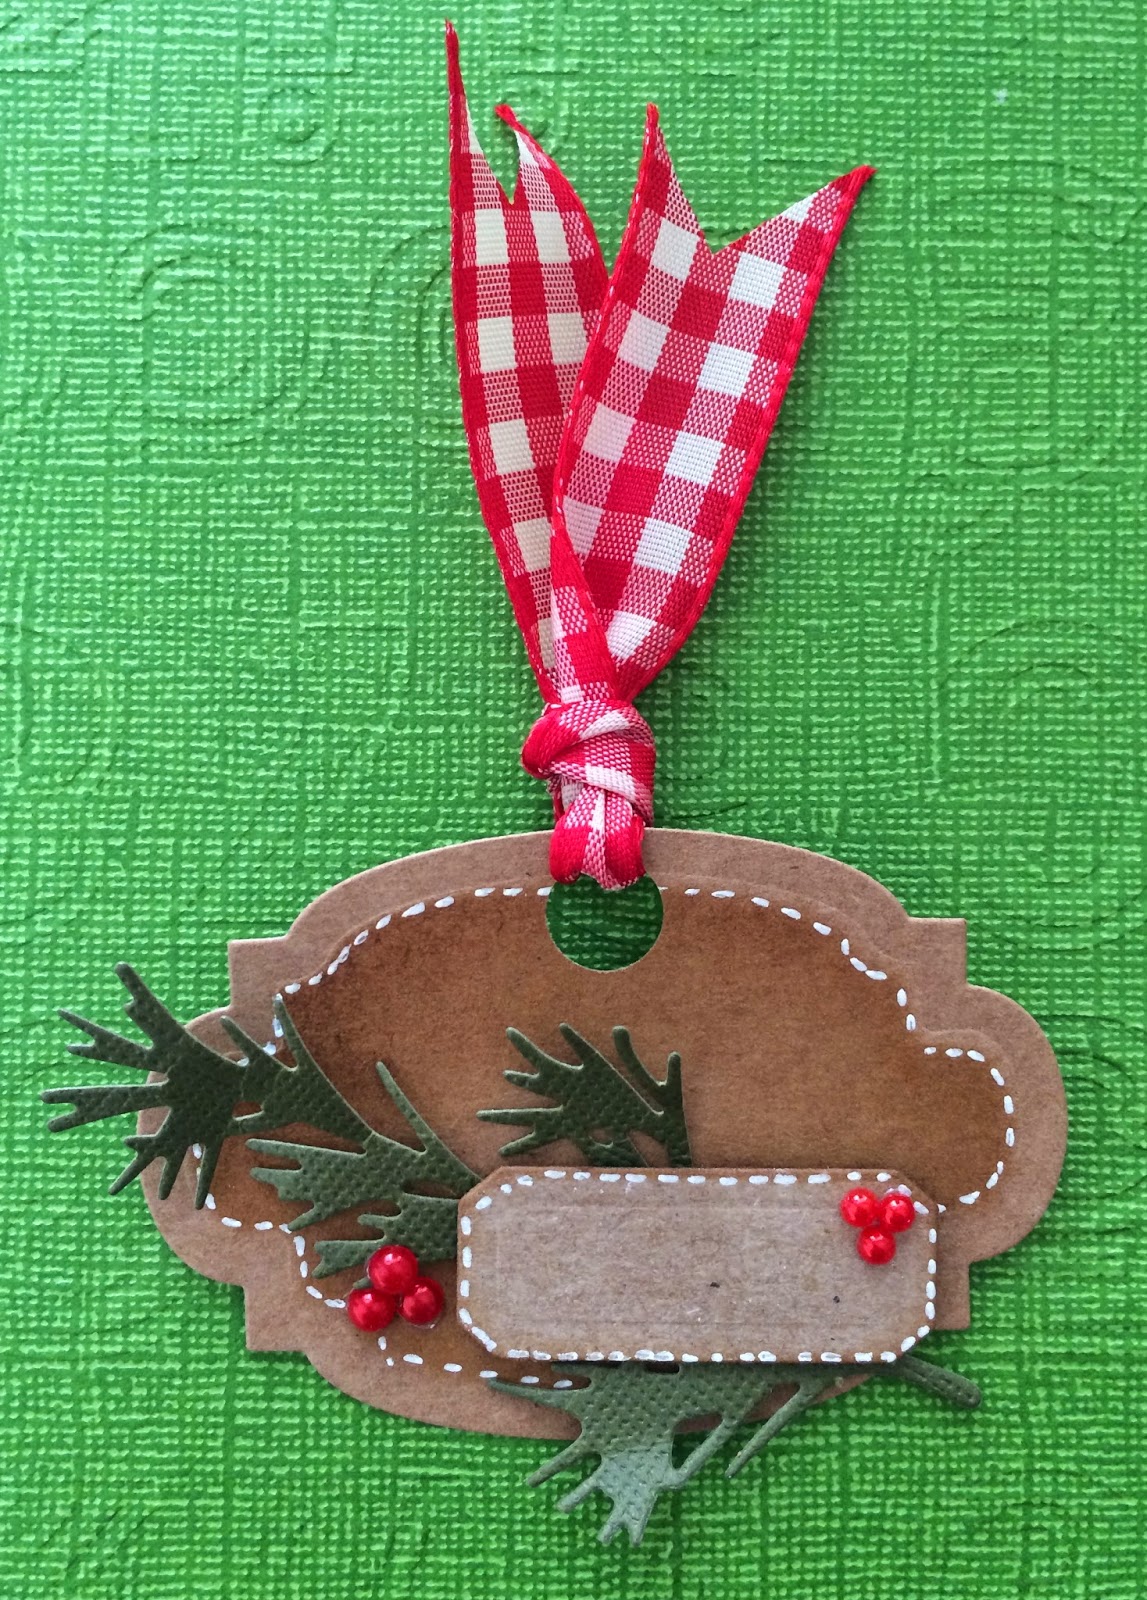
Happy Friday everyone,

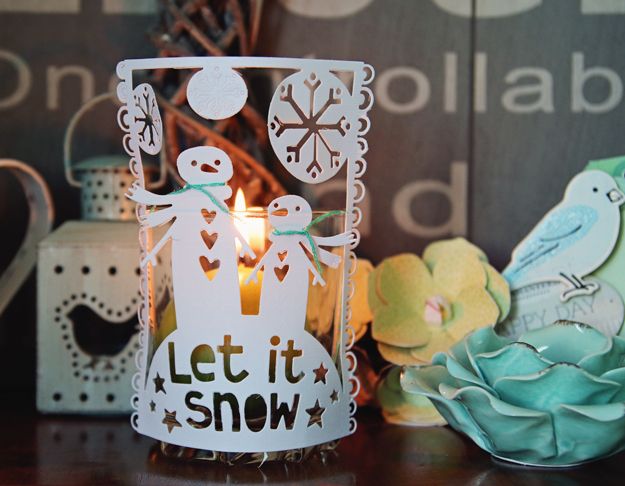
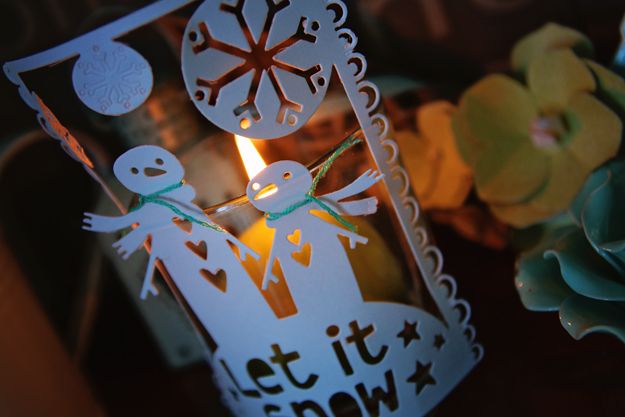
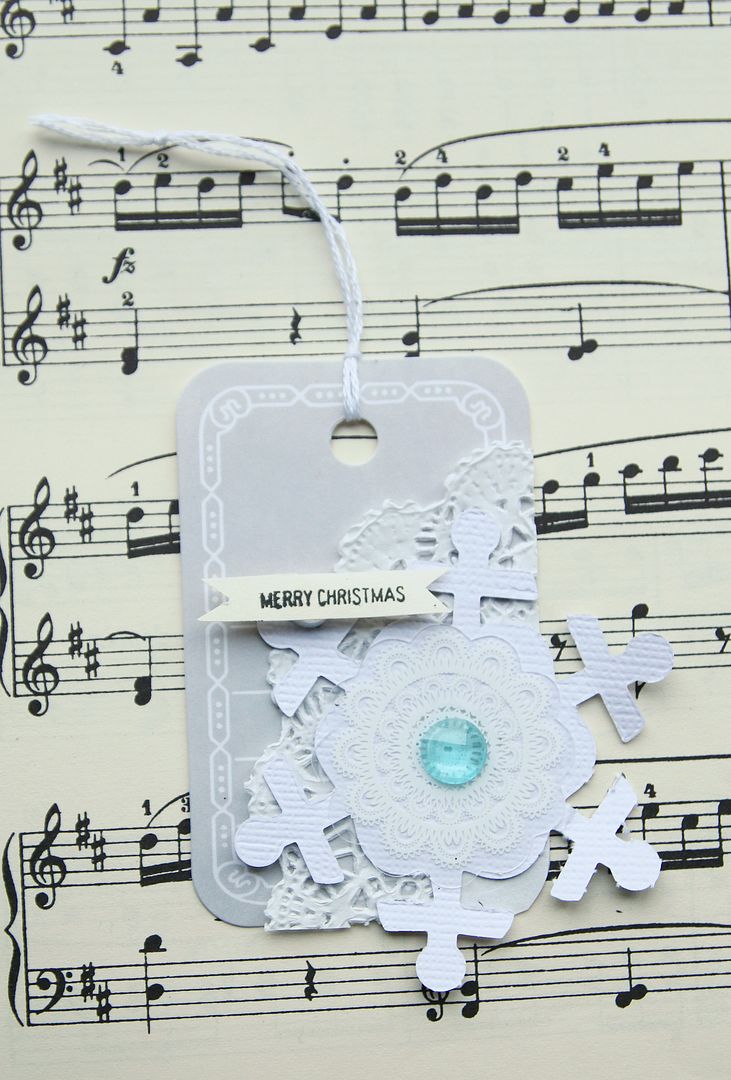
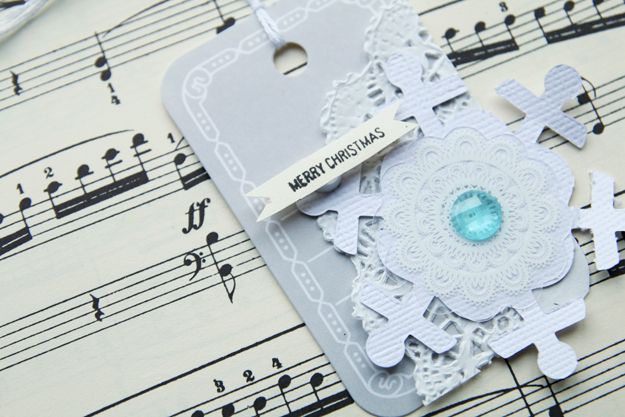
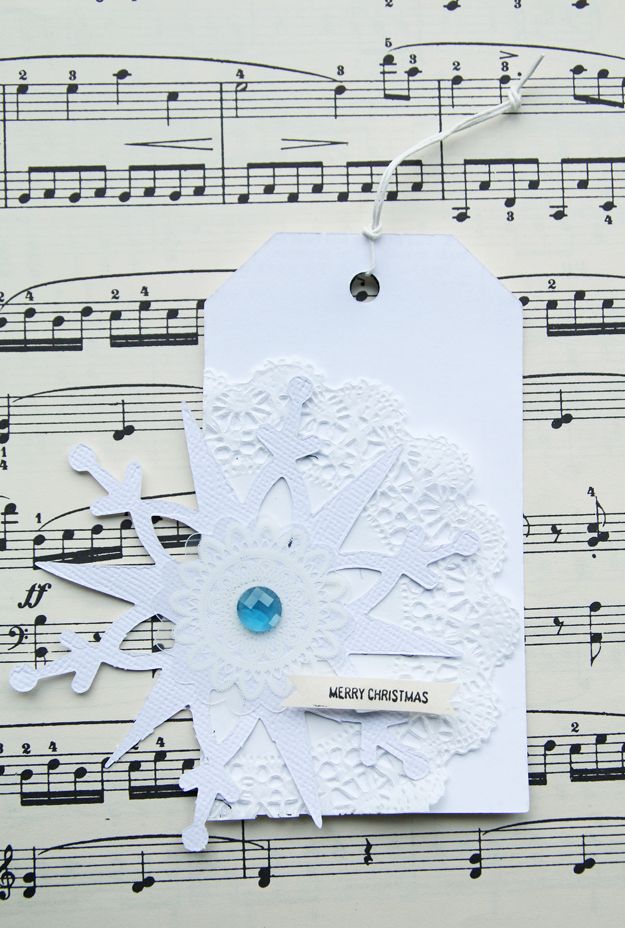
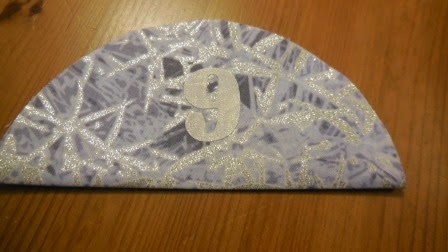
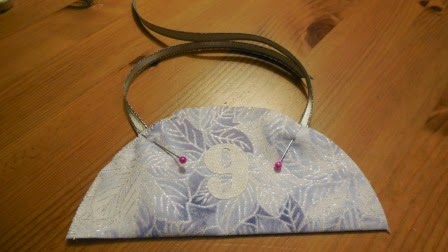
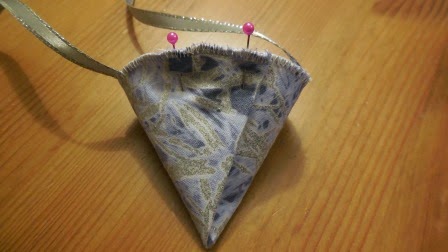
Today, I am sharing a Christmas card that I have created using Sizzix Framelits Die Set 21PK - Card, Basic Step-Ups and FREE Christmas Papers Downloads!
I was looking this cute die and I thought it would look cute with snowflakes.

cafe creativo - sizzix big shot - Christmas Step Card (1)

cafe creativo - sizzix big shot - Christmas Step Card (2)

The die is easy to use: Die-cut the Basic Step-Ups Card out of cardstock and fold along crease lines to assemble. Die-cut the panels out of patterned paper and attach to the Card base.
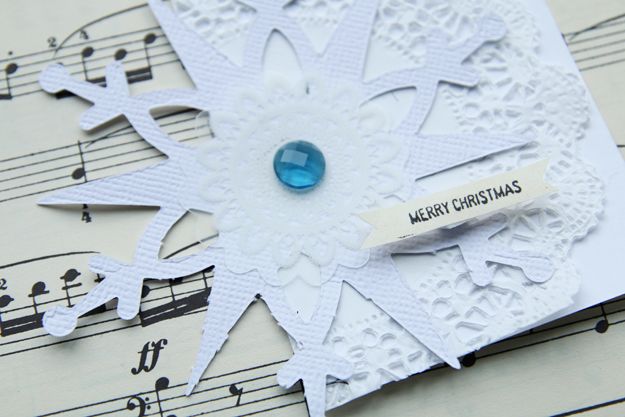
For this card it's just a case of using the dies to cut the snowflakes, printing (or stamping) the sentiment and adding some rhinestone for some sparkle.
I hope is clear, if you have questions do let me know.

cafe creativo - sizzix big shot - Christmas Step Card (3)

cafe creativo - sizzix big shot - Christmas Step Card (4)

That's all I have for you today, thanks for visiting. Why not take a look at the other, wonderful Christmas projects that the design team have come up with!


Items used:
Sizzix Big Shot Machine (657900)
Sizzix Framelits Die Set 21PK - Card, Basic Step-Ups (660023)
Sizzix Bigz Die - Snowflakes #3 (659994)
Sizzix Bigz L Die - Stacked Snowflakes (660052)
white cardstock
glitter cardstocks
patterned papers: FREE Christmas Papers Downloads
rhinestones
brad
thread
foam board tape
 
**************************************
Flag_of_Italy 
Buon Venerdì a tutti,

Oggi vorrei condividere con voi un biglietto per gli auguri di Natale, che ho creato con Sizzix Framelits Die Set 21PK - Card, Basic Step-Upse le carte digitali messe a diposizione da Sizzix FREE Christmas Papers Downloads.

Osservando questa simpatica fustella, ho pensato che sarebbe stato carino darle un look invernale e natalizio con i fiocchi di neve, usando altre bellissime fustelle naturalmente! :)

La fustella base è facile da usare e da piegare: fustellare la Basic Step-up Card dal cartoncino bianco e piegare lungo le linee; tagliare con i pezzi del set anche i pannelli di carta fantasia e incollare sulla base.
Questa card l'ho abbellita con le carte messe a disposizione da Sizzix e scricabili gratis qui.
Poi ho aggiunto i fiocchi di neve. Il fiocco principale, più grande, è composto da vari fiocchi sovrapposti ed è incollato su di un filo bianco attorcigliato.
Ho stampato la scritta con l'augurio, che ho tagliato a mo' di banner ed infine aggiunto qualche strass per dare tocchi di luce.

Spero sia tutto chiaro, ma se avete domande fatemi sapere.
Questo è tutto per oggi, grazie della visita.

Date un'occhiata anche agli altri meravigliosi progetti di Card natalizie che il team Sizzix ha creato per voi questa settimana!

Ciao
Anna
 

Materiali:
Sizzix Big Shot Machine (657900)
Sizzix Framelits Die Set 21PK - Card, Basic Step-Ups (660023)
Sizzix Bigz Die - Snowflakes #3 (659994)
Sizzix Bigz L Die - Stacked Snowflakes (660052)
cartoncino bianco
cartoncini glitter
patterned papers: FREE Christmas Papers Downloads
strass
brad
filo bianco
scotch spessorato


Quilt Mary Ann Poter: the beginning

$
0
0


Hi everyone, I know you are thinking about new Christmas projects like me , so I will do someone in Xmas style later too. But I wanted to show you something  especial and really nice I was waiting to start in autumn- winter time. This is my beautiful Mary Ann Poter quilt that I´m designing right now using Sizzix dies. It will be a big quilt , maybe a queen size for our bed. I´m exciting about this experience and I hope to share with you during next weeks too. 
It´s growing slowly but sure and I love it!!
It has been a long time since I started to sew yo- yos and  hexagons and now it´s a cozy time at home to plan how it will be. 
First I chose a central panel from one of the beautiful fabrics by Blackbird, one of my favorite designers, added some laces  and yoyos in the corners ........


This is what I used at this moment:


658322


658317


658318


657900


Then  I added  a first border with triangles and squares in the corners, then a second border with more laces and yoyos......


..... And here it is my progress. I love that antique stye I ´m getting as I wanted.......


It´s time to choose how  planning the third  border........ I had to look for a new lace ( I try not repeating )   with the perfect size..... and bingo !! I found it in a village next mine!


Now I have to finish the round with some yoyos and start the next one.
It will be a long project, I know but I have to say I´m enjoying a lot and just I need more time to decide what Sizzix dies will be the next one !!


I wait for you next Saturday in my  personal blog Las labores de Mercedes for an exciting Xmas Blog Hop!!
See you there!!
Have a nice week!
Love
Mercedes

.............................................*************************.............................................


¡  Hola a todo el mundo ! Me imagino que ya estas pensando en nuevos proyectos para las navidades como yo. Haré alguno en ese estilo también y te lo contaré. Pero hoy quiero traerte algo especial y realmente bonito que acabo de empezar y que quería hacer para la época de otoño –invierno.
Se trata del nuevo quilt que estoy diseñando y que se llama Mary Ann Poter. Será un gran quilt, quizá para nuestra cama de matrimonio.
Estoy muy ilusionada con esta nueva experiencia y espero compartirla a lo largo de las siguientes semanas.
De momento va creciendo despacito pero con buen pie, ¡ y me encanta !
Hace ya tiempo que empecé a preparar los yo- yos y los hexágonos  y por fin ha llegado este tiempo para estar en casa y planear cómo irá avanzando.

Lo primero que hice fue elegir un panel de una de las telas de Blackbird, una de mis diseñadoras favoritas, y añadí algo de tira bordada alrededor con yo yos en las esquinas.

Estos son los troqueles que he usado hasta el momento:

658322


658317


658318


657900


Añadí un primer borde con triángulos y cuadrados en las esquinas, luego un segundo con más puntilla y yoyos.

En las fotos puedes ver mis progresos hasta el momento. Me encanta el estilo antiguo que está teniendo tal y como yo quería …….
Ahora estoy planeando el tercer borde …… Tuve que buscar un  nuevo modelo de tira bordada porque no quiero repetir, y ¡por fin lo encontré en una ciudad cercana a la mía!

El próximo sábado te espero en mi blog personal  Las labores de Mercedes para un nuevo y excitante Blog Hop de Navidad.
Te espero allí la semana que viene .
Cariños
Mercedes

Christmas card by Olga

$
0
0


Hello all!

I'm so pleased to show you my new project with the new  FREE Christmas Papers Downloads announced this week. The wonderful paper and amazing prints give so many ideas for creating Christmas projects!


Have a nice day!!


Bente's card using the free paper downloads.

$
0
0


This week we have seen so much gorgeous inspiration from my fellow bloggers!
Today I am rounding off the first week of Christmas inspiration where we have all shared our cards made with some beautiful seasonal free paper downloads.

Here is mine:


If you would like to download the free papers the link is HERE. 
All you have to do is write your email address in the box on the downloadpage.

Here are a couple of close ups:


I used these products:
Sizzix Big Shot Starter Kit (Powder Blue & Teal)
Thanks for looking!!


----------------------------------------------


Denna veckan har ni sett så mycket snygg nspiration från mina bloggar kollegor här på Sizzix. I dag rundar jag av den första veckan med kortinspiration där vi använder de härliga papprena som finns att ladda ner gratis på Sizzix hemsida HÄR.
Allt du behöver göra för att ladda hem de fina mönstren är att skriva in din email adress i boxen på sidan. Sedan får du tillgång till pappren. 

The Christmas Blog Hop!!

Chritstmas gift tags!

$
0
0

Hi everybody! and welcome to the Sizzix Christmas Challenge 2014 week 2. In this week, my fellow Sizzix Bloggers and myself are giving you some ideas for your gift wrapping and tags.


Today I want to show you three different tags I  made using two Tim Holtz Die Sets: The Labels (660060) and the Holiday Greens (658759) and, of course, the Big Shot Machine.


This Thinlits are great because they are designed in a way you can cut, emboss and stencil with them. In these tags I have die cut the tags out of craft card and then I have inked them without taking out the die. This gives you a nice border without ink.


To embellish my tags I have die cut some leaves out of green card, attached some red pearls and hand doodled some lines with a white gel pen. 

These tags are very easy to make and you can make a lot of them in advance, so you are ready when It's the time to gift wrap!


Happy Monday!

....................................

Hola a todos!

Bienvenidos a la segunda semana del Christmas Challenge 2014 de Sizzix, donde mis compañeros bloggers y yo misma os vamos a dar algunas ideas para que envolváis vuestros regalos y hagáis vuestras etiquetas navideñas.

Hoy os muestro tres etiquetas hechas con los sets de troqueles Holiday Greens (658759) y Labels (660060) de Tim Holtz y, por supuesto, la Big Shot!

Estos troqueles son estupendos porque están diseñados de manera que puedes cortar, hacer embossing y estarcir con ellos. En esta ocasión he utilizado la última función y, una vez troquelados, he puesto tinta distress sin quitar el troquel. esto da un borde sin tinta que enfatiza la forma del tag.

Para embellecer las etiquetas, he troquelado algunas hojas con cartulina verde, pegado algunas perlitas y pintados unas líneas con rotulador de gel blanco.

Estas etiquetas son muy fáciles y rápidas de hacer, y puedes hacer bastantes con antelación para tenerlas listas cuando llegue el momento de envolver los regalos.

Feliz lunes!

Christmas Challenge week 2 with Lilith

$
0
0
Welcome to the second day of the Christmas Challenge week. This week the designers at Sizzix will be bringing you ideas for wrapping and sprucing up your gifts. Today I'll be showing two tags I made. They are simple yet chic.They are also very easy to make and they will instantly make your gift something special. 


I picked two tags from my stash and a doily which I layered over the tags just covering one side. Then I cut out two snowflakes from the Sizzix Bigz Snowflake Die #3 which I placed on top. A sentiment and a small shiny bead. Simple and elegant. 


 Supplies:


Gift Wraps and Tags

$
0
0


Hi everyone
Today I will show you two gift wraps and tags using the beautiful new dies
Hej alle
I dag vil jeg vise to gaveindpakninger med tags hvor jeg har brugt de fantastiske nye dies
Itemes I have used:
Sizzix triplits-Tags- 659930
Sizzix Bigz- French Bow- 659621
Sizzix Bigz XL Box-Mini Pizza-659944
Sizzix Bigz L -Note Pad Cover- 659728
Supplylist.
Paper: Craft & You design-Christmas Story-
Ink: Vintage Photo / Ranger
ribbon, Pountura paint -red- and glossy accent to the bow and Pountura paint -White- to the tag


Thanks for stopping by, wish you a nice week
Tak fordi du kiggede forbi, ønsker dig en dejlig uge
Pia

Christmas crafting week 2 - Minna

$
0
0


Hello, it`s Minna and my turn to show you some Christmas crafting ideas, themed gift wrap and tags:)


Sizzix products:
Sizzix Big Shot Machine 657900
Sizzix Thinlits Die Set 9PK - Christmas Phrase Cards 659973
Sizzix Thinlits Die Set 5PK - Christmas Trims #2 659913
Free festive papers

Other products:
Seam binding ribbon, baker twine, paper bag, glue and tape

Cut the tag size 9 cm × 17 cm. Cut the snowmans and frill out using die from the set  Sizzix Thinlits Die Set 5PK - Christmas Trims #2 659913 , phrases and frame from the set Sizzix Thinlits Die Set 9PK - Christmas Phrase Cards 659973  . Hearts are from the Free festive papers. Finally plase them all like above:)

Happy crafting, Minna

*    *    *    *

Hyvää huomenta kaikille! Tällä viikolla teemana tagit ja lahjakoristelut:)

Sizzix tarvikkeet:
Sizzix Big Shot Machine 657900
Sizzix Thinlits Die Set 9PK - Christmas Phrase Cards 659973
Sizzix Thinlits Die Set 5PK - Christmas Trims #2 659913
Free festive papers 

Muut tuotteet:
saumanauhaa, leipurin nyöriä, paperipussi, liimaa ja teippiä

Leikkaa tagi 9 cm × 17 cm. Lumiukot ja kiemura stansseilla setistä  Sizzix Thinlits Die Set 5PK - Christmas Trims #2 659913, fraasit ja kehys stansseilla setistä  Sizzix Thinlits Die Set 9PK - Christmas Phrase Cards 659973 . Sydämet sisältyvät ilmaisiin ladattaviin papereihin jotka löytyvät täältä. Lopuksi liimaa ja teippaa kuviot kuten kuvasssa:)

Terveisin Minna


Red and white gift wrapping

$
0
0


This week's Christmas Challenge 2014 deals with gift wrapping and tags. I don't think I've ever had Christmas presents all wrapped up so early in the season but it feels great to get started on the wrapping.


Using Triplits Die Set 15PK - Tags in combination with Framelits Die Set 6PK - Leaves, Holly & Berry, some white glittery wrapping paper and a red and white gingham ribbon I wrapped three presents for my sister-in-law. Essentially all three gifts are decorated the same way but with slight differences; especially when it comes to the design of the tags.


This tag was cut a little shorter by partially diecutting it with the scallopped rectangle from Triplits Die Set 15PK - Tags. 


I kept this tag very simple but layering two tags from Triplits Die Set 15PK - Tags and then stamping the text.


The larger of the gifts was decorated with a larger set of holly leaves and I also wanted the holly berries to be a little larger than on the other two packages. This led me to use one of the circles from the Thinlits Die Set 9PK - Winter Borders & Rosette set to create the berries. For the tag I layered two tags on top of one another and diecut a heart using a die from Thinlits Die Set 6PK - I Heart This in the top tag.

I hope you feel inspired to start wrapping this year's Christmas presents yourself - I can only recommend getting a jump start on this job :o)


Supply list:
Sizzix Big Shot Starter Kit (Powder Blue & Teal)
Sizzix Accessory - Magnetic Platform for Wafer-Thin Dies
Triplits Die Set 15PK - Tags
Framelits Die Set 6PK - Leaves, Holly & Berry
Thinlits Die Set 9PK - Winter Borders & Rosette
Stamps (Lawn Fawn & Papertrey Ink)
Ink: VersaMark, Simon Says Stamp
Cardstock
Patterned Paper (Prima Marketing)
White gelpen
Ribbon
Wrapping paper
 
---o---
 
I denne uge drejer Christmas Challenge 2014 sig om gaveindpakning, og jeg tror ikke, at jeg tidligere har været i gang med gaveindpakningen så tidligt, men det føles godt.
 
Jeg har kombineret Triplits Die Set 15PK - Tags med Framelits Die Set 6PK - Leaves, Holly & Berry samt glimmergavepapir og rødternet bånd ved indpakningen af tre gaver til min svigerinde. Overordnet set er pakkerne ens, men der er små forskelle især hvad angår gavemærkaterne.
 
Den første tag har jeg skåret lidt kortere ved delvist at udstanse bunden af de to forskellige tags med en anden die fra Triplits Die Set 15PK - Tags.
 
Den anden tag er holdt helt enkel ved blot at lave en sandwich af to tags i forskellige farver og derefter stemple teksten direkte på taggen.
 
På den store pakke har jeg brugt et sæt større kristtjørnsblade, og jeg ville sikre mig, at bærrene også var lidt større, så derfor brugte jeg en af cirklerne fra Thinlits Die Set 9PK - Winter Borders & Rosette til at udstanse kristtjørnens bær. Taggen består af to forskellige tags lagt ovenpå hinanden. I den øverste har jeg udstanset det lille hjerte fra Thinlits Die Set 6PK - I Heart This, hvilket betyder, at der kommer en lille fin detalje frem.
 
Jeg håber, at du er blevet inspireret til selv at komme i gang med gaveindpakningen - jeg kan kun anbefale det, for det skal jo gøres ;o)
 
Ingredienser: 
Sizzix Big Shot Starter Kit (Powder Blue & Teal)
Sizzix Accessory - Magnetic Platform for Wafer-Thin Dies
Triplits Die Set 15PK - Tags
Framelits Die Set 6PK - Leaves, Holly & Berry
Thinlits Die Set 9PK - Winter Borders & Rosette
Stempler (Lawn Fawn & Papertrey Ink)
Sværte: VersaMark, Simon Says Stamp
Karton
Mønstret papir (Prima Marketing)
Hvid gelpen
Bånd
Gavepapir 


Boxing Clever

$
0
0


Boxing Clever is an interesting idiom which I have hijacked for another of my cringe worthy little word plays. Pillow boxes it seems are a favourite amongst the paper crafting community when it comes to customisation (there are some stunning owls out there!) so I decided to create some festive themed custom jobs just for you.

the ideas are not completely original however I will show you a few little tricks of how to give them a little extra spice by using your favourite Sizzix dies.

Here is a list of dies used, click on each link to see the products:


I wanted to make a couple of festive gift boxes which will compliment each other and what better double act than Santa and Rudolph.

I started by die cutting and assembling the box from red patterned paper (My Mind's Eye Collectable Collection) 
Next, I die cut a scalloped square from gold matt card and a square of black card. I then cut a strip of black card long enough to wrap around the box and trimmed one end to a point. I scrunched the strip and black square into a ball to add a little texture before lightly applying a little pewter coloured gilding wax with my fingertip.

 The rest was easy, I wrapped the 'belt' around the box and matted the black square onto the scalloped buckle before attaching to the belt. For the finishing touch I threaded a couple of small wooden buttons with raffia and attached to the box using a glue gun.

Isn't it amazing how a few simple shapes and colours combine to leave you in no doubt as to who or what the image represents?


Rudolph is a little more challenging and even though you can find some ideas on the internet, I made this without seeing any of them as I had a few ideas I wanted to try out.

I wanted to start with Rudolph's eyes. He may be the baby of the reindeer team but he's been pulling that sleigh for centuries now so I wanted to give him a Sagacious, world weary disposition and the best way to convey a characters emotion is through the eyes which after all are the windows to the soul!

I folded a piece of white card in half and placed a circle die so that it slightly overlapped the crease, I ran this through my trusty Big Shot and ended up with two linked circles. I then repeated these steps using a slightly larger circle and corrugated card.


I folded the two corrugated circles back together and trimmed at an angle to make Rudolph's eyelids. Next, I die-cut two small black circles and carefully snipped away a couple of triangles before attaching to the whites of the eyes, This adds the illusion of highlights (Check out early Mickey Mouse cartoons). Finally, I gently inked the edges of the eyelids to add contrast using Vintage Photo Distress Ink and attached them in place with adhesive foam pads to add a little dimension.

I die-cut and assembled the pillow box from corrugated card and gently inked the edges before mounting the eyes. The nose was cut from red glitter card, after all, as the song says, it was 'very shiny' 
To create the ears I die-cut a circle from corrugated card and folded it in half before placing my circle die back onto the folded card in such a way that I ended up with two leaf shapes which I then inked around the edges.


The ears were attached with a glue gun and the last thing to do was brave the elements and collect a few suitable twigs to use as antlers. I sealed the top of the box and used a craft knife to make a couple of slits at the corners into which I inserted the trimmed twigs.


I think they make a lovely couple, I hope you agree?


Christmas Week 2 with Karine

$
0
0

Hello!


It is the Christmas tag’s week at Sizzix! Here is what I have done. I chose a glittery and natural combo which makes me think of the end-of-the-year celebrations :-)

Supply list:

Kraft bag
Cardstock: American Crafts
Glitter paper: American Crafts
Note paper
Embellishments: Teresa Collins, Freckled Fawn
Stars: Studio Calico
Ink: Distress Vintage Photo

Dies:

658300:  Sizzix Big Shot Starter Kit
659958:  Sizzix Bigz Die-Banners and hearts
659994:  Sizzix Bigz Die-Snowflakes #3
660058 : Sizzix Thinlits Die Set 17pk-Holiday Words Script

I didn’t want to create a classic tag for a change. So I selected a kraft bag and I had fun decorating it :-)
I started by cutting out large banners out of note paper (with the die Banners).

The beautiful large snowflake is cut out of white cardstock and shaded with Distress Vintage Photo ink to give it an aged aspect.

The various elements are assembled and glued with double-sided tape.
Small hearts are added as a finishing touch. They bring sparkle to the creation. They are cut out of American Crafts glitter paper; I just can’t stop using this paper these days!

So here is my small tag (not that much small, isn’t it?) realized in a New-York’s minute!

Have a lovely day,

Karine


Bonjour !

C'est la semaine des tags de NOEL sur Sizzix cette semaine ! Voici ma contribution, je reste dans un combo naturel et pailleté évocateur pour moi des fêtes :)

Matériel :

Sachet kraft
Cardstock : American Crafts
Papier paillettes : American Crafts
Papier partition musique
Embellissements Teresa Collins, Freckled Fawn
Etoiles : Studio Calico
Encre : Distress Vintage Photo

Dies utilisés :

658300 Sizzix Big Shot Starter Kit
659958:  Sizzix Bigz Die-Banners and hearts
659994 Sizzix Bigz Die-Snowflakes #3
660058 : Sizzix Thinlits Die Set 17pk-Holiday Words Script

Pour changer et ne pas partir sur un tag classique, j'ai opté pour une pochette en kraft que je me suis amusée à décorer :)
J'ai d'abord découpé des larges bannières avec le die Banners dans du papier musique.

Le grand et beau flocon est découpé dans du cardstock blanc, il est ensuite ombré à l'encre Distress Vintage Photo pour lui donner un aspect vieilli.

Les divers éléments sont ensuite assemblés et collés au double face.
Des petits coeurs sont ajoutés en touche finale et ajoutent une touche de brillance, ils sont découpés dans du papier paillettes American Crafts dont je ne peux me passer !

Et voilà un petit tag pas si petit que ça réalisé en quelques minutes !

Bonne journée

Karine

Blog hop - Advent cones

$
0
0

It’s that time of year for the blog hop – and as I prepare my contribution I start feeling excited about what our other bloggers will make – I can’t wait to see.


Here's our Blog Hop line-up:
Monday 18th November: Jo Carter 
Tuesday 19th November: Katy Jones
Wednesday 19th November: Jessie Fincham
Thursday 20th November: Angela Southey
Friday 21st Trudi Wood 
Saturday 22nd November: Mercedes Jiménez Campuzano


... And to celebrate this festive Blog Hop, we have a giveaway with a selection of fantastic dies and the Big Shot™ Machine up for grabs! Click here to enter 
So here’s my contribution – I’ve been thinking for a long time about making an Advent Calendar – but wanted to make something slightly different – this year I had this idea – hope you like it – I know my grandchildren will!
So here they are! 


Advent Cones
You will need about 75 cm of fabric for the circles and about 1.25m of fusible interfacing.
For the numbers you will need about 15cm of contrasting fabric.
You will need 10m of ribbon cut into 20cm lengths ( you will need 48, two for each cone).
I used the Big Shot Pro and die http://www.sizzix.co.uk/product/656678/sizzix-bigz-pro-die-circle-6 to cut 24 circles in Christmas fabrics and 24 in fusible interfacing. I fused the interfacing to the wrong side of the fabric circles.
I used Tim Holtz Word Play die to cut all the numbers 1 -24 http://www.sizzix.co.uk/product/657837/sizzix-bigz-xl-alphabet-die-word-play , for the numbers I fused some fusible web to the wrong side of some Michael Miller Fairy Frost fabric and then cut out the following quantity of each number ( remember to lay the fabric RS down to cut out ),  -2 x 0, 13 x 1, 8 x 2, 3 x 3, 3 x4, and 2 each of numbers 5, 6, 7, 8, and 9.
Fold,  the circles in half to create semi-circles, press the fold and then fuse the numbers in place - 


 (as these are only used for a short time I haven't stitched the numbers in place but you can if you want to)
Pin 2 lengths of ribbon to each semi- circle  - and zig-zag stitch around the edge, and across the ribbons.
Overlap the straight edge of the semi circle, by about 4cms/ 1 1/2", to create a cone, pin and straight stitch in place photo 4


Your advent cones are now ready to fill and enjoy, and they are large enough to put more than one chocolate in!!! I have made the ribbons to be tied for hanging so that you can hang them anywhere you like - so if you don't put your Christmas tree up until part way through Christmas you could hang the cones around the house - in a sort of treasure hunt. Have fun.

Angela


Paper Trail Tour and more...

$
0
0


Hello friends! I have been off the blog for a while because I took off on the Paper Trail, a two month trip in my vintage camper all around the US. While on the road, I taught classes in stores using my Sizzix dies and Clearsnap inks. I loved it- although there were some disasters along the way. You can read about it here on my blog.

Here's the invitation to the Paper Trail Blogger event that was held while I was out in California at Ellison Global Headquarters! What a fun time...


Take a look at what happened at the party. My camper Scotty is parked in the background...


More exciting news- my new collection, Vintage Kitchen, is now on its way to stores! You can create pretty and practical packaging for food gifts, jewelry and small treasures. See the all of the dies here.

I hope you will check out my blog- every week there are amazing projects created by my super talented Inspiration Team. You are sure to be inspired... here are a few pics from this week. Please click on each designer's name to see the post about their projects.


I hope you will add your latest project to our Art With Heart Challenge. Prizes are involved!


Thanks for reading. See you in a few weeks!    Eileen

The Christmas Blog Hop!!

$
0
0


Hello and welcome to the Sizzix Christmas Blog Hop! This is my first time posting a Blog Hop with Sizzix in my personal blog, and I´m very happy to invite you!
I´m the last blogger  this week offering some gift idea for Xmas.
You can find my tuto in Spanish and English.
Take a look to preview post  and find more inspiration ,please !!


The Blog Hop line-up!:

Tuesday 18th November: Katy Jones 
Wednesday 19th November: Jessie Fincham 
Thursday 20th November: Angela Southey 
Friday 21st Trudi Wood 
Saturday 22nd November: Me!

Don´t forget to enter the great giveaway  !!


Chritmas Tag and Wrap by Olga

$
0
0


Hello all!

We continue Christmas challenges with Sizzix and this time it's a Gift Wrap and Tag week. I love tags and ready to create them as often as cards)) I don't wrap presents this way but when I do this is a separate project for me)) I used again FREE Christmas Papers Downloads as the designs are so beautiful and so festive!


I wrapped Kinder chocolate so I hope my kids will like to unwrap it))


The products I used:


Have a nice day!

Olga

Bente's Week 2 post 'Gift wrap & Tags'.

$
0
0


Hi and welcome to my week 2 post using the gorgeous free papers that you can download from the Sizzix web page. There is a link at the end of my post :-)

This week here at Sizzix UK we are focusing on gift wrapping and making cute tags for the recipients. I have been busy doing some of that too, and here is the result:

I used some of my fave dies at the moment for my giftwrap and tags.
The 'Circles, scallop' finds it's way to most of my projects.And when I am thinking of a seasonal project the 'Winter Borders and Rosette' by the talented Paula Pascual is one of the first sets I look for.

As I said I used the free downloadable papers here and the snowflake on blue is one of the neat little labels on them. I love how it turned out after I used the scallopped circle to cut it out.


I used the snowflake-patterned strips as they are and added a single little white snowflake as well. For a different texture I also used a silvery chipboard snowflake. It is so much fun to use corrugated cardboard for giftwrapping as it will almost always turn out looking rustic and decorative. It is also such a great way to recycle something you would otherwise throw away. :-)

I used:
Free downloadable papers
657900 Sizzix Big Shot Machine Only (Powder Blue & Teal)
Sizzix Framelits Die Set 7PK - Circles, Scallop
Sizzix Thinlits Die Set 9PK - Winter Borders & Rosette

Thanks for looking today and as always thanks in advance for any comments you my leave me ;-)

--------------------------------------------------------------------------------------------------------------


Hej och välkomna till vecka 2 av hur vi kan använda de fina papprena som du kan ladda ner helt gratis från Sizzix hemsida. En länk finns i produktlistan på slutet.

Denna veckan har vi fokuserat på att göra fina inslagningar och tags. Det har jg också gjort och här är resultatet:

Jag använde några av mina favorit dies för ögonblicket. 'Circles scallop' kommer med på de flesta av mina projekt just nu, och ska jag göra något vinter/jul relaterat så är en av de första jag använder  'Winter Borders and Rosette' av den duktiga Paula Pascual.

Som jag sa så använde jag gratis papprena för mina paket och den lilla snöflingan med blå bakgrund är ett av de söta motiven att klippa ut.


Jag använde de tryckte stripen med snöflingor som de är och la till en extra liten snöflinga i vitt. För att få lite extra textur använde jag en färdig silvrig chipboard snöflinga. Jag tycker det är jättekul att använd wellpapp för att slå in paket. Det ser så härligt rustikt ut och det är dessutom ett bra sätt att återanvända något som kanske annars skulle hamnat i soptunnan. ;-)

Jag använde:
Gratis nerladdningsbara papper
657900 Sizzix Big Shot Machine Only (Powder Blue & Teal)
Sizzix Framelits Die Set 7PK - Circles, Scallop
Sizzix Thinlits Die Set 9PK - Winter Borders & Rosette

Tack för att ni tittar inom och även för eventuella kommentarer ni är snälla att läna mig :-)


Simple Circle Strings

$
0
0


My son, Aidan and I have had lots of fun this week making super-easy circle strings to decorate the house and tree with this Christmas. Aidan has been fascinated by the Big Shot for a while and so was delighted to get the chance to help me use it. At 7 he's too young to operate it without adult supervision but he was more than happy to just be in charge of handle turning whilst I handled the die and dealt with the fabric.


We used the Circles, 3/4in die to cut all of our circles and used 6 different coloured felts in total (as selected by Aidan).


Once we had a sufficiently large pile of felt circles they were then fed them under the presser foot of the sewing machine one at a time, sewing straight down the centre. The next circle was fed under just as the last stitch was made on the previous one so that they were chain pieced together.


I can't remember where I first saw the idea for these but I expect it was somewhere on Pinterest. They are so quick and easy to make and really effective, we made an 8ft or so string in little over half an hour from start to finish.


They make a great simple decoration and could even be used as a trimming to tie around gifts too. We might try a different shape and colours next time, little hexagons would look good. Aidan is hooked on making them and so by the start of December I'm expecting the inside our house to be webbed.


Christmas tree decorations! Christmas Challenge week 3!

$
0
0


It's week three of the Sizzix Christmas Challenge 2014! And it is Tree Decorations! So I decided to do a large bubble with a decorated inside.

For this third Christmas Challenged I used:

Thinlits™ Die Set 9PK - Winter Borders & Rosette by Paula Pascual 659978
Thinlits™ Die Set 9PK - Christmas Phrase Cards by Paula Pascual 659973
Framelits Die Set 8PK - Circles #2 658604
Bigz Die - Ribbon, 3-D 658978

And I used the free downloadable papers from Sizzix, click here for the link.


I started by die cutting the rosette from the Winter Borders & Rosette set. I die cut two strips and covered the back with washi tape to make sure that the perforating lines don't brake. (They usually don't, but if you live in a very dry place or have the heating up as I do, the fibers are more brittle and tend to break much easily than they should.)
I cut the strips to be five pointers each amd making sure that one of the ends ended in a W and the other on a M. Then I linked those to create a lampshade sort of shape.


I die cut two circles using the medium circle die included in the set. I placed a bop of  hot glue in the center of one and pressed down on the rosette. then I used another circle to secure it in place.


I used a double sided adhesive sheet from Stix2 on white paper and die cut it using the larger circle die from the Winter Borders & Rosette set. I removed the backing of and placed the white paper die cut snowflake (also from the Winter Borders & Rosette). Then I dumped in my gold flake tub and rub any excess off - To see more of this technique click here.


I finished it off layering it with circles die cut from the Circles #2 set. On the opposite side I die cut the word peace from the Christmas Phrase Cards and snowflakes. Then I placed it on a plastic bubble and pour chunky matte glitter. Finally I added a die cut bow, embellishments from the Hobby House and a ribbon loop.


And there it is...
Soft Christmas Tree Decoration!


Christmas week 3 with Lilith

$
0
0
This week's theme is Tree Decorations. I have made many decorations in the past and really wanted to make something different. I decided to tweak the theme a bit and I made a decoration by not for the tree. (naughty me). I also wanted the project to be quick and this one was SUPER FAST but I really love the end result. All you need is a water glass (I used a wide one), some embroidery thread and the Sizzix Let it Snow thinlits die.  
http://www.sizzix.co.uk/product/659921/sizzix-thinlits-die-let-it-snow
 Just cut out the design, add some thread to recreate scarves for the snowmen and adhere it to your glass. Pop in a candle, light it and voilà. A pretty feature to add to your decorations or on the dinner table. 


 Supplies:
Let it Snow thinlits die,embroidery thread, glass, candle, glue. 

Oh and just a reminder NEVER leave candles unsupervised. They are beautiful and add lots of ambiance but can also be dangerous. Have a wonderful week.

Lilith 
 
Viewing all 2033 articles
Browse latest View live