Quantcast
Channel: Crafting ideas from Sizzix UK
Viewing all 2033 articles
Browse latest View live

Watch out for this really useful die.

$
0
0
f 

Hello. As Katy said on Monday - Autumn is definitely here!
I do love the Autumn, not all the extra layers we need to wear, but the colours of the trees, the rustle of the leaves as you walk through them ( or skip and kick through them - I still enjoy that!)
It's also the time for lovely homemade soup and curling up on the sofa with a quilt - you see I got there in the end!!
Today I thought I'd show you a different shape - the chevron, Bigz Die 658664 - which makes lovely patterns and is very easy to put together.


This die also partners with the half-square triangle - 657611 which completes the end of each row.
You can either cut the chevrons in pairs -
by laying the fabric on the die with fabric layered with right sides together, or lay all  right side up -
These pieces have been cut from a 'Jelly Roll' - each strip yields 7 chevrons.
The cushion I have shown used 28 chevrons and 14 triangles -  it measures 20" x 14" - and you could make 8 cushion fronts from 1 x 40 strip Jelly Roll,
or  a lap quilt - approx. 56" x 40", which could be a quilt for a young child -
or a lap quilt.
Or you could use it as a decorative border on a larger quilt.
As I say I'm just starting to play with this die - and I'm sure over the coming months you'll be seeing more projects featuring it.
I have to admit that the quilt for little Oona is not finished - she doesn't seem to mind - but I hope to show some progress on it by next week, and maybe even a photo of the little girls.
Now I'm of to have a cup of tea and decide just what to tackle next!!
Enjoy your sewing week.
Angela

Felt House Pincushion or Ornament

$
0
0

Hi Everyone!
It's Friday which means another project with Anna.

Several weeks back I was here sharing my card that I have created with die Card House.
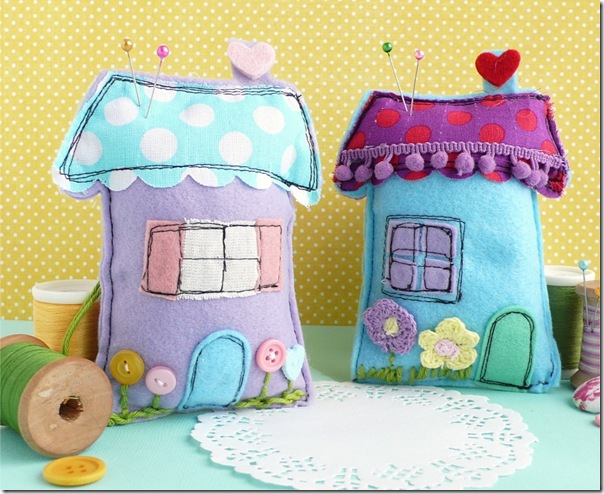
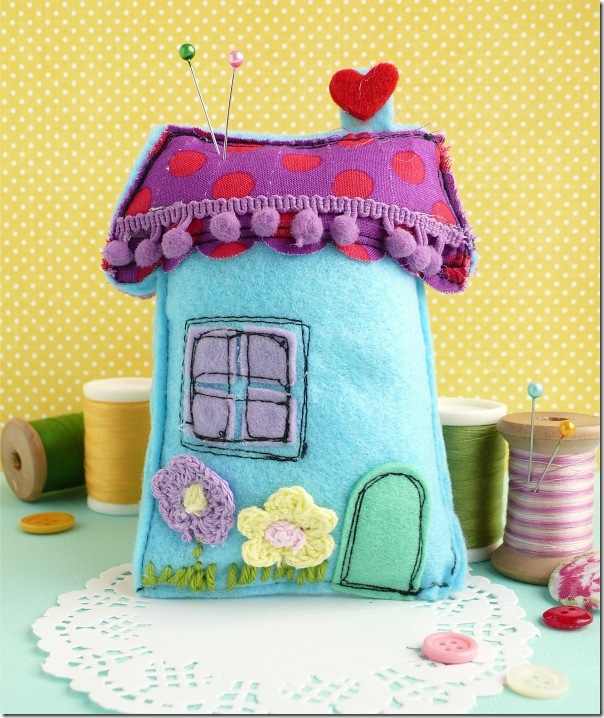
But today, I've got a really fun, whimsical pincushion that I hope you all love as much as I do.
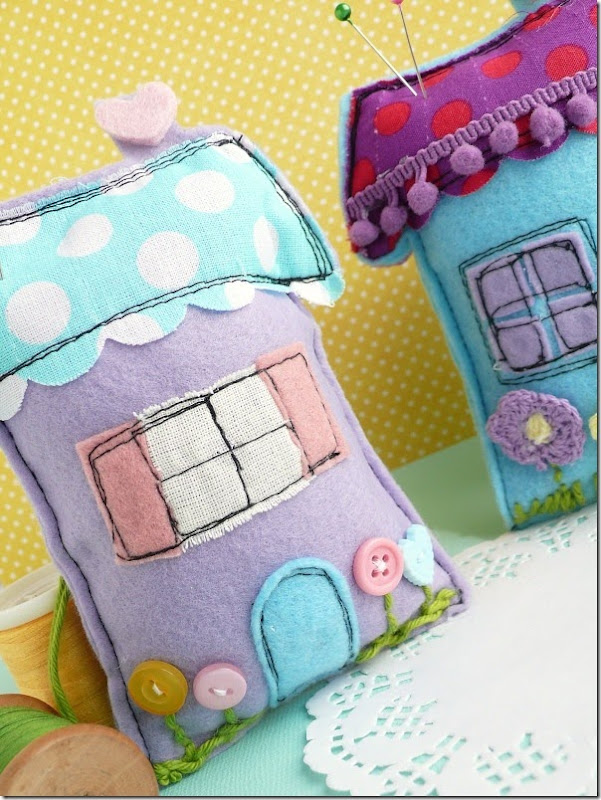
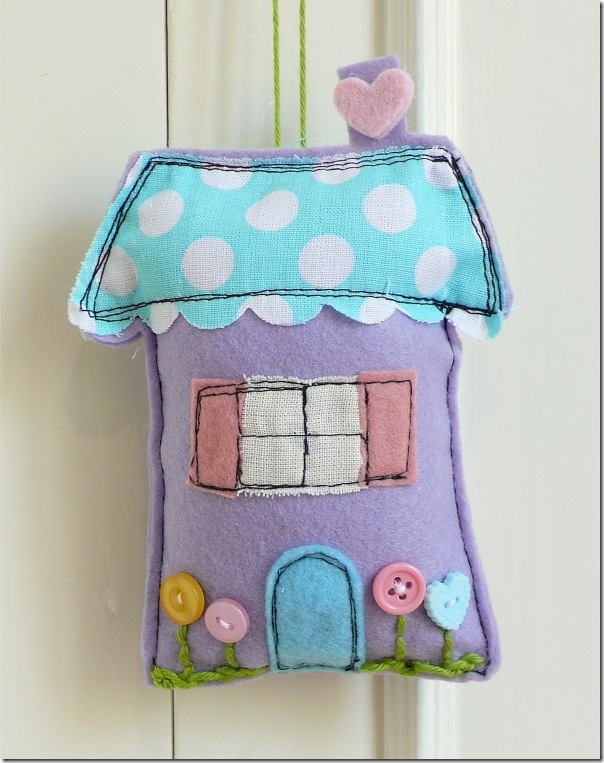
I made these pretty little houses with felt, fabric, applique and free-motion quilting. I'm very lucky to have such wonderful die to work with!

cafe creativo - sizzix big shot - sewing houses pincushion (1)

cafe creativo - sizzix big shot - sewing houses pincushion (2)

cafe creativo - sizzix big shot - sewing houses pincushion (4)

Even if you don't want to use it as a pincushion, you could hang it somewhere in your home, in the craft room or even on your Christmas tree, but for me, mine will be sitting right next to my sewing machine!

cafe creativo - sizzix big shot - sewing houses pincushion (3)

That's it! I hope you enjoyed my project today. Have a great weekend, see you next Friday!
 
Items used:
Sizzix Big Shot Starter Kit (Powder Blue & Teal) (658300) machine + dies
Sizzix Accessory - Cutting Pad, Extended, 1 Pair (655267)
Sizzix Bigz™ XL Die - Card, House by Deena Ziegler (658542)
Sizzix Bigz Die - Dog, Puppy (657687) (for felt heart)
felt
fabric
buttons
wool cotton
polyester stuffing
sewing machine, black yarn

**************************************
Flag_of_Italy Per le amiche italiane! :)
Ciao!
E Venerdì, il che significa che c'è un altro progetto con Anna.

Qualche settimana fa ho condiviso qui la card che ho creato con la fustella Card House. Ma oggi, ho un'altra divertente idea per mostrarvi le potenzialità di questa fustella XL: ecco un puntaspilli o decorazione simpatica, che spero tutti voi amerete tanto quanto me!
Anche se non pensate di utilizzarla come puntaspilli, potreste appendere la casetta da qualche parte in casa, nella craft room o anche sul vostro albero di Natale... ma per quel che mi riguarda, la mia sarà posizionata in bella vista proprio accanto alla mia macchina da cucire! Non sembrano le casette degli gnomi?!
Sono molto fortunata ad avere una fustella così meravigliosa con cui ideare tanti bei lavoretti craft! ;)
 
Ora vi spiego come fare la casetta lilla:
 
Materiali
Sizzix Bigz Die - Dog, Puppy (657687) (per il cuoricino di feltro)
feltro
tessuto
bottoni
fiori all'uncinetto
nastro pom pom
cotone lanato
imbottitura in poliestere
macchina da cucire, filo nero
 
Procedimento
1. Con la Big Shot tagliate una Card House dal feltro lilla.
2. Tagliare diverse parti della casa da diversi materiali: tagliare il tetto (sia per il davanti, che per il dietro) da stoffa fantasia, una porta azzurra e due persiane rosa. Tagliare a mano un quadratino di stoffa chiara, alto come le persiane.
3. Posizionare ogni pezzo con spilli e cucire free-motion con il filo in contrasto ovvero “disegnando” con la macchina da cucire.
4. Piegare a metà la casetta e cucire lungo i bordi, lasciando l'apertura in basso, da cui infilerete l'imbottitura.
5. Una volta imbottita la casetta, cucire l'apertura e decorare con bottoncini e filo verde per creare i fiorellini.
6. Aggiungere un cuoricino di feltro rosa sul comignolo. Questo è tutto!

Spero vi sia piaciuta questa idea :)
Grazie per essere passate di qui!

Winter Card with a touch of grunge!

$
0
0

Hi, I hope you had a great creative week!
Today I'm here to share a dimensional card which is an interesting mix of grunge and elegance - perfect for any occasion including weddings, birthdays or just simple winter greetings. I hope you will like it!


As you can see the card is really dimensional - it is all thanks to the large amount of 3D Foam Squares and the Brenda Walton's Medallions - which I really love to use. This time I combined the look of 2 doily elements, 1 bigger rosette, 1 Gift Tag and metal trinkets - Mechanicals from my Prima collection... and I really love that look!


Here is the list of Sizzix products used for this project
- Sizzix Sizzlits Die - Vintage Doily ( 658506)
- Sizzix Thinlits Die Set 4PK - Springtime (659117) 
- Sizzix Sizzlits Decorative Strip Die - Medallions (658339)
- Sizzix Bigz Die - Gift Tags (658730) 
 
All the papers and canvas are new releases of my products with Prima Marketing - Vintage Vanity (A4 Journaling Paper Pad). Metal embellishments are from my last collection - Mechanicals. The project was finished using a bit of Ranger Liquid Pearls. For sticking the elements and dimension I used products from Scrapbook Adhesives by 3L: 3D Foam Squares and Crafty Power Tape.  
See you soon!
Finn

simple pot holder tutorial

$
0
0


Quick and simple gifts ideas are always handy, whether they're for Christmas, birthdays or any other occasion.


Everybody has to eat, so everybody has to cook - a pot holder is perfect because we all use them, or oven gloves, or something to get hot pans off the stove or out of the oven!

I used the 2.5" square die to make simple 9 patch blocks from scraps. I then used my scissors to cut out squares a little larger than the patchwork block from cotton wadding, an insulating wadding such as bosal poly-therm fleece (you need both a cotton wadding and an insulating wadding to make sure you don't burn your hands), and backing fabric.


They're layered up like so;


Backing fabric right side facing down, insulating fabric with shiny side facing down (towards where the heat will be), cotton wadding and then the patchwork block on top - with the right side facing up.


Pin baste and quilt (I just quilted simply in a grid following the lines of the seams in the block. The layers are quite bulky so make sure you use a walking foot when you quilt)

Trim off the excess backing fabric and wadding, bind (you can find a binding tutorial here), and it's ready to gift!

If you want to add a hanging loop, use a grommet kit. A quick internet search will bring these up for you, or you can find them at haberdashery or craft shops. They're inexpensive and very easy to use. You just need a hammer and to follow the directions that come with the kit. Make sure the grommet is metal and not plastic - you don't want it to melt!


And there you have it - a quick and easy gift that is useful and inexpensive.

I'll have another quick Christmas gift idea next week.


I love plants LO

$
0
0
I love plants. I wish I had a big garden with lots of them. Big plants, trees, flowers... Instead, I have a small balcony where I keep some little pots with small plants and herbs. This weekend I made a page about how much I love plants and my wish to have a big garden some day.


Supply list:

I'm still taking the most of the starter kit. I love how versatile these dies are. In this LO I have used the heart and the butterfly as embellishments and the little circle as the hole protector of the tag.  I have also used the gift tag as part of the layers of my page. I have cut the tag in half and  stuck it between the papers to create more dimension.

Happy Monday!
...........................................

Me encantan las plantas. Me encantaría tener un jardín lleno de plantas grandes, árboles y flores, pero hasta que esto no pase me conformo con mi pequeño balcón en el que tengo algunas macetas con plantas pequeñas y hierbas. Este fin de semana he hecho una página sobre mi deseo de tener un gran jardín algún día.

Materiales:
Todavía estoy sacando un montón de partido al Starter Kit. Me encantan lo versátiles que son estos troqueles. En esta página he utilizado la mariposa y el corazón como adornos y el círculo pequeño como el protector del agujero del tag. También he utilizado la etiqueta para regalo como parte de las capas, cortándola por la mitad y pegándola entre los papeles para logra más dimensión.

¡Feliz lunes!
                                                                           

Tag with Stocking Gift Holder

$
0
0

Hi everyone....hope you had a great and creative week.... today I have a tag with Christmas Stocking to show you. Love this cute stocking ...I have usedSizzix Bigz XL Die - Stocking Gift Holder 
on this project.


 Supply list:

657900 Sizzix Big Shot Machine Only (Powder Blue & Teal)
658744 Sizzix Bigz XL Die - Stocking Gift Holder 
657188 Sizzix Bigz Die - Tiny Tabs & Tags
657492 Sizzix Bigz Die - Tattered Pinecone

Papers: Pion Design - Silent Night, Manila Tag #10, Bazzill
Stamps: Stampers Anonymous Tim Holtz Collection
Inks: Distress Stain - Aged Mahogany,Fired Brick, Festive Berries, Perfect Pearls - Merriment Red, Disress ink Pad - Walnut Stain, Frayed Burlap, Archival Ink - Jet Black
Other: Seam Binding Ribbon, Tissue Tape, Tinsel Twine, Trimmings.

How to do:

Distress Manila tag with Distress Stain - Aged Mahogany,Fired Brick, Festive Berries, Perfect Pearls - Merriment Red plus water. Die cut Stocking in patterned paper with Sizzix Bigz XL Die - Stocking Gift Holder  
Color the details with Distress Stain - Festive Berries. Distress the edges with Disress ink Pad - Walnut Stain. Glue the border to the edge of the stocking. Die cut branches with  Sizzix Bigz Die - Tattered Pinecone and distress the edges with Disress ink Pad - Walnut Stain
Sew or glue the stocking together and decorate.

Die cut a small tag with  Sizzix Bigz Die - Tiny Tabs & Tags .
Distress the tag with Disress ink Pad - Walnut Stain, Frayed Burlap...plus water.
Stamp motiv on the tag.


Some close up pictures....


Thanks for stopping by.
Anne Kristine

♥♥♥♥♥♥

Hei alle sammen ...håper dere har hatt en kreativ uke... i dag har jeg en tag med julestrømpe å vise dere. Strømpen er stanset ut med Sizzix Bigz XL Die - Stocking Gift Holder 

Materialer:
657900 Sizzix Big Shot Machine Only (Powder Blue & Teal)
658744 Sizzix Bigz XL Die - Stocking Gift Holder 
657188 Sizzix Bigz Die - Tiny Tabs & Tags
657492 Sizzix Bigz Die - Tattered Pinecone

Papir: Pion Design - Silent Night, Manila Tag #10, Bazzill
Stempler: Stampers Anonymous Tim Holtz Collection
Inks: Distress Stain - Aged Mahogany,Fired Brick, Festive Berries, Perfect Pearls - Merriment Red, Disress ink Pad - Walnut Stain, Frayed Burlap, Archival Ink - Jet Black
Annet: Seam Binding bånd, Tissue Tape, Tinsel Twine, Trimmings.

Beskrivelse:
Distress Manila tag med Distress Stain - Aged Mahogany,Fired Brick, Festive Berries, Perfect Pearls - Merriment Red pluss vann. Stans ut julestrømpen i mønsterark med  Sizzix Bigz XL Die - Stocking Gift Holder  
Farge detaljer med Distress Stain - Festive Berries. Distress kantene med Disress ink Pad - Walnut Stain. Lim borden øverst på julestrømpen. Stans ut grener med  Sizzix Bigz Die - Tattered Pinecone og distress kantene med Disress ink Pad - Walnut Stain
Sy eller lim strømpen sammen og dekorer.

Stans ut en liten tag med  Sizzix Bigz Die - Tiny Tabs & Tags .
Distress tag'en med Disress ink Pad - Walnut Stain, Frayed Burlap...pluss vann.
Stemple motiv på tag'en.

Ønsker deg en fin dag.
Anne Kristine


Be the best version of you......

$
0
0


Hi all Sizzix fan
I hope you had a great creative week. Today i would like to show you a card.

 
Items used:
Big Shot Machine only ( 657900 )
Sizzix Bigz die Albany Rose ( 658522 )
Sizzix Bigz die Elisse  ( 658526 )
Sizzix Bigz die Susan's Garden- Flower, black-eyed Susan (658422 )
Decorative strip- Venice ( 658521 )
Framelits Banner die set ( 658289 )
Supply list:
Paper, Prima's All About Me 6x6 paper pad, cardstock
Stamp: Clear stamp-YOU- from KaiserCraft and stamp from Sizzix framelits banner die set
Ink: Hero Art- Soft Pool-, -Mid-Tone-
3 D foam, brads and ribbon
How to make:
1. Cut out a cardstock 29x14,5 cm, fold to make a card base 14,5 x14,5 cm.
2. cut patterned paper 14,2x14,2 cm and glue to the center of the card base.
3. Cut out off White cardstock 13,5x 9,5 cm and a patterned paper 13,2x 9,2 cm glue together and glue to the card base using 3D foam.
4. Die cut the different sorts of Sizzix dies
5. Decorate the card using the differnet sorts og shapes
6. Stamp the text on to the tag and stamp banners to off white cardstock , cut out and glue to the tag


                                           I hope you enjoyed my project today.
                                    Wish you a grea week. See you next Tuesday
Hej alle Sizzix fan
I dag vil jeg vise et kort som kan bruges til alle anledninger.
Dies jeg har brugt:
Big Shot Machine only ( 657900 )
Sizzix Bigz die Albany Rose ( 658522 )
Sizzix Bigz die Elisse  ( 658526 )
Sizzix Bigz die Susan's Garden- Flower, black-eyed Susan (658422 )
Decorative strip- Venice ( 658521 )
Framelits Banner die set ( 658289 )
Andre materialer:
Papir, Prima's All About Me 6x6 paper pad, karton
Stempler: Clear stamp-YOU- fra KaiserCraft and stamp fra Sizzix framelits banner die set
Ink: Hero Art- Soft Pool-, -Mid-Tone-
3 D foam, brads og bånd
Sådan gør du:
1. Skær et stykke karton 29x14,5 cm, fold så kortet kommer til at måle 14,5 x14,5 cm.
2. Skær mønstret papir  14,2x14,2 cm og lim til midten af kort basen.
3. Skær ud creme farvet karton13,5x 9,5 cm og mønstret papir 13,2x 9,2 cm lim den sammen og sæt på kortet med 3 D puder
4. Udskær de forskellige Sizzix dies
5. Dekorer kortet med de forskellige udskæringer
6. Stempel teksten på tagen og stempel banner på karton og klip ud og lim på tagen
Jeg håber mit kort gav dig inspiration. Ønsker dig en dejlig uge.
Vi ses næste tirsdag
Pia


Planner

$
0
0


Hi All!

Daria is here.

This year will be over soon and I will need a new planner. I decided to do it by myself. I created a cover, inner sheets and dividers which I decorated using different Sizzix dies.

Items used:
Big Shot Machine (657900)
Sizzix Thinlits Die Set 6PK - For the Record (659108)
Sizzix Framelits Die Set 8PK w/Stamps - Banners #2 (658696)
Sizzix Framelits Die Set 9PK - Tags #2 (658611)
Sizzix Framelits Die Set 4PK - Frames, Instant (658608)


I used only papers, Sizzix dies and washi tapes to decorate these dividers.
I love my new planner!


Have a nice day!

Daria.


Всем привет!

Сегодня я хочу показать вам мой новый ежедневник. Этот год скоро закончится и мне нужен будет новый органайзер. Я решила сделать его сама. Создала обложку, сшила внутренний блок и сделала разделители, которые украсила с помощью ножей от Sizzix. 

Мне нужно было, чтобы разделители были как можно более плоскими, чтобы было удобно писать в ежедневнике, и при этом радовали меня. Поэтому я украшала их только бумагой (вырубками сделанными на машинке) и декоративным скотчем.

Big Shot Machine (657900)
Sizzix Thinlits Die Set 6PK - For the Record (659108)
Sizzix Framelits Die Set 8PK w/Stamps - Banners #2 (658696)
Sizzix Framelits Die Set 9PK - Tags #2 (658611)
Sizzix Framelits Die Set 4PK - Frames, Instant (658608)

Всем хорошего дня!

Дарья.

Don't Make Me Beg!

$
0
0

Hello,Today I am sharing the first of my 'Home Made Christmas' ideas.

My niece, Sally, recently bought a puppy called Bruce. It won't win any prizes for looks or obedience but it really he really has lifted everyone's spirits with his quirky ways! He is a sheepdog cross with an australian something or other and I am sure he will never grow into his ears! Sally has been trying to train Bruce and when she asked for a bag to carry his treats in, I instantly thought about the Sizzix Bigz die Dog, Puppy because the ears were so similar to Bruces!


This is the initial sketch that I made, you can see that even the best made plans can go astray!


My sewing skills are limited at best and I started with two rectangles of terracotta fabric measuring 36x16cm which allowed for a 1.5cm seam allowance.

Here are the stages of making.


The white felt heart was cut using the Big Shot Starter Kit Bigz die but any heart would do, I hand wrote the word and did a running stitch over the top. I am not very confident with the sewing machine so hand stitched this project. My colleague Angela saved me an enormous amount of time (plus sweat and tears!) by machine stitching the strap. Thank you 'sew' much Angela :)


New card !

$
0
0
Hello!

It’s always nice to give a card as a present, isn’t it?

Supply list:

Papers: Glitz Design
Sticker: Farm House
Paper clip: Farm House
Others: Ribbon, twine

Die:

657209 Sizzix Movers & Shapers Magnetic Die Set 2PK-Mini Butterflies Set 
658518 Sizzix Textured Impressions Embossing Folder 2PK-Pom-poms & roses set

The size of this card is 11x20cm. It is built with several pattern papers with luminous colours so as to shoo off the grey weather!

I used the “Roses” embossing folder with white paper; it will give a spring touch to the creation.

The embossed paper is then matted with sky blue paper.

The title “For you” is on the tag. A paper clip comes as a completion.

Let’s add a butterfly for the feminine touch! It will be attached with the paper clip.


See you on Thursday!


Karine

Bonjour !

Une petite carte à offrir, cela fait toujours plaisir n'est ce pas ?

Matériel :

Papiers : Glitz Design
Autocollant : Farm House
Trombone : Farm House
Divers : ruban, cordelette

Die :

657209 Sizzix Movers & Shapers Magnetic Die Set 2PK-Mini Butterflies Set 
658518 Sizzix Textured Impressions Embossing Folder 2PK-Pom-poms & roses set

Une carte au format au format 11x20cm composée de plusieurs imprimés aux couleurs lumineuses comme pour chasser la grisaille !

Une plaque à motifs "roses" est embossée dans du papier blanc, celle-ci viendra donner une petite touche printanière.

Le papier embossé est ensuite matté en bleu ciel.

Le titre "for you" est donné par le tag, un trombone vient le compléter.

Un papillon vient ajouter une petite touche féminine, il sera fixé à l'aide du trombone.

A jeudi !

Karine

Easy does it!

$
0
0

I have just returned from Norway where I was demonstrating at one of the most magnificent stores I have ever been in namely, Bikuben in Lillestrom, The people who I met were all lovely and Egil and Ellen were fantastic hosts and great company too. Wherever I go in Europe with all it's cultural diversity I'm happy to report that crafters everywhere are all alike thanks to their shared passion.

I am stepping back from the brink this week. My last few posts have been really complex and grungy with tons of inks, powders and other fun mucky stuff thrown into the mix. It's time for a little detox so this week I've stripped things right back.

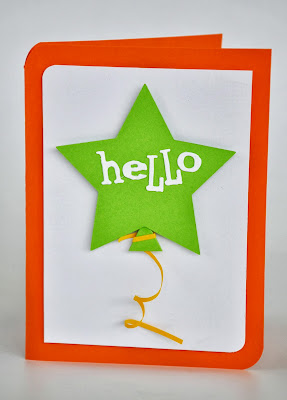
These cards were made for a couple of Create and Craft shows next Monday (30th September at 2pm and 7pm) and they feature one of my all time favourite Decorative Strip alphabets and a few Framelits for good measure.


The dies used are:

  • Sizzlits Decorative Strip - Alphabetical by Tim Holtz (657482)
  • Sizzix Framelits Set 6PK - Hearts (657561)
  • Sizzix Framelits Die Set 8PK - Circles#2 (658604)
  • Sizzix Framelits Set 5PK - Stars (657567)


First of all I chose my three main colours and white, having top quality cardstock makes all the difference, I always use Inspire Me Papers for this kind of thing. The main shapes I cut with my Framelits, the letters with the alphabet die. After die cutting the balloon shape, I would cut a triangle from the same card and attach at the base of the shape with PVA. 


Next I would cut a thin strip of yellow card and curl it around a pencil or paintbrush before attaching to the end of the balloon. Next I would measure the base card and its white background before rounding off some or all of the corners with a corner punch.


Finally, mount all the elements together using 3D foam pads and there you have it. 


Jingle bells stocking

$
0
0


Hello again, I love this time of year - I was returning home from work and as I reached the outskirts of Hereford I realised I could smell apples - harvested for cider making, one of the best smells.
So as the evenings draw in and the heating is turned on - we can enjoy making little gifts and presents in preparation for Christmas.
This week I've made a small stocking and decorated it with bells using a new  Bigz die 658765 - Christmas Bells by Tim Holtz ( it will be available from October).
My stocking is small - which I will fill with little treats for the grandchildren - but you could make it any size because the technique will be the same.
I cut 4 layers of medium weight white cotton fabric in the shape of a stocking ( you can find lots of images on line) 13" long by 10" at the toe.
For the Christmas fabrics I chose from the Yuletide range by Makower.
I cut 2 strips of Christmas fabric  2 1/2" wide to make a border for the top of the stocking.
I used 2 more different fabrics for the bells. I applied fusible web to the wrong side of the fabrics and placed them over the bells shapes on die and rolled them through the Big Shot.
Sew the border strips to the top of 2 of the stockings
 and press.
 Fuse the bells in place and stitch - I used a zig-zag stitch but you could use a straight stitch.
 
 Stitch the stockings, with the borders, right sides together, and stitch the plain pair together , but leave an opening along the straight side, so that you can turn the stocking right sides out.
Clip and snip the curves as pictured below. 
 
Turn stocking right side out.
Cut a strip of 'border' fabric - 1 1/2" x 5 1/2" to make a loop - press in half along length and then press edges to the middle and stitch in place. 
Pin loop to the top edge of the back of the stocking.
place one stocking inside the other, with right sides together, pin and stitch them together around the top edge.
Pull the stocking  so that it's right sides out - and looks like the picture below. Pin and slip stitch the opening and then push the lining inside.

 
Now you have the completed stocking. 
You could make one for  each member of your family, or as gifts for friends young and old.
I had hoped to have finished the quilt for Oona for this week - but it is in progress - I have stitched some of the animals in place and will keep you updated until I can actually show you the finished article.
Enjoy the week.
Angela

Layout "Beautiful Day"

$
0
0

Hi Everyone! This is Anna.

How are you today? Have you been busy scrapping this weekend?
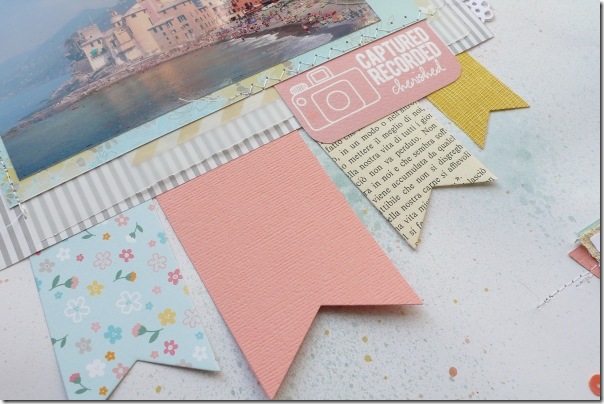
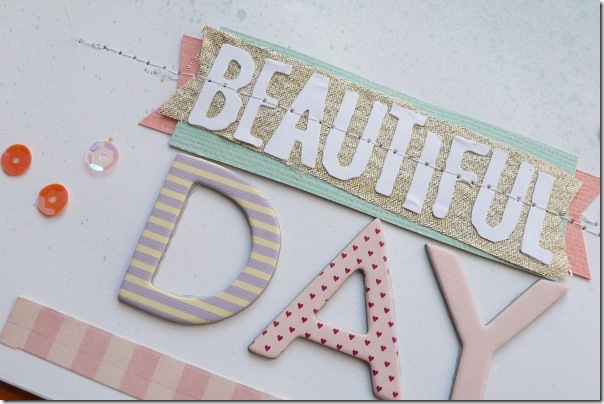
Here I am with a new layout to inspire you to create with your favorite cutting machine! A new layout full of pastels colors - I've been inspired by these color combos lately! - made with simple dies that you can use in very different ways.


cafe creativo - sizzix big shot - Travel - Liguria (1)

The Sizzix die leaves are perfect for today’s creation.

Choose the paper you want as a background: I used a simple white cardstock! Add some mists here and there. Add some embellishments here and there, still sticking to the same color combo: cut out different banners, then cut a nice lace doily into a white paper and place it under your photo.

cafe creativo - sizzix big shot - Travel - Liguria (2)

cafe creativo - sizzix big shot - Travel - Liguria (3)

Hope you liked it! Have a great, creative weekend!

Items used:

Sizzix Thinlits Die Set 2PK - Doily & Doily Border #2 (659058)
Sizzix Framelits Die Set 5PK - Labels, Wavy (658363)
Sizzix Bigz Die - Tiny Tabs & Tags (657188)
Sizzix Framelits Die Set 6PK w/Stamps – Banners (658289)
Sizzix Sizzlits Decorative Strip Alphabet Die - Chip Block (656917)

1 photo
cardstock: white, twinkle pink, aqua, cream (Bazzill)
patterned papers: American Crafts, Basic Grey, Crate Paper, Ikea
reuse packaging of Prima Marketing
vellum paper
gold ribbon
tag (Kimberly Kalil)
alphabet
mist
sequins
sewing machine, yarn

**************************************
Flag_of_Italy Per le amiche italiane! :)

Ciao!
Ecco un nuovo appuntamento con Anna.

Questa settimana mi sono dedicata ai layout, altrimenti rimango sempre indietro con i miei album! Ecco un'altra paginetta di viaggio, un piccolo fine settimana in Liguria di qualche anno fa.
Sono partita da un candido foglio bianco sul quale ho spruzzato tre diversi colori pastellosi. La mia passione per i colori pastello viene fuori ogni tanto ;)
Ho cercato di dare importanza alla foto sovrapponendola a qualche ritaglio di carta, compreso un packaging recuperato, che mi piaceva per i colori.
Sono quindi passata agli abbellimenti ritagliati con la mia cara Big Shot: ho tagliato prima di tutto un bel centrino di carta che ho messo sotto agli strati di carta.
Poi ho tagliato anche quattro bandierine di dimensioni e materiali diversi e le ho disposte nella parte bassa degli strati di carta. Infine ho tagliato un paio di tag differenti e l'alfabeto che compone la scritta "beautiful".
Ho realizzato delle cuciture, come quella sopra la scritta del titolo ed ho terminato incollando qualche paillettes vicino. Voilà!
Spero che il mio layout vi sia piaciuto. Tornate a trovarmi venerdì prossimo! :)
 
Materiali:

Sizzix Thinlits Die Set 2PK - Doily & Doily Border #2 (659058)
Sizzix Framelits Die Set 5PK - Labels, Wavy (658363)
Sizzix Bigz Die - Tiny Tabs & Tags (657188)
Sizzix Framelits Die Set 6PK w/Stamps – Banners (658289)
Sizzix Sizzlits Decorative Strip Alphabet Die - Chip Block (656917)

1 foto
cartoncino: bianco, rosa antico, verde acqua, crema (Bazzill)
patterned papers: American Crafts, Basic Grey, Crate Paper, Ikea
packaging di Prima Marketing da riiciclare
carta da lucido 
ritaglio di stoffa o nastro color oro
tag (Kimberly Kalil)
alfabeto
colori a spruzzo
paillettes
macchina da cucire, filo


Winter is Coming... - Winter Gift Bag - with Thinlits!

$
0
0

Hi, it's my turn to take over the blog again!
As people say, Winter is Coming...


Although I'm not a huge fan of preparing for Christmas so early or creating in "traditional Christmas colours" I'm ready to take a challenge and create something in a bit Winter mood... Ready?
So, having Winter on my mind - let me start with delicate, faded colours - cold greens, blues, snowflake cut-outs (great Sizzix Thinlits - Christmas (659010)), big Prima flower and metal embellishments (ok, I know I'm addicted!) to finish with a bit of veil, some crystals, vintage buttons and pins and a piece of natural canvas. I was really having great time constructing this multi-layered composition on the top of this little paper gift bag!


All the papers I've used are from my new A4 Vintage Vanity Journaling Pad from Prima and all the metal elements are "Mechanicals" - my trinkets and caps from Prima. To get extra dimension I used some 3D Foam Squares from Scrapbook Adhesives by 3L. 


And here are the links to the Sizzix Dies I used for this project - with white cardstock and Prima for cutting out the elements:
- Sizzix Thinlits Die Set 6PK - Christmas (659010)
- Sizzix Sizzlits Decorative Strip Die - Medallions (658339) 

I hope you are keeping yourself warm in this cold season - and find some time for creativity!
See you soon!
Finn

have you signed up for the newsletter?

$
0
0


If you're a fan of the big shot (and you must be if you read the blog, right?!) then you will probably be interested to learn that we have a newsletter. It keeps you up to date with all of the latest dies and offers and has some great free project ideas. You can sign up here.

And here's a few project ideas to get you started with applique. You can make a peg bag, a tea cosy and an apron, simply enter your email address in the sign up field here, and get the project downloads and the newsletter all at once!


I spent the weekend in Duxford doing demonstrations for Lady Sew and Sew. I have to admit doing 2 shows back to back was hard work, but it's always a lot of fun and it's so great to meet people (especially when I spend most of my days alone sewing in my craft room). I cut out lots of Christmassy half square triangles for a couple of projects that I'll be spending the next week or so on. I'll be sure to show you once they're finished!

Have a lovely week - I'm going to take a very long soak in the bath today and get myself unpacked and raring to go for another busy week sewing!

Nordic inspiration

$
0
0
As you may know by now I love simple things. Sometimes, I love to be able to make a cute project without having to think a lot about it and the Big Shot and Sizzix dies are perfect in these occasions.

Today I was totally inspired by the Nordic Style to make 2 Christmas gift tags and the Reindeer Bigz die from Brenda Walton has been the star of them.

Supply list:

To achieve this look you have to craft with a very neutral color palette, a lot of craft paper and some red accent. Here I have made 2 versions of the same gift tag, and as you can see you need very few supplies to make them. 


Do you like Nordic Style?

Happy Monday!

....................

Como ya sabéis a mí me encantan las cosas sencillas. Algunas veces me gusta hacer algo bonito sin tener que pensar mucho en ello y en esas ocasiones mi Big Shot y sus troqueles son de gran ayuda.

En esta ocasión me he inspirado en el estilo nórdico para hacer dos tags navideños pasa regalos, y el troquel de reno de la colección de Navidad de Brenda Walton ha sido la estrella de los tags.

Para conseguir el look nórdico tenéis que utilizar una paleta de colores natural, un montón de papel craft y algún acento rojo. Aquí podéis ver cómo he hecho dos versiones del mismo tag y ya veis que necesitáis muy poquitos materiales para hacerlos.

¿Os gusta el estilo nórdico?

¡Feliz lunes!

New Home

$
0
0

Hello,
Well what a week! I have been helping my daughter move into a lovely new apartment this week, she has been working so hard and saving every penny for the move and I had the pleasure of going shopping with her to buy those finishing touches that make a house a home.

I have to say, as lovely as it has been to stand back and watch her choosing items, it has been really quite strange and at times I wondered who had taken the real Sadie! The scatty teenager who really couldn't of cared what her surroundings looked like was nowhere to be seen, functionality and comfort were her only concerns back then but now from somewhere she has found a real eye for detail and she has really created a beautiful home to be proud of.

This morning I made a quick New Home card which hopefully reflects her modern taste and no frills style. I have used really simple shapes and tried to maintain a 'sunny', carefree, feel which is very reflective of her personality. I really hope she likes it!

The papers I have used are from a collection by 7 DOTS STUDIO called Hopefully and the Sizzix dies that I have used are:

Sizzix Framelit Die Set - Squares 657565
Sizzix Sizzlit Decorative Strip Alphabet Die -Block Chip 656917

Also the little flower is from the Sizzlit in the Big Shot Starter Kit.


The little house is created using the Square Framelit set, cut out a small rectangular door shape from a brown die-cut square to make the base of the house and then cut another square in half diagonally to create the roof.


I have used foam pads to add dimension to the card, I know this is a problem here in the UK with postal charges but as I plan to deliver this by hand, I really built up the layers!


My stitching isn't brilliant but I do love using a little on cards and scrapbooking projects, it really adds texture and interest and in my defence, I think the less neat the stitches are the better the effect. (Well thats my theory and I am sticking to it!)

Have a happy, productive crafting week everyone, I guess most of you will be pressing on with Christmas projects? Well whatever it is, have fun!

Winter Wonderland

$
0
0

Hi everyone.... hope you all had a great week....today I have made a card with the wonderful Sizzix Die:  Sizzix Bigz Die - Window & Window Box


Supply list:
657900 Sizzix Big Shot Machine Only (Powder Blue & Teal)
658780 Sizzix Bigz Die - Window & Window Box
658776 Sizzix Movers & Shapers Magnetic Die Set 2PK - Mini Toy Soldier & Ice Skate
657467 Sizzix Sizzlits Decorative Strip Die - Festive Greenery
658568 Sizzix Movers & Shapers Magnetic Die Set 3PK - Sized Rectangles 

Papir: Pion Design - Wintertime in Swedish Lapland, chipboard, white Bazzill
Stempler: Stampers Anonymous Tim Holtz Collection
Inks: Distress ink Pad - Walnut Stain, Distress Paint, Memento - Rich Cocoa
Annet: Strukturpaste, Distress Glitter - Clear Rock Candy, Pumice Stone, mini bell, Seam Binding bånd, Distress Crackle Paint


How to do:
Die cut the window in chipboard with Sizzix Bigz Die - Window & Window Box.
Paint the window with Distress Crackle Paint. Let it dry.
Cut out card and fold it to 15x15 cm, cut out a panel 14,7x14,7 cm and glut it to the main card.
Die cut rectangle with Sizzix Movers & Shapers Magnetic Die Set 3PK - Sized Rectangles 
Die cut Ice Skates in chipboard with Sizzix Movers & Shapers Magnetic Die Set 2PK - Mini Toy Soldier & Ice Skate . Paint Ice Skates with Distress Pant and distress the edges with Distress ink Pad - Walnut Stain. Die cut some branches and leaves in white Bazzill with Sizzix Sizzlits Decorative Strip Die - Festive Greenery
Distress the edges with Distress ink Pad - Walnut Stain and glue Distress Glitter - Pumice Stone on leaves.
Glue window and ice skates to the main card. Add some strukturpaste and Distress Glitter - Clear Rock Candy here and there.


Inside the card:
Die cut window in patterned paper, distress the edges and glue it to the main card. 

Wish you all a great week.
Anne Kristine 

♥♥♥♥♥♥

Hei alle sammen ...håper dere har hatt en fin uke...i dag har jeg laget et kort med et vindu som er stanset ut med Sizzix Bigz Die - Window & Window Box

Materialer:
657900 Sizzix Big Shot Machine Only (Powder Blue & Teal)
658780 Sizzix Bigz Die - Window & Window Box
658776 Sizzix Movers & Shapers Magnetic Die Set 2PK - Mini Toy Soldier & Ice Skate
657467 Sizzix Sizzlits Decorative Strip Die - Festive Greenery
658568 Sizzix Movers & Shapers Magnetic Die Set 3PK - Sized Rectangles 

Papir: Pion Design - Wintertime in Swedish Lapland, chipboard, white Bazzill
Stempler: Stampers Anonymous Tim Holtz Collection
Inks: Distress ink Pad - Walnut Stain, Distress Paint, Memento - Rich Cocoa
Annet: Strukturpaste, Distress Glitter - Clear Rock Candy, Pumice Stone, mini bell, Seam Binding bånd, Distress Crackle Paint

Beskrivelse:
Stans ut vindu i chipboard med Sizzix Bigz Die - Window & Window Box.
Mal vindu med Distress Crackle Paint. La det tørke.
Skjær ut kortet og brett til str. 15x15 cm, skjær et panel istr. 14,7x14,7 cm og lim dette til selve kortet.
Stans ut en rektangel med Sizzix Movers & Shapers Magnetic Die Set 3PK - Sized Rectangles 
Stans ut to skøyter i chipboard med Sizzix Movers & Shapers Magnetic Die Set 2PK - Mini Toy Soldier & Ice Skate . Mal skøytene med Distress Pant og distress kantene med Distress ink Pad - Walnut Stain. Stans ut grener og blader i white Bazzill med Sizzix Sizzlits Decorative Strip Die - Festive Greenery
Distress kantene med Distress ink Pad - Walnut Stain og lim Distress Glitter - Pumice Stone på bladene.
Lim vindu og skøyter til kortet. Påfør strukturpaste og Distress Glitter - Clear Rock Candy her og der.
Innsiden av kortet:
Stans ut et vindu i mønsterark og lim dette på innsiden av kortet.

Ønsker dere alle en fin dag.
Anne Kristine

Christmas card

$
0
0


Happy Tuesday everyone
I hope you all had a beautiful week. Today I will show you a Christmas card using the beautiful Sizzix dies.

Items used:
Sizzix bigz Ornate Frame ( 658720)
Sizzix bigz Tattered Pinecone ( 657492)
Sizzix bigz Classique ( 658524)
Movers & Shapers Mini Stocking& Candy Carie ( 658775)
Supply list:
Paper: Riddersholm Design-Our Country Christmas- 6x6 paper stack and cardstock, green, reed and of white
Ink:Distress ink-Vintage photo-
Ribbon, metal charms and a little clothespin
How to make:
1. Cut a cardstock 29x14,5 cm, fold to make a card base 14,5x14,5 cm
2. Cut out 2 patterned paper 14x14 cm, glue to the centre of the front and backside
3. Die cut using the different sorts of Sizzix dies , ink the edged using vintage Photo
4. Decorate the card.
 
Thanks for stopping by and hope it gave you some inspiration, see you next Tuesday.
Wish you a great week
Pia
Hej igen
Jeg håber du har haft en dejlig uge. I dag vil jeg vise et julekort hvor jeg har brugt forskellige af de lækre Sizzix dies.
Dies jeg har brugt:
Sizzix bigz Ornate Frame ( 658720)
Sizzix bigz Tattered Pinecone ( 657492)
Sizzix bigz Classique ( 658524)
Movers & Shapers Mini Stocking& Candy Carie ( 658775)
Andre materialer:
Papir: Riddersholm Design-Our Country Christmas- 6x6 paper stack og karton, grøn, rød og of white
Ink: Distress ink-Vintage photo-
bånd, metal charms og en lille tøjklemme
Sådan gør du:
1. Skær ud i karton of White 29x14,5 cm, fold på midten så kortet bliver 14,5x14,5 cm
2. Skær ud 2 stykker mønstret papir  14x14 cm, lim til centret af for og bagside
3. Udstans ved at bruge de forskellige Sizzix , ink kanterne med vintage Photo
4. Dekorer kortet
Jeg håber dette gav dig lidt inspiration til at anvende de skønne Sizzix dies, vi ses næste tirsdag
Ønsker dig en dejlig uge
Pia

100% Sweetie

$
0
0


Hi All!

Daria is here. And today I would like to show you one more layout about my daughter.

Items used:
Big Shot Machine (657900)
Sizzix Sizzlits Decorative Strip Die - Flower Garden w/Scallops (657708)
Sizzix Bigz Die - Duchess (658525)
Sizzix Sizzlits Decorative Strip Die - Venice (658521)


I love to cut from vellum different shapes and use them in my layouts.


Have a nice day!

Daria.


Всем привет!

Сегодня я с новой страничкой о моей дочке. Мне очень нравится цветовая гамма, которую я использовала для создания этой работы. 
А еще, когда мне не хватает бумаги нужно оттенка, или хочется добавить какие-то детали, но цветовая палитра исчерпала себя, я добавляю прозрачный или полупрозрачный веллум (кальку). И тогда появляется возможность добавить новые слои, вырезав различные фигурные элементы. 

Big Shot Machine (657900)
Sizzix Sizzlits Decorative Strip Die - Flower Garden w/Scallops (657708)
Sizzix Bigz Die - Duchess (658525)
Sizzix Sizzlits Decorative Strip Die - Venice (658521)

Всем хорошего дня!

Дарья.
Viewing all 2033 articles
Browse latest View live