Quantcast
Channel: Crafting ideas from Sizzix UK
Viewing all 2033 articles
Browse latest View live

3D Hexagon pom-poms

$
0
0


I know its January but I'm still thinking about Christmas!
I have been working on a display for some exhibitions and needed to create something 3D with hexagons - now they are the wrong shape to make a ball - but I came up with this idea -
 

they are quite simple to  make - just take a bit of time.

I used the Big Shot and 2 different sizes of hexagon die 1"http://www.sizzix.co.uk/catalog#q=659835 ( the larger hexagon will be available in May)

I fused 2 fabrics together with a fusible web and then cut out 6 hexagons for each 'pom-pom'
I think stitched the raw edges with a small zig-zag stitch using matching thread.
Lay 6 hexagons on top of each other, place a narrow ribbon in the middle, and stitch down the centre, as shown in the photo.
Next step is to stitch the middle points together in pairs and then stitch the top and bottom points together  - see the photo for guidance.
There is one complete 'pom-pom'
Here is a collection - I really like these and plan to make more as gifts for  next Christmas - for friends who have young children in the house - easy unbreakable decorations. I may make a couple from 'scraps' left from the projects I make this year.
Hope you like this variation for using hexagons.
Now I'm going to plan some projects for the next few weeks.
Angela
 

Happy Winter Birthday

$
0
0

Hi Sizzix fans! It's  Anna posting today.
Even during the months of December and January, we have birthdays. Mine is in August, I never had a party during school days because everybody is on summer vacation at that time. December and January are pretty much ruled by holiday celebrations, so don’t forget the birthdays in these months!
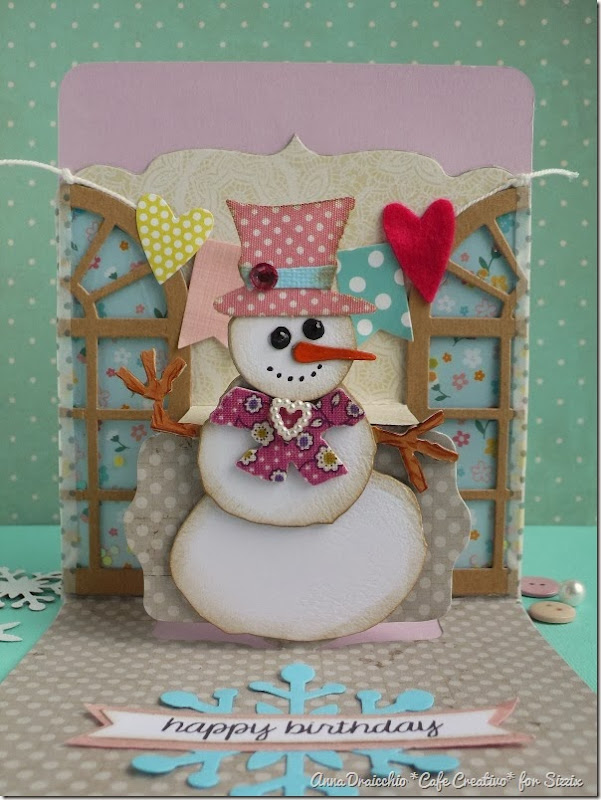
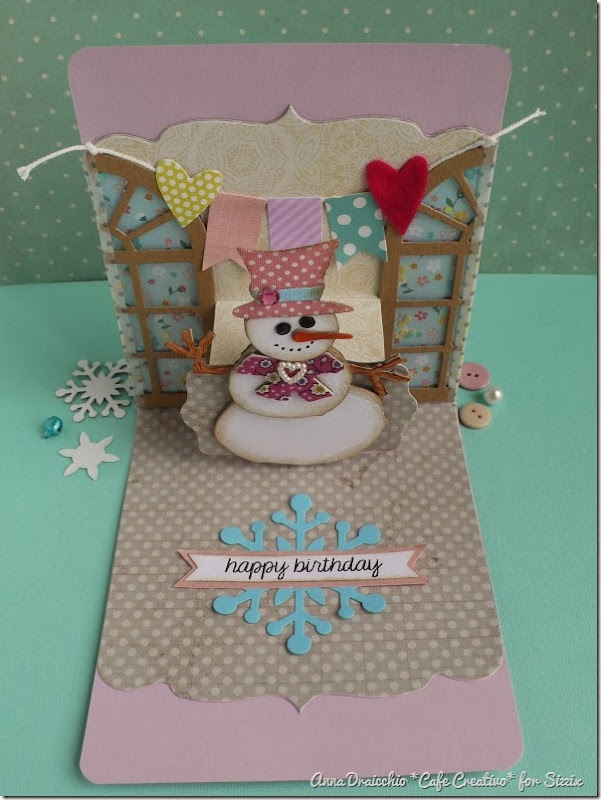
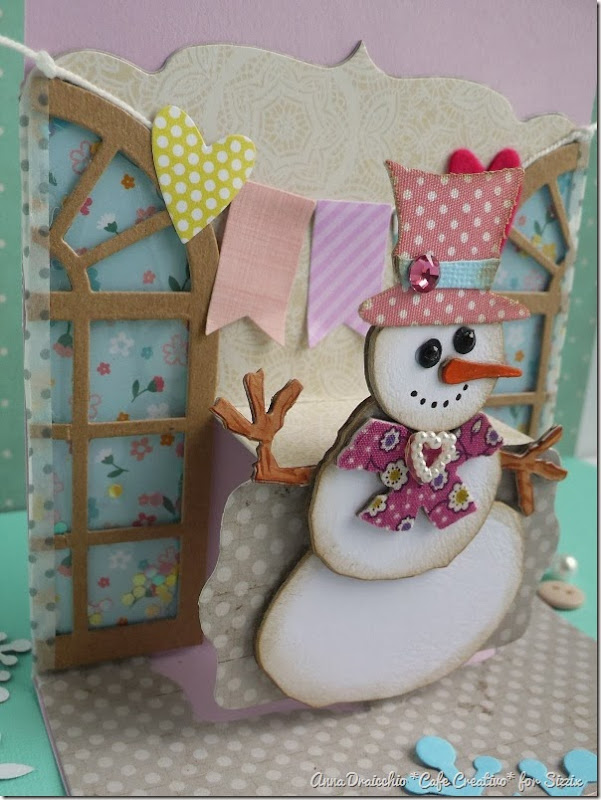
Today I shown a fun winter birthday card. For my niece I thought it would be fun to combine a winter theme with a birthday theme using Snowman and Banner. I created also two half window, that are the fun shaker boxes!
 
cafe creativo - Anna Drai - sizzix big shot - winter birthday card pop up (1)
 
cafe creativo - Anna Drai - sizzix big shot - winter birthday card pop up (2)
 
cafe creativo - Anna Drai - sizzix big shot - winter birthday card pop up (3)
 
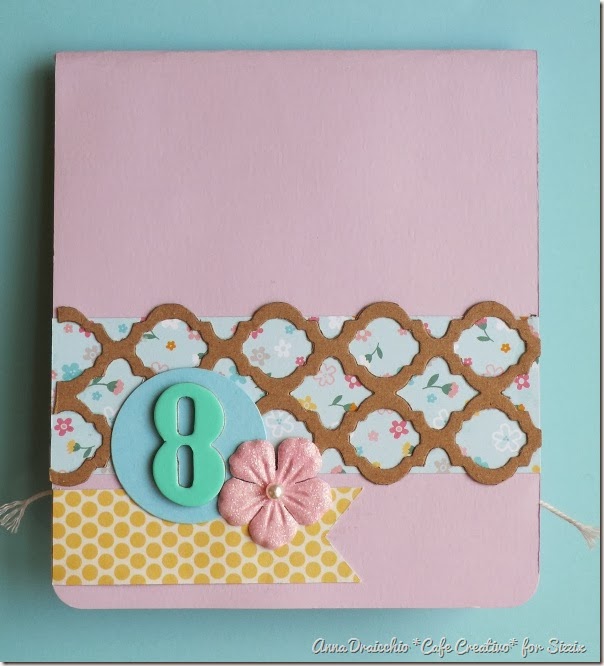
The Card front:
 
cafe creativo - Anna Drai - sizzix big shot - winter birthday card pop up (4) 
 
It uses a mishmash of dies...
 
Items used:
 
cardstock: white, lilac, light blue, turquoise, kraft
patterned paper
cardboard
scraps of felt, fabric
acetate
washi tape
mini sequins
strass
flower (Prima)
black marker
brown Copic marker (to arms)
glue, scissor
 
How to make:
Place the magnetic Pop 'n Cuts Frame inside the base die and die-cut from cardstock. Fold along the crease lines as shown to bring the pop-up forward.
Place a piece of patterned paper over the top half of the Card and die-cut, trim away the pop-up and attach to the Card.
Cut a front of Card. Crease and place over fold on back of Card to cover opening.
Cut out a Conservatory Window from the kraft cardstock, halve. Cut two shape from acetate to create the glass of windows. Apply into the card inserting some sequins and close with washi tape.
Cut out and assembly the Snowman, using cardboard to give dimension. Cut out also a blue snowflake. Glue the Snowman above pop-up and the sentiment as shown.
Embellish Card with banners, hearts and strass. Finish by embellishing the Card front as desired.
 
I hope you liked today’s card.
Enjoy your weekend and until next time...

**************************************
Flag_of_Italy Per le amiche italiane! :)

Buongiorno a tutti gli appassionati della Big Shot! Sono Anna con un nuovo progetto per voi.
Anche durante i mesi di Dicembre e Gennaio capita di avere dei compleanni in famiglia. Ci sono mesi particolari per i compleanni dei bambini. Il mio è in Agosto, per cui da bambina non ho mai potuto fare una festa durante i giorni di scuola, perché tutti erano in vacanza. Dicembre e Gennaio sono praticamente invasi dalle celebrazioni delle feste natalizie, così è giusto non dimenticare i compleanni dei bambini che avvengono in questi mesi!
Quello che vi mostro oggi è un biglietto di compleanno invernale, creato per la mia nipotina, che ha compiuto gli anni a metà dicembre. Per la sua card ho pensato che sarebbe stato divertente mettere insieme un elemento invernale con un elemento "da compleanno": Pupazzo di neve e Bandierine! Ho creato anche due mezze finestra di sfondo, che sono anche delle simpatiche shaker box. Guardate le foto sopra e le spiegazioni qui sotto e capirete meglio ;)
Per fare tutto ciò ho usato un bel mix di fustelle...

Materiali:

cartoncino: bianco, lilla, azzurro, turchese, kraft
carte scrapbooking fantasia
cartone
ritagli di feltro, tessuto
foglio di acetato
washi tape
mini paillettes
strass
fiore (Prima)
pennarello nero
pennarello Copic marrone (per le braccia del Pupazzo di neve)
colla, forbici
 
Procedimento:
Collocare la Pop 'n Cuts Frame, all'interno della fustella base e tagliare il cartoncino beige a pois. Piegare lungo le linee guida, per portare in avanti il pop-up.
Posizionare un altro pezzo di carta fantasia beige sopra la metà superiore della card e fustellare, tagliare via il pop-up e incollare sulla card.
Tagliare il fronte della card con cartoncino lilla, un po' più lungo (serve a nascondere il pupazzo di neve quando sarà chiusa). Piegare e posizionare sopra la piega sul retro della per coprire l'apertura del pop up.
Tagliare una Finestra Conservatory Window dalla carta kraft e tagliarla a metà. Tagliare due forme dall'acetato per creare il vetro delle finestre e due forme uguali con carta fantasia per lo sfondo interno. Far aderire alla card, come mostrato, inserendo alcune paillettes tra l'acetato e lo sfondo a fiorellini, chiudendo poi lateralmente con washi tape per non far uscire le paillettes.
Tagliare ed assemblare il Pupazzo di neve, usando anche del cartone per dare rilievo. Tagliare anche un fiocco di neve azzurro. Incollare il pupazzo di neve sopra il pop-up e il fiocco di neve con la scritta, così come mostrato nelle foto.
Abbellire con bandierine, cuori e strass. Terminare abbellendo anche la parte anteriore della carta, se si vuole.
 
Spero che vi sia piaciuta la card pop up di oggi.
Passate un buon fine settimana, ciao alla prossima!

Layering obsession... - Thinlits and Sizzlits everywhere!

$
0
0

Hi, it's me again!
I hope you had a great creative week! I'm away now, attending the CHA Show in Anaheim, but I've got something which I prepared for you in advance! My layering obsession continues, as you can see - it is just pleasure for me to build these projects adding more and more semi-transparent elements!


Personally I'm a huge fan of doily patterns - but can't you see how beautifully they work with inks, metals and washi tape? Poetry! Just a touch of nks and they are matching perfectly my chosen color palette... they even look cool if you won't press all of the details out of them!
Love this look! :)


Here are the Sizzix dies I used for this layout:
- 659117 - Sizzix Thinlits Die Set 4PK - Springtime 
- 658506 - Sizzix Sizzlits Die - Vintage Doily

I wish you all a great creative week!
xox
Finn 

squaring up half square triangles with a square die

$
0
0


I'm running a little late today thanks to some internet issues, but I'm finally here and I have a great little tip to share with you that I got from my friend Laura. She's a clever girl!


Instead of using the half square triangles die to rely on precise half square triangle units, you can square up your blocks with a square die.


In this block (the scrappy bear paw) I'm using a mixture of 3.5" squares and 3.5" half square triangle units. I made my HST units using a 4.5" square cut in half along the diagonal, and then used my 3.5" square die to trim them up to perfectly match the 3.5" squares in my block.


Draw a line on your square die diagonally, from one corner to the opposite corner of the square. Line up your stitched line with the marking


Run through the big shot....


...and you get a perfectly trimmed half square triangle unit!


There's a teensy bit of waste, of course - just as you would get if you were trimming the half square triangles up normally with a rotary cutter and ruler. I do my units one at a time, it doesn't take long and it's really precise!


I hope you can find a use for this little cheats tip!!!!


Sizzix new releases from CHA 2014

$
0
0
As you may know these days CHA is taking place in Los Angeles. In this trade show are presented all new releases for 2014. I was there this past weekend and, of course I went to visit the amazing Sizzix booth to see all the fabulous new dies and the ideas of the design team.

Do you want to have a look at the booth? Join Stephanie Barnard and other hosts in this video tour that I prepared exclusively for you in three videos :)


As you can see, there is a lot of new dies coming this year. What are your favorites?

Happy Monday!


Elena

............................

¡Hola a todos! Como ya sabréis estos días se está celebrando el CHA en Los Ángeles, donde se presentan todas las novedades para 2014. Tuve la oportunidad de estar allí el fin de semana y por supuesto estuve visitando el maravilloso stand de Sizzix, para ver en persona todos los nuevos troqueles y las ideas del equipo de diseño. ¿Os apetece verlo? Pues no os poerdáis este tour virtual que nos da Stephanie Barnard y otros colaboradores de Sizzix en exclusiva y que os he preparado en estos tres vídeos.

¿Qué colección os gusta más?

¡Feliz lunes!

Elena

Family house...

$
0
0


Hi everyone...hope you had a great week ....today I have made a family house with pictures of my children and grandchildren. I have used  658238 Sizzix Bigz Pro Die - House, 3-D 
and Sizzix Big Shot Pro Machine  on this project.
 

Supply list:
656250 Sizzix Big Shot Pro Machine Only (Periwinkle) w/Standard Accessories
658238 Sizzix Bigz Pro Die - House, 3-D 
659573 Sizzix Sizzlits Decorative Strip Die - Spring Greenery
657481 Sizzix Sizzlits Decorative Strip Die - Vintage Lace
658559 Sizzix Movers & Shapers Magnetic Die Set 2PK - Mini Bottle Cap & Stamp
Sizzix Movers & Shapers Magnetic Die - Mini Opening Die
Sizzix On the Edge Die - On the Fence

Papers: Pion Design - Flower Frames, cardstock, chipboard
Stamps: Stampers Anonymous Tim Holtz collection
Inks: Distress ink Pad - Pumice Stone
Other: Brads, game spinners, plaquettes - Tim Holtz idea-ology, Distress Crackle Paint. Distress Glitter, sand paper, Distress Paint - Brushed Pewter.

How to do:


You find instructions on the on house HERE.

Die cut the house in patterned pape. Bend and distress the edges with Distress ink Pad - Pumice Stone. If you want stamp some background stamps on the house. Die cut "windows" in chipboard with  Sizzix Movers & Shapers Magnetic Die Set 2PK - Mini Bottle Cap & Stamp
Paint with Distress Crackle Paint - Picket Fence. Let it dry.
Die cut the mailbox with Sizzix Movers & Shapers Magnetic Die - Mini Opening Die and paint it with Distress Paint - Brushed Pewter
Die cut the roof in cardstock and distress the edges with sand paper.
Die cut borders in cardstock with Sizzix Sizzlits Decorative Strip Die - Vintage Lace
Glue the borders on the top of the roof.
Glue windows and door to the house wall before you glue the house together.
Die cut fence and branches. Glue it to the house wall.
Cut out a panel in chipboard 12x12 cm and distress the edges. Glue the house on the panel.
Glue some Distress Glitter - Vintage Photo here and there around the house.


My husband and I in the mailbox....  :))


Thanks for stopping by and wish you a great day!
Anne Kristine

♥♥♥♥♥♥
Hei alle sammen...håper du har hatt en fin uke... idag har jeg et familie hus å vise deg med bilder av mine barn og barnebarn. På dette prosjektet har jeg brukt 658238 Sizzix Bigz Pro Die - House, 3-D 
og Sizzix Big Shot Pro Machine  .

Materialer:
656250 Sizzix Big Shot Pro Machine Only (Periwinkle) w/Standard Accessories
658238 Sizzix Bigz Pro Die - House, 3-D 
659573 Sizzix Sizzlits Decorative Strip Die - Spring Greenery
657481 Sizzix Sizzlits Decorative Strip Die - Vintage Lace
658559 Sizzix Movers & Shapers Magnetic Die Set 2PK - Mini Bottle Cap & Stamp
Sizzix Movers & Shapers Magnetic Die - Mini Opening Die
Sizzix On the Edge Die - On the Fence

Papir: Pion Design - Flower Frames, kartong, chipboard
Stempler: Stampers Anonymous Tim Holtz collection
Inks: Distress ink Pad - Pumice Stone
Annet: Brads, game spinners, plaquettes - Tim Holtz idea-ology, Distress Crackle Paint. Distress Glitter, sand papir, Distress Paint - Brushed Pewter.

Beskrivelse:
Instruksjon på huset finner du HER
Stans ut huset i mønsterark, fold og distress kantene med Distress ink Pad - Pumice Stone. Hvis du ønsker stemples bakgrunnstempler på husveggene.
Stans ut vinduer i chipboard med  Sizzix Movers & Shapers Magnetic Die Set 2PK - Mini Bottle Cap & Stamp
Males med Distress Crackle Paint - Picket Fence. La det tørke.
Stans ut postkassen med Sizzix Movers & Shapers Magnetic Die - Mini Opening Die og mal det med  Distress Paint - Brushed Pewter
Stans ut taket i kartong og distress kantene med sandpapir.
Stans ut border i kartong med Sizzix Sizzlits Decorative Strip Die - Vintage Lace
Lim bordene på toppen av taket. 
Lim vinduer og dør på hus veggene før du limer huset isammen.
Stans ut gjerder og grener og lim dette på hus veggen.
Skjær ut et panel i chipboard 12x12 cm og distress kanten. Lim huset på panelet.
Lim litt Distress Glitter - Vintage Photo her og der rundt huset.

Takk for at du stikker innom og ha en fin dag.
Anne Kristine


Layout 1952

$
0
0


Hi everyone
I hope you all had a great and creative week.Today I have a layout to show you using a different sorts of  the beautiful Sizzix dies 
Items used:
Sizzix Bigz xl Die Word Play Alphabet 657837
Sizzix Movers & Shapers Die - Postage Stamp Frame 658572
Sizzix Framelits Die Set 6PK - Circle & Labels, Stitched 658789
Sizzix Sizzlits Die - Vintage Doily 658506
Sizzix Framelits Die Set 9PK w/Stamps - Charms, Winter 658620
Sizzix Sizzlits Decorative Strip Die - Brick Wall 658240
Sizzix Sizzlits Decorative Strip Die - Vintage Lace 657481
Sizzix Sizzlits Decorative Strip Die - Tattered Flower Garland 657824
Sizzix Sizzlits Decorative Strip Die - Spring Greenery 659573
Supply list:
Paper: KaiserCraft base Coat Collection-Morter-, cardstock
Ink: Archival ink Coffee
ribbon, brads and felt
 
numbers  cut in orange felt
 
Thanks for stopping by
Wish you a great week
Pia
Hej alle
Jeg håber i har haft en god og kreativ uge. I dag vil jeg vise et layout hvor jeg har brugt mange forskellige Sizzix dies
Dies jeg har brugt:
Sizzix Bigz xl Die Word Play Alphabet 657837
Sizzix Movers & Shapers Die - Postage Stamp Frame 658572
Sizzix Framelits Die Set 6PK - Circle & Labels, Stitched 658789
Sizzix Sizzlits Die - Vintage Doily 658506
Sizzix Framelits Die Set 9PK w/Stamps - Charms, Winter 658620
Sizzix Sizzlits Decorative Strip Die - Brick Wall 658240
Sizzix Sizzlits Decorative Strip Die - Vintage Lace 657481
Sizzix Sizzlits Decorative Strip Die - Tattered Flower Garland 657824
Sizzix Sizzlits Decorative Strip Die - Spring Greenery 659573
Andre materialer:
Papir: KaiserCraft base Coat Collection-Morter-, katon
Ink: Archival ink Coffee
Bånd, brads og filt
Tak fordi du kiggede forbi
Ønsker dig en dejlig uge
 Pia

Layout

$
0
0


Hi All!

Daria is here. And today I would like to show you a layout made for my friends. I created clean and fresh layout. And I used some Sizzix dies which are ideal for this style (in my opinion).

Items:


Have a nice day!


Всем привет!

Сегодня со страничкой, которую сделала для своих друзей. У меня получилась легкая, свежая и чистая страничка. Для ее создания я использовала некоторые ножи Sizzix, которые, как мне кажется, идеальны для страничек такого рода.

Материалы Sizzix:

Всем хорошего дня!


Still Thin and Fancy

$
0
0

Hello,
Only a small project to share with you this week due to the madness that is exhibition preparation! We have only seven days remaining before we leave for Paperworld, Frankfurt and there is literally paper and glitter flying everywhere here in the Sizzix design room!

It is really exciting to be one of the first people here in Europe to get to use the new Sizzix products that will be released this year, creating projects for exhibitions is my favourite part of the job as you can really get lost in what you are creating, thinking of fresh new ways to show the dies.

Continuing with last weeks blog, this week I have chosen to create a card using a set of dies from the Thinlits collection- Fancy Label & Flowers by Rachel Bright. I created the phrase using my PC & printer and although the photograph doesn't really show it, I have fixed silver metallic card to the back of the large die-cut label so that its shown through the small intricate holes.


I love fresh, clean simple cards and this fits the bill completely. A few self-adhesive gems and foam pads to add dimension and the card is complete! 


Have a lovely week!

New Blooms! (Part 2)

$
0
0

The suspense has been killing me, so as promised last week here is part two of my Picture frame decorated with two fabulous dies from the new Tim Holtz range namely, Bigz XL Jumbo Tattered Florals and the Bigz Garden Greens.

Now if you remember, in last weeks thrilling instalment we die cut our flowers and foliage from Kraft card and attached them to an old frame and I was waiting for my Stone effect spray from PlastiKote (or Rust-oleum works just as well) to arrive. This gives a fabulous stone texture to your chosen projects which can then be painted over. As you can see below, I sprayed it on liberally, allowed it to dry and then mixed some very dark grey acrylic before painting the whole project taking care to get in all the nooks and crannies. 


I mixed a mid grey acrylic and dry brushed it across the surface very delicately to pick out the detail. Next, I mixed a pale grey acrylic and dry brushed the project once again. Finally I applied some silver wax gilt ( the stuff that smells like boot polish Mmmmm....) with my finger tip, randomly picking out bits of detail.

Last but not least, a picture of my Beloved Granddad, not bad from an old recovered frame and a couple of pieces of Kraft card? I think I'll go and make some more!


Clam shell bonanza

$
0
0


I went shopping at the weekend - for fabric for some new projects - I can't wait to start using them, and while I was browsing I spied the latest copy of 'Love Patchwork and Quilting' - on the front was a lovely clam shell cushion - which has inspired me to make one myself.


It's so easy using the - Bigz Die 658660 -http://www.sizzix.co.uk/catalog#q=clam%20shell, it makes the cutting so easy and because of the size, 4 1/2" unfinished, it can be sewn on the machine or by hand.
I used a selection of fabric, from the Secret Garden collection by Nel Whatmore, to cut 41 clam shells.


To sew the clam shells together mark the centre of the arc -


Pin the next clam shell to this one - see photo below -
 
Stitch a 1/4" seam by hand or machine

Continue adding clam shells -


You need to make 9 rows, with 5 shells in the first and following odd rows, and 4 in the second and following even rows.
Now that's all I have time for this week - I'll see you next week with the completed cushion cover.
Happy sewing.
Angela


Happy new year card

$
0
0


Hello!

January is still on going so it is still time to send greeting cards, right?
Today we’ll have a totally green card!

Supply list:

Papers: Studio Calico
Transparency: American Crafts
Masking Tape
Glitters: Pause Créative
Ink: black Versafine
Star: Studio Calico
Others: Twine, strass

Die:

658779 Sizzix Texture Fades  embossing Folder 2PK-Snowflake Pattern & Plaid Set

This is a simple and easy card to realise!
Cut a 20x20 square of pattern paper and fold it in half.

I used a checked-pattern embossing folder on a transparency to create some volume. I wanted to have a tone-on-tone effect for a chic and sober style.

The embossing technique works really well on tracing paper! It will be glued to my pattern paper with double-sided tape.

Then I used a “Meilleurs Voeux” stamp that is printed with black Versafine.

I added some gold as embellishments: thread, glitters and golden star have been invited to the show!


See you next Thursday!

Thanks,
Karine

Bonjour !

Nous sommes toujours en Janvier et c'est toujours le moment de souhaiter les voeux de bonne année, n'est ce pas ?
Voici aujourd'hui une nouvelle carte toute verte !

Matériel :

Papiers : Studio Calico
Transparent : American Crafts
Masking Tape
Paillettes : Pause Créative
Encre : Versafine noire
Etoile : Studio Calico
Divers : cordelette, strass

Die utilisé :

658779 Sizzix Texture Fades  embossing Folder 2PK-Snowflake Pattern & Plaid Set

Une carte toute simple et très rapide à réaliser !
Découpez un carré de 20cm dans un papier imprimé et pliez en deux.

J'ai utilisé une plaque à embosser à carreaux pour créer du volume sur du transparent de même couleur. J'ai opté pour une association ton sur ton pour un côté plus chic et sobre.

Le calque s'embosse très bien ! Il sera collé à mon imprimé avec du double face.

J'ai ensuite utilisé un tampon "meilleurs voeux" imprimé à la Versafine noire.
De l'or en guise de décoration : cordette, paillettes et étoile dorée sont au rendez vous !

Quant à vous, je vous donne rendez-vous jeudi prochain !

Merci
Karine


Mini album - Jumbo Tattered Florals

$
0
0

Happy Friday everyone! This is Anna.

As you may know, the Tattered Florals are hugely popular for many reasons, one being that they are useful for crafting throughout the whole year! Now, you can enjoy a larger offering with a larger size that expands the creative possibilities for the arts and crafts.
The Tattered Florals die has long been my favorite Sizzix die, so I was super excited to hear Tim was releasing a larger version. I decided to use these dies for a mini album to document this year.
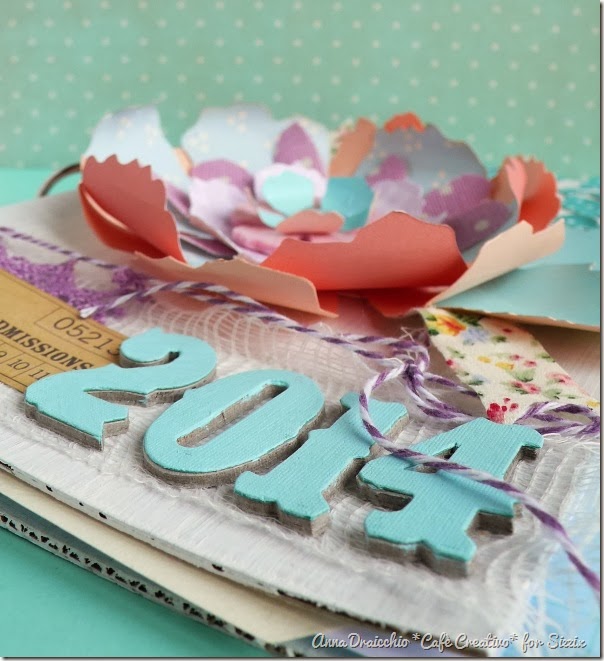
I would love for you to take a look at my mini album for my 2014 year.
 
cafe creativo - Anna Drai - sizzix big shot - Mini album - Jumbo Tattered Florals (1)
 
I will be adding photos of special events that happen all year. On the pages I plan to add photos, memorabilia and write out memories.
 
cafe creativo - Anna Drai - sizzix big shot - Mini album - Jumbo Tattered Florals (3)
 
I used the Jumbo Tattered Florals die (659441) for main embellishment of cover. This die is of the Bigz type, cut anything! For my blossom, I used paper and I added cotton fabric and felt. You could also try acetate, thin sheet metals, cork, chipboard and more. So, I love that you can use the original Tattered Florals die with the new Jumbo version to make perfectly layered flowers.
 
cafe creativo - Anna Drai - sizzix big shot - Mini album - Jumbo Tattered Florals (2)
 
Such a beautiful blossom, isn’t it? And so much fun to make!
I hope you enjoyed my Jumbo Tattered Florals inspiration piece!
Thanks so much for visiting me today
 
Items used:

cardboard (2x  15x21 cm)
white acrylic paint
cardstock
patterned paper
scraps of fabric, felt
hinged rings
button
strass
twine
lace
gauze
glue
 
cafe creativo - Anna Drai - sizzix big shot - Mini album - Jumbo Tattered Florals (4)
 
**************************************
Flag_of_Italy Per le amiche italiane! :)

Buon Venerdì! Sono Anna con un nuovo progetto Sizzix per voi.

Non so se sapete che Sizzix questo mese ha lanciato tre nuove bellissime fustelle di Tim Holtz: Sizzix Bigz XL Die - Jumbo Tattered Florals (659441), Sizzix Bigz Die - Garden Greens (659436) e Sizzix Sizzlits Decorative Strip Die - Spring Greenery (659573).
I Tattered Florals precedenti sono state fustelle molto gradite per un'infinità di motivi, uno dei quali è che sono utili per i lavori creativi in ogni occasione dell'anno. Ora con queste nuove fustelle abbiamo un'offerta più ampia, con una dimensione anche maggiore, che aumenta quindi le varianti e le possibilità per le nostre creazioni! :)

Ammetto che la fustella Bigz Tattered Florals è stata una delle mie preferite, quindi non vedevo l'ora di usare questa versione più grande. Ho deciso di utilizzare queste fustelle per decorare un mini album che documenterà questo nuovo anno.
Date quindi un'occhiata qui sopra alle foto  del mio mini album per 2014.
Sulle pagine del mini ho intenzione poi di aggiungere foto, memorabilia e appunti.

Creare la copertina è stato molto semplice: bastano due cartoni di recupero in formato A5, dipinti di bianco e tre anelli per la rilegatura. Per l'abbellimento principale della copertina ho usato la fustella Jumbo Tattered Florals (659441). Questa fustella è una Bigz quindi può tagliare di tutto! Per il mio fiore ho usato naturalmente la carta (che si può modellare a piacere) ed ho aggiunto anche tessuto e feltro per creare varietà di texture.
Si potrebbe provare ad usare anche fogli di acetato, lamierino, sughero, cartone e altro ancora!
Mi piace il modo in cui è possibile utilizzare queste fustelle per creare fiori giganti, sovrapponendo strati su strati. Si realizza così un bellissimo fiore, non è vero? Ed è così divertente da fare! Provateci anche voi! In fondo trovate come sempre i materiali per farlo ;)

Spero vi sia piaciuto il mio progetto di oggi.
Grazie per la visita :)
 
Materiali:


cartone (due pezzi 15x21 cm)
vernice acrilica bianca
cartoncini tinta unita
carte per scrapbooking varie
ritagli di stoffa e feltro
anelli apribili
bottone
strass
cordoncino bicolore
pizzo
garza
colla

distractions

$
0
0


I was certain that I'd get this hexagon piece finished by the New Year, or at least by the end of the first week of January, yet still it sits getting mostly ignored because I've become distracted by reading on an evening. Last year I didn't read a single book, but so far this year I've read 5. Granted, none of them are war and peace or anything, they've all been quite light and easy but I think I need an intervention!

Someone stop me reading and get me back to my hexagons, I'd really love this to be a big floor pillow before too long! Maybe I'll set myself a new target - it's my birthday in march so let's get this completely finished by then, that seems realistic doesn't it?


(I'm using the 1" hexagon die for the papers and the 1.25" for the fabrics)

Love should be a simple thing

$
0
0
Hi everybody!

I'm back home after my trip to CHA 2014. Did you see all the new Sizzix releases that are coming on 2014? If not, you can see all of them in my 3 videos here.

Today I want to share with you a very simple but beautiful Valentine's card, because love should be always this way, shouldn't it?


Supply list:

Happy Monday!

...........................

¡Hola a todos!

Ya estoy de vuelta después de mi viaje al CHA 2014. ¿Habéis visto ya todos los nuevos productos que va a sacar Sizzix en 2014? Si todavía no los habéis visto os dejo el enlace a mis tres vídeos de la feria aquí.

Hoy os quiero enseñar una tarjeta para San Valentín muy sencilla y bonita a la vez, porque el amor debería ser siempre de esta manera, ¿verdad?

¡Feliz lunes!

Tag

$
0
0

Hi everyone...hope you all had a great and creative week....today I have a tag to show you.


Supply list:
657900 Sizzix Big Shot machine
659573 Sizzix Sizzlits Decorative Strip Die - Spring Greenery
657207 Sizzix Movers & Shapers Magnetic Die Set 2PK - Mini Bird & Cage Set

Papers: Manila Tag # 8, Pion Design - A Day in May, Grungeboard, old book paper.
Stamps: Stamper Anonymous Tim Holtz Collection.
Inks: Distress ink Pad - Frayed Burlap, Bundles Sage, Walnut Stain, Mustard Seed, Peeled Paint
Other: Distress Carckle Paint - Picket Fence, cheesecloth, Tim Holtz idea-ology - pearls, chitchat, trimmings, Marabu - Light Structur Paste, Multi Medium Matte, Distress Marker - Gathered Twigs, Water Brush, feather.

How to do:


Die cut greenery in patterende paper with Sizzix Sizzlits Decorative Strip Die - Spring Greenery
Use the negative as a stencil and add Light Structure Paste. Glue old book paper on the tag with Multi Medium Matte. Let it dry.
Distress the tag with Distress ink Pad - Bundles Sage, Frayed Burlap and Walnut Stain. Use Distress Marker - Gathered Twigs and water brush to make the shadow around the greenery. 


Stamp some text in the background and spray the tag with Perfect Pearls Mists - Heirloom Gold.


Die cut bird and bird cage in Grungeboard with Sizzix Movers & Shapers Magnetic Die Set 2PK - Mini Bird & Cage Set
Paint the bird cage with Distress Carckle Paint - Picket Fence. Distress the bird with Distress ink Pad - Mustard Seed, Peeled Paint, Frayed Burlap.
Paint the cheesecloth with Distress ink Pad - Peeled Paint and Frayed Burlap


Thanks for stopping by and wish you a great day!
Anne Kristine

♥♥♥♥♥♥

Heisann.... håper du har hatt en fin og kreativ uke... i dag har jeg en tag å vise deg. 

Materialer:
657900 Sizzix Big Shot machine
659573 Sizzix Sizzlits Decorative Strip Die - Spring Greenery
657207 Sizzix Movers & Shapers Magnetic Die Set 2PK - Mini Bird & Cage Set

Papir: Manila Tag # 8, Pion Design - A Day in May, Grungeboard, gammel bokside.
Stempler: Stamper Anonymous Tim Holtz Collection.
Inks: Distress ink Pad - Frayed Burlap, Bundles Sage, Walnut Stain, Mustard Seed, Peeled Paint
Annet: Distress Carckle Paint - Picket Fence, osteklut, Tim Holtz idea-ology - pearls, chitchat, trimmings, Marabu - Light Structur Paste, Multi Medium Matte, Distress Marker - Gathered Twigs, Water Brush, fjær.

Beskrivelse:
Stans ut grener i mønsterark med Sizzix Sizzlits Decorative Strip Die - Spring Greenery
Bruk negativen som stensil og påfør Light Structure Paste.Lim gammel bokside på tag'en med Multi Medium Matte. La det tørke.
Distresstag'en med  Distress ink Pad - Bundles Sage, Frayed Burlap og Walnut Stain. Bruk Distress Marker - Gathered Twigs og vann pensel til å lage skygger rundt grenen og bladene.

Stemple tekst i bakgrunnen og spray tag'en med Perfect Pearls Mists - Heirloom Gold.


Stans ut fugl og fuglebur i Grungeboard med Sizzix Movers & Shapers Magnetic Die Set 2PK - Mini Bird & Cage Set
Mal fuglebur med Distress Carckle Paint - Picket Fence. Distress fuglen med Distress ink Pad - Mustard Seed, Peeled Paint, Frayed Burlap.
Farg osteklut med Distress ink Pad - Peeled Paint og Frayed Burla. 
 
Takk for at du stikker innom her og ønsker deg en fin dag.
Anne Kristine

A little desk

$
0
0

Hi everyone
I hope yoy all had a great and creative week. Today i have a desk with a drawer and a little chair to show you.
I used Sizzix Bigz Die - Writing Desk
 Items used:
Sizzix Bigz Writing Desk 658717
Sizzix Movers & Shapers Magnetic Die Set 3PK - Sized Rectangles 658568
Sizzix Movers & Shapers Magnetic Die Set 3PK - Sized Circles 658566
Supply list:
Paper: Tim Holtz paperstash-Laboratory-, cardstock
Ink: Distress paint-brushed pewter-, acrylic paint black
Pieces of wood, Tim Holtz idea-ology metal feets, recycled box
How to make:
I have paint a recycled box with a drawer using acrylic paint black and decorate using Tim Holtz paperstash laboratory.
Die cut writing desk in black cardstock 2 times and make a litle box 6x3 cm scor 1 1/2 cm  round and glue the corner, now you have a box  glue the die cut to the box
Die cut sized circles and use the die cut to a litle chair and a photo frame
 
 
Thanks for stopping by
Wish you a great week
Pia


Hej alle
Jeg håber du har haft en dejlig og kreativ uge. I dag vil jeg vise et skrivebord med en lille skuffe og stol som jeg har lavet af en genbrugsæske. Jeg har blandt andet brugt denne Sizzix Bigz Die - Writing Desk
 Dies jeg har brugt:
Sizzix Bigz Writing Desk 658717
Sizzix Movers & Shapers Magnetic Die Set 3PK - Sized Rectangles 658568
Sizzix Movers & Shapers Magnetic Die Set 3PK - Sized Circles 658566
Andre materialer:
Papir: Tim Holtz paperstash-Laboratory-, karton
Ink: Distress paint-brushed pewter-, acrylic paint black
Stykker af træ til ben, Tim Holtz idea-ology metal feets, genbrugsæske med en skuffe
Sådan gør du:
Jeg har malet æsken med sort akryl maling og beklædt den med mønstret papir
Die cut writing desk i tykt  sort karton 2 gange og lav en lille box 6x3 cm og scor hele vejen rundt 1 1/2 cm, lim hjørnerne og på boksen kan nu limes blækflasken
Die cut sized circles  og brug dem til fotorammen og den lille stol
Die cut de andre sizzix dies og pynt med den som vist på billederne
Tak for besøget
Ønsker dig en fantastisk uge
Pia

Layout "Reading"

$
0
0

Hi All!

Daria is here. And today I would like to show you one more layout made for my friends. This layout is about reading. The little boy loves books very much! And that is why I used heart and letters together.

Items:
Big Shot Machine (657900)


Have a nice day!


Всем привет!

Сегодня я хочу показать еще одну страничку сделанную для моих друзей. И страничка эта о любви к чтению. Именно поэтому я вырезала этот сердце-цветок и буквы, и соединила их вместе.

Материалы Sizzix:
Big Shot Machine (657900)

Всем хорошего дня!

Victoria's Secret!

$
0
0

The Victoria in the title was named by our very own Becky Wiseman (who is a pretty handy crafter herself!) I used this bust for an exhibition a couple of years ago and I've been looking for an excuse to use it again.


Last year at our trade show in Birmingham I bumped into Brit Wellens, an old friend who is now the UK distributor for Powertex which, amongst other things, manufacture fabric hardener for the craft industry to create beautiful statues and other such mini masterpieces( click on the link to see all the cool ideas!). She very kindly showed me around her stand and I was immediately smitten with the products and their potential.

When I was trying to come up with a design concept for the Tim Holtz display areas at our winter trade shows there was a metaphorical alignment of the stars and I found my excuse to use Victoria, Powertex and Tim's dies together.

The dies used are the Bigz XL Jumbo Tattered Florals which is already proving very popular on both sides of the Atlantic and the Bigz Die - Garden Greens also By Tim Holtz. I started by painting the bust before soaking the Stockinette fabric using the Terracotta Powertex for both steps. After draping the fabric I left it to dry until it was rock solid. Next I attached the various flowers and leaves die cut from stiff kraft card which had also been painted with Powertex. To find out more about creating the 3D flowers check out my last two 'New Blooms' blog posts.

Finally, I dry brushed the whole creation using acrylic paint and Hey Presto!!

It is on it's way to Frankfurt as we speak, I will be away for a week doing my demonstration thing! see you all when I return, so until then auf wiedersehen!


Layout Happy Day

$
0
0


Hello

It’s Thursday again and I’m back with a lay-out with pastel colours. Let’s work on softness & femininity but also on details with pretty Sizzix dies.

Supply list:

Papers: American Crafts, Glitz Design, Studio Calico
Alphabets: October Afternoon
Rub-ons: American Crafts
Enamel Dots: My Mind's Eye
Wood: Studio Calico
Stamps: Craft Origine, Paper Source
Ink: Infocréa

Dies:

659107: Sizzix Thinlits Die Set 4PK-Everyday Eclectic
659436: Sizzix Big Die-Garden Greens

A very soft page with a maximum of details and die cuts. I used two Sizzix dies to decorate my lay-out “Happy Day”.
Let’s start with the big “foliage” die that I particularly like! I can’t stop using it, trust me!
It is cut out of white paper so that it stands out but still fits in the settings…you can outline the edges with a thin-tipped black pen to add contrast.

The “heart” die is cut out of a matching pattern paper. This pretty heart will be glued with 3D foam adhesives.
Then I inserted a “happy” rub-on. It will be the first part of my title.

I had fun working on my background with stamps and watercolour pens Stabilo Pen 68.


I hope you will like my lay-out. See you next week for a new creation!

Have a lovely day

Karine

Bonjour,

De retour en ce Jeudi cette fois-ci avec une page dans les tons pastels. De la douceur, de la féminité mais également du détail avec de jolis dies Sizzix.

Matériel :

Papiers : American Crafts, Glitz Design, Studio Calico
Alphabets : October Afternoon
Rub-ons : American Crafts
Enabel Dots : My Mind's Eye
Bois : Studio Calico
Tampons : Craft Origine, Paper Source
Encre : Infocréa

Dies utilisés :

659107: Sizzix Thinlits Die Set 4PK-Everyday Eclectic
659436: Sizzix Big Die-Garden Greens

Une page toute douce avec un maximum de détails et de découpes. J'ai utilisé deux découpes Sizzix pour décorer ma page "Happy Day".
Tout d'abord une grande forme feuillage que j'adore ! Je n'ai pas fini de l'utiliser, croyez-moi ! Celle-ci est découpée dans du papier blanc afin qu'elle ressorte tout en se fondant dans le décor...Vous pouvez repasser les contours avec un stylo fin afin d'ajouter du contraste

La découpe coeur est quant à elle découpée dans du papier imprimé assorti. Le joli coeur sera ensuite monté en 3D à l'aide de mousse autocollantes.
Un rub-on "happy" sera intégré, il constitue la première partie de mon titre.

Je me suis ensuite amusée à travailler mon fond de page avec des tampons et des stylos aquarellables Stabilo Pen 68.

J'espère que ma page vous aura plu, je vous donne RDV la semaine prochaine pour une nouvelle créa !

Bonne journée

Karine
Viewing all 2033 articles
Browse latest View live