Quantcast
Channel: Crafting ideas from Sizzix UK
Viewing all 2033 articles
Browse latest View live

With Love

$
0
0
Hi everyone
Now it's Tuesday again and it's my turn to show you what I have made this time.
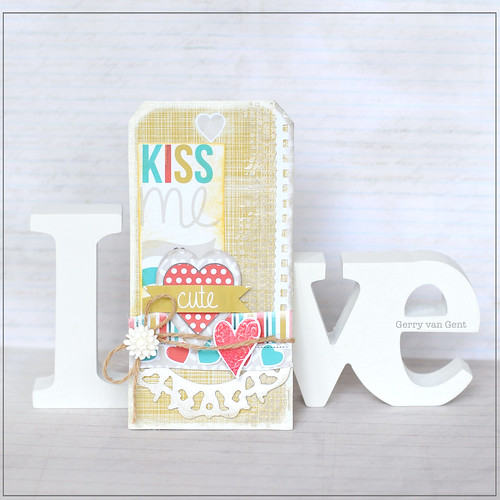
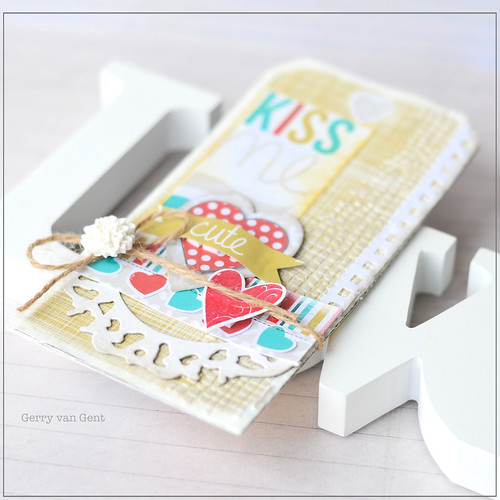
This Tuesday i will show you a tag using different sorts of the beautiful Sizzix dies.
 
Items used:
Suplly list:
Paper: Prima-Sunrise Sunset Collection White Hot-, October Afternoon-Milk pail-,cardstock
Ink: Archival ink Coffee
Stamp: Tim Holtz Collection Simple Sayings CMS 155, Mini Blue Prints CMS 150
Embossing dabber clear, ultra thick embossing enemal-white-, distress Paint -Victorian Velvet, ribbon, 3 D foam, metal foil, brads and flowers
How to make:
Die cut Sizzix On the Edge Die - Distressed Doily 657496 ink the edged and glue to the tag
Cut out a piece of patterned paper and glue to the center of the tag using 3D foam
Die cut Sizzix Movers & Shapers Die - Tag & Tie 657859, stamp using mini blue print CMS 150 and glue to the tag.
Die cut using cardstock Sizzix Movers & Shapers Magnetic Die Set 2PK - Mini Mirror & Wall Clock 658724 and paint the mirror using Victorian Velvet  and embos the mirror using clear and embos the bookplates using White embossing, decorate the center of the mirror using metal folie 
Decorate the tag using the die cut and flowers
 

Thanks for stopping by
Wish you a great week
Pia
Hej alle
Så er det tirsdag igen og min tur til at vise hvad jeg har lavet. Jeg har lavet en tag hvor jeg har brugt flere forskellige af de skønne Sizzix dies
Sizzix dies jeg har brugt:
Andre materialer:
Papir: Prima-Sunrise Sunset Collection White Hot-, October Afternoon-Milk pail-,cardstock
Ink: Archival ink Coffee
Stempler: Tim Holtz Collection Simple Sayings CMS 155, Mini Blue Prints CMS 150
Embossing dabber clear, ultra thick embossing enemal-white-, distress Paint -Victorian Velvet, ribbon, 3 D foam, metal folie,brads og blomster
Fremgangs måde:
Die cut Sizzix On the Edge Die - Distressed Doily 657496 ink kanterne og lim til tagen
Skær et stykke mønstret papir og lim til  centret af tag ved at bruge 3 D puder
Die cut Sizzix Movers & Shapers Die - Tag & Tie 657859, stempel ved at bruge mini blue print CMS 150 og lim til tag.
Die cut ved at bruge karton Sizzix Movers & Shapers Magnetic Die Set 2PK - Mini Mirror & Wall Clock 658724og mal spejlet med  Victorian Velvet og embos spejlet ved at bruge clear embossing, embos  bookplates ved at bruge White embossing, dekorer midten af spejlet ved at bruge metal folie 
Dekorer ved at bruge die cut og blomster
Tak fordi du kiggede forbi
Ønsker dig en dejlig uge
Pia

In Love...With Paper

$
0
0

Hello,
This week I have made the simplest card designs using the free Sizzix Valentines downloadable papers. I absolutely love them because of their contemporary design and as we can assume most handmade Valentine's cards are created by women for men, in my opinion it is brilliant that they are not so girly!

I have used the following dies to create the cards:


Sizzix Framelits Die Set 6PK - Hearts 657561


 When you see the cards as a group it emphasises how well the paper collection goes together, any combination will work just perfectly.


Here I have die-cut a small heart aperture into a rectangle of the printed paper and attached it to the card using foam pads to create a heart window effect. The little string bow is a quirky addition and I have used a simple staple to fix it into position


I have used the a Hexagon die to make an aperture in the card front and backed it with acetate. This enabled me to create a floating heart effect. Cutting out the same sized Hexagon from different papers create a really bold design.


 Again the heart aperture is a cute addition to this card front, the same sized heart was cut out of brown card and fixed to the end of a pin using a glue gun. The 3D flower is one of my favourite Sizzix dies,  it works brilliantly with paper as I have used here but as with all Bigz dies it works equally well with felt, fabric or leather.


 And finally, simplicity itself! Cutting out the text using the square framelit is childsplay as you can see what you are doing when registering the words. Cut out a slightly larger scallop square in a contrasting colour and stick the two together for a perfectly professional finish!


Obviously these are just ideas and you would only need to create one card forValentine's day ;)
I would love to know what you are planning to craft for the special day?
Have a lovely week!


For You Card

$
0
0
Hi All,

Today I would like to show you a mixed-media card. I used different paints, stencils, sprays and etc. to create this card. And of course Sizzix dies help me to make my card more beauty.

Items:
Big Shot Machine (657900)
Sizzix Movers & Shapers Magnetic Die Set 2PK - Mini Butterflies Set (657209)


Have a nice day!

Daria.


Всем привет!

Сегодня я хочу показать микс-медиа открытку. Я сделала ее с использованием различных красок, спреев, трафаретов и т.д. И конечно не обошлось без ножей Sizzix.

Материалы Sizzix:
Sizzix Movers & Shapers Magnetic Die Set 2PK - Mini Butterflies Set (657209)

Всем хорошего дня!

Every cloud.....

$
0
0


...... has a silver lining or so the saying goes. I want to share an idea with you which I used last year around this time, it made me smile back then and I has been trying to think of an excuse to resurrect it.

Love is in the air, which must mean that Valentines Day is on the horizon, I made a card for my wife while demonstrating at the recent Creativeworld trade show in Frankfurt,as I have done for the last three years, I'm sure that you will forgive me if I don't share it on my blog (although hundreds of people from all over the globe have watched it being made!).

I have used the Framelits die set Circles, Scallop (657552) for this card and you know how I like messing around with basic Framelits dies. apart from that I also used stiff white card and stripped paper from the Lovebirds Collection by Doodlebug Design.

I started by cutting a rectangle of the striped paper (11 x 6cm approximately) and I used my craft knife to trim between each line about half way down the rectangle. Next, I used my tweezers to grip the end of each strip before curling them to different lengths.

I cut a thin strip of silver mirror card and attached it down the centre for reasons which will become apparent at the end! Next I die cut two scalloped circles (the die is about 5cm wide) one of which I cut in two before attaching them together using 3D foam pads and I attached the third at the rear again using the foam pads to add dimension.


My card is now ready to assemble, I printed the legend 'You are my silver lining' on the base of a card measuring 18 x 10.5cm before attaching the stripped paper and finally my cloud was attached once more using 3D foam pads. I hope you like it, because I have just had an even better idea for next week!!!


Pink & Green layout

$
0
0


Hi!

Here’s a new page very spring-like with its pink & green colours and a touch of black here and there!

Supply list:

Papers, stickers: 4heures37
Alphabets: 7Gypsies, American Crafts
Rub-ons: American Crafts
Wood Embellishments: Studio Calico
Enamel dots, badge: Studio Calico, Freckled Fawn
Black ink: Mister Huey's
Ink: Neon Hero Arts, Infocréa
Stamps: 4heures 37

Dies:

658508 Sizzix Sizzlits Die Set 3PK-Roses Flower Set
658733 Sizzix Sizzlits Die -Poinsettia Swirls
659108 Sizzix Thinlits Die Set 6PK-For the record

My page is built horizontally in line with my picture. I was inspired by the Spring colours in my picture; it helped me choose my colour combo.
I cut and superimposed several strips of pattern paper. I created the Sizzix die cuts with scraps of paper.

I started by cutting two pretty flowers and added a button and a small dot in their center.
Then I cut foliage patterns out of white Bristol paper. I outlined the inner edges of the pattern with a thin-tipped black pen.
I also inserted stickers and photo corners. You can add as many die cuts as you want with the Sizzix die!!!
The title is black to add some more contrast.

I hope you will get inspired by my page!


See you next week for a Valentine’s Day creation!

Have a lovely day

Karine

Bonjour !

Une nouvelle page aujourd'hui qui sent bon le printemps avec un combo couleur rose & vert parsemé de quelques touches de noir !

Matériel :

Papiers, étiquettes : 4heures37
Alphabets : 7Gypsies, American Crafts
Rub-ons : American Crafts
Embellissements en bois : Studio Calico
Enabel dots, badge : Studio Calico, Freckled Fawn
Encre noire : Mister Huey's
Encre : Neon Hero Arts, Infocréa
Tampons : 4heures 37

Dies utilisés :

658508 Sizzix Sizzlits Die Set 3PK-Roses Flower Set
658733 Sizzix Sizzlits Die -Poinsettia Swirls
659108 Sizzix Thinlits Die Set 6PK-For the record

Ma page est construite de façon horizontale dans le prolongement de ma photo. Je me suis inspirée des couleurs printanière de celle-ci pour choisir mon combo couleur.
Plusieurs bandes de papiers imprimés sont découpées et superposées, je me suis servie des chutes pour effectuer mes découpes Sizzix.

Tout d'abord deux belles fleurs dont les centres seront complétés par un bouton et un petit dot.
J'ai ensuite découpé des feuillages dans du bristol blanc, l'intérieur sera souligné à l'aide d'un stylo noir.
Ma page sera complétée avec des étiquettes, angles photos, le die Sizzix est juste parfait pour rajouter des découpes à volonté !
Le titre est ajouté en noir afin d'ajouter un maximum de contraste.

Une page qui je l'espère vous inspirera !

A la semaine prochaine pour une réalisation spéciale St Valentin !

Très bonne journée

Karine

Hearts a plenty

$
0
0


I don't want to be boring - but as it's February I started looking at the heart dies that we have here at Sizzix - and there are quite a few - so for this week I'm showing this die -
It has 3 different sizes on the same die - 656334 -http://www.sizzix.co.uk/product/656334/sizzix-bigz-die-hearts.
This week I decided to embellish a ready made felt purse using this die -
 
I stitched them in place with blanket stitch - and it only took a short while to do - a lovely little gift. I love personalising things - so that they become unique.
Next week I'm going to use a different heart die to decorate something else - I haven't decided what yet - it might be a table runner, or placemats for a romantic meal, or it could be a cushion to cuddle up with - so look in again next week to see!
Happy sewing.
Angela

Mini Album – You and Me

$
0
0

Happy Friday Everyone! This is Anna.
With Valentine's Day coming, I thought I'd show you a simple mini album that you can make out of two piece of cardboard, a few pieces of pattern paper and cardstock and some Sizzix dies.
This quick & easy mini could be used for multiple projects.
 
cafe creativo - Anna Drai - sizzix big shot - Mini album - Valentine (1)
 
cafe creativo - Anna Drai - sizzix big shot - Mini album - Valentine (5)
 
Items used:
two 17x17 cm chipboard pieces
a variety of cardstocks
patterned paper: 8 free downloadable papers by Sizzix, Toga - Tourbillon d'automne, Bazzill - Love Doilies - Heart Attack, Sassafras - Serendipity - The countdown
acrylic paint
binder rings
hole punch
sewing machine and yarn (optional)
 
How to make:
 
Cover:
Cut two pieces of 17x17 cm chipboard or cardboard to create your cover. Choose your favorite patterned paper for the cover and print or stamp the title. Let a few drops of red and black color.
Cut a stripe of turquoise patterned paper, cut a banner edge and glue down as shown. With Bigz dies cut out a Doily from white paper and a heart from red patterned paper and cardboard. Adhere above turquoise stripe.
Apply two different piece of washi tape on the top right hand side. Cut out a small star from cardstock and chipboard and adhere above the washi tape. If you want add stitches.
Adhere together to the front of the chipboard.
Punch holes in the board and use that as a template for punching holes in the rest of your pages.
 
Interior pages:
Choose a variety of papers, tags and envelopes. I used five 17x17 cm sheets of patterned paper or cardstock, some 10x17 piece, envelope and tags. These are the base of interior pages.
 
cafe creativo - Anna Drai - sizzix big shot - Mini album - Valentine (3)
 
On these pages, I used the fabulous Sizzix die, called “Flip-its” by Stephanie Barnard. This is so much fun to make.
I die cut a card Movers & Shapers L Die - Card, Fancy Flip-its from cardstock and patterned paper and I place it at the center of the page, sort of as “flip-up page”.
I decorate this card with the coordinating Stamps+Dies and Label Framelits: Framelits Die Set 20PK w/Stamps - Birds & Tree (658833), Framelits Die Set 7PK - Labels, Fancy #6 (658831). What is important is that you must glue the Flip Its card along one edge only, otherwise it does not open.
 
cafe creativo - Anna Drai - sizzix big shot - Mini album - Valentine (2)
 
You can decorate each page however you’d like. Assemble using binder rings.
I love to create mini albums that have a variety of sizes and lovely embellishments sticking out all over the place, so you don’t have to get too caught up in perfection here.

Now for some of the inside pages...


Hope you enjoyed this little book!
 
cafe creativo - Anna Drai - sizzix big shot - Mini album - Valentine (6)
 
**************************************
Flag_of_Italy Per le amiche italiane! :)

Buon Venerdì! Ecco un nuovo appuntamento con Anna.
Con San Valentino in arrivo, ho pensato di mostrarvi un mini album semplice che si può fare con due pezzi di cartone, pezzi di carte e cartoncini e naturalmente alcuni fustelle Sizzix.
Questo mini, rapido e semplice, potrebbe essere utilizzato per progetti differenti.
Per comprendere meglio guardate le foto qui sopra e poi leggete le spiegazioni qui sotto ;)

Materiali:
due pezzi 17x17 cm di cartone
cartoncini vari
patterned paper: 8 free downloadable papers by Sizzix, Toga - Tourbillon d'automne, Bazzill - Love Doilies - Heart Attack, Sassafras - Serendipity - The countdown
pittura acrilica
anelli apribili
perforatore per buchi
macchina da cucire e filo (facoltativo)
 
Come fare:
 
Copertina:
Tagliare due pezzi di cartone 17x17 cm. Scegliete la vostra carta preferita per la copertina e stampare o timbrare il titolo. Far cadere qualche goccia di colore quà e là.
Tagliare una striscia di carta fantasia turchese, con un lato a bandierina ed incollare come mostrato in foto. Con le fustelle Bigz tagliare un centrino di cartoncino bianco ed un cuore da carta fantasia rossa + cartone. Incollare entrambi sopra la striscia turchese.
Applicare due diversi pezzi di washi tape in alto a destra. Tagliare una piccola stella di cartoncino + cartone ed incollare sopra. Se volete aggiungete qualche cucitura per rendere la copertina più varia.
Incollare ora il foglio decorato sulla parte anteriore del cartone per creare la copertina.
Fare i buchi nel bordo sinistro e utilizzare come modello per forare il resto delle pagine ed il retro della copertina.
 
Pagine interne:
Scegliere una varietà di carte, etichette e buste. Io ad esempio ho usato cinque fogli di carta fantasia o cartoncino 17x17 cm, qualche pezzo più piccolo 10x17, poi buste ed etichette. Questi saranno la base delle pagine interne.
In alcune pagine, ho usato la favolosa fustella Sizzix, chiamata Flip-its. E' così divertente da montare: ho fustellato una card base con Movers & Shapers L Die - Card, Fancy Flip-its dal cartoncino / carta fantasia prescelta e l'ho poi messa al centro della pagina 17x17, per creare una sorta di "flip-up", che crea un “effetto sorpresa” mentre si sfoglia il mini album.
Ho decorato questa “card” con i Framelits coordinati timbri + fustelle e Label: Framelits Die Set 20PK w/Stamps - Birds & Tree (658833), Framelits Die Set 7PK - Labels, Fancy #6 (658831).
Mi raccomando: incollare la card Flip-its sulla pagina solo lungo un bordo, altrimenti non si apre!
Potete decorare ogni pagina a piacimento. Assemblare poi l'album con anelli apribili.

Mi piace creare mini album che hanno pagine di dimensioni varie, con sorprese ed abbellimenti che spuntano ovunque, in questo modo l'album è meno monotono e la perfezione non è richiesta ;)
 
Spero vi sia piaciuto questo piccolo minialbum!
A presto

I add layers - because I can!

$
0
0


Hi again friends! 
Today I'm sharing with you one of my newest paper layouts - all covered in my favorite colors of Archival Inks, Distress Inks and sprays... I just love this way of creating, when I keep using bits and pieces which are around, on my table, waiting to be used. I hate throwing away things - they can be used for a project, right? Small pieces of paper and cardboard are great for Die-cutting - that's why I always put them aside. I've also made a basket for my cut-out pieces and leftovers... hmmm crazy enough?


As you can see I've gone really crazy with layers (why not, right?)
There are paper strips and pieces (7 Dots Studio, Prima Marketing), canvas pieces, metal embellishments (Prima Marketing - my Mechanicals), lace - and of course my favorite Sizzix cut-outs - all colored and inked!


Here are the Sizzix dies I used for this layout:
- 659117 - Sizzix Thinlits Die Set 4PK - Springtime
 - 658506 - Sizzix Sizzlits Die - Vintage Doily 
- 659436 - Sizzix Bigz Die-Garden Greens

I wish you all a great, creative week - I hope you will find time to play a bit and make something beautiful!
Finn

Instant Photo Frame Card

Valentine's Tag by Gerry van Gent

$
0
0

Happy Sunday Sizzix friends!
Valentine's Day is approaching and today I would
love to share another project created for this occasion.
And once again for my today's project I used our FREE


Here is my tag....
I used one of the pattern papers as a background and
then I began adding embellishments to decorate it.
Kiss Me Tag {Sizzix}
657900 Sizzix Big Shot Machine
656938 Sizzix Movers & Shapers Die Tag & Bookplates
658720 Sizzix Bigz Die Ornate Frame
658837 Sizzix Framelits Die Set w/ Stamps Love, Hugs & Hearts
658947 Sizzix Thinlits Die Doily & Doily Border
658932 Sizzix Thinlits Dies Rosettes 

*    *    *

Different dies were used to die cut my embellishments...
The red heart - between the twine - was first stamped and then die cut.
You will find the word "cute" printed on one of the pattern papers - 
I used a small banner die which fit perfectly.
DSC_8334
Other Products I used:
Webster's Pages flower resin

*    *    *

And sharing a mini layout (15cm x 15cm) where I used
once again the Ornate Frame (658720) to layer my photo....
Dreams_gerry

Thank you for visiting!

thinking outside the box with half square triangles

$
0
0


Quite some time ago now I cut out a whole heap of triangles that I wanted to piece into some cushions and possibly a small quilt. Those poor triangles have sat on my desk ever since I cut them, and I finally gave in to their cries for attention and started piecing them together.


Matching up 2 fabrics and making a small pile of half square triangle units.


The die I'd used to cut my triangles wasn't one that had the little dog ears cut off, so I knew I'd have to trim all of these down which put me off a little bit (I've gotten so lazy since the big shot made cutting a breeze for me!)

And I got to thinking, how could I play around a little and end up with something that looked completely different?

I trimmed my half square triangle units with a square die - laying the units on at angles (I cut up to 5 layers at once - you could maybe try at least another layer)


I really love the effect you get when you start arranging the wonky half square triangles units together. It looks so different to regular half square triangles, doesn't it?


(excuse the pics, I was too excited to get my camera and used my phone instead!)


I know you get a bit of waste this way, but I think it'd be a fantastic method for using up scraps. You should give it a try!


Hostess gift idea: Pretty coasters

$
0
0

Hi everybody!

Some of you know that  I have recently moved to a new home and I'm in de process of decorating and making everything nice. Today I decided that I need some cute coasters for my pretty cups.


Supply list:

Making this coasters is as simple as 1-2-3! You need some adhesive cork, some pattern paper, the amazing Jumbo Tattered Florals Bigz Die fom Tim Holtz, and your Big Shot. This Bigz Die is brand new, and is being released this month, so if you like it you can have it right now :)


This coasters are for me, but they make a very nice hostess gift, just put them inside a nice plastic bag and embellish it with green cardstock and the Garden Greens Bigz Die from the same range. I love it!

Happy Monday!

.....................

¡Hola a todos! 

Muchos de vosotros sabéis que me he mudado recientemente y ahora estoy en el proceso de decorar la casa y tener todo de manera agradable. Esta mañana he decidido que necesitaba unos posavasos bonitos para estas tazas tan cucas, así que me he puesto manos a la obra.

Hacer estos posavasos es facilísimo, solo necesitas el nuevo troquel de Tim Holtz Jumbo Tattered Florals, papel decorado, corcho adhesivo y tu big shot. Este troquel acaba de salir del horno, así que si lo quieres puedes tenerlo ya :)

Aunque estos posavasos son para mí, pueden ser un regalo estupendo para una anfitriona, solo ponlos en una bolsa bonita y adórnalos con unas hojitas troqueladas con cartulina verde y el troquel Garden Greens de la misma colección.

¡Feliz lunes!

Valentine tag....

$
0
0

Hi everyone....hope you all had a great week...today I have a tag to show you with heart and wings...


Supply list:
658300 Sizzix Big Shot Starter Kit 
656638 Sizzix Bigz Die - Heart Wings
658555 Sizzix On the Edge Die - Torn Notebook
656643 Sizzix Texture Fades Embossing Folders 2PK - Bingo & Patchwork Set

Papers: Manila tag # 12 and # 5, Manila Cardstock, Pion Design - A Day in May
Stamps: Stampers Anonymous Tim Holtz collection
Inks: Distress ink Pad - Brushed Corduroy, Walnut Stain, Distress Stain - Barn Door.
Other: Distress Stickles - Clear Rock Candy, Ticket, Brads, ChitChat, Trimmings, Seam Binding Ribbon, Sand paper - Tim Holtz idea-ology.

How to do:
Distress Manila tags with Distress ink Pad - Brushed Corduroy and Walnut Stain. Distress Manila cardstock with Distress Stain - Barn Door, Distress ink Pad - Brushed Corduroy and Walnut Stain.
Die cut the edge of Manila tag # 12 with  Sizzix On the Edge Die - Torn Notebook
Emboss the cardstock with Sizzix Texture Fades Embossing Folders 2PK - Bingo & Patchwork Set
and distress it with sand paper.
Glue the cardstock to Manila tag # 12.
Die cut heart in old book paper with Sizzix Big Shot Starter Kit  
Color the heart with Distress Stain - Barn Door. Add Distress Stickles - Clear Rock Candy to the heart. Die cut wings in patterned paper with Sizzix Bigz Die - Heart Wings
Stamp "love" text on Manial tag # 5 and glue it in the front with wings and heart.


Wish you all a great week and a Happy Valentine day ♥
Anne Kristine

♥♥♥♥♥♥

Hei alle sammen ...håper dere har hatt en fin uke...i dag har jeg en tag med hjerte og vinger å vise dere.

Materialer:
658300 Sizzix Big Shot Starter Kit 
656638 Sizzix Bigz Die - Heart Wings
658555 Sizzix On the Edge Die - Torn Notebook
656643 Sizzix Texture Fades Embossing Folders 2PK - Bingo & Patchwork Set

Papir: Manila tag # 12 og # 5, Manila kartong, Pion Design - A Day in May
Stempler: Stampers Anonymous Tim Holtz collection
Inks: Distress ink Pad - Brushed Corduroy, Walnut Stain, Distress Stain - Barn Door.
Annet: Distress Stickles - Clear Rock Candy, Ticket, Brads, ChitChat, Trimmings, Seam Binding bånd, Sandpapir - Tim Holtz idea-ology.

Beskrivelse:
Distress Manila tags med Distress ink Pad - Brushed Corduroy og Walnut Stain. Distress Manila kartong med Distress Stain - Barn Door, Distress ink Pad - Brushed Corduroy og Walnut Stain.
Stans ut nederste kant av Manila tag # 12 med  Sizzix On the Edge Die - Torn Notebook
Emboss Manila kartong med Sizzix Texture Fades Embossing Folders 2PK - Bingo & Patchwork Set
og puss over med sandpapir.
Glue the cardstock to Manila tag # 12.
Stans ut hjerte i gammel bokside med Sizzix Big Shot Starter Kit  
Farg hjertet med Distress Stain - Barn Door. Påfør Distress Stickles - Clear Rock Candy over hjertet. Stans ut vinger i mønsterpapir med  Sizzix Bigz Die - Heart Wings
Stemple "love" tekst på Manial tag # 5 og lim den i front med hjerte og vinger.

Ønsker deg en herlig uke og en fin Valentine dag.
Anne Kristine

Valentine's projects

$
0
0
     Happy Tuesday everyone
Valentine's day is appoaching and today i would love to share another project using the beautiful
Items I have used:
Supply list:
Red cardstock, recycled glass, a little heart box, half Pearls and lace
I have made 2 cards 9,5x12,5 cm, a gift box and a candy glass


Thanks for stopping by
Wish you a great week
Pia
Hej alle
Valentine's day er nær og derfor vil jeg vise nogle andre projekter hvor jeg har brugt
Sizzix dies jeg har brugt: 
Andre materialer:
Rødt karton, genbrugs glas, en lille hjerte box, halv perler og blonde
jeg har lavet 2 kort 9,5x12,5 cm, en hjerte box  og et lille glas med slik
Tak fordi du kiggede forbi
Ønsker dig en dejlig uge
Pia

Pure as the Welsh Snow!

$
0
0

Hello,
This week we are frantically preparing for the upcoming trade show, Craft Hobby & Stitch which takes part in the NEC, Birmingham next Sunday, Monday and Tuesday. It is lovely to be using the newest dies and showing them off to their best, I do feel very lucky!

One of the areas that I have been working on is using various Sizzix dies but all of the projects are white! White paper, white card, white felt...quite fitting actually as here in Wales we were treated to a covering of snow yesterday!

I have taken a few sneaky photos to share with you, I have made several of each of the projects along with lots of huge paper pompoms and they will be all hung at different levels as a central display, even I can't totally visualise the finished display but I promise to take photos of that too so that you can see what it turns out like.


This beautiful flower is created by die-cutting several layers of voile and sparkly white felt and pinching them together with little white stitches using a needle and thread. I have kept all of the embellishments as crystals, metallics or glass as you can see.


Here are two of the many baubles that I have made using paper. The first is simple white card flowers attached to a polystyrene ball using pins, the other is layers of tissue paper flowers folded and staple to a disc of white card. I will be demonstrating this technique and any others that you see here in the coming weeks, just let me know!


This is the amazing Tim Holtz Tattered Florals die which is now available in Jumbo format, again this has been used to die-cut voile and sparkly white felt. I have added crystals from an old chandelier....waste not-want not!


 I will be back with more photos and any exhibition news next week so until then have a lovely week!


Watermelon

$
0
0

Hi All,

Today I would like to show a layout for my friends. This layout is about a girl who loves watermelons very much.

Items:
Sizzix Sizzlits Decorative Strip Die - Vintage Lace (657481)
Sizzix Sizzlits Decorative Strip Alphabet Die - Typeset (657176)
Sizzix Thinlits Die Set 6PK - For the Record (659108)


To create more layers I used Vintage Lace  and For the Record dies sets.


To make the second word of my title I used Typeset Strip Alphabet Die.


Have a nice day!

Daria.


Всем привет!

Сегодня я с еще одной страничкой для моих знакомых. Эта страничка о девочке, которая очень любит арбузы.

Я люблю многослойность в работах. И мне нравится для создания слоев использовать различные ажурные бордюры, что я и сделала в этой работе.

Материалы Sizzix:
Sizzix Sizzlits Decorative Strip Die - Vintage Lace (657481)
Sizzix Sizzlits Decorative Strip Alphabet Die - Typeset (657176)
Sizzix Thinlits Die Set 6PK - For the Record (659108)

Всем хорошего дня!

In Living Colour

$
0
0

Last week I used an old idea from about twelve months ago and this week I am using the same idea, but in a different way. The idea struck me when I was writing my blog last week; it doesn't always work that easily..... I wish!

Valentines is only a couple of days away so this could be a great quick make idea if you are stuck for inspiration. Failing that, you could resurrect it for Father's day or any other occasion where a masculine themed card is required.

I used one die set to make this card namely the Tags, Rounded Framelits set, one of my personal favourites and it's on sale as we speak so don't delay! I also used striped paper from the Lovebirds collection by Doodlebug Design.

Those of you who read last weeks blog will be familiar with the first three steps, I started by cutting a rectangle of striped card measuring about  9 x 6cm before using my craft knife to trim between each stripe along half the length of the rectangle. Next, I used my tweezers to grip the end of each stripe before curling them into different lengths.

I chose two of the rounded tag Framelits dies and cut shapes with the larger one from wood effect card, corrugated card and silver card ( all of which came from the good folks at Inspire Me Papers. Click on the link, the wood effect card in particular is stunning!). with the smaller of the two dies I cut only the wood effect card.


I took the large wood effect and silver die cuts and trimmed each to size, attached them together and secured with eyelets. With the smaller wood effect die cut, I punched a hole near the end and added a large eyelet. Next, I attached them all together using my trusty glue gun and a large 3D foam pad to attach the corrugated card (bristles!). Finally, I laced a length of cord through the handle.

My base card is cut from Kraft card and measures 17 x 10.5cm, onto which I printed the legend 'You bring colour to my life' before adding the striped paper at a jaunty angle. You will notice I have trimmed away one corner where I'm attaching the assembled brush.


And here it is, the finished card with the brush attached using 3D foam pads. All this leaves is for me to wish you a happy Valentines Day! I'm off to the Stitches trade show in Birmingham with the rest of the gang on Saturday, I'll let you know how we got on next week.


Valentine Card !

$
0
0


Hello!

If I say “let’s create a Valentine’s card for your DH”, will you play along with me? Let’s play with neon colours to realise a trendy but romantic card!

Supply list:

Paper: Creative Imaginations
White Cardstock: American Crafts
Alphabets : 7Gypsies
Stamps: Florilèges Design, Glitz Design
Embossing powder: Aladine
Ink: Versafine
Masking Tape
Izink Pigments: Aladine
Others: music paper, Indian ink

Dies:

658798 Sizzix
659107Sizzix Thinlits Die Set 4PK- Everyday Eclectic

Let’s start by embossing a pattern of your choice on a white paper.
Apply a drop of neon pink Izink pigment and spread it with care with a slightly wet paintbrush.
Do the same with neon yellow colour. Mix the colours for a more natural effect.
Let it dry in the open.

While it dries, cut out a pretty heart out of beige paper. Then print a “Love” text stamp pattern with Versafine grey ink.
An embossed gold arrow will be cut up and glued on top.

Use a label die to cut out a shape out of music paper.

Assemble the whole adding some matching masking tape strips here and there. Splash the card with black Indian ink. Use alphabets to create your title LOVE.
Your Valentine’s Day card is ready!


Here's to Saint Valentine and here's to all lovers!

Karine

Bonjour !

Une petite carte pour offrir à votre amoureux pour la St Valentin, cela vous dit ? Je vous propose de céder à la mode du fluo et de créer un carte tout aussi romantique que tendance !

Matériel :

Papier : Creative Imaginations
Cardstock blanc : American Crafts
Alphabets : 7Gypsies
Tampons : Florilèges Design, Glitz Design
Poudre à embosser : Aladine
Encre : Versafine
Masking Tape
Pigments Izink : Aladine
Divers : papier partition, encre de chine

Commencez par embosser une plaque de votre choix un morceau de papier blanc.
Déposez une goutte d'Izink rose fluo et étalez délicatement à l'aide d'un pinceau humidifié. Renouvelez l'opération avec du jaune, mélangez les couleurs pour plus de naturel.
Laissez sécher à l'air libre.

Pendant ce temps-là, découpez un joli coeur dans du papier beige. Tamponnez ensuite avec un texte "Love"à l'aide d'une encre Versafine grise.
Une flèche embossée en or sera découpée et collée par dessus.

A l'aide d'un die étiquette, découpez une forme dans du papier partition musique.

Assemblez l'ensemble en ajoutant quelques touches de masking tape assortis. Eclaboussez d'encre de chine noire, ajoutez le titre LOVE à l'aide d'alphabets et votre carte de St Valentin est prête !

Très bonne fête à tous les amoureux !

Karine

The way to a man's heart!

$
0
0


I know that I said I would be using a different heart die to embellish a cushion, table runner or place mats this week but ...... change of plan!
As I was thinking about what to make for this week's blog I started to think that neither my husband or son's in law would be particularly impressed with any of the above - but what they do all like is cake, which I happen to love baking. So ......
I've embellished brownies with hearts -
First bake some brownies or any other favourite tray bake and allow to cool, when cool cut into squares.
Using die 656334 - http://www.sizzix.co.uk/product/656334/sizzi x-bigz-die-hearts cut the smallest heart in thin plastic or thick card -

Place the plastic over one square of cake -


and sprinkle with icing sugar -
I just happen to have a lovely cake stand to display the brownies on -

Now this will put a smile on my husbands face - and anyone else in the house tomorrow - and the great thing is - you can make it in time for Valentine's day tomorrow - or you could even buy ready made cake and decorate in the same way.
So now I'm going to do the washing up - and then get back to the sewing machine - or maybe I'll have a cup of tea and a slice of brownie first!
Enjoy your weekend.
Angela

Last Minute Valentine Card

$
0
0
Happy Valentine's Day everyone! This is Anna.

Love is definitely in the air! I hope you enjoy spending some time today with those you love.
Need a last minute Valentine card idea using a few Sizzix products? Low on supplies or Valentine elements?
This post will show you how to create an easy Elephant in Love Valentine card :)
In February we are releasing our Cherished collection by Eileen Hull. It is absolutely perfect for papercraft. There are several pieces in this collection... so cute!

This is my card:
 
cafe creativo - Anna Draicchio - sizzix big shot - card elephant love (1)
 
For this card I used the new adorable Sizzix Thinlits Die Set 7PK - Elephant & Giraffe (658972) plus a Textured Impressions Embossing folder, any of the yours. I added a little heart to symbolize love.
I finished it off with the "valentine" sentiment. The sentiment could also be changed to "I love you" as well.
This elephant would make such a cute card for any event.
 
cafe creativo - Anna Draicchio - sizzix big shot - card elephant love (2)
 
This is a quick and simple card.  I think I created this first one in record time.
 
cafe creativo - Anna Draicchio - sizzix big shot - card elephant love (3)
 
Items used:
Sizzix Big Shot Machine (657900)
Sizzix Thinlits Die Set 7PK - Elephant & Giraffe (658972)
Sizzix Bigz Die - Dog, Puppy (657687)
Sizzix Texture Fades Embossing Folders 2PK - Bubble & Honeycomb Set (657846)
cardstock: white, kraft
red felt
brown marker
foam board tape
sewing machine and yarn
 
I hope you enjoyed these Valentine cards!
Whatever you give (and receive) this Friday, I hope that all of you have a sweet and happy Valentine's Day!
Thanks for visiting and until next time, Happy Crafting!


**************************************
Flag_of_Italy Per le amiche italiane! :)

Ciao! Ecco un nuovo appuntamento con Anna.

L'amore è sicuramente nell'aria! Spero che oggi possiate trascorrere un po' di tempo con chi amate.
Nel frattempo... avete bisogno di un'idea last minute per un biglietto di San Valentino? Avete poche carte o elementi in tema? Niente paura!
Questo post vi mostrerà come creare una semplice card per San Valentino o per anniversario con un simpatico elefantino innamorato :)

Nel mese di febbraio infatti sta uscendo la nuova collezione Cherished by Eileen Hull. E' assolutamente deliziosa. Ci sono diversi pezzi di questa collezione... uno più carino dell'altro, ma ve li lascio scoprire da sole.

Intanto guardate la mia card last minute. E' veloce e semplice da fare e penso di averla creata a tempo di record! Quindi va bene anche per chi è alle prime armi ;)

Per questa card ho usato appunto la nuova adorabile fustella Sizzix Thinlits Die Set 7PK - Elephant & Giraffe (658972) più una mascherina per Embossing, scegliete una qualsiasi delle vostre.
Ho aggiunto poi una cucitura rossa tutt'intorno e un cuoricino rosso di feltro per simboleggiare l'amore.
Ho terminato con il “sentiment” ovvero una frase ritagliata da una tag per l'occasione ed incollata con scotch spessorato. Il sentiment potrebbe anche essere un semplice "Ti amo" ;)

Questo elefantino e gli altri elementi del set vi potranno aiutare a creare card per qualsiasi evento dell'anno.

Spero vi sia piaciuta questa card last minute.
Auguro a tutti voi di trascorrere un dolce e felice San Valentino.
Grazie per la visita, Happy Crafting!
 
Materiali:
Sizzix Big Shot Machine (657900)
Sizzix Thinlits Die Set 7PK - Elephant & Giraffe (658972)
Sizzix Bigz Die - Dog, Puppy (657687)
Sizzix Texture Fades Embossing Folders 2PK - Bubble & Honeycomb Set (657846)
cartoncino bianco e kraft
feltro rosso
pennarello marrone
scotch spessorato
macchina da cucire e filo
Viewing all 2033 articles
Browse latest View live