Quantcast
Channel: Crafting ideas from Sizzix UK
Viewing all 2033 articles
Browse latest View live

A Thank You card with roses

$
0
0


Hello all!

Here is my new card. I like to play with materials and colours to find new interesting decisions and variants. As usually I used water-color to create the background. And Sizzix dies helped to create the decoration. 

There are only 2 sizes of roses in the set but you can create any size when you roll it.


Simple white roses always look very soft.


Here are the materials I used:

  
Have a nice day!

Olga 

Всем привет!

Это моя новая открыточка. Я люблю экспериментировать с материалами и цветами и находить новые решения и сочетания. Как обычно, для создания фона я использовала акварель. А с помощью ножей я создала такую вот чудесную композицию. Я часто использую простые белые розы - они всегда смотрятся очень нежно.
В этом наборе ножей "Розы"только 2 размера, но при скручивании можно сделать фактически любой размер - чем туже скручивать, тем меньше получится бутон.

Всем хорошего дня!

Ольга


Bentes Flowery Sunday post

$
0
0


Hello and happy Sunday to you!!

Here in the south of Sweden we're enjoying a beautiful weekend and I hope the same for you wherever you are!!

My daughter has been doing a major cleaning and sorting of her room and we found loads of loose pecils laying around. I decided to decorate a wooden pencilbox that I've had for along for her to keep them in.

This is how it turned out:

 I used a frameworks die for the lattice work on my box. 
As you may see my piece of lattice is double the length and yet there is no joint to be seen.
That is because I cut out my lattice on a double piece of paper. I just make sure the die does not cut the very end of the pattern and that gives me a nice long piece. Look closely where it says 'here'.

 And this is the finished long piece. The middle is where it says 'here'.

And some more close ups:


 Sizzix products I used:


Other products are by Papirdesign.

------------------------------------------------ooOOOOOOOOOo-----------------------------------------------


He och trevlig söndag till er!


Här i södra Sverige njuter vi av en vacker weekend och jag hoppas ni gör det samma var ni än är!
Min dotter har haft storstädning på sitt rum och vi hittade en hel hög pennor, som jag bestämde mig för att ge ett hem. Jag har haft ett odekorerat pennskrin i trä liggande och nu var det lämpligt att plocka fram det.

Så här blev det:

Jag använde en frameworks die för 'lattice' mönstret. Som du ser så har mönstret blivit längre än själva die'en och där är ingen skarv. Detta beror på att jag placerade ett dubbelvikt papper på min die så att den inte skar riktigt ända ut på motivet. Man sparar ett par millimeter som gör att motivet hänger ihop. Titta på bilderna där det står 'here'.


Clean and simple flower card with the Starter Kit

$
0
0
Hi everybody!

Today I was looking to my scraps folder and I decide to make a quick card to use some of them. I wanted a basic clean and simple card, that could be used in any occasion, so I grabbed my Big Shot machine and the Starter kit.


As you can see I have used very few supplies, only some card and paper :) To create the flower leaves I have used the little heart framelit included in the kit. It complements very perfectly the flower :)

Happy Monday!

.......................

¡Hola a todos!

Hoy estaba mirando mi carpeta de restos y he decidido hacer una tarjeta rápida para gastar algunos. Quería una tarjeta neutra, que pueda utilizar en cualquier ocasión, así que he cogido mi Big Shot y el starter Kit, que vienen genial para esto.

Los materiales utilizado ya veis que son muy poquitos, apenas un poco de cartulina y papel decorado y unas perlitas. Para hacer las hojas de la flor he utilizado el troquel pequeño de corazón del kit que complementa la flor a la perfección :)

¡Feliz lunes!

Your heart...

$
0
0


Hi everyone... hope you had a great week...today I have a gift tag to show you.


Supply list
658300 Sizzix Big Shot Starter Kit (Powder Blue & Teal)
659448 Sizzix Texture Fades Embossing Folders 2PK - Chevron & Lattice Set
658720 Sizzix Bigz Die - Ornate Frame
656633  Sizzix Movers & Shapers Die - Baroque

Papers: Watercolor cardstock, Sizzix packaging, old book paper
Stamps: Unity Stamps
Inks: Spray Mist Color Bloom - Lime Wedge
Other: Sweetheart Blossom  - Wild Orchid Crafts, Seam Binding Ribbon, button

How to do:
Die cut gift tag in Sizzix packaging with Sizzix Movers & Shapers Die - Baroque and emboss it with Sizzix Texture Fades Embossing Folders 2PK - Chevron & Lattice Set
Color watercolor cardstock with Spray Mist Color Bloom - Lime Wedge and water. Let it dry.
Die cut the frame with Sizzix Bigz Die - Ornate Frame
Die cut hearts from  Sizzix Big Shot Starter Kit (Powder Blue & Teal)


Thanks for stopping by and have a great day ♥
Anne Kristine

♥♥♥♥♥♥

Heisann...håper du har hatt en fin uke.. i dag har jeg en pakkelapp å vise deg.

Materialer:
658300 Sizzix Big Shot Starter Kit (Powder Blue & Teal)
659448 Sizzix Texture Fades Embossing Folders 2PK - Chevron & Lattice Set
658720 Sizzix Bigz Die - Ornate Frame

Papir: Akvarell kartong, Sizzix emballasje, gammel bokside
Stempler: Unity Stamps
Inks: Spray Mist Color Bloom - Lime Wedge
Annet: Sweetheart Blossom  - Wild Orchid Crafts, Seam Binding bånd, knapp

Beskrivelse:
Stans ut gavelappen i Sizzix emballasje med Sizzix Movers & Shapers Die - Baroque og emboss med Sizzix Texture Fades Embossing Folders 2PK - Chevron & Lattice Set
Farg akvarell kartong med Spray Mist Color Bloom - Lime Wedge og vann. La det tørke.
Stans ut rammen med Sizzix Bigz Die - Ornate Frame
Stans ut hjerter med  Sizzix Big Shot Starter Kit (Powder Blue & Teal)

Takk for at du stikker innom her og ha en herlig dag ♥
Anne Kristine

Happiness is not a...................

$
0
0
Hi everyone, today i have a cart to show you
Sizzix dies:
Supply list:
Stamp: KaiserCraft -way of life-
Paper: Maja design-Coffee in the Arbour- 6x6
Ink: Archival ink Watering can and Coffee
ribbon, bottun, ponture paint.pink-3D foam


Thanks for stopping by, wish you a great week
Pia
Hej alle
I dag vil jeg vise et kort jeg har lavet
Sizzix dies:
Andre materialer:
Stempler: KaiserCraft -way of life-
Papir: Maja design-Coffee in the Arbour- 6x6
Ink: Archival ink Watering can and Coffee
bånd, knap, ponture paint.pink-3 d foam
Tak fordi du kiggede forbi, ønsker dig en dejlig uge
Pia

Never give up....tag

$
0
0

Hi to everyone:) Today I want to show you this tag I made.


Sizzix products:
Sizzix Big Shot Machine 657900
Sizzix Frameworks Die - Chevron 659428

Other products:
Pion Design papers My Precious Daughter
cardboard white and kraft
seam binding ribbon mint
Stempelglede stamp from the set Follow Your Heart
Distress Paints Bundled sage and Picket Fence
Archival Ink Jet Black
Distress Crackle Paint Rock Candy
glue
fastener

How to do:
1. Cut the framework out from white cardboard using Sizzix Frameworks Die - Chevron 659428.
2. Apply crackle paint to the framework and allow to dry.
3. Cut the tag size 8,5 cm × 16,5 cm from kraft cardboard and the patterned paper slightly smaller. Fit them together with sewing.
4. Apply Distress paint Bundled Sage on to the edges and then fade a little with Distress paint Picket Fence, allow to dry.
5. Cut the flowers out from the other patterned paper and glue to the tag.
6. Stamp the sentiment, fasten the framework using fastener and glue the bow. That`s it:)

Have a nice day, Minna

*  *  *

Moi:) Vaihteeksi tällainen nopeatekoinen tagikortti.

Sizzix tarvikkeet:
Sizzix Big Shot Machine 657900
Sizzix Frameworks Die - Chevron 659428

Muut  tarvikkeet:
Pion Design papereita My Precious Daughter
valkoista ja kraft kartonkia
saumanauhaa minttu
Stempelglede tekstileima setistä Follow Your Heart
Distress Paints Bundled sage ja Picket Fence
Distress Crackle Paint Rock Candy
liimaa
nitoja

Kuinka teet tämän:
1. Leikkaa framework Sizzix Frameworks Die - Chevron 659428 stanssilla.
2. Levitä frameworkiin Distress krakleerausmaalia Rock Candy ja anna kuivua.
3. Leikkaa tagi kraft kartongista koko 8,5 cm × 16,5 cm ja kuviopaperi hieman sitä pienemmäksi. Kiinnitä toisiinsa ommellen.
4. Levitä Distress Paint Bundled Sage reunoihin ja häivytä sitä Picket Fence maalilla, anna kuivua.
5. Leikkaa kukat toisesta kuviopaperista ja liimaa tagiin.
6. Leimaa teksti, kiinnitä framework nitojalla ja rusetti liimalla. Valmista:)

Mukavaa keskiviikkoa, Minna

Partial embossing

$
0
0


This week I am back to making cards and I've made a very clean and simple card using what I termed partial embossing.
 

I simply cut a white piece of light cardstock, placed the top part of the cardstock inside one of the folders from Sizzix Textured Impressions Embossing Folders 2PK - Swirls, Butterflies & Dragonflies Set. When I then ran it through my Big Shot only part of the cardstock got embossed.


Next step was of course to pull the card together and again I kept it simple: Added some glitter tape, baker's twine, a sentiment and one half pearl and then I added the decorated cardstock to my card front using foam squares.


I loved that it was so easy to achieve a clean look with the embossing on only part of the cardstock. Of course you could have two separate pieces of cardstock meeting under the glitter tape, but I think this is an easier way of achieving the same look.
 
 
Supply list:
Cardstock
Baker's twine
Half pearl (Kaisercraft)
Stamp (Papertrey Ink)
Glitter Tape (American Craft)
Ink (VersaFine)
 
---o---
 
I denne uge er jeg vendt tilbage til kortmageriet, og jeg har lavet et meget enkelt kort ved hjælp af det, jeg kalder delvis embossing.
 
Jeg skar simpelthen et stykke hvidt karton ud til kortforsiden, placerede toppen af kartonet i en af embossingfolderne fra Sizzix Textured Impressions Embossing Folders 2PK - Swirls, Butterflies & Dragonflies Set, og da jeg så løb det igennem min Big Shot blev kun en del af kartonet embosset.

Det næste skridt var naturligvis at få et kort ud af det embossede karton og fortsat holde det enkelt: Jeg tilføjede glitter tape, baker's twine, en tekst og en enkelt halvperle, før jeg monterede det hele på kortbasen vha. 3d-puder.

Jeg var begejstret over, hvor nemt det var at opnå det enkle fine look med delvist embossing. Naturligvis kunne man have haft to separate papirer, som mødtes under glitter tapen, men jeg tror, at det her er en nemmere måde at få det samme look.

 
Ingredienser:
Karton
Baker's twine
Havlperle (Kaisercraft)
Stempel (Papertrey Ink)
Glitter Tape (American Craft)
Sværte (VersaFine)

Out of the Shadows!

$
0
0


ShadowPress is here!!...For those of amongst you who have no idea what I'm talking about let me enlighten you!

ShadowPress is the name of a new style of debossing folder which leaves the impression of the shadow of the letters rather than the letters themselves, confused?

It's so hard to describe the concept; when it was explained to me my eyes glazed over in incomprehension too! They say 'A picture is worth a thousand words' so with that in mind let us cut to the chase and show you what ShadowPress can do!!

The folders are the work of MrTim Holtz known for his innovative work in many crafting fields including die cutting and embossing. I am using the following folders and dies to create this weeks blog (click on the product to follow the link):

I have restricted myself to ivory and black card for this project and I am also using one of my favourite products which is Treasure Pewter gilding wax. I folded an A5 piece of ivory card in half to form my base card together with a 21 x 9 cm rectangle of black card. I debossed then word 'hello' onto the front of the black card with my folder.... It's all starting to make sense now!!!


I tore the base from the black card below the debossed word and started to gently rub the Treasure Pewter over the word with my finger tip gradually building up the silver patina. Its important not to apply too much and work in delicate circles. Once satisfied, I wrapped the black card around the base card. We can see how the debossed image is highlighted by the wax, it's a wicked effect and works equally well with acrylics, pastels etc.


Next I Die-cut a line of birds from stiff black card and trimmed away the birds that I wanted to use with a craft knife before applying the gilding wax as before.

Here's the finished card. I attached the birds with 3D foam pads and added a few pewter coloured 2mm adhesive pearl gems.


I couldn't stop at one card so I returned to my old friend the Butterfly Frenzy decorative strip which we saw a few months back, I created the card in the same way but to get added dimension the the butterflies I gently curled the wing tips and folded them in the centre before applying to the card with a glue gun.


I think these cards are quite modern and stylish as well as delivering maximum impact in return for minimum effort. I actually quite like to spend hours labouring over a project but sometimes we just want something quick and easy!

Next week I'm going to return to my old friends the Framelits Circles...Can't wait!


Adopted blocks

$
0
0


Hello again, I hope you've all been enjoying the lovely weather.
My friend Katy Jones had some blocks made but no time to make them into a quilt - so I adopted them -
 
and chose a plain fabric for sashing, borders, binding and backing - I decided to keep it plain as there were so many colours in the blocks, and I think they look great -


 Over the next few weeks I'll put the instructions for the blocks on this blog - this week I can tell you that finished quilt measures 71" x 58". I used 6 metres of plain fabric (42" wide) for the backing, binding, borders and sashing.
The dies Katy used are
 657610  http://www.sizzix.co.uk/product/657610/sizzix-bigz-die-half-square-triangles-3-finished-square
657606 http://www.sizzix.co.uk/product/657606/sizzix-bigz-die-square-2-1-2-finished-3-unfinished
657620 http://www.sizzix.co.uk/product/657620/sizzix-bigz-l-die-triangle-3-1-8-h-x-5-1-2-w-unfinished
657624 http://www.sizzix.co.uk/product/657624/sizzix-bigz-l-die-rectangle-2-1-2-x-5-finished-3-x-5-1-2-unfinished
657627 http://www.sizzix.co.uk/product/657627/sizzix-bigz-l-die-trapezoid-3-x-5-1-2-unfinished
These dies all work together to create 10" finished blocks.
You could make this a scrappy  quilt or you could choose co-ordinating fabrics - it will look good whichever way you choose.
So next week the instructions will begin - in the meantime have fun sewing or just enjoying the sunshine.
Angela


Sunny layout by Karine

$
0
0


Hi everyone!

Here is a new sunny page with my June pretty star!

Supply list:

Cardstock: American Crafts
Alphabets: American Crafts
Frame: Crate Paper
Labels: October Afternoon, K Box Scrap Plaisir
Wood Embellishments: Studio Calico
Stickers: Studio Calico, Crate Paper
Chipboards: Studio Calico
Enamel Dots: Studio Calico
Masking Tape
Ink: Adirondack Sunshine Yellow
Spray ink: Tattered Angels Rosey
Chalk inks: Prima
Stamps: Florilèges Design

Dies:

658778 : Sizzix Texture Fades Embossing Folders 2PK-Birch trees & Candy Stripes Set
659436 : Sizzix Bigz Die-Garden Greens
656212 : Sizzix Bigz Die-Branch with leaves
658300 : Sizzix Big Shot Starter Kit

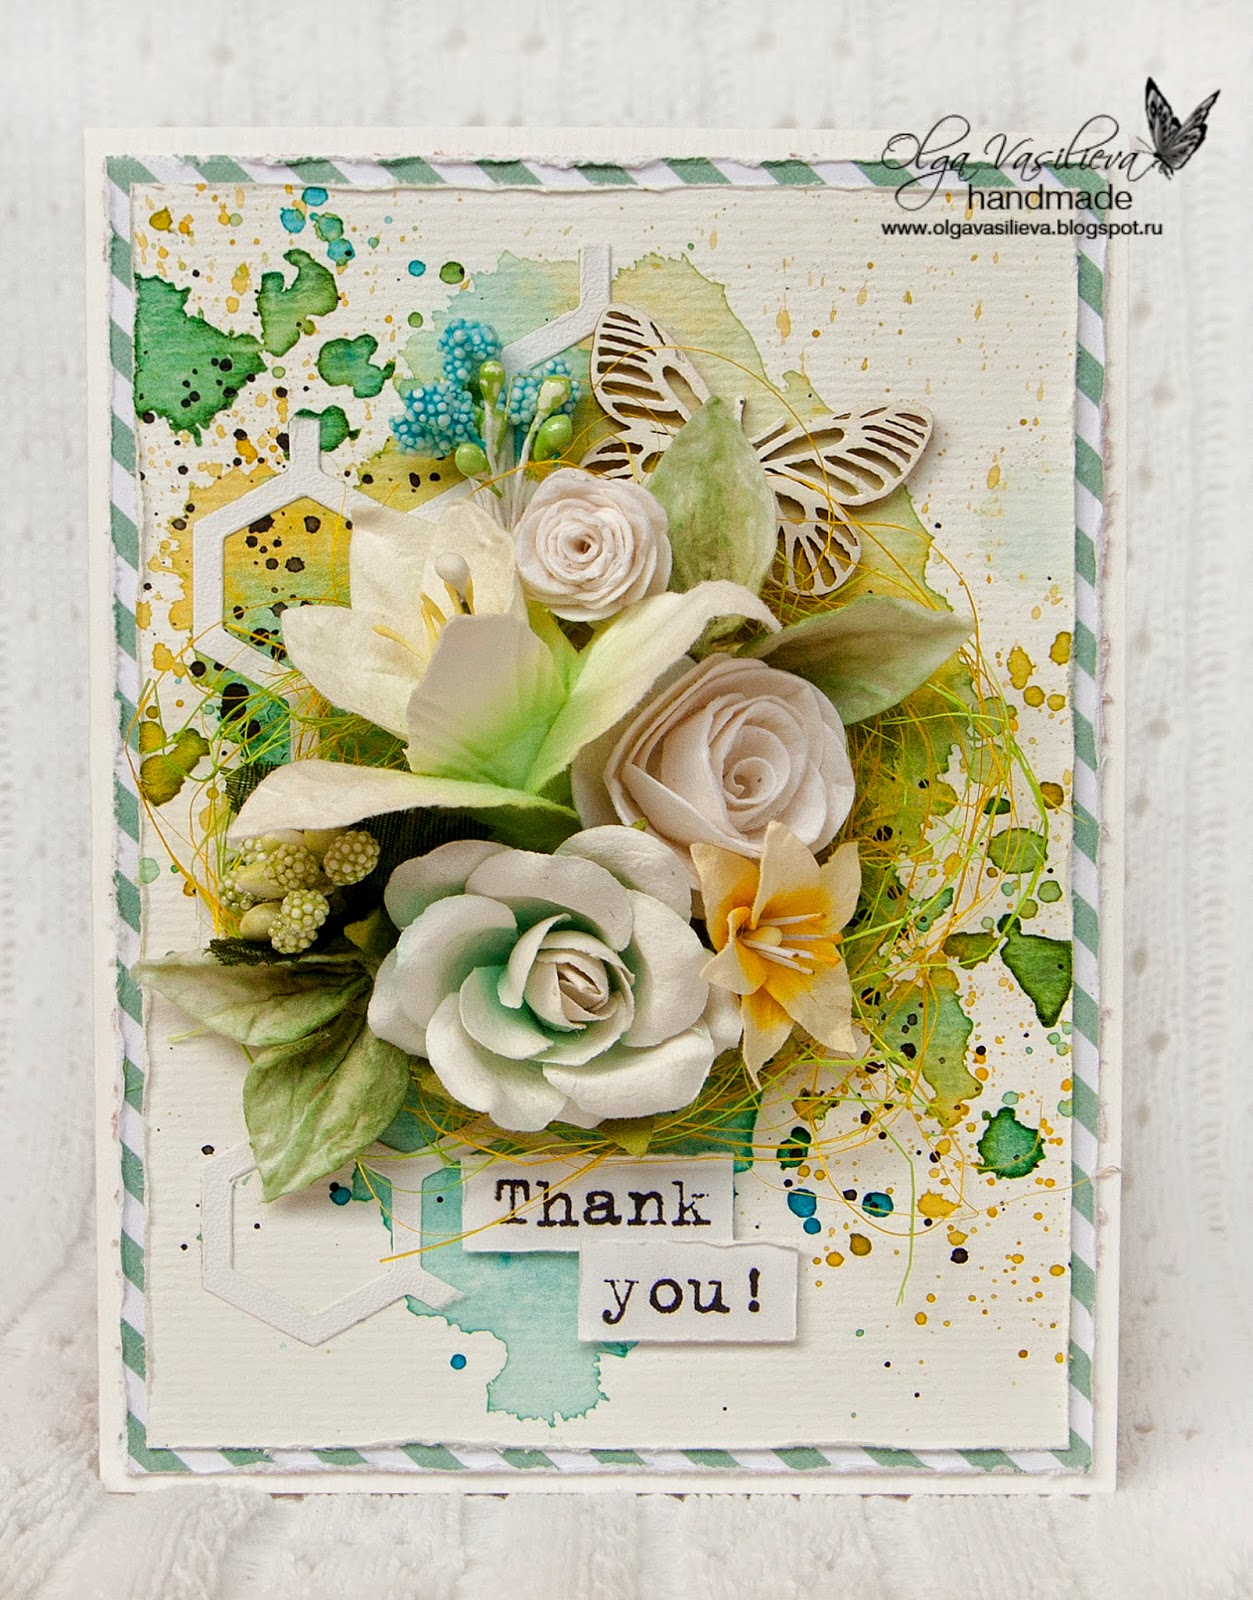
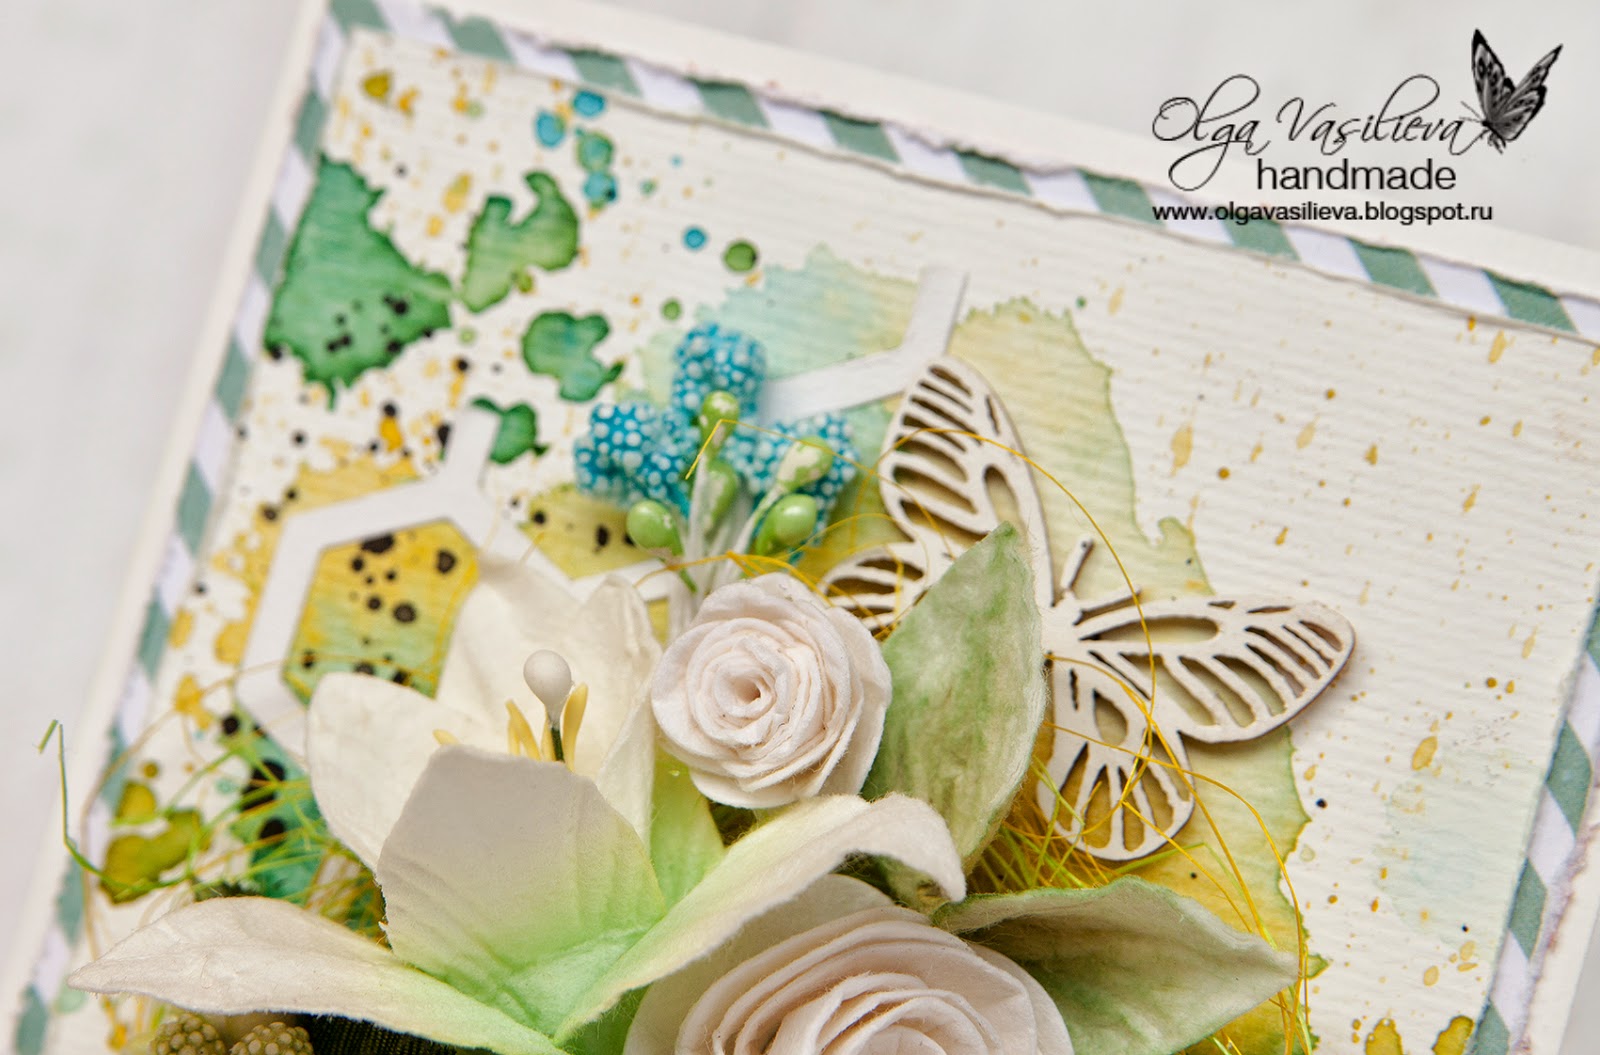
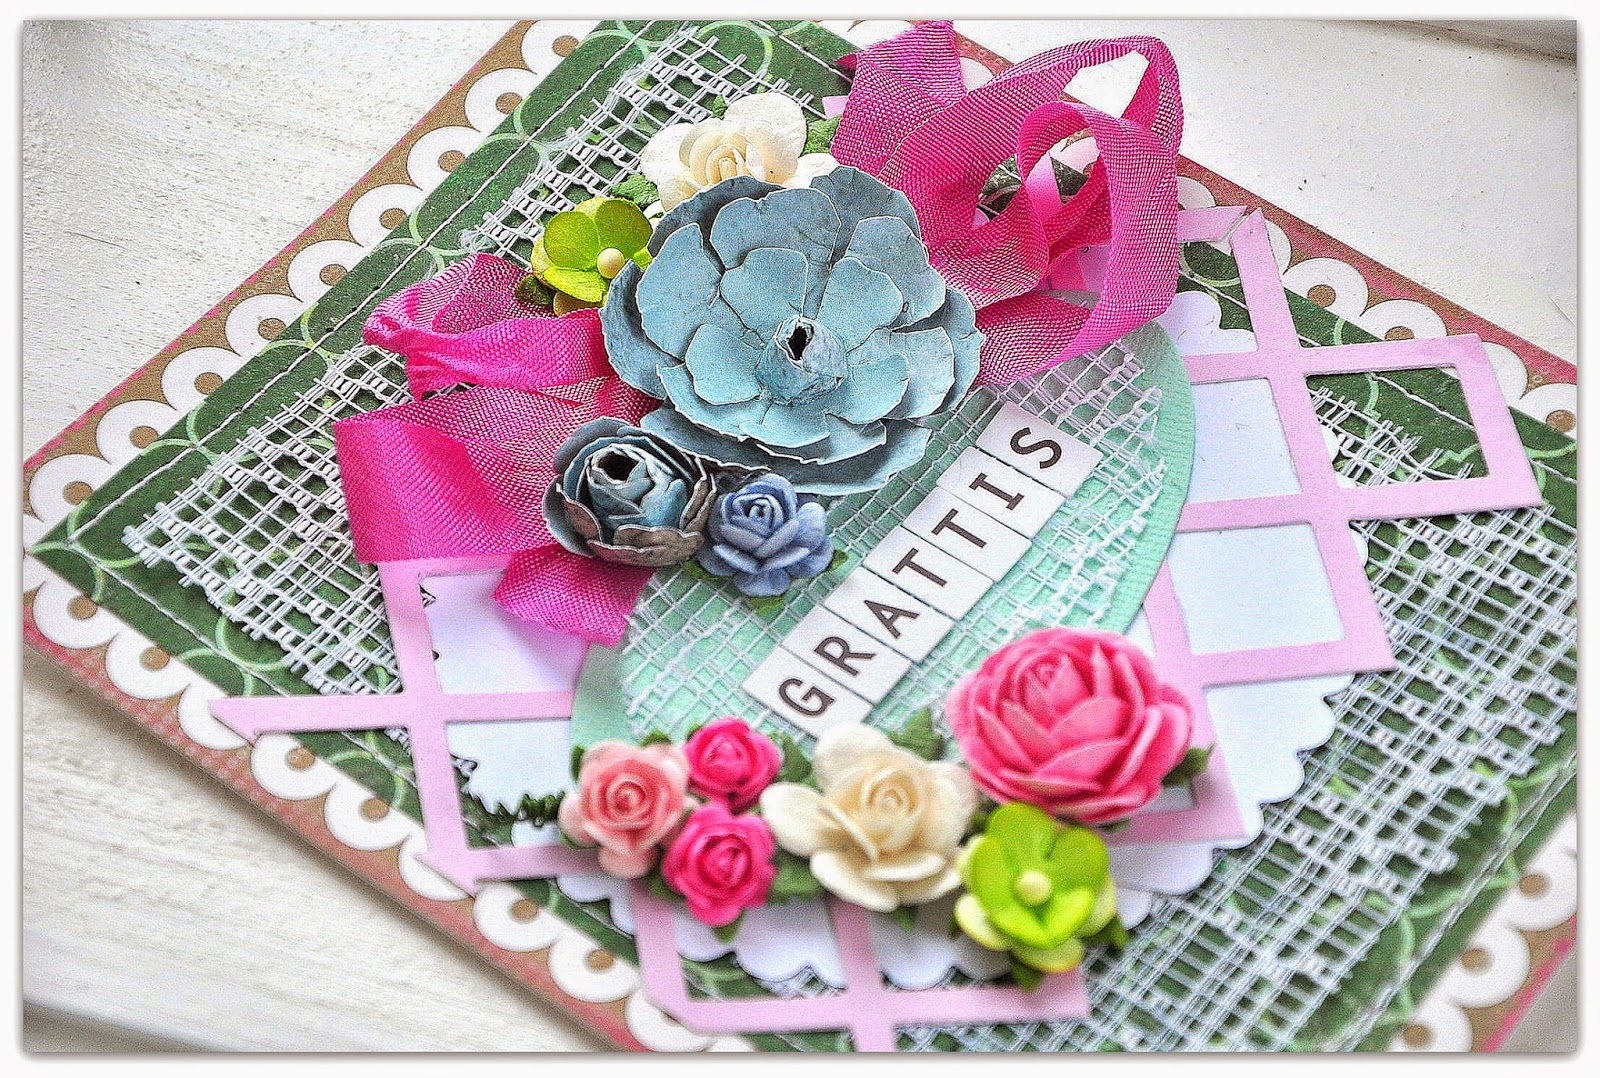
Start by realizing a mat for your picture. Here I used a white cardstock embossed with a diagonal strips patterned folder. Spray a bit of pink to colour it partially. Let it dry in the open. Glue your picture and a pretty pastel green frame as well.

Cut two foliage shapes out of kraft paper and a sea green pattern paper. Then print some text stamps in light blue and pink on your foliage die cuts.

Shade partially your page with the help of a cut’n dry foam piece and your Adirondack yellow ink.

Add some 3D embellishments such as woodies or enamel dots.


Your turn to play now! See you next week!

Karine

Bonjour tout le monde !

Une nouvelle page ensoleillée avec mon joli modèle du mois de Juin !

Matériel :

Papiers : Crate Paper, Scrap Plaisir, American Crafts
Cardstock : American Crafts
Alphabets : American Crafts
Cadre : Crate Paper
Etiquettes : October Afternoon, K Box Scrap Plaisir
Embellissements bois : Studio Calico
Autocollants : Studio Calico, Crate Paper
Chipboards : Studio Calico
Enabel Dots : Studio Calico
Masking Tape
Encre : Adirondack Sunshine Yellow
Encre en spray : Tattered Angels Rosey
Encres Chalk : Prima
Tampons : Florilèges Design

Dies :

658778 : Sizzix Texture Fades Embossing Folders 2PK-Birch trees & Candy Stripes Set
659436 : Sizzix Bigz Die-Garden Greens
656212Sizzix Bigz Die-Branch with leaves
658300 Sizzix Big Shot Starter Kit

Commencez par envisager un mat pour votre photo. J'ai utilisé ici un cardstock blanc embossé avec une plaque rayures diagonales. Vaporisez en rose pour la teinter légèrement. Laissez sécher à l'air libre. Collez votre photo puis un joli cadre vert pastel.

Découpez ensuite deux feuillages dans du kraft et un imprimé vert d'eau. Les découpes seront tamponnées avec des motifs textes en rose et en bleu clair.

Ombrez ensuite partiellement votre page à l'aide d'un cut-n-dry et de votre encre Adirondack jaune.

Complétez avec des petites décorations en volume telles du bois des pastilles autocollantes.

A vous de jouer et à la semaine prochaine !

Karine

Sweet and layered baby cards

$
0
0


Hello Sizzix fans! Today I would like to show you two cards, created to celebrate the baby birth.
Children are born during the whole year and you never know when you will need a beautiful card with congratulations for the happy parents. To create my today's cards I used one of my favorite dies - Sizzix Bigz Die - Ornate Plate - I just love it, it's incredibly versatile. Since I decided to cut out my graphics with images of children in a round shape, an openwork motif of the Sizzix Bigz Die - Ornate Plate fits perfectly here, as a background for round images. 


I really like to add some extra decorations to cut-outs. This time, I embellished doily lace with small dots of 3D paint, imitating adhesive pearls. On my cards can not be missing flower, and if we talk about flowers - the leaves also are very important. I have to admit, not for the first time, that Sizzix Bigz Die - Garden Greens is my favorite to cut leaves and twigs. This time after cutting the leaves, I covered them using heat embossing techinique. I did it quite freely, just to leave patterned paper visible in some places.
I combined white and holographic embossing powder, so my leaves have an interesting texture and sparkle beautifully in the sun. As usual, I cut twigs into smaller pieces - this way you can get some more smaller leaves and arrange them evenly in the composition.


Sizzix supplies used:

Thank you for visit us today! 
Have a wonderful weekend! 
~~ Karola ~~ 


****************************

Dziś chciałabym pokazać Wam dwie kartki, stworzone z okazji narodzin dziecka. Dzieci rodzą się przez cały rok i nigdy nie wiadomo kiedy będzie potrzebna piękna kartka z gratulacjami dla szczęśliwych rodziców oraz powitaniem maleństwa na świecie.
Do stworzenia moich dzisiejszych kartek wykorzystałam wykrojnik Sizzix Bigz Die - Ornate Plate, przypominający koronkową serwetkę - uwielbiam go, jest niesamowicie uniwersalny. Ponieważ moje grafiki z wizerunkami dzieci postanowiłam wyciąć w kształt koła, okragły, ażurowy wzór z wykrojnika Sizzix Bigz Die - Ornate Plate idealnie tu pasował jako tło do okrągłych grafik. 
Bardzo lubię dodatkowo ozdabiać wycinanki z wykrojników. Tym razem koronkowe serwetki ozdobiłam małymi kropkami z farbki 3D, imitującymi samoprzypelne perełki.
Na moich kartkach nie może zabraknąć kwiatów, a jeśli mowa o kwiatach - muszą być też liście. Muszę przyznać, nie po raz pierwszy, że wykrojnik Sizzix Bigz Die - Garden Greens jest moim ulubionym do wycinania liści i gałązek. Tym razem wycięte liście ozdobiłam pokrywając je embossingiem na gorąco, zrobiłam to dość niedbale, nieregularnie, aby zostawić widoczny wzorzysty papier w niektórych miejscach. Połączyłam biały i holograficzny puder do embossingu, dzięki czemu moje listki mają ciekawą teksturę oraz pięknie się mienią w słońcu. Jak zwykle wycięte gałązki pocięłam na mniejsze fragmenty - w ten sposób można uzyskać kilka mniejszych liści i rozłożyć je w kompozycji równomiernie.

Wykorzystane produkty Sizzix:

Dziękuję za dzisiejsze odwiedziny na naszym blogu i życzę Wam 
wspaniałego, kreatywnego weekendu! 
~~ Karola ~~

Three Hearts Cushion

$
0
0


Hi to everyone, today I come back with another cushion, this time the Three Hearts Cushion that I have done using Sizzix dies .


My cushion is 13" x 13"


This technique is used to in scrapbooking and I wanted to do a chance on fabric.

Supplies List :


Scraps of fabrics for the hearts 
6"x 5.5" fusible web
14"x 9.5" floral fabric for the back
14"x 2" floral fabric for the back
14" x 5" linen fabric
14"x 14" linen fabric 
5" ribbon
1 button


First I chose my fabrics, some  in red ,pink and white on a dark linen I could get in our last trip to IKEA.


Sew some little scraps changing the size of everyone .


I  saw it can fit the die and press the fusible web on the back of the block before using the Big Shot machine.
Then only  cut  and prepared the back of the cushion as usually.
I centered  the three hearts on the linen and pinned


It was the time to applicate the hearts with my sewing machine with red thread.


And with the two parts finished  I sew  around right side together.


Now , I ´ve got a confortable cushion for my chair  and spent time sewing in my pation.


Hope you have a wonderful weekend
 
Love
Mercedes
 
 
...........................................*************............................................

Hola a todo el mundo, hoy regreso con otro  cojín , esta vez “ Tres corazones “ que he confeccionado  usando los troqueles de Sizzix.
 Mi cojín tiene una medida de 33cm x 33cm

Esta técnica se usa también en scrapbooking and quería probar  a hacerlo sobre tela.

Materiales:

Trozos de tela para los corazones
14cm x 15 cm de entretela para pegar con plancha.
35.5 cm x 24cm de tela de florecitas para la trasera
35.5 cm x 5cm de tela de flroecitas para la trasera
35.5 cm x 12.5cm de lino
35.5 cm x 35.5 cm de lino para el top del cojín
12.5 cm de cinta para el cierre
1 botón

Primero elegí mis telas , algunas en rojos , rosas y blancos que irían sobre un lino  gris oscuro que compré en IKEA
Cosí algunos trozos cambiando el tamaño de cada uno.
Comprobé  la medida para el troquel de corazones y pegué con la plancha la entretela.
Después corté los corazones con el troquel y preparé la trasera del cojín como es habitual.
Centré los corazones  con alfileres y apliqué a máquina con hilo rojo sobe el cuadrado de lino.
Monté el cojín dejando derecho con derecho y cosí alrededor.
Ahora tengo un cómodo cojín para mi silla y  estar cosiendo en el patio.

Que tengas un maravilloso fin de semana
Cariños 
Mercedes

A vintage card by Olga

A summery greetingcard.

$
0
0


We have arrived at Midsommer Eve which is hugely celebrated here in Sweden and this is our beloved lightest period of the year. It's a beautiful time!
I have several friends who celebrate a birthday just about now I wanted to make a few birthdaycards :-)


I started out with a card base and stitched a green panel to it.
On top I layered a piece of netting and two pices of lattice in pink. Then I die cut and  added an oval in the center. To finish off I added several flowers; handmade and from the store, as well as some seambinding.


These leftovers from different packages of flowers have been calling my name to get used. I think next time I'll make a mini album with them, but today they served as cardbases.


Sizzix frameworks die lattice
Sixxix Big Shot starter kit
Sizzix framelits die set ovals
Sizzix Tattered florals Bigz die

Other from Papirdesign

                                  --------------------------000-----------------------------
Nu firar  vi midsommar här i Skandinavien och vi tycker det är underbart med allt ljus vid denna tiden. En stor högtid för oss i norr! Dessutom känner jag många som firar sin födelsedag nu så jag kände för att göra några kort.
Jag började med basen och sydde fast en grönt panel sedan lite lager på lager med tyg, framework  lattice och en oval. För att dekorera la jag till några handgjorda och köpta blommor och en rosett.

Dessa bakgrunderna från olika blomsterpaket har kallat på min uppmärksamhet ett tag. Idag blev det ett kor5t, men nästa gång blir det nog ett mini album.
Detta använde jag:
Övrigt från Papirdesign

Frameworks dies as masks for gold flakes

$
0
0


One of my long time always in my craft room product are any type of gold flakes or faux gold leaf. they add a different kind of metallic effect that not card mirri or shiny would ever do. 
One of my favourite products form the latest releases from Mr. Tim Holtz are the Frameworks dies, dies that are perfect for a lot of different technique. And if you know me, you will know that I love techniques. Frameworks dies make wonderful masks, gap cards and templates. Here is one of those techniques.


I die cut first the Frameworks-Chevron die using white textured card. As usual, I put the textured card facing the foam that will make the textured side the front. Then I took a piece of Stix2 double sided sticky sheet and attached it to a plain card to give it some extra stability, though is not necessary. 
I lifted the remain protective sheet and place over it the Chevron (texture side up). I protected the adhesive placing the protective sheet over it.


I placed on to the biz die from the Big Shot Starter kit but any Bigz die with a bold shape will work. Once die cut, I removed the protective sheet and use the left overs from the Chevron die to fill the one area that looked a bit bare. this in itself is another way to do this technique as you will see bellow.


Then I placed the heart with the sticky side up on a plastic container that holds my gold flakes. Using a scrunchy tool (usually sold on its own as a gold flake tool) I made sure that all sticky areas were covered and that any excess was pulled away and back in the container. On the right photo you can see the effect.

As I mentioned, this technique can be used as well with just the off bits like in the card bellow.


And finally a close up of the golden flakes effect bellow.


I think it is a very elegant way to add some metallics to your work, specially if you mix it up with matte and soft colours. I love it and I hope you try this technique soon!


Wooden block....

$
0
0


Hi everyone...hope you had a great week...today I have made a wooden block with Frameworks, cheesecloth and Gesso. Very easy to make and a nice gift to a dear friend ♥


Supply list:
657900 Sizzix Big Shot machine
659424 Sizzix Frameworks Die - Courtyard 

Papers: Pion Design - My Precious Daughter
Other: Wooden block, Gesso, cheesecloth, Flowers - Kort & Godt, Tissue Tape - Tim Holtz idea-ology

How to do:
Find a  wooden block and Die cut Framework in patterned paper with Sizzix Frameworks Die - Courtyard 
"Glue" it to the wooden block with Gesso and cheesecloth. Add flowers, Tissue Tape and text. 


Thanks for stopping by and I wish you a great day!
Anne Kristine

♥♥♥♥♥♥

Heisann... I dag har jeg laget en trekloss  med Frameworks og osteklut.

Materialer:
657900 Sizzix Big Shot machine
659424 Sizzix Frameworks Die - Courtyard 

Papir: Pion Design - My Precious Daughter
Annet: Trekloss, Gesso, osteklut, blomster - Kort & Godt, Tissue Tape - Tim Holtz idea-ology

Beskrivelse:
Finn en trekloss og stans ut  Framework i mønsterark med Sizzix Frameworks Die - Courtyard 
"Limes" til treklossen med Gesso og osteklut. Lim på blomster, Tissue Tape og tekst. 

Takk for at du stikker innom her og ha en herlig dag!
Anne Kristine

Star box

$
0
0
Hi everyone
I hope you all had a great week, today I have a little giftbox to share with you.
Sizzix dies I have used:
Sizzix movers and sharpers Bigz L Matchbox 659447
Supplylist:
Paper: Purple Violets Galeriapapiera
Ink: memento-Sweet Plum
pontura paint-Lilla

Thanks for stopping by, wish you a great week
Pia
Hej alle
Jeg  håber du har haft en fantastisk uge, i dag vil jeg vise en lille gaveæske


Sizzix dies jeg har brugt:
Sizzix movers and sharpers Bigz L Matchbox 659447
Andre materialer:
Papir: Purple Violets Galeriapapiera
Ink: memento-Sweet Plum
pontura paint-Lilla

Remembering those special moments....

$
0
0

Hello to everyone:) Today I have this card to show you:)


Sizzix products:
Sizzix Big Shot Machine 657900
Sizzix Frameworks Die - Chevron 659428
Sizzix Bigz Die - Flowers, 3-D 656545
Other products:
Prima Marketing papers; Sweet Fairy
Prima Marketing journaling notecards; Meadow Lark
cardboard
gesso
glue
corrugated cardboard
doily
Prima Marketing PRINTERY Reflections Antique Mirror 
burlap

How to do:
1. Cut the backroundpaper size 12 cm × 15 cm, apply gesso on to it and allow to dry.
2. Cut the pieces of burlap (4 cm × 11 cm) and corrugated cardboard (10 cm × 4 cm) and paint them using gesso, allow to dry.
3. Cut the roses, two big and four small, using Sizzix Bigz Die - Flowers, 3-D 656545. Finish them with glue.
4.  Cut also the framework using Sizzix Frameworks Die - Chevron 659428. 
5. When the backgrounpaper is dry, fit it on to the cardboard ( a little bit bigger than the paper) by sewing.
6. Cut a piece of patterned paper 5 cm × 14 cm and fit it vertically to the left side. Cut also the other paper size 5 cm × 12 cm and fit it horizontally in the middle of the card.
7. Place the journaling card (cut the piece of), doily, corrugated cardboard, burlap, framework and Prima Marketing antique mirror  as above in the picture.
8. Place the roses on to the card and glue them.
9. Tape the ready cover on to the cardboard size 14 cm × 16,5 cm.

Have a nice day,Minna

*  *  *  *

Moi:) Tässä jälleen uusi kortti näytille:)

Sizzix tarvikkeet:
Sizzix Big Shot Machine 657900
Sizzix Frameworks Die - Chevron 659428
Sizzix Bigz Die - Flowers, 3-D 656545

Muut tarvikkeet:
Prima marketing papereita; Sweet Fairy
Prima marketing journaling kortti; Meadow Lark
kartonkia
gesso
liimaa
aaltopahvia
doily
Prima Marketing PRINTERY Reflections Antique Mirror
juuttikangasta

Kuinka teet tämän:
1. Leikkaa taustapaperi kokoon 12 cm ×15 cm ja levitä gessoa siihen, anna kuivua.
2. Leikkaa myös palaset juuttikangasta (4 cm × 11 cm) ja aaltopahvia (10 cm × 4 cm) ja maalaa ne gessolla, anna kuivua.
3. Leikkaa ruusut; kaksi isoa ja neljä pientä käyttäen Sizzix Bigz Die - Flowers, 3-D 656545. Liimaa ne valmiiksi.
4. Leikkaa myös framework käyttäen Sizzix Frameworks Die - Chevron 659428. 
5. Kun taustapaperi on kuivunut, kiinnitä se ommellen hieman sitä isompaan kartonkiin.
6. Leikkaa pala kuviopaperia 5 cm × 14 cm ja kiinnitä se pystysuoraan kortin vasempaan reunaan. Leikkaa toinen paperi 5 cm × 12 cm ja kiinnitä se vaakasuoraan kortin keskelle.
7. Kiinnitä journaling kortti (leikkaa pala pois), doily, aaltopahvi, juuttikangas, framework ja Prima Marketing  antique mirror koriste korttiin kuten kuvassa.
8. Asettele ruusut ja liimaa ne paikalleen.
9. Teippaa lopuksi valmis kansi korttipohjaan kokoa14 cm × 16,5 cm.

Mukavaa keskiviikkoa, Minna

Los geht's Deutschland

$
0
0


Germany is (along with much of the rest of the world) in the grips of the football mania of the World Cup and since the Danish team didn't make it to Brasil and I live in Germany, I still have a team to root for. I'll be watching the game between Germany and the United States with some friends in Denmark and I wanted to bring some German flair to the event.
 

When I saw these Niederegger marcipans in the German colours, I decided to buy some and make a little gift set in the German colour: Schwarz (black), rot (red), gold (golden/yellow).


I figured out that two of the marcipans would fit in a small square box that I formed out of a die cut scallopped square using Sizzix Framelits Die Set 6PK - Squares, Scallop: Simply die cut the largest square, then count three scallops from each side and score lines here. Once you have the score lines you also have a guide for cutting: One side of each corner need to be cut lose (use the picture above for reference). Last step is to assemble the box by folding in the corners and glueing them down.


I made my boxes in black cardstock and then I added slivers of red and yellow cardstock to mimic the German flag. A 12" strip is plenty to reach around the box.
 
 
I knew I wanted to wrap the boxes in cellofan paper and then add some tags with text to the packages, so I die cut three tags. Once more, I used the Germany trio of colours for the frames of the tags. I looked up what German fans might yell at a game and I added that call to the three tags.
 
 
I added two marcipans to each little box and I colour coordinated them so there would be a black, a red and a golden box.


The last step was wrapping the boxes in cellofan paper and adding the tags to each box with matching baker's twine. Los geht's Deutschland (Let's go Germany)!

Supply list:
Sizzix Big Shot Starter Kit (Powder Blue & Teal)
Sizzix Accessory - Magnetic Platform for Wafer-Thin Dies
Sizzix Framelits Die Set 12PK - Tags, Sentiments
Sizzix Framelits Die Set 6PK - Squares, Scallop
Marcipan pieces
Cardstock
Baker's twine
Stikers (LilyBee)
 
---o---
 
Tyskland er (sammen med meget af resten af verden) grebet af fodboldmania på grund af VM i Brasilien, og nu da landsholdet ikke er i Brasilien og vi bor i Tyskland, har jeg fortsat et hold at holde med. Jeg skal se kampen mellem Tyskland og USA sammen med venner, og jeg ville have lidt tysk flair med til festlighederne.
 
Da jeg så Niederegger marcipanstykkerne i de tyske farver, slog jeg til og besluttede at lave et lille gavesæt i de tyske farver: Schwarz (sort), rot (rød), gold (gylden/gul).
 
Jeg opdagede, at to af marcipanstykkerne kunne passe i en lille box, som jeg lavede ud af udstansede scallopped firkanter lavet med Sizzix Framelits Die Set 6PK - Squares, Scallop: Jeg udstansede den største af firkanterne og lavede foldelinjer tre buer inde på alle sider af firkanterne. Foldelinjerne er samtidig guides til der, hvor man skal skære for at kunne samle boxen (brug billedet ovenfor som reference). Det sidste skridt er at samle boxene ved at folde hjørnerne ind og lime dem sammen.
 
Jeg lavede mine boxe i sort karton, hvorefter jeg tilføjede strimler af rødt og gult karton, så boxene kom til at ligne det tyske flag. Strimler på 12 inches / 30,5 cm er rigeligt lange til at nå hele vejen rundt.
 
Da jeg vidste, at jeg ville pakke boxene ind i cellofan og så tilføje nogle tags, udstansede jeg tre tags og endnu en gang brugte jeg den tyske trio af farver. Derudover fandt jeg et fodboldslogan, som jeg kunne sætte på tagene.
 
Hver box indeholder to marcipanstykker, og de er farvesorteret, så der er en sort, en rød og en gylden box.
 
Det sidste skridt var at pakke boxene ind i cellofan og sætte taggene fast med matchende baker's twine. Los geht's Deutschland (Go Tyskland)!
 
Ingredienser:
Sizzix Big Shot Starter Kit (Powder Blue & Teal)
Sizzix Accessory - Magnetic Platform for Wafer-Thin Dies
Sizzix Framelits Die Set 12PK - Tags, Sentiments
Sizzix Framelits Die Set 6PK - Squares, Scallop
Marcipanstykker
Karton
Baker's twine
Stikers (LilyBee)

Tidy!

$
0
0


Tidy is not a word that would necessarily spring to mind when describing my work area when I'm busy crafting. I'm sure that this is true of many of you? In my defence I do clean up between projects but I'm not too bothered by clutter.

If like me, you live in Wales then this word takes on a different meaning, Tidy could be transposed for any number of words, all of which are positive like excellent, brilliant, wicked etc.

My good friend and former band mate  Andrew 'Bone' Jones, an excellent fellow and Tidy guitar player as well was blessed with a little girl last Tuesday by the name of Isabella Eira (a welsh name meaning 'snow') So many congrats to Bone and Julia.

Bone told me the happy news via text, it read as one might expect but ended with the word tidy! which is  his favourite word by far, not that he has a limited vocabulary, although now you mention it.......

I wanted to mark the occasion with a card, and the great thing about being a crafter is that you can offer something a little bit special and bespoke. I had a great idea but to make it work I had to reach for my Framelits Circles dies and my Scalloped Squares, The rest, as they say was easy. There are two sets of Framelits circles dies and even though you can create the project using just those in the link above I have lumped them all together in one folder.

I Started by selecting my papers and dies before die-cutting three different circles, two pale yellow and the smallest from Spotty pink paper. Next I placed a smaller circle against the base of the largest circle and another die roughly in the centre of the smaller yellow circle. I also trimmed away part of the spotty circle until I have the collection of shapes in the far right hand picture.


I cut the yellow 'ring' in half and fashioned one end into a chevron with my craft knife forming the end of the trunk before mounting them all together to form my elephant. Next I cut a square of ivory card and added a faux stitch effect around the perimeter with a pattern makers wheel. I matted the square onto a die-cut pink scalloped square before mounting the elephant using 3D foam pads.

Finally, I printed the word tidy onto white card and carefully trimmed around it with a craft knife forming a speech bubble.


I printed the words onto a rectangle of kraft card as well as the seal at the top (this is from a dingbats font called 'old seals' free to download from dafont.com).


TIDY!!!


Viewing all 2033 articles
Browse latest View live