Quantcast
Channel: Crafting ideas from Sizzix UK
Viewing all 2033 articles
Browse latest View live

Spring Card by Camilla Ekman

$
0
0


I created a spring card for the Sizzix blog this week. I really thought spring was coming to Sweden, but...no. We had a bit of snow again this week.

Anyway... I used the Iron Gate Frame for this card. It makes the perfect background. Then I added some layers with Sizzix doilies and the Renaissance Frame. The lovely papers are from Maja Design.


Have a nice week!


******************************

Denna veckan gjorde jag ett vårkort till Sizzixbloggen. Jag trodde verkligen att våren skulle komma till Sverige, men...nej. Vi fick lite snö igen denna veckan.

Jag använde Iron Gate Frame till detta kort. Det är den perfekta bakgrunden. Sen lade jag till några lager med Sizzix doilies och Renaissance Frame.

Ha en trevlig vecka!


"Spring Time" by Gerry

$
0
0


Hello Sizzix Friends!
I`m here today to share with you my latest Sizzix project.
On the photos (taken in April, 2012)  my daughter is
enjoying a Barbie Magazine and making her "dress" wish list ;-)
I can`t wait for Spring to come - love all the blossoming flowers and
all the freshness and colours. And to get into the Spring mood
 I created my layout..."Spring Time"
655268 Sizzix Big Shot Machine
658948 Sizzix Thinlits Die - Frame, Fancy Rectangles
658607 Sizzix Thinlits Die Set 13PK - Flowers, Intricate
657773 Sizzix Framelits Die Set w/Stamps - Butterflies #3
657751 Sizzix Sizzlits Dies - Decorative Vintage Set
657786 Sizzix Textured Impressions Embossing Folders - Dress Form Set
657522 Sizzix Sizzlits Die Set - Card Phrases Set

I chose light pink pattern paper to emboss the dress form.
Once it was embossed I fussy cut only the right side and the bottom one.
I inked the embossed parts with (old rose colour) ink 
and added pearl drops to the dress form as a final touch.
The flowers were die cut from from the pattern paper & white cardstock.


Butterflies were die cut twice by using two different pattern papers

I love the cute little circles from the New Thinlits Flowers, Intricate.
You can not only use them for the centres of your flowers
but also to make them part of your background. And this is how I used them...
I chose different colours pattern papers and die cut all five sizes.
Then randomly adhered them on my white background.

Other Products I used:
Webster's Pages - "Girl Land" Collection
Webster's Pages - "Best Friends" Collection
Webster's Pages - "Composition & Color" Collection

Dutch Translation

Hallo Sizzix Vrienden!
Vandaag heb ik weer een pagina om met jullie te delen.
Op de foto's (van april, 2012) geniet mijn dochter van een Barbie tijdschrift
en maakt haar keuze voor een jurkje.
Ik kan niet wachten tot lente komt - ik hou van alle frisse en bloeiende bloemen en kleuren.
Deze pagina heb ik gemaakt in een lente stemming te komen.
* * *

655268 Sizzix Big Shot Machine
658948 Sizzix Thinlits Die - Frame, Fancy Rectangles
658607 Sizzix Thinlits Die Set 13PK - Flowers, Intricate
657773 Sizzix Framelits Die Set w/Stamps - Butterflies #3
657751 Sizzix Sizzlits Dies - Decorative Vintage Set
657786 Sizzix Textured Impressions Embossing Folders - Dress Form Set
657522 Sizzix Sizzlits Die Set - Card Phrases Set

* * * 

Ik heb een licht roze patroon papier gekozen voor het Dress Form Set.
Toen deze klaar was heb ik alleen langs de rechter en onderkant geknipt.
Daarna heb ik inkt en pearl drops aangebracht. 


* * *
De bloemen zijn gestanst uit het patroon papier en de witte cardstock.

* * * 
Ik ben gek op de schattige kleine cirkeltjes van de New Thinlits Flowers, Intricate.
Je kunt ze zowel voor het midden van de bloemen als decoratie voor de achtergrond gebruiken. En dat heb ik dus ook gedaan. Ik heb verschillende kleuren patroon papier gebruikt en alle 5 beschikbare maten gebruikt. Vervolgens heb ik ze willekeurig aangebracht op mijn witte achtergrond.
* * * 

I hope you enjoyed my project today!
Have a Creative Sunday!

Spring window card

$
0
0


I love window cards. They are so unexpected and they always cause the "Wow effect". And I love making these cards using framelits because it is very easy. Let's see...


Supply list:


I have die cut the card base and all parts of the window using different sizes of the ticket die, then I have glued everything together. Finally I have die cut the butterfly, made the banner and put some pearls to embellish.

And there you have it: Simple and cute.


Happy Monday!

............................

Me encantan las tarjetas con ventana. Son muy inesperadas y siempre tiene ese efecto "guau" en quien las recibe. Y me encanta hacerlas utilizando Framelits porque es muy sencillo. Vamos a ver...

Materiales:


He troquelado la base de la tarjeta y todas las partes de la ventana utilizando diferentes medidas del ticket y después las he pegado con glossy accents. Por último he troquelado la mariposa, hecho el banner con el título y he pegado unas perlitas para adornar.

Y ya está: Sencilla y bonita.

¡Feliz lunes!

Easter treat bags - Spring Quilting Blog Hop!

$
0
0


It's day 1 of the Sizzix Spring Quilting Blog Hop and I'm delighted to kick off the week!  We've got 5 days of fabulous spring and Easter ideas from some very talented ladies! Here's the line up for the week...

Monday 18th March - Me!
Tuesday 19th March - Carolyn Forster
Wednesday 20th March - Laura Taylor
Thursday 21st March - Hadley Gordon
Friday 22nd March - Anna Draicchio

To make the week even more exciting, you can enter this exclusive competition to get started with your patchwork and quilting adventure... Click here to enter! The closing date is 28th March at 10am GMT.


So here we go then with my project!

Easter is coming up fast, and the stores are full of overly packaged chocolate eggs that look great with all that bright cardboard and shiny foil, but once they're opened they're quite disappointing. In our house the actual chocolate eggs seem to get leftover and forgotten about, so I try to make things more interesting and use little handmade bags stuffed with favourite sweets and little eggs, and maybe a tiny toy to leave in hiding places around the garden for the annual Easter egg hunt my children and their cousins have.

1

I've called them 2 minute treat bags, and admittedly 2 minutes is probably pushing it a little bit, they take more like 5 or 10 minutes each, but they're still fast and you can whip up a whole easter egg hunt's worth in very little time.

You need Sizzix Bigz Die Birds 3 (number 657685)

I used layer cake squares for my bags (layer cakes are pre-cut 10" squares that you can buy in a set), and scraps of fabric for the bird appliques. Make a couple at once, using one bird shape for one bag, and the other bird shape for the second bag.

For 2 bags you need;

4 layer cake squares (or 4 10" squares of fabric - use pinking shears for a zigzag edge to prevent fraying)
1.5 metres of ribbon
6" square of scrap piece of fabric
6" square of fusible web
2 buttons
embroidery floss/cotton and a needle (to sew on the buttons)

Firstly, following the manufacturers directions for the fusible web, apply fusible web to the reverse of the scrap piece of fabric and cut the bird shapes using die 657685.

Lay one of the 2 different birds on a layer cake or 10" fabric square, in the middle but towards the bottom of the square.

Use one of the small circles cut from the die as an eye, and press the applique with an iron to fuse (because these are fast treat bags you don't need to sew the appliques on, the fusible web will hold just perfectly. If you were making something that was to be washed or have heavy use, use a blanket, zig zag or straight stitch to fix into place).

Sew a small button onto the 'eye' with embroidery floss or cotton thread.


bird1


Take the ribbon and cut into 2 lengths, set one aside for use on the second bag
Fold the ribbon in half, and pin onto the bag front approximately 3" from the top. Note that the folded end is just overlapping the raw edge of the side of the bag.


bird2

Take a second layer cake square/10" square and lay right sides together on top of the bag front. 


bird3

Make sure the ribbon is poking out the top of the bag, and pin and sew using a straight stitch and 1/2" seam allowance round the 2 sides and the bottom of the bag. Don't sew the top - it won't be much of a bag without the top edge open!

Turn right ways out and poke the corners out well so they're nice and pointy


bird4

And repeat the steps above for the second bag using the other bird shape.

When you're done, stuff with small treats and tie the tops closed with the ribbon. These little bags are also perfect for birthday party bags, or for stocking stuffers at Christmas.


birds1


Memories

$
0
0

Hello everybody
Now it's Tuesday again and I will show you my handemade smash book
Items used:
Big Shot Machine (655268)
Banners (658289)
Chip Block Alphabet ( 656917)
Frames, Damask ( 657599)
Mini Butterflies Sets ( 657209)
Heart, Stem & Leaves ( 657691)
Tag & Tie ( 657859)
Ornamental (656641)
Distressed Doily (657496)
Flowers, Lovely 658291)
Supply list:
Paper: 7 Dots Studio-Alpha Stickers 6x12,White rabbit, stickers 6x12 7Dots Studio-Dreamer Collection- Recycled cardstock Brown envelops 23 x 16 cm
Ink: Archival ink-jet black-, Ranger - Vintage Photo-, Peeled Paint-Wild Honey-
Stamp: Stampers Anonymous Tim Holtz Collection
Clossy Accent from ranger
 
For the front of the book using 2 pieces of patterned paper and 1 piece of recycled cardboard and the same for backside. Envelops used as pages inside the book.Cut out the diffrent sorts of shapes Now the pages are ready to decorate.


I hope you like the book and it gave you some inspiration
Thanks for stopping by
See you next Tuesday
Pia
Hej Alle
Så er det tirdag igen og jeg vil vise min hjemmelavede smash bog
Dies jeg har brugt:
Big Shot Machine (655268)
Banners (658289)
Chip Block Alphabet ( 656917)
Frames, Damask ( 657599)
Mini Butterflies Sets ( 657209)
Heart, Stem & Leaves ( 657691)
Tag & Tie ( 657859)
Ornamental (656641)
Distressed Doily (657496)
Flowers, Lovely 658291)
Andre materialer:
Papir: 7 Dots Studio-Alpha Stickers 6x12,White rabbit, stickers 6x12 7Dots Studio-Dreamer Collection-Recycled cardstock Brown envelops 23 x 16 cm
Sværte: Archival ink-jet black-, Ranger - Vintage Photo-, Peeled Paint-Wild Honey-
Stempler: Stampers Anonymous Tim Holtz Collection
Clossy Accent fra ranger.
Til for og bagside har jeg til hver side limet 2 stykker mønstret papir med et genbrugs karton imellem, indeni har jeg anbragt de brune konvolutter.
Jeg håber det har givet lidt inspiration,tak for besøget.
Vi ses næste tirsdag
Pia

Happy Easter...

$
0
0


Hi to you all... Easter is just "around the corner" and I have a Happy Easter card to show you today.
Love the cute Bunny from Sizzix Bigz Die - Easter Elements

 
Supply list: 
655268 Sizzix Big Shot machine
657485Sizzix Bigz Die - Easter Elements
658555Sizzix On the Edge Die - Torn Notebook
657599Sizzix Framelits Die Set 3PK - Frame, Damask
657179 Sizzix Sizzlits Decorative Strip Die - Tattered Banners 

Papers: Pion Design - Fairytale of Spring
Stamps: Stampers Anonymous Tim Holtz Collection
Inks& paint: Distress ink Pad - Brushed Corduroy, Walnut Stain, Memento - Rich Cocoa, 
         Distress Stain - Bundled Sage, Distress Paint - Bundled Sage, Peeled Paint, Picket Fence
Flowers  - Wild Orchid Crafts
Other: Tulle, Seam Binding Ribbon, Tim Holtz idea - ology - Chitchat Seasonal

How to make:
1. Die cut the frame from patterned paper 11x16,5 cm, distress the frame with  
    Distress ink Pad - Brushed Corduroy and Walnut Stain.
2. Sew it together with tulle inside, glue it to the card. 


3. Die cut the cute Bunny from chipboard and paint the bow and bunny with Distress Paint.    
4. Cut out the card 26x18,5 cm and fold the card to 13x18,5 cm. Die cut the card on the edge with  
    Sizzix On the Edge Die - Torn Notebook
5. Distress all the edges with Distress ink Pad - Walnut Stain.
6. Cut out some grass and sew it to the card. Glue the Bunny to the card with 3D foam.
7. Die cut banners and cut it in two and glue smal banner to a stick. 
    Glue "Happy Easter" to the banner

The insideof the card:


Seam Binding Ribbon is colored with Distress Stain - Bundled Sage.
 

Wish you a great week and thanks for stopping by!
Anne Kristine  


Hei alle sammen. Påske er rett rundt hjørnet og jeg har laget et påskekort som jeg vil vise deg i dag.
Elsker den søte lille Haren som er stanset ut med  Sizzix Bigz Die - Easter Elements

Produkter som er brukt:
655268 Sizzix Big Shot machine
657485Sizzix Bigz Die - Easter Elements
658555Sizzix On the Edge Die - Torn Notebook
657599Sizzix Framelits Die Set 3PK - Frame, Damask
657179 Sizzix Sizzlits Decorative Strip Die - Tattered Banners 

Mønsterark: Pion Design - Fairytale of Spring
Stempler: Stampers Anonymous Tim Holtz Collection
Stempelputer og maling: Distress ink Pad - Brushed Corduroy, Walnut Stain, Memento - Rich Cocoa,  Distress Stain - Bundled Sage, Distress Paint - Bundled Sage, Peeled Paint, Picket Fence
Blomster- Wild Orchid Crafts
Annet: Tyll, Seam Binding Rbånd, Tim Holtz idea - ology - Chitchat Seasonal

Beskrivelse:
1. Stans ut rammen som måler 11x16,5 cm i mønstret papir, distress rammen med
    Distress ink Pad - Brushed Corduroy og Walnut Stain.
2. Sy sammen rammen og panelet bak med tyll inni.
3. Stans ut haren med chipboard og mal sløyfen og haren med Distress Paint.    
4. Skjær ut kortet i str. 26x18,5 cm og fold til kortet måler 13x18,5 cm. Stans ut enden av kortet med
    Sizzix On the Edge Die - Torn Notebook
5. Distress alle kantene medDistress ink Pad - Walnut Stain.
6. Klipp ut gress med en saks og sy eller lim dette på kortet. Lim fast haren med 3D puter.
7. Stans ut banner og klipp det av,lim banner på en liten pinne, lim på ordene"Happy Easter" på    banneret.

Ha en flott uke og takk for at du stikker innom her.
Anne Kristine 


Spring Card

$
0
0

Hi all! 

This week I would like to show you a spring card. We are waiting for spring in South Ural in Russia. But spring doesn't want come to us. There are a lot of snow in my city... Let it be spring at least on my card.

Items used:
Big Shot Machine (655268)
Sizzix Movers & Shapers Magnetic Die Set 2PK - Mini Butterflies Set (657209)
Sizzix Framelits Die Set 6PK w/Stamps – Floral (657776)
Sizzix Sizzlits Decorative Strip Die - Vintage Lace (657481)
Sizzix Sizzlits Decorative Strip Die - Tattered Flower Garland (657824)
Sizzix SizzlitsDecorative Strip Die - Vintage Lace Edging (657413)

Paper Glitz Design - Cashmere Dame 
Stickers Glitz Design – Cashmere Dame
Flowers Roses
Ribbon-flower - Pink, Ivory 
Pigment Ink - Pink
Cardstock - White
Crystals - Blue

I used a lot of my favorite dies to create this card. 
I used Vintage Lace Edging to create small swirls. 

Have a nice day


Всем привет!
Сегодня я с весенней открыткой. У нас на Урале весна как-то не спешит к нам. На улице полно снега,  минусовая температура, и вообще неуютно. Поэтому скрапить хочется только что-то весеннее (может весна так быстрее придет?).
Для создания этой открытки я использовала одни из самых своих любимых материалов и ножей.


Материалы:
Big Shot Machine (655268)
Sizzix Movers & Shapers Magnetic Die Set 2PK - Mini Butterflies Set (657209)
Sizzix Framelits Die Set 6PK w/Stamps – Floral (657776)
Sizzix Sizzlits Decorative Strip Die - Vintage Lace (657481)
Sizzix Sizzlits Decorative Strip Die - Tattered Flower Garland (657824)
Sizzix SizzlitsDecorative Strip Die - Vintage Lace Edging (657413)

Бумага Glitz Design - Cashmere Dame 
Наклейки Glitz Design – Cashmere Dame
Цветы - букет роз
Цветочная лента - розовая, бежевая
Пигментный чернила - розовые
Кардсток - белый
Стразы - голубые

Всем хорошего дня,

Desert Island Dies

$
0
0


If you are wondering what the title of this blog is all about it's very simple, 'If you could only choose a dozen dies to take to a desert island what would they be and why?'

I'm not going to list them here as I would spend forever whittling down my choices, it would be a nightmare! The most important quality a die can have for me is versatility, something you can use all year round and never get tired of or run out of inspiration.

This description fits many of my favourite dies and one of my new favourite sets from super talented designer Paula Pascual's inspired Fresh Moments collection fits the bill perfectly. 

The set in question is Wrappers (658613) and to look at it's deceptively simple but it offers a ton of creative mileage. The great thing about Framelits is the ability to crop images and text very accurately, ideal for scrapbookers and cardmakers alike, and because the blade is on the inside edge of the die you never get any unwanted emboss lines creeping in.

To illustrate what I mean about the versatile nature of this set, I have decided to create 3 card toppers combining the Framelits with 3 similar embossing folders from Tim Holtz but using different colour palettes to suite each theme.

The Texture Fades Embossing Folders used are:

  • Christmas Background & Border Set (657480)
  • Valentines Background & Border Set (657490)
  • Halloween Background & Border Set (657465)
I started by measuring the circle dies and Recreating the same size circle on the desktop of my PC, this will act as a template over which to drop my text. As you can see below, I created phrases for Christmas,Halloween and Valentines. The great thing about using a PC to create and print your greetings is the ability to personalize your message making it ideal also for wedding stationary etc.

Once I have the phrases how I want them I simply remove the circle which was acting as a template and print onto heavy weight white card. Next, position the framelits over the phrases and pass through your Big Shot.

 I took a piece of smooth white card and added colour using assorted blue Distress Inks before embossing. Next, I used a darker blue ink pad to pick up the detail in the embossed image. I die cut all the elements to create my wrapper from white and teal card before embossing the long white element with a snowflake border folder and inking to bring out the detail. Finally, I assembled my wrapper and attached it to the embossed background using double sided tape before mating onto a teal background.


 Below are my other efforts, and even though they share many things in common they are all very different. Truth is, I could have kept going all day, Weddings, Christenings Father's and Mother's Day, Easter.....etc, etc, etc!

Enjoy!


Mini book O Masculin

$
0
0


Mini Album " O Masculin"

Here is a mini album I realized specially for one of my classes at Version Scrap Paris next month.
A 100% handmade mini album with a creative, textured and asymmetric structure to insert your nicest portraits in!

Supply list:

Papers: Color Conspiracy
Alphabets: 7Gyspsies
Die-cuts: Color Conspiracy
Wood embellishments: Studio Calico
Stamps: Craft Origine, 7Gypsies, Stampin'up
Inks: Versafine, Distress, Adirondack
Spray inks: Glimmer Mist Tattered Angels
Others: Tags, thread

Used dies:
658608 Sizzix Framelits Die Set 4PK - Frames, Instant
657814  Sizzix Textured Impressions Embossing Folders 2PK - Free Spirit Florals Set

I used my Big Shot and my Polaroid dies to put the emphasis on some of my pictures. I had fun using the 2 largest Pola dies on many occasions!
For a fancy effect, I glued my frames in an oblique manner and I chose to use frames smaller than my pictures! It allows seeing the picture in full, focusing on the face.

Do not hesitate to trace the inner outlines of your frame with a thin-tipped black pen, for more originality.

I also inserted one of this dies on my cover page. It is cut out of a yellow patterned paper and shaded with Vintage Photo Distress ink. A text stamp is printed where the picture should have been.

On the last double page, I had fun embossing a white paper with one of my favourite embossing folders: the hexagon-shaped one! I used blue & yellow Adirondack inks to make the patterns stand out. I added some ink splashes, a few nice patterns and here we are!


I hope you liked what I showed you today!

See you soon,
Have a nice day,

Karine

Mini Album " O Masculin"

Voici un mini album réalisé pour un de mes prochain ateliers à Version Scrap Paris le mois prochain.
Une structure créative, texturée et asymétrique 100% fait-main pour accueillir vos plus beaux portraits !

Matériel utilisé :

Papiers : Color Conspiracy
Alphabets :7Gyspsies
Die-cuts : Color Conspiracy
Embellissements en bois : Studio Calico
Tampons : Craft Origine, 7Gypsies, Stampin'up
Encres : Versafine, Distress, Adirondack
Encres en spray : Glimmer Mist Tattered Angels
Divers : Tags, ficelle

Dies utilisés :
658608 Sizzix Framelits Die Set 4PK - Frames, Instant
657814  Sizzix Textured Impressions Embossing Folders 2PK - Free Spirit Florals Set


J'ai utilisé ici ma Big Shot et mes dies polaroids pour mettre en valeur certaines photos. Je me suis amusée avec les deux plus grandes découpes pola à plusieurs reprises !
J'aime jouer la fantaisie en inclinant mes cadres et en choisissant des cadres plus petits que mes photos ! Cela permet de voir la photo en entier tout en zoomant sur le visage.

Pensez également à repasser au stylo fin noir les contours intérieurs de votre cadre pour un rendu plus original.

J'ai également repris un de ces dies sur la page de couverture. Le cadre est ici découpé dans un imprimé jaune et ombré à l'encre Distress Vintage Photo, un texte imprimé au tampon vient remplacer la photo.

Sur la dernière double page, je me suis amusée avec un papier blanc que j'ai embossé avec une de mes plaques préférée : le motif hexagonal ! J'ai utilisé des Adirondack blet et jaune pour bien faire ressortir les motifs, quelques tâches d'encres, des jolis motifs et le tour est joué !

J'espère que ces quelques visuels vous auront plu !

A très vite et bonne journée

Karine

Shabby Chic cards "light" with Janna Werner.

$
0
0

Hello there, this is Janna with two Shabby Chic cards. Well, actually you could say it is a Shabby Chic "light" style, have a look by yourself :)


Material list:
655268 Sizzix Big Shot machine
657691 Sizzix Bigz Die - Heart, Stem & Leaves
658613 Sizzix Framelits Die Set - Wrappers, Circle
657846 Sizzix Texture Fades Embossing Folders - Bubble & Honey Comb
blank card: Tchibo
patterned paper, cardstock, brads, vellum, twine, rhinestones, doily: Stampin´ Up
tags: Ranger Ink
other: sewing machine, white thread


I love Shabby Chic, but I also love minimalism - it is always a challenge to create a card with scraps and to not add too many elements. If you have a close look you will see, that I used the same supplies on both cards, but I also used scraps. The heart on this card was cut with the Bigz Die - Heart, Stem & Leaves. I used the negative on the other card. Same with the circles that I cut with the Sizzix Framelits Die Set - Wrappers, Circle, you´ll find them on both cards.


I arranged the elements slightly different on both cards and used the honeycomb embossing die on one, the bubble wrap embossing die on the other card, both belong to the Sizzix Texture Fades Embossing Folders - Bubble & Honey Comb set. Instead of embossing the paper, I used vellum, great effect!


You know, I love my sewing machine. It is a super easy way to add the Shabby touch to a project. Furthermore you can adhere the elements without using glue.


Thanks for stopping by today. Have a great and crafty day, everyone!
Janna

*****

Hallo ihr Lieben, hier ist Janna mit zwei Shabby Chic Karten. Eigentlich könnte man diesen Stil eher Shabby Chic "light" nennen, seht selbst :)

Materialliste:
655268 Sizzix Big Shot machine
657691 Sizzix Bigz Die - Heart, Stem & Leaves
658613 Sizzix Framelits Die Set - Wrappers, Circle
657846 Sizzix Texture Fades Embossing Folders - Bubble & Honey Comb
Kartenrohling: Tchibo
Patterned Paper,Cardstock, Brads, Vellum, Twine, Rhinestones, Doily: Stampin´ Up
Tags: Ranger Ink
Anderes: Nähmaschine, weißes Garn

Ich liebe Shabby Chic, aber ebenso Minimalismus - es ist immer eine Herausforderung, eine Karte mit Scraps zu gestalten und nicht zu viele Elemente zu hinzuzufügen. Wenn ihr genau hinseht könnt ihr erkennen, dass ich bei beiden Karten die gleichen Materialien verwendet habe. Ich habe ebenfalls Scraps, also Reste, benutzt. Das Herz habe ich mit der Bigz Die - Heart, Stem & Leaves geschnitten. Das Negativ der Form habe ich anschließend für die andere Karten genutzt. Das Gleiche mit den Kreisen, die ich mit der Sizzix Framelits Die Set - Wrappers, Circle zurechtgeschnitten haben, die sind auf beiden Karten drauf.

Ich habe die Elemente auf beiden Karten etwas anders arrangiert und zwei verschiedene Embossing Dies verwendet: Honeycomb auf der einen, Bubble Wrap auf der anderen. Beide Dies gehören zum Sizzix Texture Fades Embossing Folders - Bubble & Honey Comb Set. Anstatt das Papier zu embossen, habe ich Vellum genommen, das ergibt einen tollen Effekt.

Ihr wisst, dass ich meine Nähmaschine liebe. Es ist super einfach mit ein paar Stichen einen Shabby Touch zu kreieren. Außerdem muss man nicht soviel Kleber verwenden, wenn man auf diese Weise die Papiere verbindet. 
 
Habt einen schönen Tag!
Janna 

Light and shadows block

$
0
0


It's official - it's Spring! well at least according to the date - let's hope the weather will catch up sometime soon!
So this week I've chosen to make the block 'Light and Shadows'
I've looked back at the fabrics I've already used and have tried to keep a balance so that I am using different ones from my collection.

For this block you will need enough dark fabric to cut - 5 x  2 1/2" squares and 2 x 4 1/2" x 2 1/2" rectangles.
From medium fabric you need to be able to cut 2 x 2 1/2" squares and 2 x 4 1/2" x 2 1/2" rectangles.
Finally a small piece of light fabric to cut 1 x 2 1/2" square.
Using die 657607 and the Big Shot machine cut 5 dark, 2 medium and 1 light squares.
With die 657605 cut 2 rectangles from each of the dark and medium fabrics using
the Big Shot machine.

 
Join a dark and a medium square to each end of a dark rectangle


Join 2 dark squares to either end of a dark rectangle
Join 2 dark squares to a medium and a light square
Join the 2 sets of squares together,
 
and then join a medium and a dark rectangle - see photo below

Finally lay all the pieces out, see below
and then join them to complete the block
I'm running workshops at the Sewing for Pleasure show at the NEC this week - today until Sunday - if you're visiting the show do come by and join in or jsut say Hello.
Hope to see you there.
Next week I'll be working with applique flowers - just in time for Easter.
Have a lovely week.
Angela

Dream by Camilla Ekman

$
0
0


It is Sunday again and I am here to share a new layout with you. This layout is in muted spring colours and includes yummy Sizzix dies. The papers are from Vintage Summer Basics collection by Maja Design.


Behind the photo I have used the Weathered Clock die.


And in layers underneath the clock I have used the Distressed Doily die and the Botanical & Rose Garden die.


I used some flowers, bling and alpha stickers to finish the layout.


Have a nice Sunday!


************************************

Det är söndag igen och jag är här för att visa en ny layout jag har gjort. Layouten är i dova vårfärger och inkluderar fina Sizzix dies.Pappren är från Vintage Summer Basics kollektionen från Maja Design.

Bakom fotot har jag använt Weathered Clock die. Och i lager bakom klockan har jag använt Distressed Doily die och Botanical & Rose Garden die. Jag använde till slut några blommor, bling och alfabetssticker för att slutföra layouten.

Ha en härlig söndag!

Easter Baskets from Gerry

$
0
0
Hello Sizzix friends!
Gerry's here today with some Easter inspiration.
I have two Easter Baskets to share with you today which 
I made for my kids. These baskets will be part of their decoration
during their Easter breakfast at school.
655268 Sizzix Big Shot Machine
657724 Sizzix ScoreBoards Die - Candy Cup
657707 Sizzix Sizzlits Dec. Strip Die - Flower Burst w/Ribbon
657747 Sizzix Sizzlits Dec. Strip Die - Regal Edging
658506 Sizzix Sizzlits L - Vintage Doily

I used peel cardboard (1.5mm) to die cut the base for the basket. 
Then I chose pattern papers to "dress it up".
I sanded the edges of each side of the basket.
To make the Flower Burst w/Ribbon more stable I die cut it three times -
twice using white cardstock and once using pattern paper.
Then I adhered them to one another. 

I added Pearl Drops and a paper flower on top.
I also inked a little bit the edges.
The Regal Edging strip die was cut as normal.
I removed one of the die-cut pattern as I needed 4 for one basket.
Fold in 4 so it will look quadratic and adhere only in the middle
of each side of the basket.
Add a twine and a flower to the front side.

Die cut the  Vintage Doily and adhere underneath each basket.
OTHER PRODUCTS I USED:
Webster's Pages - "Modern Romance" Collection
Webster's Pages - "New Beginnings" Collection
Webster's Pages - "Best Friends" Collection
Prima Marketing Flowers - Velvet Rainbow Brights

 I hope you enjoyed my projects today!
Wishing you a Happy Sunday!

thinking ahead

$
0
0


I've been thinking ahead to Summer. With the crazy snowy weather as it is here in the UK (as we come to the end of March!) I need to cheer myself up a little and at least dream about the warmer weather we are bound to get any time soon (I live in hope!)

The Summer means more time spent outside, and less time spent at the sewing machine, so I need portable projects that can be hand sewn and my default hand sewn projects are usually hexagon english paper pieced.

My 1" and 1.25" hexagon dies are getting a work out at the minute, the 1" is turning junk mail, used envelopes and (dare I admit it?) bills into hexagon papers and the 1.25" die is making light work of cutting my fabrics into perfect hexies ready for basting. I love using the dies for cutting paper. It should be incredibly obvious to use them this way, as Sizzix is so big on scrap booking and paper crafts, but when I realised I could actually cut papers from my hexagon dies it was like winning the lottery. Simple things, eh?!


Happily hexing


It's so satisfying getting these prepped and ready for sewing together. My long term vision is a traditional grandmother's flower garden quilt, something big enough to cover a bed. I know it's going to take me a long, long time but having this kind of project where I know there's no deadline helps keep me sane amongst a stack of projects that are more urgent.

Happily hexing

In a couple of weeks I'll be at  the Spring Quilt Festival in Exeter demoing the Big Shot on the Cotton Patch stand and, as I'll be away from home for a few nights, my hexies will be there keeping me company on an evening. I'm hoping to get a fair few 'flowers' stitched up. I'll keep you posted on my progress! This is where I'm at so far. It's a start, albeit a small one!

Happily hexing

Have a wonderful week - keep warm and happy stitching!

Katy


Puppy bookmark for children

$
0
0


In the age of computers and screens enhancing reading in children is very important and fun bookmarks can help us in this purpose.
Today I'm showing you how to make a puppy bookmark that every child will love.


Supply list:


Die cut 2 shapes of the dog with craft cardstock and adhere their ears together using a strong adhesive like Glossy Accents. Then die cut all the little parts with paper scraps an use them to embellish the puppy. I have put a mini brad in the heart and adhered it with a foam square to create some dimension. 


For sure they will love their new Puppy bookmark and will want to read more!
Happy Monday!

----------------
En la era de las pantallas y los ordenadores potenciar la lectura en los niños es muy importante y un marcapáginas divertido nos puede ayudar en esta misión. Hoy os voy a enseñar cómo hacer un divertido punto de lectura en forma de perrito que le encantará a cualquier niño.

Materiales:

Troquela dos formas de perrito con la Big Shot y pégalos entre ellos solo por la parte de las orejas. Después troquela todas las partes pequeñas utilizando restos de papeles y utilízalos para adornar el perrito. Yo he puesto un mini brad en el corazón y lo he pegado utilizando foam adhesivo para crear más dimensión.

Ten por seguro que les va a encantar su nuevo marcapáginas y que querrán leer más :)

¡Feliz lunes! 

Picture Frame

$
0
0

Hi Sizzix fan...hope you all had a wonderful week.
Today I have a Picture Frame to show you.


Supply list :
655268 Sizzix Big Shot machine 
658570 Sizzix Movers & Shapers Die - Cameo Frame
658567Sizzix Movers & Shapers Magnetic Die Set 3PK - Sized Ovals
657824 Sizzix Sizzlits Decorative Strip Die - Tattered Flower Garland
657467Sizzix Sizzlits Decorative Strip Die - Festive Greenery
657187 Sizzix Bigz Die - Small Easel

Papers: Pion Design - Studio of Memories, chipboard
Inks: Distress ink Pad - Walnut Stain
Other: Tulle, feather, brads, 3D foam 


How to do: 
1. Cut out chipboard 12,5x15,5 cm, patterned paper 12x15 cm.
2. Die cut the frame with 658570 Sizzix Movers & Shapers Die - Cameo Frame  ,
 658567Sizzix Movers & Shapers Magnetic Die Set 3PK - Sized Ovals
3. Distress the edges gently with Distress ink Pad - Walnut Stain.
4. Glue patterned paper to chipboard. Glue the picture on the front. 
5. Glue the frame over the picture with 3D foam. 
6. Die cut some flowers and swirls and glue it to the frame with some tulle and white feather.

7. Die cut Small Easel with chipboard and glue it to the frame. 


    Thanks for stopping by.
Happy Easter!
Anne Kristine 


Hei alle Sizzix fans... håper du har hatt en fin uke.
I dag har jeg laget en foto ramme.

Produkter som er brukt:
655268 Sizzix Big Shot machine 
658570 Sizzix Movers & Shapers Die - Cameo Frame
658567Sizzix Movers & Shapers Magnetic Die Set 3PK - Sized Ovals
657824 Sizzix Sizzlits Decorative Strip Die - Tattered Flower Garland
657467Sizzix Sizzlits Decorative Strip Die - Festive Greenery
657187 Sizzix Bigz Die - Small Easel

Papir: Pion Design - Studio of Memories, chipboard
Stempelputer: Distress ink Pad - Walnut Stain
Annet: Tyll, fjær, brads, 3D foam 

Beskrivelse:
1. Skjær ut chipboard i str. 12,5x15,5 cm, mønster papir i str. 12x15 cm.
2. Stans ut rammen med 658570 Sizzix Movers & Shapers Die - Cameo Frame  ,
 658567Sizzix Movers & Shapers Magnetic Die Set 3PK - Sized Ovals
3. Distress alle kantene forsiktig med Distress ink Pad - Walnut Stain.
4. Lim mønsterarket til chipboarden og lim bildet på fremsiden
5. Lim rammen utenpå bildet med 3D puter.
6. Stans ut blomster og swirls og lim det fast til rammen med tyll og fjær. 
7. Stans ut Small Easel med chipboard og lim det fast på baksiden av rammen.

Takk for at du stikker innom og ønsker deg en riktig GOD PÅSKE!
Anne Kristine 

Gift bag

$
0
0

Today I will show you a gift bag. It's always nice to have a gift bag ready if you need to wrap a gift
658289 Banners
657177 Mini paper Rosettes
657188 Tiny, Tabs & tags
657496 Distressed Doily
Supply list:
Paper: Kaisercraft-75 Collection-Penny-,Off White cardstock
Ink: Distress ink-Vintage photo-, Stormy Sky-
Ribbon: Cheesecloth ( gauze like fabric made from cotton) colored it with
distress ink-Stormy Sky-
Stamp: Whiff of Joy
 I've used a brown paper bag size 12x14 cm ,used a different sorts of dies and paper from
KaiserCraft.


Thanks for stopping by, see you next Tuesday
Have a great day
Pia
Dies jeg har brugt:
655268 Big Shot Machine
658289 Banners
657177 Mini paper Rosettes
657188 Tiny, Tabs & tags
657496 Distressed Doily
Andre materialer:
Papir: Kaisercraft-75 Collection-Penny-Off white cardstock
Sværte: Distress ink-Vintage photo-, Stormy Sky-
Bånd: Cheesecloth ( gauze like fabric made from cotton) colored it with
distress ink-Stormy Sky-
Stempel: Whiff of Joy
Jeg har brugt en brun papirspose størrelse 12x14 cm ,brugt forskellige dies og papir fra Kaisercraft Tak fordi du tog turen forbi, håber vi ses næste tirsdag.Ha' en dejlig dag
Pia

Smash book

$
0
0


Hi al!

Today I would like to show you two-page layouts to my smash book. Last year we had trip to Antalya. And these pages are about the Beach and the Sea. In my smash book I like to create a lot of layers. I used different papers, decorative tapes, journaling cards, stickers and etc to create a lot of layers. And dies are my big helpers.

This is my first two-page layout. It’s about the Beach. I created these pages some time ago.

Items used:

I used hearts die to create my background more interesting. And I used the resulting holes to write my journaling. Also I used Make It Crafty digi stamp to create this beach umbrella. I colored it with Prismacolor pencils, cut out and glue onto layout. 

I used Card Fronts die to create the opening element. I like to use different opening elements to fit on the page many photos.


This is my second two-page layout. It’s about the Sea. And these pages are new.

Items used:


I used Flourish die – because they are look like waves. And I used more different dies to make my pages more varied.


Have a nice day

Daria.

Всем привет!

Сегодня я хочу показать вам два разворота в мой смешбук. Прошлым летом мы ездили в Анталию и об этой поездке я создаю свой смеш. Два разворота, которые я хочу сегодня показать рассказывают о море и пляже.
Я люблю, чтобы в моем смеше было много разных слоев, открывающихся элементов и т.д. Для этого я использую различные бумажки, декоративный скотч, наклейки, и конечно вырубки, сделанные с помощью Big Shot.

Первый разворот о пляже. Я сделала его некоторое время назад.

Я использовала нож с сердечками, и использовала не сами сердца, а то, что осталось после их вырезания. Мне кажется получилось интересно, плюс можно в отверстиях написать журналинг. Так же я использовала нож для создания открыток с фигурными краями. С его помощью я сделала открывающийся элемент для размещения дополнительных фотографий и журналинга.

Второй разворот о море. И это новый разворот.
Я использовала нож с завитками, т.к. завитки ассоциируются у меня с волнами, и другие ножи (список ниже), чтобы сделать странички более разнообразными.

Материалы:


Всем хорошего дня!

Simply Easter!

$
0
0


Notice how I resisted using any terrible Easter puns in the title. Nothing about our egg-citing new die ranges or how egg-static I am to be working with the latest Stephanie Barnard collection!

I am, however enjoying working with the aforementioned range, especially the flip-its card dies, the Easter themed stamp/Framelits sets and the Easter egg Framelits dies, check out the website and run a search under the name Stephanie Barnard...Clever lady!

Check out some of the eggs-amples below....DOH!


Happy Birthday !

$
0
0


Hello!


After a long series of mini album, I am back with a layout starring my friend Celine, who I’m sure all of you know!

Here are the dies I used:

655268 Big Shot
659068 Sizzix Thinlits die-Doily
658556 Sizzix Bigz die-fleur de Lis & Eiffel Tower

Supply list:

Papers: I Lowe Scrap, American Crafts
Alphabets: American Crafts
Embellishments: Pink Paisley, American Crafts
Stamps: Florilèges Design, Paper Artsy, 7Gypsies
Inks: Archival Viridian, Madden Rose
Distress Stain
Adirondack Clover ink


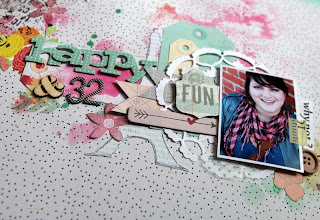
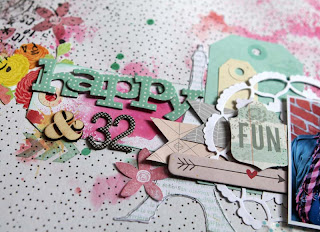
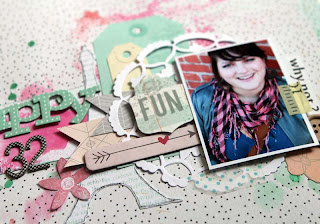
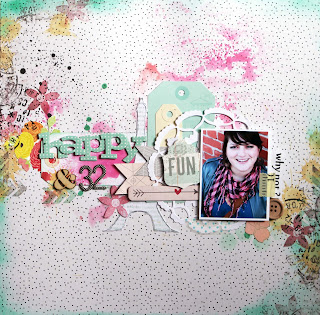
I started by cutting a pretty doily out of white paper. This die is so neat and feminine, I love it!

I didn’t want to hide the die so I glued a very small photo astride it.


I also cut an Eiffel Tower shape out of white paper then I stamped text on it with a Florilèges design stamp. I outlined its edges so that it stands out more.

This layout "Happy 32" is simply built around these two dies, with soft pastel colours.

The background is stamped with various patterns and ink colours. I shaded the edges of the page with green Adirondack ink.

An easy layout with a linear design for a dear friend! I hope you liked it!

See you next Thursday!

Karine


Bonjour !


Après cette longue série de mini retour aux pages avec cette fois une création sur mon amie Céline que vous connaissez toutes !

Voici les dies utilisés :

655268 Big Shot
659068 Sizzix Thinlits die-Doily
658556 Sizzix Bigz die-fleur de Lis & Eiffel Tower


Matériel :

Papiers : I Lowe Scrap, American Crafts
Alphabets : American Crafts
Embellissements : Pink Paislee, American Crafts
Tampons : Florilèges Design, Paper Artsy, 7Gypsies
Encres : Archival Viridian, Madden Rose
Distress Stain
Encre Adirondack Clover


Je me suis tout d'abord amusée à découper un joli napperon dans du papier blanc, une découpe vraiment fine et si féminine j'en raffole !

Afin de bien voir ma découpe j'ai utilisé une mini photo que j'ai collé à cheval.


Un die Tour Eiffel est également découpé en blanc, il est ensuite tamponné à l'aide d'un tampon textes Florilèges. J'ai simplement souligné l'extérieur afin qu'elle ressorte le plus possible.


Ma page "Happy 32" est simplement construite autour de mes deux découpes en gardant des couleurs très douces et pastels.


Le fond est ensuite tamponné avec plusieurs motifs et encres, les bords de pages sont quant à eux ombrés à l'encre Adirondack verte.


Une page toute simple construite en ligne pour une amie très chère ! J'espère qu'elle vous aura plu !


A jeudi prochain !


Karine

Viewing all 2033 articles
Browse latest View live